Migration from Proxmox to VMmanager
Hosters, already grown from a home server with 1-2 virtual servers to several high-performance servers in DC, think about automating routine actions and administering virtual servers.
The most popular free virtualization manager is Proxmox.
With its advantages (it is free, open source and community), it also has disadvantages, which more than overlap these advantages:


It is quite difficult to switch from the usual software to something new, besides studying a new software product, it is necessary to migrate all the data. This is a very difficult step and you should approach it as thoroughly as possible. Not rarely, the choice of free or less expensive products results in additional expenses for adding the necessary functionality, integration with other software, localization, and the like.
')
Using the ISPsystem software products, the hoster can receive full automation of the entire process of providing services to its customers.
In this article I will tell you how to move virtual machines from Proxmox under the control of VMmanager. VMmanager does not support importing or migrating containers and virtual servers from other virtualization managers. But it is not difficult to do this using the VMmanager API.
Consider the option of migrating containers from Proxmox to VMmanager-OVZ.
Migrating containers from Proxmox to VMmanager-OVZ.
Migration is simplified by the fact that it can be done on a single server.
VMmanager-OVZ is installed without any problems on the same server where Proxmox works without any interference with the operation of containers.
To do this, download and run the file installer -
http://download.ispsystem.com/install.5.sh
then answer a few questions for choosing the desired software product and its version.
The official repository will also automatically connect and the installation of the control panel and related software will begin.
Please note that the openvz settings from proxmox are used without any problems in VMmanager-OVZ.
The only note is: after installing VMmanager-OVZ, you need to manually download an example configuration file for openvz. It is required to create a container, and is missing from the proxmox distribution, so you will see the following error in the logs when you try to create a container:
2014-12-03T10: 39: 28 + 0800 vzctl: CT 100: Sample config /etc/pve/openvz/ve-basic.conf-sample not found: No such file or directory
2014-12-03T10: 39: 28 + 0800 vzctl: CT 100: Creation of container private area failed
Download the sample configuration file for openvz from the official repository and put it in the directory where it should be:
# wget --no-check-certificate github.com/blueboxgroup/vzctl/blob/master/etc/conf/ve-basic.conf-sample -O /etc/pve/openvz/ve-basic.conf-sample
I want to draw attention to one moment during the transfer. There is a possibility that the identification numbers of containers may not match.
In both cases, the numbering starts from 100. Although in Proxmox you can select an arbitrary ID for the container being created, in VMmanager this counter starts from 100 and is not reset, after removing all containers, the numbering continues from the number that is subsequent to the deleted ones. There is one solution to this account: you need to delete all the previously created virtual servers and abort the vmmgr process, then the numbering will start first.
Setting parameters in VMmanager-OVZ

Create a container template with default settings.
Proxmox lacks such concepts as a range of IP addresses and templates for creating containers. When creating each new container, you must manually specify both the IP address and the resources available for the new container.
In VMmanager, these actions are standardized and made as convenient as possible. It is required to create several tariff templates and a range of IP addresses once. When a container is created, an IP address is automatically assigned, and resources are specified by selecting the appropriate template.
Container creation in Proxmox

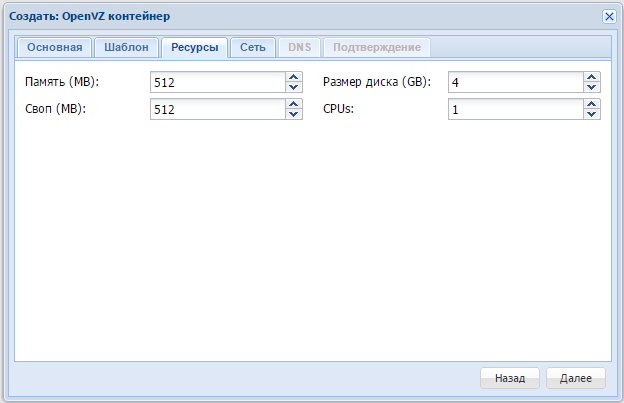
Creating a container in VMmanager
Transferring containers is complicated by the fact that both virtual server managers use different methods for storing information about the resources of the managed containers.
Proxmox uses the openvz configuration files, VMmanager - stores everything in the mysql database, duplicating the settings in the files for openvz. Therefore, the scheme is complicated by the need to create containers from VMmanager-OVZ and then replace this container with a container from Proxmox.
After the settings are made, we have working copies of Proxmox and VMmanager-OVZ on the server.
The rest of the migration process leads to a few simple steps:
To simplify this process, use the sample script that I attach below.
I will make a few comments about the script:
Now let's move on to the migration option from Proxmox with virtual servers to VMmanager-KVM.
Virtual server migrations from Proxmox to VMmanager-KVM.
Unfortunately, not everything here will go as smoothly as in the previous case.
Installing VMmanager-KVM as the primary node on the same server where Proxmox is working will fail due to problems with package dependency. Therefore, consider the migration using the second server.
We configure VMmanager-KVM, which is not very different from what I described above for VMmanager-OVZ
And we act according to the following algorithm:
The proxmox virtual machines settings are stored in the /etc/pve/qemu-server/.conf files.
Proxmox virtual machine image files are stored in the / var / lib / vz / images / directories. In order not to enter authorization data each time to connect servers using ssh-keygen, we will create a pair key and send the public key to the Proxmox server.
cat .ssh / id_rsa.pub | ssh root @ proxmox "cat >> /root/.ssh/authorized_keys"
And then everything can be done with the help of this script.
Leave a couple of comments on the script:
When describing the possibilities of transferring containers and virtual machines, the proxmox test setup was used with default values and the situation with the combat servers may differ. If you have experience with real-life Proxmox applications and you are ready to share it, it will be very nice to see your comments. Successful migration and maximum automation in the provision of hosting services!
The most popular free virtualization manager is Proxmox.
With its advantages (it is free, open source and community), it also has disadvantages, which more than overlap these advantages:
- Paid updates
- Paid technical support
- Lack of official Russian documentation
- Non-professional localization
- Relative complexity of installation
- All additional features and integration - paid
- Many components are created by third-party developers.
It is quite difficult to switch from the usual software to something new, besides studying a new software product, it is necessary to migrate all the data. This is a very difficult step and you should approach it as thoroughly as possible. Not rarely, the choice of free or less expensive products results in additional expenses for adding the necessary functionality, integration with other software, localization, and the like.
')
Using the ISPsystem software products, the hoster can receive full automation of the entire process of providing services to its customers.
In this article I will tell you how to move virtual machines from Proxmox under the control of VMmanager. VMmanager does not support importing or migrating containers and virtual servers from other virtualization managers. But it is not difficult to do this using the VMmanager API.
Consider the option of migrating containers from Proxmox to VMmanager-OVZ.
Migrating containers from Proxmox to VMmanager-OVZ.
Migration is simplified by the fact that it can be done on a single server.
VMmanager-OVZ is installed without any problems on the same server where Proxmox works without any interference with the operation of containers.
To do this, download and run the file installer -
http://download.ispsystem.com/install.5.sh
then answer a few questions for choosing the desired software product and its version.
The official repository will also automatically connect and the installation of the control panel and related software will begin.
Please note that the openvz settings from proxmox are used without any problems in VMmanager-OVZ.
The only note is: after installing VMmanager-OVZ, you need to manually download an example configuration file for openvz. It is required to create a container, and is missing from the proxmox distribution, so you will see the following error in the logs when you try to create a container:
2014-12-03T10: 39: 28 + 0800 vzctl: CT 100: Sample config /etc/pve/openvz/ve-basic.conf-sample not found: No such file or directory
2014-12-03T10: 39: 28 + 0800 vzctl: CT 100: Creation of container private area failed
Download the sample configuration file for openvz from the official repository and put it in the directory where it should be:
# wget --no-check-certificate github.com/blueboxgroup/vzctl/blob/master/etc/conf/ve-basic.conf-sample -O /etc/pve/openvz/ve-basic.conf-sample
I want to draw attention to one moment during the transfer. There is a possibility that the identification numbers of containers may not match.
In both cases, the numbering starts from 100. Although in Proxmox you can select an arbitrary ID for the container being created, in VMmanager this counter starts from 100 and is not reset, after removing all containers, the numbering continues from the number that is subsequent to the deleted ones. There is one solution to this account: you need to delete all the previously created virtual servers and abort the vmmgr process, then the numbering will start first.
Setting parameters in VMmanager-OVZ
- Create an admin user to manage containers
- Create a user - owner of containers
- Create an address space from which IP addresses will be issued for containers to be created. Settings -> IP Address Base
- In the example, I use the subnet 192.168.0.0/24, since the containers on the Proxmox use the same address range.
- In “Cluster Settings” => “Container Templates” create a template, the parameters from which will be used by default for all created containers.
Create a container template with default settings.
Proxmox lacks such concepts as a range of IP addresses and templates for creating containers. When creating each new container, you must manually specify both the IP address and the resources available for the new container.
In VMmanager, these actions are standardized and made as convenient as possible. It is required to create several tariff templates and a range of IP addresses once. When a container is created, an IP address is automatically assigned, and resources are specified by selecting the appropriate template.
Container creation in Proxmox
Creating a container in VMmanager
Transferring containers is complicated by the fact that both virtual server managers use different methods for storing information about the resources of the managed containers.
Proxmox uses the openvz configuration files, VMmanager - stores everything in the mysql database, duplicating the settings in the files for openvz. Therefore, the scheme is complicated by the need to create containers from VMmanager-OVZ and then replace this container with a container from Proxmox.
After the settings are made, we have working copies of Proxmox and VMmanager-OVZ on the server.
The rest of the migration process leads to a few simple steps:
- Stopping a container created in Proxmox
- Create a container dump.
- Rename container configuration file
- Deleting or renaming container files
- Creating a container in VMmanager-OVZ with the same parameters as the portable one
- Restore dump to new container
- Launch new container
To simplify this process, use the sample script that I attach below.
#!/bin/bash # for i in `vzlist -Ha|awk '{print $1}'` do PASS=`pwgen 10 1` vzctl stop $i vzdump $i -dumpdir /vz-dump/ mv /var/lib/vz/private/$i /var/lib/vz/private/$i.proxmox mv /var/lib/vz/root/$i /var/lib/vz/root/$i.proxmox mv /etc/vz/conf/$i.conf /etc/vz/conf/$i.conf.proxmox /usr/local/mgr/sbin/mgrctl -m vemgr vm.edit id=$i name=`grep HOSTNAME /etc/vz/conf/$i.conf.proxmox|awk -F'"' '{print $2}'|awk -F. '{print $1}'` domain=`grep HOSTNAME /etc/vz/conf/$i.conf.proxmox|awk -F'"' '{print $2}'`. iptype=public ip=`grep IP_ADDRESS /etc/vz/conf/$i.conf.proxmox|awk -F'"' '{print $2}'` user=user1 mem=`grep PHYSPAGES /etc/vz/conf/$i.conf.proxmox|awk -F'"' '{print $2}' |awk -F: '{print $2}'|sed -e 's/.$//'` hdd=`grep PHYSPAGES /etc/vz/conf/$i.conf.proxmox|awk -F'"' '{print $2}' |awk -F: '{print $2}'|sed -e 's/.$//'` cpu=`grep CPUS /etc/vz/conf/$i.conf.proxmox|awk -F'"' '{print $2}'` cpufreq=`grep CPUUNITS /etc/vz/conf/$i.conf.proxmox|awk -F'"' '{print $2}'` ostemplate=debian-6.0-i386-minimal password=$PASS confirm=$PASS preset=1 sok=ok; vzctl stop $i vzrestore /vz-dump/vzdump-openvz-$i-*.tar $i -force vzctl start $i done # I will make a few comments about the script:
- The script does not take into account the status of the container and the activation time. After all, this is an example considered in a spherical vacuum.
- The pattern is explicitly specified - debian-6.0-i386-minimal. Proxmox and VMmanager-OVZ container templates may not match. But to create a container, you should use the template as a stub, then everything will overwrite the data from the dump that was made from the old container.
- The minimum number of parameters required to create a container in VMmanager-OVZ is taken from the container configuration file created in Proxmox. If desired, the configuration file can be returned back if it used parameters other than those created by default.
- All unspecified parameters are taken from the first container template created in VMmanager-OVZ => Cluster Settings => Container Templates
- After checking the correctness of the transferred containers, backup copies of files and dumps can be deleted.
Now let's move on to the migration option from Proxmox with virtual servers to VMmanager-KVM.
Virtual server migrations from Proxmox to VMmanager-KVM.
Unfortunately, not everything here will go as smoothly as in the previous case.
Installing VMmanager-KVM as the primary node on the same server where Proxmox is working will fail due to problems with package dependency. Therefore, consider the migration using the second server.
We configure VMmanager-KVM, which is not very different from what I described above for VMmanager-OVZ
And we act according to the following algorithm:
- copy the configuration file of the virtual machine from the Proxmox server
- create an identical virtual machine on vmmgr
- stop
- we stop on the Proxmox server
- make a copy of the vm image file
- transfer the image from the Proxmox server to the server with VMmanager-KVM and replace the old image
- we start vm in VMmanager-KVM
The proxmox virtual machines settings are stored in the /etc/pve/qemu-server/.conf files.
Proxmox virtual machine image files are stored in the / var / lib / vz / images / directories. In order not to enter authorization data each time to connect servers using ssh-keygen, we will create a pair key and send the public key to the Proxmox server.
cat .ssh / id_rsa.pub | ssh root @ proxmox "cat >> /root/.ssh/authorized_keys"
And then everything can be done with the help of this script.
#!/bin/bash # scp root@proxmox:/etc/pve/qemu-server/*.conf /root for i in `ls *.conf|awk -F. '{print $1}'` do PASS=`pwgen 10 1` /usr/local/mgr5/sbin/mgrctl -m vmmgr vm.edit id=$i mem=`grep memory /root/$i.conf|awk '{print $2}'` vcpu=`grep cores /root/$i.conf|awk '{print $2}'` cputune=1000 blkiotune=500 vsize=`grep size /root/$i.conf|awk -F= '{print $2}'| sed -e 's/.$//g'` name=`grep name /root/$i.conf|awk '{print $2}'` domain=`grep name /root/$i.conf|awk '{print $2}'`.`hostname` ip= iptype=public preset=1 password=$PASS confirm=$PASS installtype=installtemplate vmi=CentOS-6-amd64 sok=ok virsh shutdown `grep name /root/$i.conf|awk '{print $2}'` ssh root@proxmox “qm stop $i” ssh root@proxmox “cp /var/lib/vz/images/$i//vm-$i-disk-1.qcow2 /var/lib/vz/images/$i//vm-$i-disk-1.qcow2.bak” mv /vm/`grep name /root/$i.conf|awk '{print $2}'` /vm/`grep name /root/$i.conf|awk '{print $2}'`.old echo rsync -avz --partial root@proxmox:/var/lib/vz/images/100/vm-100-disk-1.qcow2 /vm/`grep name /root/$i.conf|awk '{print $2}'` virsh start `grep name /root/$i.conf|awk '{print $2}'` done # Leave a couple of comments on the script:
- The server with Proxmox is listed as “proxmox”.
- I decided to use copies of the virtual machine configuration files from Proxmox on the server with VMmanager, it seemed to me the easiest.
- When creating each virtual machine using the API, a random password is generated.
- In the 'vmi =' parameter, the template identifier is set and available for operation. The identifiers of all installed templates can be viewed by API request via the command line:
/ usr / local / mgr5 / sbin / mgrctl -m vmmgr osmgr | grep 'installed = ok' | awk '{print $ 1}' | sed-e's / id = // ' - Just as in the previous script, the server deployment time on VMmanager is not taken into account.
- Image files are transferred without any preprocessing. Both Proxmox and VMmanager understand the qcow2 format.
- The original image file of the created VM on VMmanager is renamed and located next to it)
When describing the possibilities of transferring containers and virtual machines, the proxmox test setup was used with default values and the situation with the combat servers may differ. If you have experience with real-life Proxmox applications and you are ready to share it, it will be very nice to see your comments. Successful migration and maximum automation in the provision of hosting services!
Source: https://habr.com/ru/post/245965/
All Articles