We test Mighty Editor and Phaser. HTML5 game per hour
HTML5 games grow and develop, as well as tools for creating them. For example, phaser.js has become quite a popular engine, suitable for the production of medium-sized games. But each time, applying phaser.js, the developers of html5 games have to write repeating code for standard operations. The visual editor allows you to generate sample code automatically.
In this article I will describe the main features of MightyEditor and the game development process. The tutorial will show you how to make an HTML5 mini-game within an hour.
Requirements
The latest browser Google Chrome. You can try other browsers, but we have not tested them yet.
')
What is MightyEditor?
MightyEditor is an online editor for creating and hosting an HTML5 game. It is open source and compatible with the popular Phaser game engine, but you can also use it with other engines. The main features of the editor are: asset management, map editing, code editor, and data export. Learn more about MightyEditor http://mightyfingers.com/editor-features/ .
How does MightyEditor work?
The process of using the editor works as follows:
- Project creation
- Texture loading
- Creating a map
- Grouping textures in layers for example background, blocks ...
- Adding collisions and functionality in the code editor
- Run the game and export data
Why do we need editors HTML5 games?
An online tool with the function of map and code editor allows you to make a prototype of the game faster. To work, just open the browser tab, there are no unnecessary problems with installing and configuring various software solutions, which significantly saves valuable time.
It also simplifies cooperation with the designer, another developer or client, for this again, just send a link to the project. You can work in a team: assign an illustrator who will add graphics, while the game designer creates different levels in the map editor, and the developer adds functionality with JavaScript code.
A game made in MightyEditor is independent of it. All textures and code can be exported at any time, also thanks to the open source code, data can be transferred to a local computer with a local version of the editor. Source code can be found on GitHub https://github.com/TheMightyFingers/mightyeditor .
The idea of a mini-game
In this tutorial we will create a simple mini-game called Digger. The game is about a small miner who digs the ground, searches for gold and sells it in a shop. The arrow keys will be used for navigation, and idle physics and collision will be added to the miner object.
Project creation
Open the link http://mightyeditor.mightyfingers.com . Enter project name - Digger .

In the lower right pane, enter the dimensions of the game: worldWidth , worldHeight 640 x 640. For simplicity, we will set the view-port to the same size as 640 x 640.

Texture loading
In the next part of the tutorial we will use textures that can be downloaded here . In the top right corner of the panel in the list of options, select the upload file and add files. Alternatively, you can drag and drop files onto the panel and textures will be loaded automatically.

Creating a map
Click the stamp icon in the left pane, then select background_sky.png from the texture panel, then click on the map, thus creating the background (hold down the Ctrl key to snap to the grid). To move the background, select the arrow in the left toolbar. For a more accurate position, you can change the X, Y position in the settings panel.
Then repeat this step with the following textures: background_city.png, background_hill1.png, background_hill2.png, background_grass.png . In the end, everything should look like the following image.

Group creation
Now create a group for the created background objects. In the right panel Objects in the selection list, click Add Group . Rename the group to bg and drag objects to this group. To select multiple objects, hold down the Shift key.

Adding other textures
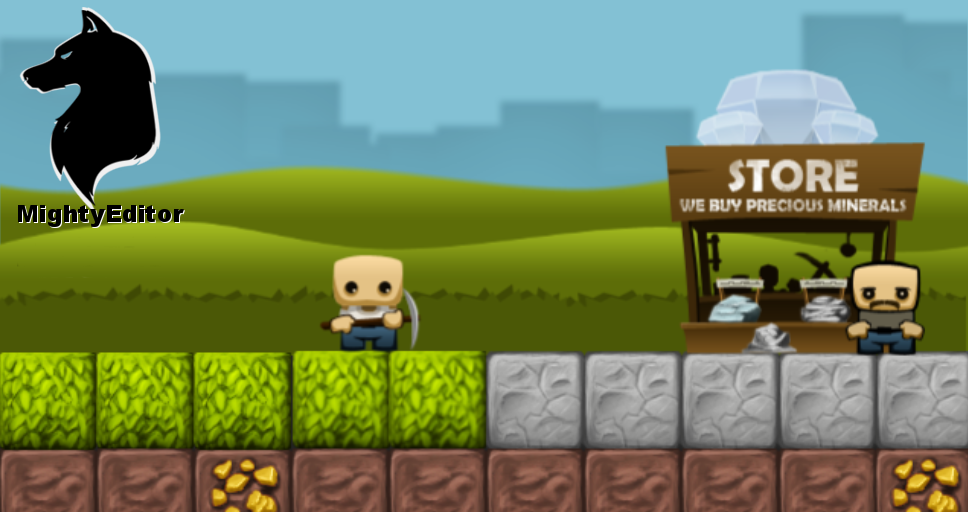
Create 5 rows of blocks under the background group. There are four different types of blocks: stone, earth, grass, gold (rock, ground, grass, gold). At the same time you need to collect gold blocks, but you can not break the stones. Objects must be added to the blocks group.

Finally, we need to add hero and shop objects. As for the texture of the hero - the image contains several frames. We need to define the frame width and height in the lower right pane of the Settings . Size 90 x 90. Individual frames can be viewed on the bottom assetPreview panel. You also need to edit anchorX and anchorY . Set them to 0.5

In addition, you can set your own variables for the object. Open the userData tab in the same panel and add the gold parameter with the value 0 .

Select the text icon in the panel on the left and write "0" in the upper right corner of the map, thus points will be displayed. Rename the text object in the Objects panel to points .

Now we are ready to add objects and complete editing the map. Objects of the hero and the store are added as follows

We finished the graphic part of the project. Next, we will begin programming and adding functionality: hero control, physics, collisions, etc.
Code editor
Let's go to the code editor on the top left side.

On the left side is a list with game files. Basically, you will need to program in the state / play.js file . You can find key shortcuts for the editor here .
Game states
For programming, we are going to use the popular game engine Phaser. By default, the editor provides a template with four states boot, load, menu, play . For each state there are some predefined methods: preload, create, update, render . For this project, we need to know two methods: the create method is called immediately after all the textures have loaded and the update method is called 60 times per second in the game loop. Find out more in the documentation .
By default, the template calls the menu state. For simplicity, we will not create a menu this time and start with the gameplay. To do this, call the play state in the menu.js file, in the create method.
window.Digger.state.menu = { create: function() { this.game.state.start("play"); } } Open the game
Click on the Open game button, a black screen will appear on the top panel. To display the objects we just created, we need to initialize them in play.js in the create method.
create: function() { this.bg = mt.create("bg"); this.blocks = mt.create("blocks"); this.shop = mt.create("shop"); this.character = mt.create("character"); this.points = mt.create("points"); } Initialization is done using the mt.create function. “Bg” and “blocks” represent the names of the groups in the object bar on the right side. "Shop" and "character" represent the names of the sprites, in the same panel and, finally, the "points" represent the text. As you can see, all objects (groups, sprites and text) are initialized by the same method.
Open the game now and the objects will be visible on the screen.
Adding physics
By default, physics in Phaser is disabled for better performance. We will enable the easiest and fastest physics of all available - Arcade physics. Open the physics tab in the bottom right corner. Change the enable parameter to 1 and the other parameters will appear below. Set the hero's body size to width : 60 and height 60. Turn on gravity and set y to 1000. And at the end, set the collideWorldBounds parameter to 1.

When you open the game you will see a hero falling at the bottom of the screen.
Control hero
Initialize the control keys in the create method.
this.cursors = this.game.input.keyboard.createCursorKeys(); This function gives us an object with four arrow keys: up, down, left and right. In the update method, we will track when the left / right / up key is pressed and set the speed for the hero or stop it if the keys are not active.
update: function() { if (this.cursors.left.isDown) { this.character.body.velocity.x = -200; } else if (this.cursors.right.isDown) { this.character.body.velocity.x = 200; } else { this.character.body.velocity.x = 0; } if (this.cursors.up.isDown) { this.character.body.velocity.y = -300; } } Open the game and press the arrow keys to control the hero.
Collisions between heroes and blocks
Turn on physics for the blocks and set them fixed in the Map editor in the bottom right panel of physics.

Add collisions in the update method. The first two arguments mean that we will check for collisions between the sprite object and the group. The third argument is a function that is called upon collision.
this.game.physics.arcade.collide(this.character, this.blocks.self, function(character, block) { console.log('Collision between', character, block); }, null, this); Opening the game, the hero will not fall to the end of the screen, but will land on the blocks.
Hero animation
We need to define frames in the sprite list for different types of animation. Add these lines to the create method.
this.character.animations.add('stand', [0, 1, 2, 3], 10, true); this.character.animations.add('fly', [4, 5, 6, 7], 10, true); this.character.animations.add('run', [8, 9, 10], 10, true); this.character.animations.add('fall', [12, 13, 14, 15], 10, true); this.character.animations.add('dig', [16, 17, 18], 10, false); this.character.animations.add('dig_down', [20, 21, 22], 10, false); this.character.animations.play('stand'); The last line of code starts the stand animation.
For the rest of the animation, we need to change the update method and add an animation for each keystroke. Note that we have the same run animation for the left and right arrow keys. In order to flip the sprite horizontally, we use scale -1 .
if (this.cursors.left.isDown) { this.character.body.velocity.x = -200; this.character.animations.play('run'); this.character.scale.x = -1; } else if (this.cursors.right.isDown) { this.character.body.velocity.x = 200; this.character.animations.play('run'); this.character.scale.x = 1; } else { this.character.body.velocity.x = 0; this.character.animations.play('stand'); } if (this.cursors.up.isDown) { this.character.body.velocity.y = -300; this.character.animations.play('fly'); } Destruction of blocks
In order to dig blocks you need to add functionality for our collision function:
this.game.physics.arcade.collide(this.character, this.blocks.self, function(character, block) { if (this.cursors.left.isDown) { if (block.body.touching.right) { this.destroyBlock(block); } } else if (this.cursors.right.isDown) { if (block.body.touching.left) { this.destroyBlock(block); } } else if (this.cursors.down.isDown) { if (block.body.touching.up) { this.destroyBlock(block); } } }, null, this); Different blocks should be processed differently. Blocks of grass and land are simply destroyed, stones are inviolable and we can collect gold and save it as a parameter to the hero. Add the destroyBlock method to the play state .
destroyBlock: function(block) { switch (block.key) { case '/rock.png': break; case '/grass.png': case '/ground.png': block.destroy(); break; case '/gold.png': this.character.getData().userData.gold++; block.destroy(); break; } }, Overlapping and selling gold
In the next step, we must realize the sale of the collected gold in the store. At the end of the update method, add the following lines:
if (this.checkOverlap(this.character, this.shop)) { if (this.character.getData().userData.gold > 0) { var newPoints = parseInt(this.points._text) + this.character.getData().userData.gold; this.points.setText(newPoints); this.character.getData().userData.gold = 0; } } And create a new method in the play state, which checks the boundaries of the hero and the store:
checkOverlap: function(spriteA, spriteB) { var boundsA = spriteA.getBounds(); var boundsB = spriteB.getBounds(); return Phaser.Rectangle.intersects(boundsA, boundsB); } Refactoring and adding final animations
Add dig animations and refactor the update method to keep the game code pretty beautiful. Given the previous patterns, the code below should be clear.
"use strict"; window.Digger.state.play = { create: function(){ this.cursors = this.game.input.keyboard.createCursorKeys(); this.bg = mt.create("bg"); this.blocks = mt.create("blocks"); this.shop = mt.create("shop"); this.character = mt.create("character"); this.points = mt.create("points"); this.character.animations.add('stand', [0, 1, 2, 3], 10, true); this.character.animations.add('fly', [4, 5, 6, 7], 10, true); this.character.animations.add('run', [8, 9, 10], 10, true); this.character.animations.add('fall', [12, 13, 14, 15], 10, true); this.character.animations.add('dig', [16, 17, 18], 10, false); this.character.animations.add('dig_down', [20, 21, 22], 10, false); this.character.animations.play('stand'); }, update: function(){ var collideDown = false; this.game.physics.arcade.collide(this.character, this.blocks.self, function(character, block){ if(this.dig) return; if(this.cursors.left.isDown){ if(block.body.touching.right){ this.dig = this.character.animations.play('dig'); this.dig.onComplete.addOnce(function(){ this.destroyBlock(block); }, this); } else { this.character.animations.play('run'); } } if(this.cursors.right.isDown){ if(block.body.touching.left){ this.dig = this.character.animations.play('dig'); this.dig.onComplete.addOnce(function(){ this.destroyBlock(block); }, this); } else { this.character.animations.play('run'); } } if(this.cursors.down.isDown){ if(block.body.touching.up){ this.dig = this.character.animations.play('dig_down'); this.dig.onComplete.addOnce(function(){ this.destroyBlock(block); }, this); } else { this.character.animations.play('stand'); } } if(block.body.touching.up){ collideDown = true; } }, null, this); if(this.dig){ return; } if(this.cursors.left.isDown){ this.character.scale.x = -1; this.character.body.velocity.x = -200; } else if(this.cursors.right.isDown){ this.character.scale.x = 1; this.character.body.velocity.x = 200; } else { this.character.body.velocity.x = 0; } if(this.cursors.up.isDown){ this.character.body.velocity.y = -300; this.character.animations.play('fly'); } else { if(!collideDown){ this.character.animations.play('fall'); } else if(this.character.body.velocity.x === 0){ this.character.animations.play('stand'); } } if(this.checkOverlap(this.character, this.shop)){ if(this.character.getData().userData.gold > 0){ var newPoints = parseInt(this.points._text) + this.character.getData().userData.gold; this.points.setText(newPoints); this.character.getData().userData.gold = 0; } } }, destroyBlock: function(block){ this.dig = false; switch(block.key){ case '/rock.png': break; case '/grass.png': case '/ground.png': block.destroy(); break; case '/gold.png': this.character.getData().userData.gold++; block.destroy(); break; } }, checkOverlap: function (spriteA, spriteB) { var boundsA = spriteA.getBounds(); var boundsB = spriteB.getBounds(); return Phaser.Rectangle.intersects(boundsA, boundsB); }, stopDig: function(){ this.dig = false; } }; The complete project of the game is available here: http://mightyeditor.mightyfingers.com/#pde5-copy
The final game: http://mightyeditor.mightyfingers.com/data/projects/pde5/phaser/index.html
Facebook: https://www.facebook.com/mightyfingers
Twitter: https://twitter.com/Mighty_Fingers
Source: https://habr.com/ru/post/245921/
All Articles