Garland on Raspberry Pi

The New Year holidays are approaching, and it was decided to make something New Year using the existing B-model Raspberry Pi. Before that, I used it as a web server. Then I played a little with GPIO on Python, making the LEDs glow.
Well, a small artificial tree told me how to combine my desire with my skills. LED garland!

')
Garland? Hmm ... I can make it blink as I want! I immediately decided to lay the opportunity to easily add various effects of its “blinking”. Make an expandable application.
What do you need
I will not tell you how to enable and install the OS on the Raspberry Pi. About this written many articles. I will say that there was a Raspberry Pi Model B with Arch Linux installed. I think most of the described here will be true for other GNU / Linux distributions. For example, Raspbian.
So, from the hard you need: Raspberry Pi, multi-colored LEDs, resistors with nominal values from 100 Ohm to 1 KΩ, button, terminals for GPIO, wires.
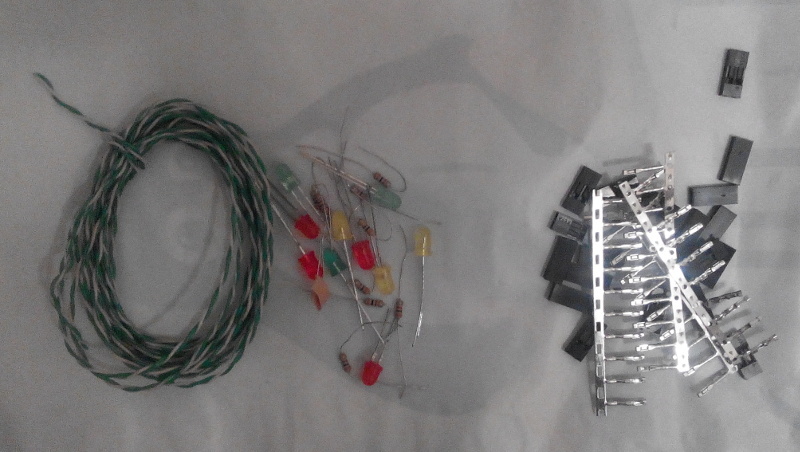
The number of LEDs may be different. In my case, they were involved in 6. Connecting the LEDs to the GPIO outputs is necessary through resistors. Due to the fact that the LEDs were of completely different origin, it was necessary to individually select the value of resistors in order to achieve optimum brightness. In general, you can do 330 ohms.
The button is needed so that you can use it to switch the effects of the garland.
We connect
Connection diagram:
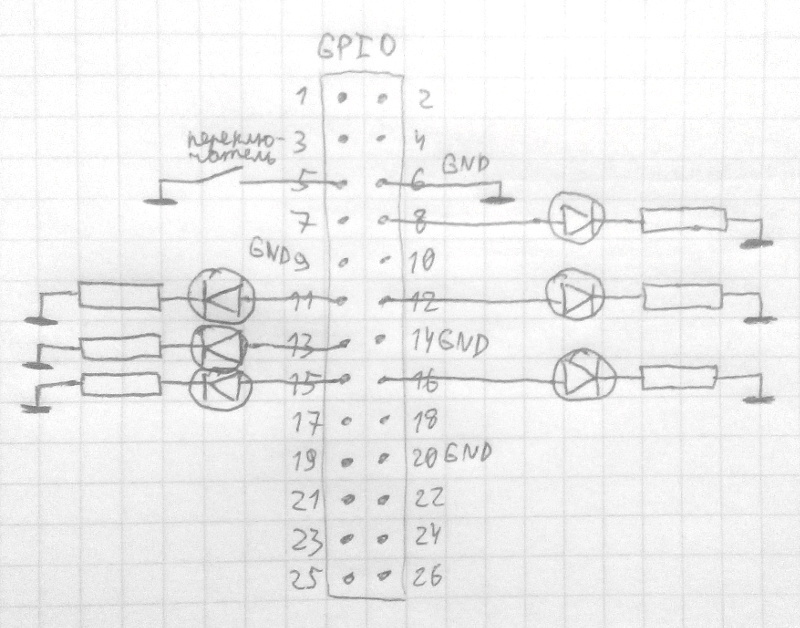
Note the ports marked GND. This is the land, they can not be used as input or output. No resistor for the button. Circuit protection is already provided in the Raspberry Pi.
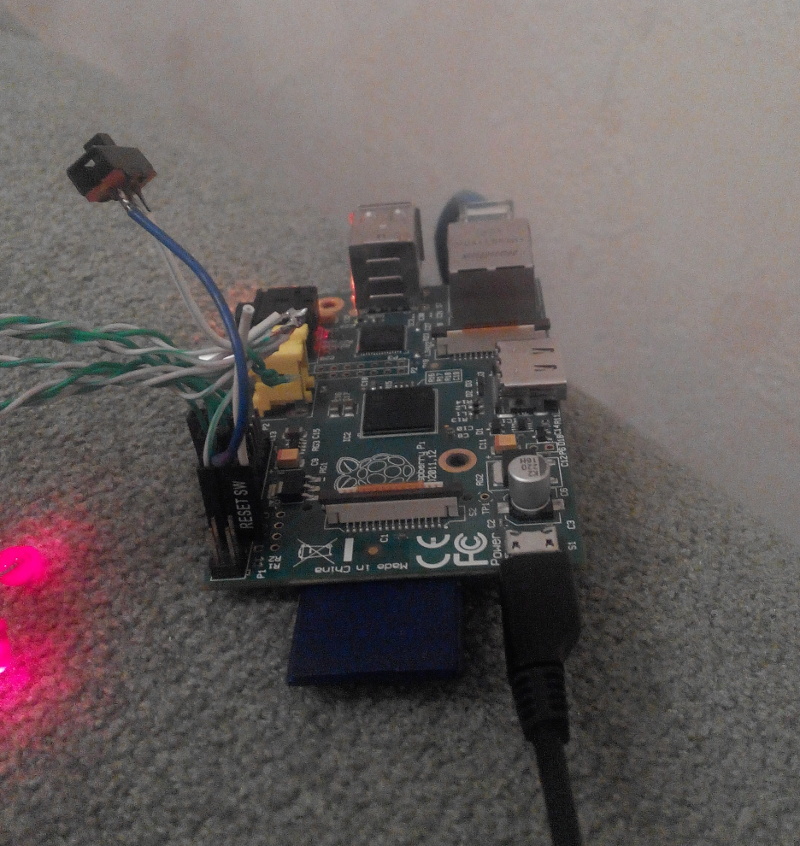
This is how it looked:

With the connection of LEDs you can experiment. I have two LEDs connected to some ports for more variety.
We prepare the software
We need Python 3. On Arch Linux, I put it like this:
sudo pacman -S python Perhaps on other distributions the package will be called python3.
You also need the Python module RPi.GPIO. I installed using easy_install:
sudo easy_install RPi.GPIO Perhaps on other distributions, this module is in the repository, so you can search.
After connecting, it would be good to test how our LEDs and the button work. Here is a small example of how this can be done:
#gpio_test.py import RPi.GPIO as GPIO import sys GPIO.setmode(GPIO.BOARD) led = 8 button = 5 # GPIO.setup(led, GPIO.OUT) GPIO.setup(button, GPIO.IN) # GPIO.output(led, 1) # while GPIO.input(button): pass # -- if GPIO.input(button) == False: GPIO.output(led, 0) print("Button pressed") GPIO.cleanup() Here we set the port with the number from the led variable as the output, and the port with the button as the input. Then send the signal 1 to the led port (light up!) And wait until the button is pressed. As soon as the button is pressed, we extinguish the LED and clean it.
In the example above, we test the LED connected to the 8th port and the button connected to the 5th. You can run the script like this:
sudo python3 gpio_test.py Please note that you need to run the script with root-rights. For example, using sudo. After starting, the LED connected to the 8th port should light up. After pressing the button - go out, and the script will complete its work.
Changing the value of the led variable in the script to the number of the desired port, you can test the operation of all LEDs.
My software
I will not dwell on the code that I wrote below for the functionality I need. Dame link to github: https://github.com/jhekasoft/raspberry-led-garland .
I'll tell you how to customize and write your own effects.
Installation
Place the application in / opt / raspberry-led-garland or create a symlink. For example:
sudo ln -s /home/jheka/raspberry-led-garland /opt/raspberry-led-garland Of course, it can be placed in any place, but then I will count on it lying there.
Customization
The config is in JSON-format in the settings.json file. If you have connected the LEDs and the button according to the scheme previously cited, then nothing can be changed in the config. Example file settings.json:
{ "leds": [ {"num": 8, "state": 0}, {"num": 11, "state": 0}, {"num": 12, "state": 0}, {"num": 13, "state": 0}, {"num": 15, "state": 0}, {"num": 16, "state": 0} ], "button": {"num": 5}, "effects": ["static", "blink", "slow_blink", "fast_blink", "run", "fast_run", "off"], "logfile": "/var/log/raspberry-led-garland.log" } Here, leds lists the ports of the connected LEDs (num) and their initial state (state, 0 - disabled). The number of LEDs can be arbitrary, the main thing is that the GPIO has enough ports.
Next, the button has the port number (num).
Effects lists the effect names in the order in which they will be switched by the button. All effects are in the directories effects as a file with a Python class.
Logs everything to the file specified in the logfile.
Effects
In fact, now there are three main effects: static, flashing and a running LED.
As mentioned above, effects are located in the effects directory. You can add your effects there. Also do not forget to add them to the config. Let's take a look at the blink effect. Here are its contents:
#blink.py import RPi.GPIO as GPIO class GarlandEffect(object): delay = 1.0 ledstate = 0 def __init__(self, garland): self.garland = garland self.ledstate = 1 def iterate(self): if not self.garland.checkIterationDelay(self.delay): return False self.garland.setLedsState(self.ledstate) self.garland.gpioOutSetState() self.ledstate = 1 - self.ledstate return True During initialization (__init__ function) we set a garland object to it. This should occur in almost every effect. Next, we indicate the initial state for all LEDs 1 (included).
At each iteration (the iterate function) we pass through, but the time equal to the set delay of 1 second has passed (delay = 1.0). If not, then do nothing (return false). If it has passed, then we set the state ledstate to all the LEDs and change the value of the state variable to the opposite so that at the next iteration it is different.
Let's look at the effect of fast_blink:
#fast_blink.py import effects.blink class GarlandEffect(effects.blink.GarlandEffect): delay = 0.1 As you can see, it is inherited from blink and it has a delay of 0.1 seconds. That is, it is all the same blink, just with a smaller delay between the iteration - the LEDs blink faster.
Notice the effect named off. In it, during the initialization, all the LEDs are extinguished and nothing happens during the iteration. Thus, the attenuation of the garland is realized.
systemd service
So that the garland was autonomous and worked after the start of the system, I wrote a small config to run our violin as a service. The systemd / garland.service file must be copied to / etc / systemd / system /. Then run:
sudo systemctl enable garland.service The script will start at system startup. To start immediately, you can do this:
sudo systemctl start garland.service Hopefully, don’t go around using systemd. It is on Arch Linux for a long time and I'm used to it. At one time, too, holivarili about this.
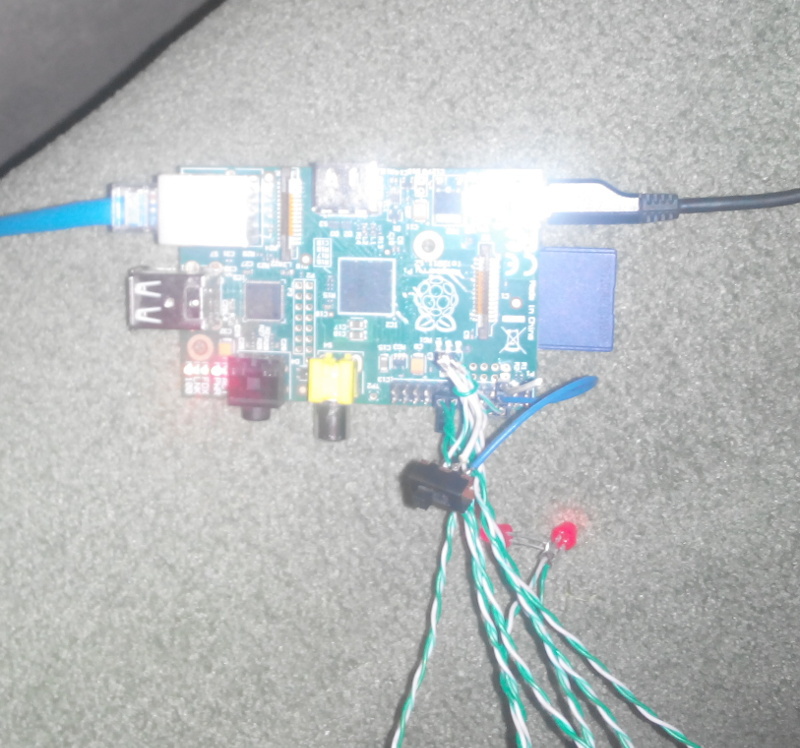
Demo
Here's what it looks like:
I hope you also connect to this business and make your own garlands with a large number of LEDs, and write your own interesting effects! Happy coming!
Source: https://habr.com/ru/post/245887/
All Articles