Analog video input for Virturilki and its use in the national economy
KDPV

Nowadays, the widespread domination of very compact, economical and multi-megapixel digital video sensors old good analog CCD video cameras are slowly slipping into oblivion, remaining in demand only where the presence of the advantages of CCD matrices over CMOS is required. This is the automotive industry (rear-view cameras), and video surveillance, and various professional equipment (such as thermal imagers). In general, where high sensitivity is required in low light conditions and a decent dynamic range. But even in these areas, cameras with CMOS sensors are slowly squeezing "tsetsedeshki."
But there remains a large number of old analog cameras and I want to somehow use them in a new way. And if you remember that analog (composite, with “RCA” connectors, also known as “tulip”), many interesting devices have a way out, I really wanted to capture a video stream from them for subsequent transmission via digital communication channels. Of course, for these purposes you can use a USB TV tuner or more or less specialized USB devices with composite input, but this option is rather cumbersome, and not all ARM controllers can take advantage of hardware video encoding for USB sources.
')
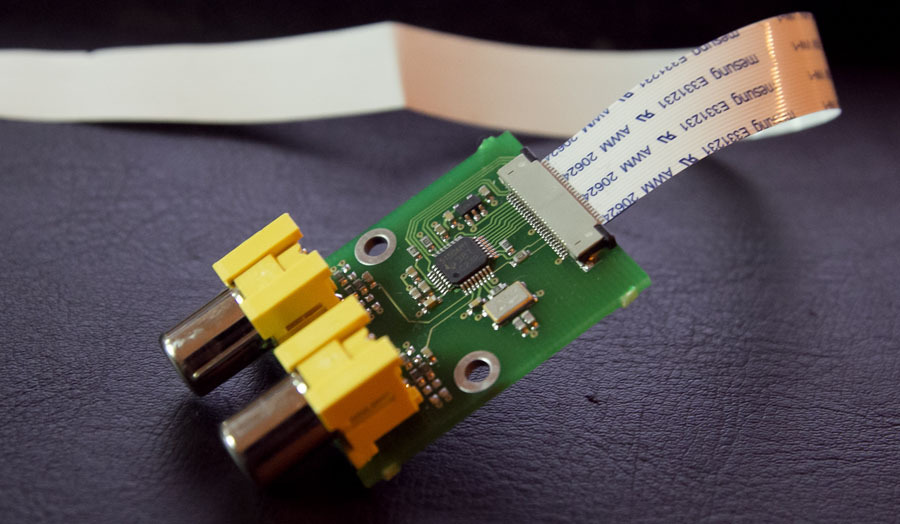
In general, to solve some problems, it was necessary to connect a device to our Virturilka that outputs an analog video signal. We (or rather, our apparatchik Sasha) searched it on the Internet and found a suitable chip - Texas Instruments TVP5150AM1 . It has two inputs for composite video, but they can work alternately, not simultaneously. The chip generates 720x576 @ 50fps on a parallel bus, through which we usually connect our digital camera sensor to Virturile.
The analog video stream after capture is interlaced, as opposed to the usual progressive one, so that the video stream formed by the chip is required to be subjected to the deinterlacing procedure. It is engaged in DSP Virtuurki. Moreover, there are several deinterlacing options that are set at the kernel driver level. So far, we have tested only one option, he is satisfied with everything, so they didn’t pick any further. Also, until we tried the NTSC mode, at which the video resolution is 640x480 pixels. The chip supports this mode without problems, but the switch is not yet implemented in the driver, now it works only in PAL.
In general, driver tinkering was the biggest problem when designing an analog input card. Initially, PAL video worked only 640x480, the edges were cut off from the original frame. The problem was solved by one of the early board testers, who found a bug and stuck fixing the problem patch. It turned out that in the video subsystem the resolution was 640x480. :-)
In general, meet - a board for capturing an analog video signal:
http://wiki.virt2real.ru/wiki/Analog_modul_TVP5050
Size 37x29 mm (excluding protruding connectors).
Connecting the board is similar to connecting the camera module - just plug in the cable and snap the latch. :-) In a worn state, it looks like this:
To work with this module, you need to use a special kernel, the sources of which are located on Github in the TVP5150 brunch .
Of course, very few people will be assembling the core itself, so for the majority, ready fresh firmware for Virturilka is suitable, where there are already cores for our usual digital camera and there is a kernel for analog module. True, there is also a core for HDMI input, but these boards are worth their weight in gold, so we don’t let the store go. :-)
Link to the firmware http://files.virt2real.ru/firmware/virt2real-board/1.1/virt2real-1.02.002.zip
By default, the HD core for the digital camera is active in the firmware, so for use with an analog module you need to switch the core. This is done by simply copying the uImage.tvp5150 file to the uImage file in the boot section, but it is much more convenient to do this in the admin panel. Section "Settings -> Kernels". Select “uImage.tvp5150”, click the “Save” button, rebuild the piece of iron and get the active core for TVP5150.

By the way, there, in the admin panel, you can immediately check the video broadcast from the analog input. To do this, in the "Video" section there are many options for transmitting video (you can broadcast to RTP, RTSP, RTMP and Ivideon).
As I said, the video input is double, i.e. You can connect two independent sources of composite video and switch them as needed. Switching is to change the state of one register of the i2c device and comes down to commands
Select first entry:
Select the second entrance:
The same can be done with the mouse in the admin panel, in the section “Cameras -> TVP5150” there are two buttons, “Input 1” and “Input 2”, when clicked, the above commands are executed.
Since most of the devices with analog output have a linear audio output (usually a white tulip next to the yellow one, or white + red for stereo), you can also get a sound on the Virtirlka. It has a microphone input, which, in combination, is also a linear audio input.
When using gstreamer for broadcasting, you must specify the correct video format parameters, since there is one small nuance - the pitch parameter must be specified, without it the picture will be distorted.
Here is an example of transferring video from an analog RTP input:
For all video translation scripts used in the firmware, all the main video parameters are saved in the settings file when changing the current core. This was done in order not to correct the chains every time. Trifle, but very convenient.
The most interesting part of my story, IMHO. Abstractly, nobody needs a piece of hardware; you need to use it for specific purposes.
The first thing I did when I got a test copy of an analog module was that I attached it to a six-wheeled cart. The Canon 60D DSLR camera and a regular analog video camera with a CCD sensor from SONY were installed on the cart. Sonya acted as a course camera, i.e. from the picture of it, I remotely controlled the cart. A DSLR acted as a photographer — in the management application Virt2real Player , when a special button was pressed, the video input was switched, and the second button was responsible for lowering the shutter on the SLR. Thus, it was possible to ride with a view through a single camera, and before photographing, switch to the SLR, point and focus on the desired object and take a picture. Unfortunately, the Canon 60D does not know how to simultaneously deliver video to the analog video output (and also to hdmi, already checked) and allow you to control yourself via PTP. It is a pity, since the control of the SLR by PTP has long been mastered, even in our admin there is a corresponding module, you can change any shooting settings on the fly.
In general, this cart was tested at the Open Innovations 2014 exhibition. A squirrel from the Ice Age was mounted on the cart for greater mimicity and, accordingly, to attract the attention of the female sex. The mirror was tilted up, and the trolley received the code name "Podboybochnik." Guess why.

The ride looked something like this
There were few short skirts, so the catch came out sparsely. Only two frames were excellent, but I will not publish them in order to keep propriety. I will show only one innocent shot from the "Undercaster":

I’ll not be able to install this application at a permanent place of deployment, so it rolls around for use as debugging. The essence is simple: there is a video-peephole (CCD, of course) in the door to the landing, just a virtual virtual camera with a digital camera cannot be installed there, you just need a peephole in the form of an ordinary door glass peephole. From the video eye comes standard cable, two wires and a screen. 12V power is supplied to one core, otherwise there is a video signal from the peephole, the screen, respectively, is a common ground. Video from the peephole at the same time written on a Virtuurka flash drive, plus displayed on the monitor at the front door of my apartment. Memo to myself: the record should be made cyclical, but it turns out nekosherno.
And, of course, the video is duplicated over the network to any connected device (a normal computer, a device for iOS or a device for Android).
Now I have it parsed disassembled, so that the illustration is not very visual. On the monitor you can see the picture from goprohi:

In general, the whole thing remains to be ennobled and yet to set it all up, finally, to a permanent place at the door.
Somehow I was given a real thermal imager for hire, by Flir (the exact model could not be determined). At first I planned to install it on a trolley as a second camera (instead of a DSLR), but I was fascinated by examining my plastic windows for frost penetration and forgot about the trolley.
With a thermal imager, everything is simple - we connect its analog output to our input, turn on the broadcast and go around the apartment, we look where the windows are poorly insulated. Well, do not forget to take a picture of yourself in the IR range.

Of course, video can be transmitted from a thermal imager with an ordinary RC video transmitter, but this is a more cumbersome option. From Virtuurki immediately into the net it is more convenient to stream the stream in order to look on a smartphone or tablet.

Actually, this is a special case of how the SLR was used on the cart. Realtime video transmission from the viewfinder. Video, compressed in H264 with the desired bit rate, for transmission over relatively narrow channels (3G / 4G). If the model of the photo-unit supports simultaneous video output and control through PTP - then just beauty, also any parameters can be changed (shutter speed, aperture, focus points, etc.). My Canon 60D does not support this, unfortunately. Either management or video. True, with PTP there is an opportunity to receive video from the viewfinder, but it is of low resolution and in the MJPEG format, and this is usually unsuitable for transmission somewhere.
When I served in the army (communications platoon), I had to mess around with a pretty cool surveillance system called VideoNet. So, by itself, I tried to make Virtualulka a friend with her. They made friends easily - it is enough to run an RTSP server on Virtual Virtrka (from the admin panel), and add a “Universal RTSP” type camera in Videogame. Of course, it is not necessary to use an analog input here, but with him personally it is more interesting to me.

The source of the video is GoPro, connected to our analog video input.
Probably, all Habr readers know about a cool company called Ivideon . They often tinker with cameras based on the DM368 processor (and DM365, I think), so we went to meet us and gave us our client to connect to their cloud. As a result, a module appeared in the admin panel for linking Virtuylka to the Ivideon service and the ability to broadcast video to it. The admin module wrote hastily, I confess, it's a mess, but it works.

The same source appears in the video source:
It would be necessary for the guys from Ivideon to ask the API for motion detection and the initial camera binding through the recognition of a QR code through the camera. :-)
Many have heard about the service Twitch ? I'm not a gamer at all, so I heard about him recently. I had a test sample of analog input on my hands, so I thought - why not shake from the old console? In modern (PS, XBOX), the broadcast on Twitch is already in the standard firmware (sort of), but for older consoles there is no such possibility.
True, I don’t have a real Dendy (NES) or Sega for a long time, but there is a Playstation2, for which I made a CD with an NES emulator for a long time, and sometimes with daughters we chop into Chip-n-dail. How would you run it on twitter?
Garbage question. We take ... Yes, all the same our Virturika, straight from the tin analog module. We connect, open the section with RTMP broadcasts in the admin panel, enter the stream address (taken from the channel settings in your account on Twitch), something like this
rtmp: //live-lhr.twitch.tv/app/live_73242159_p0OUfxtnBGoSwgdcaQVXZ7uRJO3hsM We start the broadcast and, voila, we see our game on tweet!
Screenshot from my blog

Video demonstration of the broadcast of the game Chip'n'Dale 2 on the service Twitch.tv:
And if you connect the audio output to the Virtuurka microphone input, you can do this:
Of course, I managed to try out only a small part of what can be created with an analog video output. Personally, I like it even more than the HDMI input and than ordinary digital cameras, because it is compatible with a bunch of all kinds of equipment.
When we first tweeted about the analog input, several response tweets at once were about the fact that we needed to connect a regular car rear view camera to see the picture on the android device. I don't have a parking camera in my car, so I can't check it. And I don’t want to screw the usual one to the bumper :-)
One more person was going to screw the video output of the telescope to the virtrilka to stream to internet. Let's see what he will do in the end.
You can throw your use cases (if they are not secret, of course) in the comments. What I can - I will quickly test and accomplish the results. Well, or you can check out the interesting options yourself, the analog module is already on sale. If we see a very interesting application in the comments, we guarantee the author a bonus analog input. Of course, only if he already has Virturilka, otherwise there is nothing to cling to the module. Well, and if the application is very, very, very interesting, we will give Virtualulka in full ammunition.
We ourselves have sold the devices to end-users for a long time already, so now all our hardware is sold in the online store Chipster . And yes, you know what is happening now with the ruble exchange rate, so prices will have to be raised periodically, excuse me.
Not exactly about the analog module, but useful for him too. Just the day before yesterday, as a result of the experiment, it turned out that Virtual Virtka, which is actually based on a DM365 processor, works fine at the frequencies of the older processor, DM368. I will not copy-paste, I will give a link, if anyone is interested - http://www.g0l.ru/blog/n4018
In short - our DM365 feels great at frequencies of DM368 (CPU 432 Mhz, DDR 340 MHz). The network works, Wi-Fi works, video from cameras, from an analog input, from an HDMI input - everything works as it should. But I couldn’t check out Full HD video, for lack of a suitable source. How do we reconfigure the HDMI input to 1080p or get a sensor with Full HD - check if it can pull a whole topic.
Overclocked in this way, Virtuerilka has been operating continuously for more than 14 hours, the flight is stable. The increased frequency is very useful for HD RTMP broadcasts, where before the usual frequency of 300 MHz, there was just enough with a modest bitrate.
If anyone is interested to try - link to firmware
I just warn you right away - while I am in the testing phase, I cannot guarantee anything. If the overclocked Virtuirlka explodes, swells up, collapses, annihilates - Virt2real is not responsible for this. So, “You have been warned!”, As they say.
To view RTP video streams on mobile devices, we released the first versions of applications:
Android
iOS
And for viewing on the desktop:
Under windows
Online store Chipster.ru
Prehistory
Nowadays, the widespread domination of very compact, economical and multi-megapixel digital video sensors old good analog CCD video cameras are slowly slipping into oblivion, remaining in demand only where the presence of the advantages of CCD matrices over CMOS is required. This is the automotive industry (rear-view cameras), and video surveillance, and various professional equipment (such as thermal imagers). In general, where high sensitivity is required in low light conditions and a decent dynamic range. But even in these areas, cameras with CMOS sensors are slowly squeezing "tsetsedeshki."
But there remains a large number of old analog cameras and I want to somehow use them in a new way. And if you remember that analog (composite, with “RCA” connectors, also known as “tulip”), many interesting devices have a way out, I really wanted to capture a video stream from them for subsequent transmission via digital communication channels. Of course, for these purposes you can use a USB TV tuner or more or less specialized USB devices with composite input, but this option is rather cumbersome, and not all ARM controllers can take advantage of hardware video encoding for USB sources.
')
Our piece of iron
In general, to solve some problems, it was necessary to connect a device to our Virturilka that outputs an analog video signal. We (or rather, our apparatchik Sasha) searched it on the Internet and found a suitable chip - Texas Instruments TVP5150AM1 . It has two inputs for composite video, but they can work alternately, not simultaneously. The chip generates 720x576 @ 50fps on a parallel bus, through which we usually connect our digital camera sensor to Virturile.
The analog video stream after capture is interlaced, as opposed to the usual progressive one, so that the video stream formed by the chip is required to be subjected to the deinterlacing procedure. It is engaged in DSP Virtuurki. Moreover, there are several deinterlacing options that are set at the kernel driver level. So far, we have tested only one option, he is satisfied with everything, so they didn’t pick any further. Also, until we tried the NTSC mode, at which the video resolution is 640x480 pixels. The chip supports this mode without problems, but the switch is not yet implemented in the driver, now it works only in PAL.
In general, driver tinkering was the biggest problem when designing an analog input card. Initially, PAL video worked only 640x480, the edges were cut off from the original frame. The problem was solved by one of the early board testers, who found a bug and stuck fixing the problem patch. It turned out that in the video subsystem the resolution was 640x480. :-)
In general, meet - a board for capturing an analog video signal:
http://wiki.virt2real.ru/wiki/Analog_modul_TVP5050
Size 37x29 mm (excluding protruding connectors).
Compared to camera module
What does it eat
Connecting the board is similar to connecting the camera module - just plug in the cable and snap the latch. :-) In a worn state, it looks like this:
To work with this module, you need to use a special kernel, the sources of which are located on Github in the TVP5150 brunch .
Of course, very few people will be assembling the core itself, so for the majority, ready fresh firmware for Virturilka is suitable, where there are already cores for our usual digital camera and there is a kernel for analog module. True, there is also a core for HDMI input, but these boards are worth their weight in gold, so we don’t let the store go. :-)
Link to the firmware http://files.virt2real.ru/firmware/virt2real-board/1.1/virt2real-1.02.002.zip
By default, the HD core for the digital camera is active in the firmware, so for use with an analog module you need to switch the core. This is done by simply copying the uImage.tvp5150 file to the uImage file in the boot section, but it is much more convenient to do this in the admin panel. Section "Settings -> Kernels". Select “uImage.tvp5150”, click the “Save” button, rebuild the piece of iron and get the active core for TVP5150.
By the way, there, in the admin panel, you can immediately check the video broadcast from the analog input. To do this, in the "Video" section there are many options for transmitting video (you can broadcast to RTP, RTSP, RTMP and Ivideon).
As I said, the video input is double, i.e. You can connect two independent sources of composite video and switch them as needed. Switching is to change the state of one register of the i2c device and comes down to commands
Select first entry:
i2cset -f -y 1 0x5d 0x00 0x00 Select the second entrance:
i2cset -f -y 1 0x5d 0x00 0x02 The same can be done with the mouse in the admin panel, in the section “Cameras -> TVP5150” there are two buttons, “Input 1” and “Input 2”, when clicked, the above commands are executed.
Since most of the devices with analog output have a linear audio output (usually a white tulip next to the yellow one, or white + red for stereo), you can also get a sound on the Virtirlka. It has a microphone input, which, in combination, is also a linear audio input.
When using gstreamer for broadcasting, you must specify the correct video format parameters, since there is one small nuance - the pitch parameter must be specified, without it the picture will be distorted.
Here is an example of transferring video from an analog RTP input:
gst-launch v4l2src always-copy=false chain-ipipe=true ! \ capsfilter caps=video/x-raw-yuv,format='(fourcc)'NV12,width=720,height=576,framerate='(fraction)'25,pitch=736 ! \ dmaiaccel ! dmaienc_h264 copyOutput=false ddrbuf=false encodingpreset=2 ratecontrol=2 intraframeinterval=30 idrinterval=120 t8x8intra=true t8x8inter=true targetbitrate=$BITRATE bytestream=true headers=false ! \ rtph264pay mtu=1500 ! \ multiudpsink clients="192.168.1.10:3000" sync=false enable-last-buffer=false For all video translation scripts used in the firmware, all the main video parameters are saved in the settings file when changing the current core. This was done in order not to correct the chains every time. Trifle, but very convenient.
Where it can be used in business
The most interesting part of my story, IMHO. Abstractly, nobody needs a piece of hardware; you need to use it for specific purposes.
Trolley driven
The first thing I did when I got a test copy of an analog module was that I attached it to a six-wheeled cart. The Canon 60D DSLR camera and a regular analog video camera with a CCD sensor from SONY were installed on the cart. Sonya acted as a course camera, i.e. from the picture of it, I remotely controlled the cart. A DSLR acted as a photographer — in the management application Virt2real Player , when a special button was pressed, the video input was switched, and the second button was responsible for lowering the shutter on the SLR. Thus, it was possible to ride with a view through a single camera, and before photographing, switch to the SLR, point and focus on the desired object and take a picture. Unfortunately, the Canon 60D does not know how to simultaneously deliver video to the analog video output (and also to hdmi, already checked) and allow you to control yourself via PTP. It is a pity, since the control of the SLR by PTP has long been mastered, even in our admin there is a corresponding module, you can change any shooting settings on the fly.
In general, this cart was tested at the Open Innovations 2014 exhibition. A squirrel from the Ice Age was mounted on the cart for greater mimicity and, accordingly, to attract the attention of the female sex. The mirror was tilted up, and the trolley received the code name "Podboybochnik." Guess why.
The ride looked something like this
There were few short skirts, so the catch came out sparsely. Only two frames were excellent, but I will not publish them in order to keep propriety. I will show only one innocent shot from the "Undercaster":
Video-eye
I’ll not be able to install this application at a permanent place of deployment, so it rolls around for use as debugging. The essence is simple: there is a video-peephole (CCD, of course) in the door to the landing, just a virtual virtual camera with a digital camera cannot be installed there, you just need a peephole in the form of an ordinary door glass peephole. From the video eye comes standard cable, two wires and a screen. 12V power is supplied to one core, otherwise there is a video signal from the peephole, the screen, respectively, is a common ground. Video from the peephole at the same time written on a Virtuurka flash drive, plus displayed on the monitor at the front door of my apartment. Memo to myself: the record should be made cyclical, but it turns out nekosherno.
And, of course, the video is duplicated over the network to any connected device (a normal computer, a device for iOS or a device for Android).
Now I have it parsed disassembled, so that the illustration is not very visual. On the monitor you can see the picture from goprohi:
And the script for different types of image duplication looks like this for now.
CAPS=video/x-raw-yuv,format=\(fourcc\)NV12,width=720,height=576,pitch=736,framerate=\(fraction\)25/1 ENCODER="dmaienc_h264 encodingpreset=2 ratecontrol=2 targetbitrate=2000000 maxbitrate=2000000 intraframeinterval=25 idrinterval=500 bytestream=false headers=false aud=false level=51 t8x8intra=true t8x8inter=true airrate=30" VIDEOOUT="TIDmaiVideoSink videoStd=D1_PAL videoOutput=composite accelFrameCopy=false noCopy=true sync=false max-lateness=300000000 render-delay=300000000" REC="matroskamux streamable=true min-index-interval=1000000000 ! filesink location=video.mkv enable-last-buffer=false sync=true" #REC="flvmux ! filesink location=video.flv enable-last-buffer=false sync=false" #REC="mp4mux streamable=false dts-method=1 presentation-time=true ! filesink location=video.mp4 enable-last-buffer=false sync=false" # clear overlay window fbset -yres 0 -fb /dev/fb0 # show type0 () { gst-launch v4l2src always-copy=false chain-ipipe=true ! \ $CAPS !\ dmaiaccel !\ $VIDEOOUT } # show and send type1 () { gst-launch v4l2src always-copy=false chain-ipipe=true ! \ $CAPS !\ dmaiaccel !\ tee name=sendvideo !\ queue max-size-buffers=0 max-size-bytes=0 max-size-time=0 !\ $VIDEOOUT \ sendvideo. !\ $ENCODER !\ queue max-size-buffers=0 max-size-bytes=0 max-size-time=0 !\ rtph264pay !\ multiudpsink clients=192.168.1.10:3000 enable-last-buffer=false sync=false } # show, send and record type2 () { gst-launch v4l2src always-copy=false chain-ipipe=true ! \ $CAPS ! \ dmaiaccel ! \ tee name=sendvideo ! \ queue max-size-buffers=0 max-size-bytes=0 max-size-time=0 !\ $VIDEOOUT \ sendvideo. ! \ queue max-size-buffers=0 max-size-bytes=0 max-size-time=0 !\ $ENCODER ! \ tee name=recvideo ! \ queue max-size-buffers=0 max-size-bytes=0 max-size-time=0 !\ rtph264pay ! \ multiudpsink clients=192.168.1.10:3000 enable-last-buffer=false sync=false \ recvideo. ! \ queue max-size-buffers=0 max-size-bytes=0 max-size-time=0 !\ legacyh264parse config-interval=2 split-packetized=false output-format=2 access-unit=true ! \ $REC } # send and record type3 () { gst-launch v4l2src always-copy=false chain-ipipe=true ! \ $CAPS ! \ dmaiaccel ! \ dmaiperf print-arm-load=true ! \ queue max-size-buffers=0 max-size-bytes=0 max-size-time=0 !\ $ENCODER ! \ tee name=recvideo ! \ queue max-size-buffers=0 max-size-bytes=0 max-size-time=0 !\ rtph264pay ! \ multiudpsink clients=192.168.1.10:3000 enable-last-buffer=false sync=false \ recvideo. ! \ queue max-size-buffers=0 max-size-bytes=0 max-size-time=0 !\ legacyh264parse config-interval=2 split-packetized=false output-format=2 access-unit=true ! \ $REC } # show and record type4 () { gst-launch v4l2src always-copy=false chain-ipipe=true ! \ $CAPS ! \ dmaiaccel ! \ tee name=recvideo ! \ queue max-size-buffers=0 max-size-bytes=0 max-size-time=0 !\ $VIDEOOUT \ recvideo. ! \ queue max-size-buffers=0 max-size-bytes=0 max-size-time=0 !\ $ENCODER ! \ queue max-size-buffers=0 max-size-bytes=0 max-size-time=0 !\ legacyh264parse config-interval=2 split-packetized=false output-format=2 access-unit=true ! \ $REC } type0 Video with video eye tips
In general, the whole thing remains to be ennobled and yet to set it all up, finally, to a permanent place at the door.
Thermal imager
Somehow I was given a real thermal imager for hire, by Flir (the exact model could not be determined). At first I planned to install it on a trolley as a second camera (instead of a DSLR), but I was fascinated by examining my plastic windows for frost penetration and forgot about the trolley.
With a thermal imager, everything is simple - we connect its analog output to our input, turn on the broadcast and go around the apartment, we look where the windows are poorly insulated. Well, do not forget to take a picture of yourself in the IR range.
Video with windows
Of course, video can be transmitted from a thermal imager with an ordinary RC video transmitter, but this is a more cumbersome option. From Virtuurki immediately into the net it is more convenient to stream the stream in order to look on a smartphone or tablet.
Live streaming from a DSLR
Actually, this is a special case of how the SLR was used on the cart. Realtime video transmission from the viewfinder. Video, compressed in H264 with the desired bit rate, for transmission over relatively narrow channels (3G / 4G). If the model of the photo-unit supports simultaneous video output and control through PTP - then just beauty, also any parameters can be changed (shutter speed, aperture, focus points, etc.). My Canon 60D does not support this, unfortunately. Either management or video. True, with PTP there is an opportunity to receive video from the viewfinder, but it is of low resolution and in the MJPEG format, and this is usually unsuitable for transmission somewhere.
Video from Canon 60D
Video Surveillance with VideoNet
When I served in the army (communications platoon), I had to mess around with a pretty cool surveillance system called VideoNet. So, by itself, I tried to make Virtualulka a friend with her. They made friends easily - it is enough to run an RTSP server on Virtual Virtrka (from the admin panel), and add a “Universal RTSP” type camera in Videogame. Of course, it is not necessary to use an analog input here, but with him personally it is more interesting to me.
The source of the video is GoPro, connected to our analog video input.
Virtualer, analog video input and VideoNet
CCTV via Ivideon
Probably, all Habr readers know about a cool company called Ivideon . They often tinker with cameras based on the DM368 processor (and DM365, I think), so we went to meet us and gave us our client to connect to their cloud. As a result, a module appeared in the admin panel for linking Virtuylka to the Ivideon service and the ability to broadcast video to it. The admin module wrote hastily, I confess, it's a mess, but it works.
The same source appears in the video source:
Virtuillare, analog video input and Ivideon
It would be necessary for the guys from Ivideon to ask the API for motion detection and the initial camera binding through the recognition of a QR code through the camera. :-)
Streaming from old school consoles
Many have heard about the service Twitch ? I'm not a gamer at all, so I heard about him recently. I had a test sample of analog input on my hands, so I thought - why not shake from the old console? In modern (PS, XBOX), the broadcast on Twitch is already in the standard firmware (sort of), but for older consoles there is no such possibility.
True, I don’t have a real Dendy (NES) or Sega for a long time, but there is a Playstation2, for which I made a CD with an NES emulator for a long time, and sometimes with daughters we chop into Chip-n-dail. How would you run it on twitter?
Garbage question. We take ... Yes, all the same our Virturika, straight from the tin analog module. We connect, open the section with RTMP broadcasts in the admin panel, enter the stream address (taken from the channel settings in your account on Twitch), something like this
rtmp: //live-lhr.twitch.tv/app/live_73242159_p0OUfxtnBGoSwgdcaQVXZ7uRJO3hsM We start the broadcast and, voila, we see our game on tweet!
Screenshot from my blog
Video demonstration of the broadcast of the game Chip'n'Dale 2 on the service Twitch.tv:
Script for broadcast on Twitch without sound
gst-launch v4l2src always-copy=false chain-ipipe=true ! \ capsfilter caps=video/x-raw-yuv,format='(fourcc)'NV12,width=720,height=576,framerate='(fraction)'25,pitch=736 ! \ dmaiaccel ! \ dmaienc_h264 copyOutput=false ddrbuf=false encodingpreset=2 ratecontrol=2 single-nalu=true targetbitrate=2000000 maxbitrate=4000000 level=51 intraframeinterval=150 idrinterval=250 t8x8intra=true t8x8inter=true bytestream=false headers=false ! \ flvmux name=mux streamable=true ! \ queue ! \ rtmpsink location="rtmp://live-lhr.twitch.tv/app/live_73242159_p0OUfxtnBGoSwgdcaQVXZ7uRJO3hsM" sync=false enable-last-buffer=false And if you connect the audio output to the Virtuurka microphone input, you can do this:
Script for broadcast on twitch with sound
gst-launch v4l2src always-copy=false chain-ipipe=true ! \ capsfilter caps=video/x-raw-yuv,format='(fourcc)'NV12,width=$WIDTH,height=$HEIGHT,framerate='(fraction)'$FPS$PITCH ! \ dmaiaccel ! \ dmaienc_h264 copyOutput=false ddrbuf=false encodingpreset=2 ratecontrol=2 single-nalu=true targetbitrate=$BITRATE maxbitrate=4000000 level=51 intraframeinterval=150 idrinterval=250 t8x8intra=true t8x8inter=true bytestream=false headers=false ! \ queue ! \ flvmux streamable=true name=mux \ alsasrc latency-time=200000 buffer-time=4000000 slave-method=3 do-timestamp=false provide-clock=false ! \ capsfilter caps=audio/x-raw-int,channels=1,rate=16000,endianness=1234,signed=true,width=16,depth=16 ! \ queue ! \ dmaienc_aac bitrate=48000 maxbitrate=48000 tns=false copyOutput=false outputBufferSize=500000 fullbandwidth=true fixTimestamp=true ! \ mux. \ mux. ! \ queue ! \ rtmpsink location="rtmp://live-lhr.twitch.tv/app/live_73242159_p0OUfxtnBGoSwgdcaQVXZ7uRJO3hsM" sync=false enable-last-buffer=false Other uses
Of course, I managed to try out only a small part of what can be created with an analog video output. Personally, I like it even more than the HDMI input and than ordinary digital cameras, because it is compatible with a bunch of all kinds of equipment.
When we first tweeted about the analog input, several response tweets at once were about the fact that we needed to connect a regular car rear view camera to see the picture on the android device. I don't have a parking camera in my car, so I can't check it. And I don’t want to screw the usual one to the bumper :-)
One more person was going to screw the video output of the telescope to the virtrilka to stream to internet. Let's see what he will do in the end.
You can throw your use cases (if they are not secret, of course) in the comments. What I can - I will quickly test and accomplish the results. Well, or you can check out the interesting options yourself, the analog module is already on sale. If we see a very interesting application in the comments, we guarantee the author a bonus analog input. Of course, only if he already has Virturilka, otherwise there is nothing to cling to the module. Well, and if the application is very, very, very interesting, we will give Virtualulka in full ammunition.
We ourselves have sold the devices to end-users for a long time already, so now all our hardware is sold in the online store Chipster . And yes, you know what is happening now with the ruble exchange rate, so prices will have to be raised periodically, excuse me.
Offtopic
Not exactly about the analog module, but useful for him too. Just the day before yesterday, as a result of the experiment, it turned out that Virtual Virtka, which is actually based on a DM365 processor, works fine at the frequencies of the older processor, DM368. I will not copy-paste, I will give a link, if anyone is interested - http://www.g0l.ru/blog/n4018
In short - our DM365 feels great at frequencies of DM368 (CPU 432 Mhz, DDR 340 MHz). The network works, Wi-Fi works, video from cameras, from an analog input, from an HDMI input - everything works as it should. But I couldn’t check out Full HD video, for lack of a suitable source. How do we reconfigure the HDMI input to 1080p or get a sensor with Full HD - check if it can pull a whole topic.
Overclocked in this way, Virtuerilka has been operating continuously for more than 14 hours, the flight is stable. The increased frequency is very useful for HD RTMP broadcasts, where before the usual frequency of 300 MHz, there was just enough with a modest bitrate.
If anyone is interested to try - link to firmware
I just warn you right away - while I am in the testing phase, I cannot guarantee anything. If the overclocked Virtuirlka explodes, swells up, collapses, annihilates - Virt2real is not responsible for this. So, “You have been warned!”, As they say.
Applications
To view RTP video streams on mobile devices, we released the first versions of applications:
Android
iOS
And for viewing on the desktop:
Under windows
Where can one buy?
Online store Chipster.ru
Source: https://habr.com/ru/post/245459/
All Articles