Bylina about how I connected Drupal and Yandex.
Some time ago I had an idea to make a city site (of course, another one) for one small town based on Drupal. Just before this, Yandex expanded the functionality of its Mail for Domains and added the ability to manage mailboxes through the API. And the thought arose in my head: why not? Why not give users the ability to simultaneously receive a mailbox in the city domain at the same time as registering on the city portal? The idea itself, of course, is not surprising, but there were no ready-made solutions. I never launched the site, and it's a sin to lay the code without doing anything.
As you know, Drupal is positioned as a CMS, oriented developers and allowing through an extensive API to develop at least a system for managing the lunar base. In my post, I will not go into her praise and the most basic principles of developing modules for Drupal, however, Drupal beginner developers will certainly find the material useful, and I will be grateful for the advice and recommendations.

')
Naturally, starting to write a module, you need to decide what functionality it will have. The module is designed for a social site where users can register. Therefore, it must:
Of course, it would be possible to add some other bonuses (for example, change the password to the box when changing the password in our system, edit user data, manage forwarding), but this is more of an excess.
Any Drupal module must contain a .info file with service information about the module. The minimum set is the name of the module, a brief description and the version of the kernel for which it was written. But in our case, you need to specify another field - dependencies. The logic of the module provides for the creation of mailboxes whose login matches the user login. But in order not to deprive users of the ability to create Cyrillic logins and not to surprise Yandex, we need a transliteration module. Thus, the yandex_pdd.info file will look like this:
Naturally, before installing the module, you need to remember to install this very transliteration in yourself.
Another required file is .install (in our case, yandex_pdd.install), which defines the database module used and the necessary actions when installing and removing the module. To work we need one database and two variables. First, let's define the base structure ( hook_schema () )
The first two columns, I think, do not cause questions. In the third column, we will record the login of the e-mail box itself. The fourth column should be disassembled separately. In CMS Drupal, to activate a user, it is necessary that he follow the link sent to him by e-mail and set his password. The well-known fact that part of the accounts will never be activated (part of the spam bots and just strange people), because it makes sense to create a box when the user sets a new password. Actually, this at the same time allows us to create a box with the same password. I will touch upon this question below.
When a module is removed, the bases described in the diagram are automatically deleted. But variables, cached data, etc. it should be removed by hook_uninstall () .
The parameters yandex_pdd_domain and yandex_pdd_authtoken specify the domain in which the boxes will be created, and the API key, respectively. I will tell about them in more detail later.
The necessary foundation for the work of the module has been laid, and we can start writing the module code itself. We will have it, as it should be, in the file with the .module extension (yandex_pdd.module).
If the Drupal module needs to be registered in the menu, create any pages, etc., we need to describe the entire structure and the necessary actions when following links using the hook_menu () hook. In our case, two URLs will be used: the module settings page and the redirection to the mailbox.
Note the use of the t () system function. It allows you to translate text elements into the current system language. And yes, on the mailbox page we don’t need this feature.
In the previous section, we told our CMS that the page for entering the data needed by the module will be placed along the path admin / config / content / yandex_pdd and processed by the main_config function. Actually, the CMS does not really know what the page will actually do, but it knows that when accessing this path you need to access this function.
To create a page, we get a drupalo-understandable array of form fields by calling the system function drupal_get_form () to the user function pdd_config_form .
The result is passed to the drupal_render () function, which assembles the array into the ready html-code of the page.
The form contains only two fields:
Naturally, the results of filling out the form we need to save. The pdd_config_form_submit function is responsible for this, which simply saves the field values to system variables.
Another small piece of code is the hook_help () implementation, which displays help information about the module in the corresponding section of the admin part. Regarding this feature, I did not bother and followed the path of minimalism.
Dealt with the administrative part. It's time to do custom, all the functionality of which can be divided into the stage of creation and stage of work.
Not all of our users may need another e-mail, even in the domain of their favorite site. Yes, and we have nothing to produce a huge number of unused boxes. Therefore, we will add a checkbox to the user’s registration form, which will allow him to choose whether to create a box or not. Any form in Drupal can be changed using hook_form_alter () . With the appointment of some elements of the form description array, we are already familiar. More details on all the others can be found on the forms help page .
A lot of text for one small checkbox.
When registering a user, we check whether the checkbox for creating a box in the form is checked, and if so, enter in the table information about the inactive box.
Creating a box is bound to a form change with user data by hook hook_field_attach_submit () . Thus, before the user first edits the data (changing the password), the box is not created.
Finally, our user received the box, although he doesn’t really know how to get there. It remains to implement the functionality of the transition to the post.
Actually, there are only two user functions: display the block and log in by mail. The block must first be described by hook hook_block_info ()
For the block, we still need to set the theme and the file with the formatting template. The theme is described by hook hook_theme () , which describes the implementation of the design of the elements of the module, which is described by the system.
And, actually, the file yandex-pdd-block.tpl.php .
For the block, we need to get a single value via the API - the number of new letters, then render the block itself by hook hook_block_view ()
The generated block will look something like this.
The final touch is the system link mailbox , which will transfer the user to the Yandex.Mail page and authorize by a one-time token. As we remember (or no longer remember), we previously specified that this link should be processed by the mailbox_login function. The life time of the token is only 30 seconds, because after receiving it, the user should immediately be redirected to the login page.
Here and I will say the end. Placed pieces of code compiled according to the specified file names should give you a complete module. I hope it will be useful to someone, and I will be happy to hear comments and recommendations on the code.
As you know, Drupal is positioned as a CMS, oriented developers and allowing through an extensive API to develop at least a system for managing the lunar base. In my post, I will not go into her praise and the most basic principles of developing modules for Drupal, however, Drupal beginner developers will certainly find the material useful, and I will be grateful for the advice and recommendations.
')
Formulation of the problem
Naturally, starting to write a module, you need to decide what functionality it will have. The module is designed for a social site where users can register. Therefore, it must:
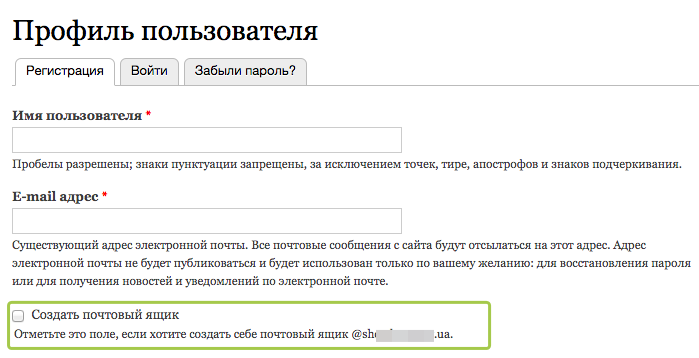
- when registering a user, offer him the opportunity to create a box on Yandex;
- when confirming registration, initiate the creation of the box;
- display to the authorized user a block with information about the number of new letters and the ability to go to the box;
- create an admin part to enter the required parameters.
Of course, it would be possible to add some other bonuses (for example, change the password to the box when changing the password in our system, edit user data, manage forwarding), but this is more of an excess.
.info file
Any Drupal module must contain a .info file with service information about the module. The minimum set is the name of the module, a brief description and the version of the kernel for which it was written. But in our case, you need to specify another field - dependencies. The logic of the module provides for the creation of mailboxes whose login matches the user login. But in order not to deprive users of the ability to create Cyrillic logins and not to surprise Yandex, we need a transliteration module. Thus, the yandex_pdd.info file will look like this:
name = Yandex PDD description = Yandex PDD mailboxes autocreation. core = 7.x dependencies[] = transliteration Naturally, before installing the module, you need to remember to install this very transliteration in yourself.
Install and uninstall file
Another required file is .install (in our case, yandex_pdd.install), which defines the database module used and the necessary actions when installing and removing the module. To work we need one database and two variables. First, let's define the base structure ( hook_schema () )
function yandex_pdd_schema() { $schema['yandex_pdd'] = array( 'fields' => array( 'id' => array('type' => 'serial', 'not null' => TRUE), // 'uid' => array('type' => 'int', 'unsigned' => TRUE, 'not null' => TRUE, 'default' => 0,), // 'login' => array('type' => 'varchar', 'length' => 100, 'not null' => TRUE), // 'activated' => array('type' => 'varchar', 'length' => 1, 'not null' => TRUE) // ), 'primary key' => array('id'), ); return $schema; } The first two columns, I think, do not cause questions. In the third column, we will record the login of the e-mail box itself. The fourth column should be disassembled separately. In CMS Drupal, to activate a user, it is necessary that he follow the link sent to him by e-mail and set his password. The well-known fact that part of the accounts will never be activated (part of the spam bots and just strange people), because it makes sense to create a box when the user sets a new password. Actually, this at the same time allows us to create a box with the same password. I will touch upon this question below.
When a module is removed, the bases described in the diagram are automatically deleted. But variables, cached data, etc. it should be removed by hook_uninstall () .
function yandex_pdd_uninstall() { variable_del('yandex_pdd_domain'); variable_del('yandex_pdd_authtoken'); cache_clear_all('yandex_pdd','cache',TRUE); menu_rebuild(); } The parameters yandex_pdd_domain and yandex_pdd_authtoken specify the domain in which the boxes will be created, and the API key, respectively. I will tell about them in more detail later.
The necessary foundation for the work of the module has been laid, and we can start writing the module code itself. We will have it, as it should be, in the file with the .module extension (yandex_pdd.module).
Menu items
If the Drupal module needs to be registered in the menu, create any pages, etc., we need to describe the entire structure and the necessary actions when following links using the hook_menu () hook. In our case, two URLs will be used: the module settings page and the redirection to the mailbox.
function yandex_pdd_menu(){ $items = array(); $items['admin/config/content/yandex_pdd'] = array( // - 'title' => t('Yandex PDD'), // <title> 'page callback' => 'main_config', // , 'type' => MENU_NORMAL_ITEM, // CMS 'access callback' => TRUE, // ); $items['mailbox'] = array( 'title' => 'Yandex PDD login', 'page callback' => 'mailbox_login', 'type' => MENU_CALLBACK, 'access callback' => TRUE, ); return $items; } Note the use of the t () system function. It allows you to translate text elements into the current system language. And yes, on the mailbox page we don’t need this feature.
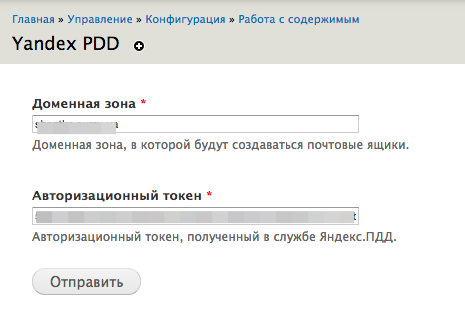
Setup page
In the previous section, we told our CMS that the page for entering the data needed by the module will be placed along the path admin / config / content / yandex_pdd and processed by the main_config function. Actually, the CMS does not really know what the page will actually do, but it knows that when accessing this path you need to access this function.
function main_config(){ $form = drupal_get_form('pdd_config_form'); // $form = drupal_render($form); // return $form; } To create a page, we get a drupalo-understandable array of form fields by calling the system function drupal_get_form () to the user function pdd_config_form .
function pdd_config_form($form, &$form_state){ $form=array(); $form['pdd_domain'] = array( // - '#type' => 'textfield', // '#title' => t('Domain zone'), // , '#description' => t('A domain zone in which email should be created.'), // '#default_value' => variable_get('yandex_pdd_domain'), // '#required' => 1, // ); $form['authtoken'] = array( '#type' => 'textfield', '#title' => t('Auth Token'), '#description' => t('Authorization token obtained at Yandex.PDD service.'), '#default_value' => variable_get('yandex_pdd_authtoken'), '#required' => 1, ); $form['submit'] = array( '#type' => 'submit', '#value' => t('Submit'), ); return $form; } The result is passed to the drupal_render () function, which assembles the array into the ready html-code of the page.
The form contains only two fields:
- pdd_domain - domain tied to Yandex.PDD in which the boxes will be created;
- authtoken is an authentication token obtained in the Mail API settings for the domain.
Naturally, the results of filling out the form we need to save. The pdd_config_form_submit function is responsible for this, which simply saves the field values to system variables.
function pdd_config_form_submit($form, &$form_state){ variable_set('yandex_pdd_domain', $form_state['values']['pdd_domain']); variable_set('yandex_pdd_authtoken', $form_state['values']['authtoken']); } Another small piece of code is the hook_help () implementation, which displays help information about the module in the corresponding section of the admin part. Regarding this feature, I did not bother and followed the path of minimalism.
function yandex_pdd_help($path, $arg) { switch ($path) { case "admin/help#yandex_pdd": return '<p>'. t("Yandex PDD mailboxes management module.") .'</p>'; break; } } Dealt with the administrative part. It's time to do custom, all the functionality of which can be divided into the stage of creation and stage of work.
Creating a box
Not all of our users may need another e-mail, even in the domain of their favorite site. Yes, and we have nothing to produce a huge number of unused boxes. Therefore, we will add a checkbox to the user’s registration form, which will allow him to choose whether to create a box or not. Any form in Drupal can be changed using hook_form_alter () . With the appointment of some elements of the form description array, we are already familiar. More details on all the others can be found on the forms help page .
function yandex_pdd_form_alter(&$form, &$form_state, $form_id){ if($form_id=='user_register_form'){ // $form['account']['createmail']=array( // '#type' => 'checkbox', '#title' => t('Create a mailbox'), '#description' => t('Check this box if you want to create a mailbox @'.variable_get('yandex_pdd_domain').'.'), '#required' => 0, '#access' => 1, // '#weight' => 10 // ( ) ); } } A lot of text for one small checkbox.
When registering a user, we check whether the checkbox for creating a box in the form is checked, and if so, enter in the table information about the inactive box.
function yandex_pdd_user_insert(&$edit, $account, $category){ if($account->createmail){ $transliterated = transliteration_get($account->name, '_'); // $pattern = '/[^a-zA-Z0-9]/'; // , $transliterated = preg_replace($pattern, '-', $transliterated); // alphanumeric $newbox = db_insert('yandex_pdd'); // $newbox->fields(array('uid' => $account->uid, 'login' => strtolower($transliterated), 'activated' => '0')); // $res = $newbox->execute(); // watchdog('yandex_pdd',print_r('Res: '.$res,1)); // CMS } } Creating a box is bound to a form change with user data by hook hook_field_attach_submit () . Thus, before the user first edits the data (changing the password), the box is not created.
function yandex_pdd_field_attach_submit($entity_type, $entity, $form, &$form_state) { global $user; if($entity_type == 'user' and $user->uid > 0) { // user $select = db_select('yandex_pdd','ypdd'); $select->addField('ypdd', 'id'); $select->addField('ypdd', 'login'); $select->addField('ypdd', 'activated'); $select->condition('uid', $user->uid); $entries = $select->execute()->fetchAssoc(); // if (array_key_exists('login', $entries) and $entries['login'] != '' and $entries['activated'] == 0) { // $mailboxcreate = simplexml_load_file('https://pddimp.yandex.ru/reg_user_token.xml?token='.variable_get('yandex_pdd_authtoken').'&u_login='.$entries['login'].'&u_password='.$form["#user"]->pass); // XML- if ($mailboxcreate->ok[0]) { // $num_updated = db_update('yandex_pdd'); $num_updated->fields(array('activated' => '1')); $num_updated->condition('uid', $user->uid); $res = $num_updated->execute(); // } elseif ($mailboxcreate->error[0]) { // API foreach($mailboxcreate->error[0]->attributes() as $key => $value) { $mbc[$key] = (string)$value; } watchdog('yandex_pdd',"Can't create new mailbox. Reason: ".$mbc['reason']); // } else { // watchdog('yandex_pdd','Unknown error while creating mailbox.'); // } } } } Finally, our user received the box, although he doesn’t really know how to get there. It remains to implement the functionality of the transition to the post.
Working functionality
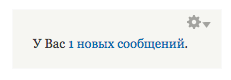
Actually, there are only two user functions: display the block and log in by mail. The block must first be described by hook hook_block_info ()
function yandex_pdd_block_info() { $blocks['mailbox_status'] = array( // 'info' => t('Mailbox status'), // 'cache' => DRUPAL_CACHE_PER_ROLE, // ); return $blocks; } For the block, we still need to set the theme and the file with the formatting template. The theme is described by hook hook_theme () , which describes the implementation of the design of the elements of the module, which is described by the system.
function yandex_pdd_theme() { return array( 'yandex_pdd_block' => array( // 'variables' => array( // 'newmail' => NULL ), 'template' => 'yandex-pdd-block', // ) ); } And, actually, the file yandex-pdd-block.tpl.php .
<div class="yandexpdd"><?php print t('You have ').'<a href="/mailbox" target="_blank">'.$newmail.t(' new messages').'</a>.'; ?></div> For the block, we need to get a single value via the API - the number of new letters, then render the block itself by hook hook_block_view ()
function yandex_pdd_block_view($delta = '') { global $user; if ($user->uid > 0) { // , $select = db_select('yandex_pdd','ypdd'); $select->addField('ypdd', 'login'); $select->condition('uid', $user->uid); $entries = $select->execute()->fetchAssoc(); // $unreadmailxml = simplexml_load_file('https://pddimp.yandex.ru/get_mail_info.xml?token='.variable_get('yandex_pdd_authtoken').'&login='.$entries['login']); // if ($unreadmailxml->ok[0]) { // foreach($unreadmailxml->ok[0]->attributes() as $key => $value) { // $unreadmail[$key] = (string)$value; } $blocks = array(); $blocks['subject'] = null; $blocks['content'] = theme('yandex_pdd_block', array('newmail' => $unreadmail['new_messages'])); return $blocks; // } elseif ($unreadmailxml->error[0]) { foreach($unreadmailxml->error[0]->attributes() as $key => $value) { $unreadmail[$key] = (string)$value; } watchdog('yandex_pdd',"Can't get new mail info. Reason: ".$unreadmail['reason']); } else { watchdog('yandex_pdd','Unknown error while loading new mail info'); } } } The generated block will look something like this.
The final touch is the system link mailbox , which will transfer the user to the Yandex.Mail page and authorize by a one-time token. As we remember (or no longer remember), we previously specified that this link should be processed by the mailbox_login function. The life time of the token is only 30 seconds, because after receiving it, the user should immediately be redirected to the login page.
function mailbox_login(){ global $user; global $base_url; if ($user->uid > 0) { $select = db_select('yandex_pdd','ypdd'); $select->addField('ypdd', 'login'); $select->condition('uid', $user->uid); $entries = $select->execute()->fetchAssoc(); $tokenxml = simplexml_load_file('https://pddimp.yandex.ru/api/user_oauth_token.xml?token='.variable_get('yandex_pdd_authtoken').'&domain='.variable_get('yandex_pdd_domain').'&login='.$entries['login']); // if ($tokenxml->xpath('status/success')) { $tokenarr = $tokenxml->xpath('domains/domain/email/oauth-token'); header('Location: http://passport.yandex.ru/passport?mode=oauth&type=trusted-pdd-partner&error_retpath='.urlencode($base_url.'/').'&access_token='.(string)$tokenarr[0]); // . drupal_exit(); // CMS } elseif ($tokenxml->xpath('status/error')) { watchdog('yandex_pdd',"Can't get short-term auth token info. Reason: ".(string)$tokenxml->xpath('action/status/error')); } } } Conclusion
Here and I will say the end. Placed pieces of code compiled according to the specified file names should give you a complete module. I hope it will be useful to someone, and I will be happy to hear comments and recommendations on the code.
Source: https://habr.com/ru/post/245117/
All Articles