We write firmware for Arduino in C ++ with REST control through the serial port and the screen
This is the second post about Wi-Fi roboticak . It will say how not to do the firmware if you are a harsh programmer of microcontrollers and how can you do if you need maximum visibility and the ability to steer the firmware almost like a web application directly from the terminal.
That is, for example, by sending to the serial port something like
/ battery? act = statuswe will get back something like
{"status": "OK", "minValue": 600, "maxValue": 900, "value": 750, "percent": 50} For those who are too lazy to read the article, immediately refer to github and Yandex disk , whose githab is locked (thanks to MaximChistov ).
')
So, at some point I realized that I could not do without an Arduin, I took out Arduino Nano from the bins and bought a screen with an I2C adapter for it. As I tried to connect the screen, this is a separate song with the chorus, but in the end it turned out that I had a broken ground wire and the I2C screen address did not match any of the descriptions in the internet. After the successful launch of HelloWorld from the examples, I started thinking and what should I do with all this?
What was in the beginning
At the start there was the following:
- Arduino nano
- LCD screen 16x2 with an adapter on I2C
- I2C Screen Library
Task list:
- Management by HTTP REST type
- Display on the screen messages, notifications (more priority) and icons like system tray
- Determining the level of battery charge
- Power Management and Gun Shot
A little bit about the gun and the battery. To determine the level of charge, I connected the plus of the battery through a divider of 2x resistors of 43KΩ to the input A0. It remains only to calibrate the upper and lower values. My gun is not always on. When the unit is fed to the Arduin’s digital foot, the servo drive of the gun is powered through the field effect transistor and at the same time the laser sight. For a shot, it is necessary to gradually open the second transistor, including the motor of the gun itself, and gradually turn it off when the contact closes, which signals that a shot has happened, using ShIM (to reduce noise on the power supply).
I will also immediately clarify that, having looked at the RAMe size of the ATMega328, which is only 2 kilobytes, I was afraid and did not use dynamic memory. Only stack, only hardcore.
Basic skeleton for processing REST requests
Understanding what I need from the Arduin and driving out the test examples, I happily opened up the Arduino IDE and hung up. I obviously had a little single file and wanted a normal C ++ with backlighting and autocomplete. After some time, the insight came. The source is formatted as a library in the sketchbook / libraries, and the sketch itself creates a single object with the Setup () and Loop () methods and calls them accordingly.
Just in case, I’ll clarify that the Arduino SDK has two I / O abstractions. This is Print, which can be strangely deduced, and Stream , which is inherited from Print.
Base entities turned out such:
- Team. It is created from a string of the form / commandName? Arg1 = value1 & arg2 = value2 and contains the simplest argument parser.Interface
class Command { public: Command( char* str ); inline const char* Name() const { return _name; } inline const char* Params() const { return _params; } const char* GetParam( const char* paramName ); bool GetIntParam( const char* paramName, int* out ); bool GetDoubleParam( const char* paramName, double* out ); bool GetStringParam( const char* paramName, const char** out ); private: char* _name; char* _params; size_t _paramsLen; }; - Command handler It processes the command and sends the response in the form of JSON.Interface
class CommandHandler { public: virtual void HandleCommand( Command& cmd, Print &output ); static void SendError( Print &output, const char* err ); static void SendOk( Print &output ); static void SendErrorFormat( Print &output, const char* fmt, ... ); }; - Request handler Creates a command and routes it to the appropriate handler, if any.Interface
struct HandlerInfo { const char* command; CommandHandler* handler; HandlerInfo(): command(0), handler(0) {} HandlerInfo(const char* c, CommandHandler* h): command(c), handler(h) {} }; class RequestHandler { public: RequestHandler(); void SetHandlers( HandlerInfo* handlers, size_t count ); void HandleRequest( char* request, Print& output ); private: HandlerInfo* _handlers; size_t _handlersCount; };
To handle requests from the serial port (or even some Stream'a) was written
StreamRequestHandler
class StreamRequestHandler : public RequestHandler { public: static const size_t BufferSize = 128; StreamRequestHandler( Stream& stream ); void Proceed(); private: Stream& _stream; char _requestBuf[BufferSize]; size_t _requestLen; }; It is time to test all this. To do this, you need to create an instance of StreamRequestHandler, passing it to the Serial constructor (which is actually the HardwareSerial singleton), transfer to the SetHandlers array of command handlers and pull the Proceed method somewhere inside the loop ().
The first handler was
Pinghandler
class PingHandler : public CommandHandler { public: virtual void HandleCommand( Command& cmd, Print &output ) { SendOk(output); } }; Working with screen
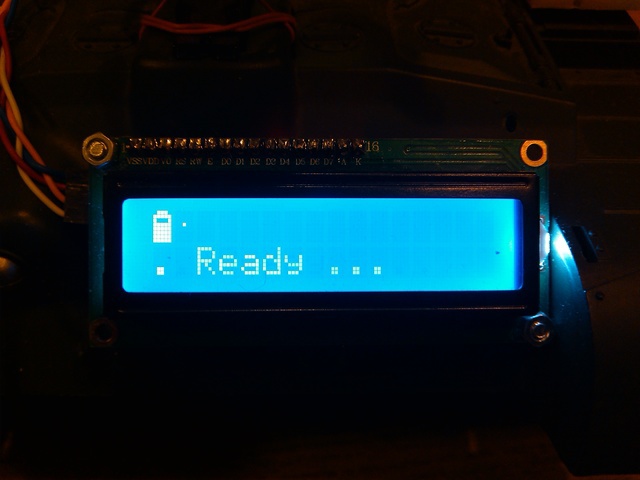
After a successful response to the ping, I wanted to read something on the screen and see the battery charge there. The standard 16x2 screen has, oddly enough, two lines of 16 characters each, and also allows you to override the images for the first eight characters. Based on this, I decided to take the first 8 acquaintances of the top line under the system tray, the second 8 for the time being not to touch, and to display all messages in the bottom line.
Regular messages will be displayed in a creeping line, and priority messages will be no longer than 16 characters and displayed in the center, interrupting the current creeping line for display, if necessary. In order not to fence coherent lists on pointers, the maximum number of messages in the queue was limited to 8 regular and 4 priority, which allowed using the usual ring buffer for their storage.
The icons in the system tray are ordinary characters with codes from 0 to 7. To display the icon, you must first reserve it by receiving iconID (which is just the character code), after which you can specify the image itself for iconID. Animated icon can be obtained by constantly changing the picture. The screen is a mockery withstand without problems.
What is the result?
class DisplayController { public: static const uint8_t MaxIcons = 8; static const uint8_t Rows = 2; static const uint8_t Cols = 16; static const uint8_t IconsRow = 0; static const uint8_t IconsCol = 0; static const int MaxMessages = 8; static const unsigned MessageInterval = 150; static const uint8_t MessageRow = 1; static const uint8_t MessageCol = 0; static const uint8_t MessageLen = 16; static const int MaxAlerts = 4; static const unsigned AlertInterval = 1000; static const uint8_t AlertRow = 1; static const uint8_t AlertCol = 0; static const uint8_t AlertLen = 16; private: struct Message { const char* text; int length; int position; inline Message() { Clear(); } inline void Clear() { text = 0; length = 0; position = 0; } }; struct Alert { const char* text; int length; bool visible; inline Alert() { Clear(); } inline void Clear() { text = 0; length = 0; visible = false; } }; public: DisplayController( uint8_t displayAddr ); void Init(); int8_t AllocateIcon(); void ReleaseIcon(int8_t iconId); void ChangeIcon(int8_t iconId, uint8_t iconData[]); void UpdateIcons(); void Proceed(); bool PutMessage( const char* text ); bool PutAlert( const char* text ); inline bool HasMessages() { return _messages[_messageHead].text != 0; } inline bool HasAlerts() { return _alerts[_alertHead].text != 0; } void UpdateMessage(); void UpdateAlert(); private: LiquidCrystal_I2C _lcd; int _iconBusy; unsigned long _messageTick; Message _messages[MaxMessages]; int _messageHead; int _messageTail; unsigned long _alertTick; Alert _alerts[MaxAlerts]; int _alertHead; int _alertTail; }; And then everything is trite
It remains only to add the logic of command handlers and register them in the router. Processors, except for PingHandler, turned out as many as three: a battery, a gun and the general status of everything at once. Of particular interest, they are not, therefore, who are interested, just look at the source.
The future plans include finishing the DisplayController so that it can show not only constant strings, but also, for example, strings received as command parameters. The problem here is that there is no freeing up of memory and signaling that the message is displayed and deleted from the DisplayController.
I also plan to add a handler that will show the microphone and speaker in the tray when the corresponding audio channel is connected.
Actually, thank you for your attention. I hope that someone my experience will come in handy. All the code except for the sketch is on github and more , and the sketch itself looks like this:
Sketch
#include <Wire.h> #include <LiquidCrystal_I2C.h> #include <Tank.h> Tank tank(19200, 0x3F, A0, 4, 5, 6); void setup() { tank.Setup(); } void loop() { tank.Loop(); } Source: https://habr.com/ru/post/245043/
All Articles