WordPress for paranoid, part 1
So, if you are a happy owner of nginx , a noble paranoid and, after some devil, you decided to install wordpress, then ... The first thing that came to mind was “we must restrict this creature’s freedom!”.
Account settings, as well as the settings for php5-fpm, I will omit, since everyone has their own cockroaches, and someone even runs apache. But here are common for Wordpress, I will describe in this part. I will write about what I did, what happened and why.
This is a typical set for Wordpress 4.0.
What do we need? We need to restrict access to php files and admin panel, render statics, close xmlrpc.
')
In my wordpress version, I do not save user comments and do not use xmlrpc. How to safely give access to comments, as well as a number of other pressing issues on nginx and wordpress will be examined in the second part of this article, which, of course, will be created in the presence of these. Since there is no apache, the .htaccess file is useless.
Therefore, close the above whistlers:
After that, when we request xmlrpc.php and .htaccess, we will have a 404 error. Although it is possible to issue both 403 and 200 “trololo”, but this is already a matter of taste.
Next, we restrict access to the rest. By restriction, I mean the authorization request, namely auth_basic .
* This code will force nginx to request authorization when requesting statics from / wp-admin /, statics are issued by nginx.
Next, we restrict access to files:
A record of the form /wp-includes/.*?\.php includes all php files in wp-includes and below.
Done, we have closed access. Now we will selectively include the elements we need for the public version, and this is further down the text.
Since we have closed wp-login.php with authorization, then, having written a secured post and having thrown off the link and password (from the post) to the desired user, the user ... will be frightened by the unknown window. Since the password is sent to the wp-login.php file as a post request with GET parameters ? Action = postpass .
nginx imposes a number of restrictions:
What to do?
There is a solution! Create a symbolic link to wp-login.php in the same folder. I have this wp-postpass.php . A symbolic link is needed so that if we update wordpress, then wp-login.php will also be updated and the file will be updated by reference ... That's why I love linux.
Next in the nginx config we write:
In this case, when requesting /wp-postpass.php?action=postpass, the wppostpass variable will take the value 1, and the location will work to the end. In the case of a bare request wp-postpass.php or with other parameters (as it sees here is checked from the beginning ^ to the end of the $ string) there will be an error 403, which means access is denied.
For such a scheme, we need ngx_http_substitutions_filter_module . In the config should be prescribed
Then nginx automatically changes the wp-login.php? Action-postpass link to wp-postpass.php? Action-postpass, and the user can authenticate with a password to view the protected entry.
In the load, js, css and small gifs do not play a role, since with the presence of memory, nginx stores them in its cache, and if there is enough memory, all the statics of the site can be placed on the tmpfs section (3.8 GB read-write and 745k iops' for example).
But in the case of one server, someone will receive the file earlier, someone later, and if we have a lot of clients, then when distributing 1000 files of 1MB each, the channel will work for good if you do not enter a rate.
Here for these cases caching CDN providers are also thought up. For example - cloudflare .
The principle of the work is remarkably illustrated in their picture:
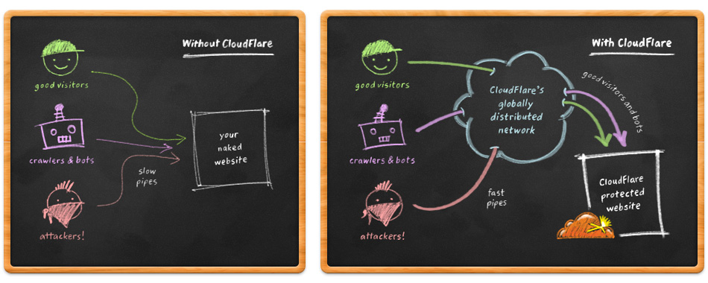
Without CDN, all requests go to the destination site, and with CDN requests go to the CDN provider, which acts as an intermediate link. And in this case, if 1000 users request a file of 1 MB in size, this file will be requested by the CDN provider 1 time for their cache, and then distributed to that 1000 users. DDoS options in à la google docs when asked for big_photo.jpg ? Ver = 1 , then big_photo.jpg ? Ver = 2 , etc. does not work if moderate caching mode is selected (it has a cloudflare) and only static caching, then when you request big_photo.jpg , big_photo.jpg? ver = 1 or big_photo.jpg? ver = 123, big_photo.jpg is requested from the server and then distributed he and only he, even if the client requests a file with arguments (they are simply ignored). This solves the problem of the ddos cdn provider, which in fact must protect from ddos.
I did not climb much, but I found that the default statics are stored in:
Accordingly, for them we will make new rules in location and will use nginx with ngx_http_substitutions_filter_module .
It is not necessary to install this module, it is possible to do with rewrite alone, but by itself it is useful and through it you can improve one or another output from backend.
Add to the config:
To filter the output of html and xml documents.
Then:
Thereby the links in html and xml will be rewritten. Now it remains to make the end user, knowing the original link, not abuzil server, and was sent to the CDN.
As a result, if you request any php file, nothing will happen. And when requesting static (all that is not php in the case of WP, which is logical), the user will be redirected to the static server.
The configuration of the nginx profile for the static server will be discussed below .
Then it remains only to make an account on cloudflare (or any) of another cdn provider that you are going to use, register their DNS in yourself and enable caching of the domain static.example.com, without caching example.com, where wordpress works.
Since we transferred feedback to the statics server, you need to configure it correctly.
You need to allow access to the localhost, access to the server itself from an external IP (for example, which script) and to the provider's CDN servers. For example, CloudFlare subnets can be found here via this link. And, of course, to close access to all the rest. As if the CDN suddenly decides to send traffic to the line ... leave a free channel.
You also need to make the dummy directory as root for the entire statics server.
So that the requests that came to the static server for location / or = / and which do not correspond to the location specified there, go to that dummy directory. This directory is written inside server {} .
Further location greeting:
This is the text that the user who requested the root will see. You can write anything, the main thing when used inside is "to shield quotes as \" .
Then you should write the location 's on static:
When you request static.example.com/images/pic.png, the server will give the file from the directory / wp-includes / images / pic.png file, but when you request static.example.com/images/pic.php, the location will click and eventually will give a file from dummy / images / pic.php, which is not present and as a result, error 404.
Still need to add rates for speed.
After 16 megabytes, the speed is reduced to 2 MB per second per stream . This is so that the CDN does not clog the entire channel when caching a huge file.
In the case of cloudflare, the maximum file size (at the time of this writing) is 512 megabytes , and the supported formats for the free tariff plan include : css, js, jpg, jpeg, gif, ico, png, bmp, pict, csv, doc, pdf , pls, ppt, tif, tiff, eps, ejs, swf, midi, mid, ttf, eot, woff, otf, svg, svgz, webp, docx, xlsx, xls, pptx, ps, class, jar.
There are two cases at once:
To do this, we write in the server {} of our config for nginx code:
Then if the request arguments contain attachment_id, eval, duplicate, base64, substring, preg_replace, create_function, nginx will return error 403, and the request will not be passed to the dynamics for the execution of a potential vulnerability.
The purpose of this module has been reviewed here .
Task: wordpress by default opens links to the media file in the current window. And you need to new.
Solution: add a small code to the nginx command line.
After that, the target = "_ blank" will be added to the links to media files using frontend.
Task: everywhere xmlrpc.php links ... need to be removed.
Solution: add a small code to the nginx command line.
Well, in xmlrpc.txt you can shove the Easter egg.
Good luck to you!
Account settings, as well as the settings for php5-fpm, I will omit, since everyone has their own cockroaches, and someone even runs apache. But here are common for Wordpress, I will describe in this part. I will write about what I did, what happened and why.
Folders
- wp-admin
- wp-content
- wp-includes
Php files
- wp-activate.php
- wp-blog-header.php
- wp-comments-post.php
- wp-config.php
- wp-config-sample.php
- wp-cron.php
- wp-links-opml.php
- wp-load.php
- wp-login.php
- wp-mail.php
- wp-postpass.php (about this below )
- wp-settings.php
- wp-signup.php
- wp-trackback.php
- xmlrpc.php
- xmlrpc.txt (more on this below )
This is a typical set for Wordpress 4.0.
What do we need? We need to restrict access to php files and admin panel, render statics, close xmlrpc.
')
Restrict access to the admin panel and to php files
In my wordpress version, I do not save user comments and do not use xmlrpc. How to safely give access to comments, as well as a number of other pressing issues on nginx and wordpress will be examined in the second part of this article, which, of course, will be created in the presence of these. Since there is no apache, the .htaccess file is useless.
Therefore, close the above whistlers:
 location ~ * ^ / (\. htaccess | xmlrpc \ .php) $ {
  return 404;
 }
After that, when we request xmlrpc.php and .htaccess, we will have a 404 error. Although it is possible to issue both 403 and 200 “trololo”, but this is already a matter of taste.
Next, we restrict access to the rest. By restriction, I mean the authorization request, namely auth_basic .
 location ~ * ^ / wp-admin / (. * (? <! (\. php))) $ {
    auth_basic "protected by password";
    auth_basic_user_file users / somefile;
    root / path / to / site / root;
    # more options
 }
* This code will force nginx to request authorization when requesting statics from / wp-admin /, statics are issued by nginx.
Next, we restrict access to files:
 location ~ * (/ wp-admin / | / wp-cron \ .php | / wp-config \ .php | / wp-config-sample \ .php | / wp-mail \ .php | / wp-settings \. php | / wp-signup \ .php | / wp-trackback \ .php | / wp-activate \ .php | / wp-links-opml \ .php | / wp-load \ .php | / wp-comments-post \ .php | / wp-blog-header \ .php | / wp-login \ .php | / wp-includes /.*? \. php | / wp-content /.*? \. php) {
    auth_basic "protected by password";
    auth_basic_user_file users / somefile;
    root / path / to / site / root;
    # more options
 }
A record of the form /wp-includes/.*?\.php includes all php files in wp-includes and below.
Done, we have closed access. Now we will selectively include the elements we need for the public version, and this is further down the text.
We include secure entries in our secure wordpress
Since we have closed wp-login.php with authorization, then, having written a secured post and having thrown off the link and password (from the post) to the desired user, the user ... will be frightened by the unknown window. Since the password is sent to the wp-login.php file as a post request with GET parameters ? Action = postpass .
nginx imposes a number of restrictions:
- in location from nginx we cannot describe the parameters of the request;
- in an if expression, auth_basic cannot be used;
- a game with a variable in the config that is passed to 1 in case of a successful authorization will not bring anything, since the variable lives only in the current request .
What to do?
There is a solution! Create a symbolic link to wp-login.php in the same folder. I have this wp-postpass.php . A symbolic link is needed so that if we update wordpress, then wp-login.php will also be updated and the file will be updated by reference ... That's why I love linux.
Next in the nginx config we write:
 location ~ * (/wp-postpass\.php) {
    if ($ args ~ "^ action = postpass $") {
       set $ wppostpass 1;
    }
    if ($ wppostpass ~ 0) {
       return 403;
    }
    # more options
 }
In this case, when requesting /wp-postpass.php?action=postpass, the wppostpass variable will take the value 1, and the location will work to the end. In the case of a bare request wp-postpass.php or with other parameters (as it sees here is checked from the beginning ^ to the end of the $ string) there will be an error 403, which means access is denied.
For such a scheme, we need ngx_http_substitutions_filter_module . In the config should be prescribed
subs_filter 'https://example.com/wp-login.php??action=postpass' 'https://example.com/wp-postpass.php?action=postpass' gi;
Then nginx automatically changes the wp-login.php? Action-postpass link to wp-postpass.php? Action-postpass, and the user can authenticate with a password to view the protected entry.
We take out the statics on a separate server and connect the CDN
In the load, js, css and small gifs do not play a role, since with the presence of memory, nginx stores them in its cache, and if there is enough memory, all the statics of the site can be placed on the tmpfs section (3.8 GB read-write and 745k iops' for example).
But in the case of one server, someone will receive the file earlier, someone later, and if we have a lot of clients, then when distributing 1000 files of 1MB each, the channel will work for good if you do not enter a rate.
Here for these cases caching CDN providers are also thought up. For example - cloudflare .
The principle of the work is remarkably illustrated in their picture:
Without CDN, all requests go to the destination site, and with CDN requests go to the CDN provider, which acts as an intermediate link. And in this case, if 1000 users request a file of 1 MB in size, this file will be requested by the CDN provider 1 time for their cache, and then distributed to that 1000 users. DDoS options in à la google docs when asked for big_photo.jpg ? Ver = 1 , then big_photo.jpg ? Ver = 2 , etc. does not work if moderate caching mode is selected (it has a cloudflare) and only static caching, then when you request big_photo.jpg , big_photo.jpg? ver = 1 or big_photo.jpg? ver = 123, big_photo.jpg is requested from the server and then distributed he and only he, even if the client requests a file with arguments (they are simply ignored). This solves the problem of the ddos cdn provider, which in fact must protect from ddos.
I did not climb much, but I found that the default statics are stored in:
- / wp-content / uploads /
- / wp-content / themes /
- / wp-content / plugins /
- / wp-includes / js /
- / wp-includes / css /
- / wp-includes / certificates /
- / wp-includes / fonts /
- / wp-includes / images /
Accordingly, for them we will make new rules in location and will use nginx with ngx_http_substitutions_filter_module .
It is not necessary to install this module, it is possible to do with rewrite alone, but by itself it is useful and through it you can improve one or another output from backend.
Add to the config:
	 subs_filter_types text / html;
	 subs_filter_types text / xml;
To filter the output of html and xml documents.
Then:
 subs_filter 'https://example.com/wp-content/uploads/' 'https://static.example.com/uploads/' gi;
 subs_filter 'https://example.com/wp-content/themes/' '' https://static.example.com/themes/ 'gi;
 subs_filter 'https://example.com/wp-content/plugins/' 'https://static.example.com/plugins/' gi;
 subs_filter 'https://example.com/wp-includes/js/' 'https://static.example.com/js/' gi;
 subs_filter 'https://example.com/wp-includes/css/' 'https://static.example.com/css/' gi;
 subs_filter 'https://example.com/wp-includes/certificates/' 'https://static.example.com/certificates/' gi;
 subs_filter 'https://example.com/wp-includes/fonts/' 'https://static.example.com/fonts/' gi;
 subs_filter 'https://example.com/wp-includes/images/' '' https://static.example.com/images/ 'gi;
Thereby the links in html and xml will be rewritten. Now it remains to make the end user, knowing the original link, not abuzil server, and was sent to the CDN.
 location ~ * ^ / wp-content / themes / (. * (? <! (\. php))) $ {
	 rewrite ^ / wp-content /(.*)$ https://static.example.com/$1 permanent;
 }

 location ~ * ^ / wp-content / plugins / (. * (? <! (\. php))) $ {
	 rewrite ^ / wp-content /(.*)$ https://static.example.com/$1 permanent;
 }

 location ~ * ^ / wp-content / uploads / (. * (? <! (\. php))) $ {
	 rewrite ^ / wp-content /(.*)$ https://static.example.com/$1 permanent;
 }

 location ~ * ^ / wp-includes / js / (. * (? <! (\. php))) $ {
	 rewrite ^ / wp-includes /(.*)$ https://static.example.com/$1 permanent;
 }

 location ~ * ^ / wp-includes / css / (. * (? <! (\. php))) $ {
	 rewrite ^ / wp-includes /(.*)$ https://static.example.com/$1 permanent;
 }
 location ~ * ^ / wp-includes / certificates / (. * (? <! (\. php))) $ {
	 rewrite ^ / wp-includes /(.*)$ https://static.example.com/$1 permanent;
 }
 location ~ * ^ / wp-includes / fonts / (. * (? <! (\. php))) $ {
	 rewrite ^ / wp-includes /(.*)$ https://static.example.com/$1 permanent;
 }
 location ~ * ^ / wp-includes / images / (. * (? <! (\. php))) $ {
	 rewrite ^ / wp-includes /(.*)$ https://static.example.com/$1 permanent;
 }
As a result, if you request any php file, nothing will happen. And when requesting static (all that is not php in the case of WP, which is logical), the user will be redirected to the static server.
The configuration of the nginx profile for the static server will be discussed below .
Then it remains only to make an account on cloudflare (or any) of another cdn provider that you are going to use, register their DNS in yourself and enable caching of the domain static.example.com, without caching example.com, where wordpress works.
Static server setup
Since we transferred feedback to the statics server, you need to configure it correctly.
 allow 127.0.0.1;
 allow IPv4 server;
 allow IPv6 server;
 allow IP / subnet of CDN servers;
 ...
 allow IP / subnet of CDN servers;
 deny all;
You need to allow access to the localhost, access to the server itself from an external IP (for example, which script) and to the provider's CDN servers. For example, CloudFlare subnets can be found here via this link. And, of course, to close access to all the rest. As if the CDN suddenly decides to send traffic to the line ... leave a free channel.
You also need to make the dummy directory as root for the entire statics server.
root / path / to / site / dummy;
So that the requests that came to the static server for location / or = / and which do not correspond to the location specified there, go to that dummy directory. This directory is written inside server {} .
Further location greeting:
 location = / {
	 default_type text / html;
	 return 200 "c'est static, c'est simple: P";
 }
This is the text that the user who requested the root will see. You can write anything, the main thing when used inside is "to shield quotes as \" .
Then you should write the location 's on static:
 location ~ * ^ / uploads /.* (? <! (\. php)) $ {
	 root / path / to / site / root / wp-content;
	 autoindex off;
	 index index.html;
 }

 location ~ * ^ / themes /.* (? <! (\. php)) $ {
	 root / path / to / site / root / wp-content;
	 autoindex off;
	 index index.html;
 }

 location ~ * ^ / plugins /.* (? <! (\. php)) $ {
	 root / path / to / site / root / wp-content;
	 autoindex off;
	 index index.html;
 }

 location ~ * ^ / js /.* (? <! (\. php)) $ {
	 root / path / to / site / root / wp-includes;
	 autoindex off;
	 index index.html;
 }

 location ~ * ^ / css /.* (? <! (\. php)) $ {
	 root / path / to / site / root / wp-includes;
	 autoindex off;
	 index index.html;
 }

 location ~ * ^ / certificates /.* (? <! (\. php)) $ {
	 root / path / to / site / root / wp-includes;
	 autoindex off;
	 index index.html;
 }

 location ~ * ^ / fonts /.* (? <! (\. php)) $ {
	 root / path / to / site / root / wp-includes;
	 autoindex off;
	 index index.html;
 }

 location ~ * ^ / images /.* (? <! (\. php)) $ {
	 root / path / to / site / root / wp-includes;
	 autoindex off;
	 index index.html;
 }
When you request static.example.com/images/pic.png, the server will give the file from the directory / wp-includes / images / pic.png file, but when you request static.example.com/images/pic.php, the location will click and eventually will give a file from dummy / images / pic.php, which is not present and as a result, error 404.
Still need to add rates for speed.
 limit_rate_after 16m;
 limit_rate 2m;
After 16 megabytes, the speed is reduced to 2 MB per second per stream . This is so that the CDN does not clog the entire channel when caching a huge file.
In the case of cloudflare, the maximum file size (at the time of this writing) is 512 megabytes , and the supported formats for the free tariff plan include : css, js, jpg, jpeg, gif, ico, png, bmp, pict, csv, doc, pdf , pls, ppt, tif, tiff, eps, ejs, swf, midi, mid, ttf, eot, woff, otf, svg, svgz, webp, docx, xlsx, xls, pptx, ps, class, jar.
Request Filtering
There are two cases at once:
- When downloading media files, they receive a link of the form example.com/?attachment_id=XX , where XX is the page id for this media file. Appropriately going through 1, 2, 3 ... the user can download all the content, and that part which is not intended for him;
- php and full of sores. Probably, there is not so much the architecture of the language as the skills of the programmers and the settings of the environment in which this creation turns. But once put wordpress, we will be preparing for future bugs.
To do this, we write in the server {} of our config for nginx code:
 if ($ args ~ * "(attachment_id | eval | duplicate | base64 | substring | preg_replace | create_function)") {
	 return 403;
 }
Then if the request arguments contain attachment_id, eval, duplicate, base64, substring, preg_replace, create_function, nginx will return error 403, and the request will not be passed to the dynamics for the execution of a potential vulnerability.
Buns via subs_filter from nginx
The purpose of this module has been reviewed here .
Task: wordpress by default opens links to the media file in the current window. And you need to new.
Solution: add a small code to the nginx command line.
 subs_filter '<a href=\'https://static.example.com/uploads/(.*?)\'>' '<a href = \' https: //static.example.com/uploads/$1 \ 'target = \' _ blank \ '>' gi;
 subs_filter '<a href=\"https://static.example.com/uploads/(.*?)\">' '<a href = \ "https: //static.example.com/uploads/$1 \ "target = \" _ blank \ "> 'gi;
After that, the target = "_ blank" will be added to the links to media files using frontend.
Task: everywhere xmlrpc.php links ... need to be removed.
Solution: add a small code to the nginx command line.
subs_filter 'https://example.com/xmlrpc.php' 'https://example.com/xmlrpc.txt' gi;
Well, in xmlrpc.txt you can shove the Easter egg.
Afterword
- example.com and static.example.com replace with your servers. Examples will work not only with php5-fpm, but also with apache;
- The article considers only static caching in a CDN, without dynamic caching. The reason is very simple: at free rates, the cache update time is 30 minutes. That is, your page will be in the cache for half an hour. Although now you can switch to development mode every time you update the site (instead of selectively resetting the cache every time);
- The location shows the main points. I am guided by the fact that the reader does not put nginx and wordpress for the first time in his life. Take the article as a hint to action and no more;
- Descriptions of the regulars can be found here and read this article here. I use the negative look behind the construction when distributing statics, that is, the regular schedule takes the value of location , looks from the end to the beginning and if .php is not found, then the file is given. If php is found in the request, the location is incorrect, and since all locations exclude php , you will select root for dummy , in which there is no php file (just an empty folder) and which will return 404 ;
- CloudFlare .com is a great CDN provider, and already on a free plan you get a nehily functional that is enough for almost any project.
Good luck to you!
Source: https://habr.com/ru/post/244911/
All Articles