Automate testing of iOS applications using Calabash and Cucumber
In the process of developing any application, there comes a time when, due to the growth of functionality, labor costs for regression testing become excessively large. Another reason for the considerable labor intensity of testing iOS applications (as well as any other mobile applications) is the diversity of the line of supported devices and OS versions, the need to test in landscape and portrait modes, as well as under different conditions of connection to the Internet. The desire to optimize the testing process leads us to the need for its full or partial automation.
In this article I will talk about how we automate the testing of our applications (ICQ and Agent Mail.Ru), share our best practices in this area and mention the problems that we face.
About pumpkin and cucumbers
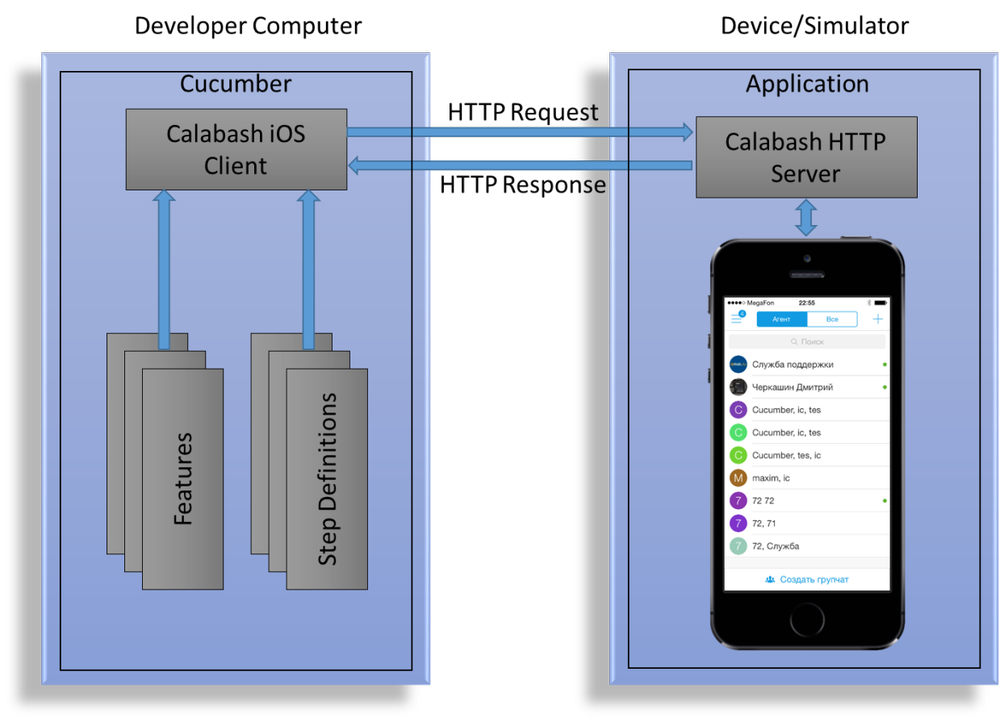
Our project for autotests uses a bunch of Calabash + Cucumber . Calabash is a framework for automating functional testing, which, in essence, is the driver that controls the operation of an application on a device or simulator. Cucumber provides a test infrastructure (running tests, parsing scripts, generating reports).
')
Architecturally, Calabash consists of two parts - client and server. The server part is an HTTP server that is embedded in the application under test and accepts requests to perform certain actions in the application, the client part is written in Ruby and implements an API for interacting with the server.
Cucumber uses the Gherkin language and the Given / When / Then pattern to describe the scenarios, where the
Given keyword specifies the initial conditions, When is the operation, Then is the final result. All scripts are placed in a special .feature file, which contains scripts related to a particular project feature.A typical test script looks like this:
@Login Feature: Login (IMIOS-4898) @ICQ @myChat @Agent @ALL_DEVICES @en Scenario Outline: Login with empty uin/password (IMIOS-4898 #6) Given I go on "LoginScreen" When I login with username "<username>" and password "<password>" Then I view alert with text "<text>" Examples: | username | password | text | | | passz | [_auth_wrong_data] | | 442657876 | | [_auth_wrong_data] | | | | [_auth_wrong_data] | For each scenario, you can specify a set of control tags. In particular, the applications for which this script should be run, the list of devices and the interface language are indicated. How to transfer the list of required tags at the start of the run, I will tell below.
It is obvious that a simple description of the script in a language understandable to man is completely inadequate for its use. In the next step, we need to implement each of its steps using Ruby, a Given-When-Then BDD pattern, and regular expressions.
Given /^I go on "(.*)"$/ do |screen| @page=page(Kernel.const_get(screen)) unless element_exists(@page.trait) cur_screen=Utils.current_screen # return current screen of application Utils.go_to(cur_screen, @page) # transition from screen1 to screen2 else print("Already on #{screen}\n") end @page.await(:timeout=>10) end Then /^I login with username "(.*)" and password "(.*)"(?: by (.*))?$/ do |username, password, protocol| if $App=="Agent" protocol||='mrim' steps %Q{Given I go on "PhoneLoginScreen"} @page = @page.go_to_login(protocol) else steps %Q{Given I go on "LoginScreen"} end @page = @page.login(username, password) End Then /^I view alert with text "(.*)"$/ do |text| @page.check_alert(text) end When running the tests, Cucumber takes one step of the script and searches for the desired implementation using a regular expression, substituting the parameters from the
Examples section, executes this implementation, and proceeds to the next step. If during the execution of the script there are no errors, then it is marked as PASS , otherwise - FAILED .These are the general principles for the execution of test scenarios. An attentive reader has already had a question regarding the mythical object
@page , so we smoothly proceed to the examination of the Page Object design pattern.Page object and what it eats
Page Object is a term derived from the scope of UI testing of web applications. For iOS, the name Screen Object is sometimes found. We will use the first option as the most commonly used.
Page Object is a design pattern that is widely used in automated testing and allows you to separate the logic of test execution from their implementation. Page Object models the screens (or pages) of the application under test as objects. As a result, we get a set of classes, each of which is responsible for working with a separate screen of the application. This approach significantly reduces the amount of duplicate code, because the same screen objects can be used in different tests. The main advantage of Page Object is that if the user interface changes, you can only perform a fix in one place, and not fix every test in which this interface is used.
Methods of screen classes can be divided into three logical parts:
- Locators - return locators by which Calabash finds the right interface elements.
- Actions - implement all possible user actions on the screen
- Assertions - implement screen checks
Below is a snippet of code for the
CreateGroupChatScreen class: require 'calabash-cucumber/ibase' require_relative 'BaseScreen' class CreateGroupChatScreen < BaseScreen # Locators ******************************************************************** def title "UINavigationBar NavigationTitleView" end def back_button "view:'UINavigationBar' view:'MRButtonWithTintedImage' index:0" end def create_button "view:'UINavigationBar' view:'MRButtonWithTintedImage' index:1" end # ... # Actions ********************************************************************* # touch create button ant return ChatScreen def create mtouch(create_button) page(ChatScreen).await end # remove last member from members list def remove_selected mtouch(remove_button) self end # remove all members from members list def remove_all_selected until get_selected_members.empty? remove_selected end self end # ... # Assertions ****************************************************************** def check_selected_members(expected_members) actual_members=get_selected_members expected_members=expected_members.split(',') unless expected_members.empty? fail("Incorrect members list") unless actual_members.sort.eql?(expected_members.sort) self end def check_title(title) fail("Incorrect title") if get_title!=title self end def check_cl(cl) cl=cl.split(',') fail("Incorrect CL (actual - #{get_cl}, expected - #{cl})") unless get_cl.eql?(cl) self end # ... end When implementing screen classes, you need to pay attention to some aspects. The locators used in the above example are “fragile” and unreliable, and when they change the interface, they are more likely to stop working. Therefore, in the project we assign
accessibilityIdentifier each UI element, unique within the application and uniquely identifying the desired element. In this case, locators take on this form and are no longer afraid of UI changes: def title "view accessibilityIdentifier:'conference_captionLabel'" end def back_button "view accessibilityIdentifier:'conference_backButton'" end def create_button "view accessibilityIdentifier:'conference_createButton'" end Screen classes are inherited from the base class
BaseScreen , which implements common functionality for all screens (input in text fields, clicks with checking for the existence of an element, etc.).All screen class methods return pointers to Page Object. If the method call does not change the current screen,
self returned, otherwise a pointer to the desired Page Object is returned. This approach allows you to record the steps of the script in a convenient form, sequentially calling the necessary methods. Then /^I invite contact "(.*)"/ do |contact| steps %Q{Given I go on "ContactsScreen"} @page = @page.show_all_contacts if @page.contact_exist?(contact) @page .chat(contact) .chat_info .invite else print("Contact #{contact} not exists") end end Test bench management
The joy of testing automation would be incomplete without automating the process of preparing the build, running test scripts and sending test reports.
Our first attempts to run autotests on the server with TeamCity failed because Calabash refused to work in a monitorless configuration. Therefore, a forced measure was the launch of tests on a separate machine using Mac OS Automator scripts.

The main stages of the script:
- According to the configuration ID (for example,
ImIOS_ICQ00Develop) requests the number of the last build and the current version number to TeamCity - Makes
git checkoutfrom the Git repository on theteamcity-build-ios-< .1>tag (with this tag, TeamCity marks the collected commits) - Download and link to the project the latest version of Calabash.framework
- Performs branding and starts building a project using xcodebuild. Branding refers to setting up a project and loading the necessary resources to further build a specific application. The assembly is made both for the simulator (
-sdk iphonesimulator), and for devices (-sdk iphoneos). - Runs tests directly by calling a bash script.
Running a test is very simple:
$ cucumber tests/features We need to ensure the launch of tests on all models of devices (simulators) and with all supported interface languages. To run test scripts on a specific simulator, you must pass the
DEVICE_TARGET parameter with the UDID of the desired simulator. With the installation of the desired language, the situation is more complicated. At the moment, Calabash-iOSs does not support the installation of the desired language on the iOS-simulator version 8. But if you delve into the depths of iOS Simulator, you can find the .GlobalPreferences.plist file, which contains the AppleLanguages parameter, which defines the interface language. You can set its value using the following script using the CFPropertyList gems. def Utils.set_language_in_iossim8(lang) `find ~/Library/Developer/CoreSimulator/Devices/#{$TargetUDID} -type f -name ".GlobalPreferences.plist"`.split("\n").each do |fn| plist = CFPropertyList::List.new(:file => fn) data = CFPropertyList.native_types(plist.value) data["AppleLanguages"][0]=lang plist.value = CFPropertyList.guess(data) plist.save(fn, CFPropertyList::List::FORMAT_BINARY) end end Also in the Cucumber call command, a list of tags is specified, which determines which scripts need to be run. The start script consistently performs runs on each of the specified simulators and with each interface language, passing this data in the form of tags, and Cucumber executes only those test scripts that correspond to the specified tags.
#simulators list for launch sim=(\ 'iPhone 4s (7.1 Simulator)'\ 'iPhone 5 (7.1 Simulator)'\ 'iPhone 5s (7.1 Simulator)'\ 'iPad 2 (7.1 Simulator)'\ 'iPad Retina (7.1 Simulator)'\ 'iPad Air (7.1 Simulator)'\ 'iPhone 4s (8.0 Simulator)'\ 'iPhone 5 (8.0 Simulator)'\ 'iPhone 5s (8.0 Simulator)'\ 'iPhone 6 (8.0 Simulator)'\ 'iPhone 6 Plus (8.0 Simulator)'\ 'iPad 2 (8.0 Simulator)'\ 'iPad Retina (8.0 Simulator)'\ 'iPad Air (8.0 Simulator'\ ) #languages list for launch lang=(\ en\ cs\ de\ es\ pt\ ru\ tr\ uk\ zh-Hans\ ja\ vi\ ) for i in "${sim[@]}"; do for j in "${lang[@]}"; do case "$i" in ... 'iPad Retina (8.0 Simulator)' ) profile='-t @ALL_DEVICES,@iPadRetina_iOS8' ;; ... esac DEVICE_TARGET='$i' cucumber tests/features -t @$j -t @ ${profile} done done Thus, if we have a certain script with tags
@iPadRetina_iOS8 @en , then it will run only on iPad Retina simulator with iOS 8 and installed English.Almost everything is ready to launch autotests, but a necessary condition for their correct operation is to reset the simulator data and settings, which corresponds to a hard reset device. Thus, we get rid of the side effects of previous runs and set identical initial conditions. In the simulator menu there is a corresponding item, but according to the good old tradition we will have to choose it without the help of hands and the cursor, writing a small apple script.
tell application "iOS Simulator" activate end tell tell application "System Events" tell process "iOS Simulator" tell menu bar 1 tell menu bar item "iOS Simulator" tell menu "iOS Simulator" click menu item "Reset Content and Settings…" end tell end tell end tell tell window 1 click button "Reset" end tell end tell end tell One of the pillars of testing mobile applications is testing work with different types and quality of communication. The smartphone is almost always located with the owner - and the office with a fast WI-FI network, and in the country with a barely perceptible 3G. Therefore, in conclusion of this paragraph, I want to talk about the mechanism of network quality emulation on a test bench. On devices with Developer Mode enabled and on Mac OS, the Network Link Conditioner tool is available, which allows you to set network quality using a graphical interface. But we need the ability to change the quality of the network "on the fly" during the autotests and manage this process through the command line. For these purposes, the
ipfw utility, included in the standard Mac OS delivery package, is suitable. The following commands set the speed of receiving / sending to 1 Mbit / s, packet loss of 10% and delay in receiving / sending packets of 500 ms. $ sudo ipfw add pipe 1 in $ sudo ipfw add pipe 2 out $ sudo ipfw pipe 1 config bw 1Mbit/s plr 0.1 delay 500ms $ sudo ipfw pipe 2 config bw 1Mbit/s plr 0.1 delay 500ms After manipulating
ipfw it is necessary to reset all installed settings. $ sudo ipfw delete pipe 1 $ sudo ipfw delete pipe 2 $ sudo ipfw -f flush Functional testing
Based on the test run results, the following report is generated.

The report shows in which scenarios errors occurred. For failed scripts, a screenshot is taken at the time of the error - it sometimes allows you to immediately determine the cause of the file. If during the manual reproduction of the test scenario, the bug repeats, it starts up in the bug tracker.
Migration testing
With the active development of the application and the release of new versions, testers face the challenge of checking data migration from older versions. Constant installation of old versions, filling the database with data and updating to the tested version are very time-consuming tasks that cause despondency even for the most diligent tester. To facilitate this process, we collect sandboxes for each version of the application with an already filled (manually) database and then reuse them to verify the correctness of the migration. With this approach, it is possible to automate this type of testing.
Downloading the sendboxes to the simulator is easy and boils down to copying files into the correct directory of the simulator. To download the sendboxes to the device, the
ifuse utility is ifuse , which allows you to mount the device's file system. $ ifuse --udid #{$Udid} --container #{$Bundle_app} /Volumes/iphone Migration testing is as follows. The application is installed on the simulator or device, then the desired sandbox rolls. The implementation of the corresponding step of the script is as follows:
Given /^upload database from "(.*)"$/ do |path| if simulator? path=File.expand_path(path.gsub(' ','\ ')) sand=`find ~/Library/Developer/CoreSimulator/Devices/#{$Udid} -type d -name "#{$App}.app"`.gsub("#{$App}.app","") FileUtils.rm_rf(Dir.glob("#{sand}Documents/*")) FileUtils.rm_rf(Dir.glob("#{sand}Library/*")) FileUtils.cp_r("#{path}/Documents/.", "#{sand}/Documents", :verbose => false) FileUtils.cp_r("#{path}/Library/.", "#{sand}/Library", :verbose => false) else path=path.gsub(' ','\ ') system("umount -f /Volumes/iphone") system("rm -rf /Volumes/iphone") system("mkdir /Volumes/iphone") `ifuse --udid #{$Udid} --container #{$Bundle_app} /Volumes/iphone` FileUtils.rm_rf(Dir.glob("/Volumes/iphone/Documents/*")) FileUtils.rm_rf(Dir.glob("/Volumes/iphone/Library/*")) FileUtils.cp_r("#{path}/Documents/.", "/Volumes/iphone/Documents/", :verbose => false) FileUtils.cp_r("#{path}/Library/.", "/Volumes/iphone/Library/", :verbose => false) end end After launching and updating the application, the corresponding checks occur (the number of chats, unread messages, saving the login).
Automation has reduced the laboriousness of migration testing. At the moment, an increase in the list of checks and the number of sandboxes being checked is required, which ideally will allow us to completely eliminate the manual component of testing.
Design and testing by screenshots
Testing an application based on a comparison of screenshots has its advantages and disadvantages. On the one hand, it, in addition to functional bugs, reveals all the problems with the design, such as, for example, the “slid” buttons, on the other hand, it has a number of features that limit the full transition to testing by screenshots. With several applications and a wide range of supported devices, a huge base of reference screenshots is required for all possible screen resolutions. In addition, it is not always easy to provide the required type of application. For example, the area of the screen that displays the clock or the quality of communication will change on each particular run.
An API has been added to autotests, allowing you to perform screenshots of the application. This functionality is implemented using the ImageMagick library and allows you to compare the specified area of the screenshot with the standard, as well as perform a fuzzy search by pattern.
def Image.compare(image_path, etalon_path, x=0, y=0, w=0, h=0) img = Magick::ImageList.new(File.expand_path(image_path)) et = Magick::ImageList.new(File.expand_path(etalon_path)) img = img.crop(x, y, w, h, true) if w!=0 && h!=0 res=img.signature<=>et.signature return true if res==0 return false end def Image.search_subimage(image_path, subimage_path, fuzzy='20%') img = Magick::ImageList.new(File.expand_path(image_path)) sub = Magick::ImageList.new(File.expand_path(subimage_path)) img.fuzz=fuzzy sub.fuzz=fuzzy if img.find_similar_region(sub)==nil return false else return true end end The functionality is used to check the logo of the application. Screening testing has a lot of potential and its use will expand.
Faster, higher, stronger, or performance testing
The user expects from the mobile application not only reliable operation without failures and wide functionality, but also an instant reaction to its actions. Speed and response time are important factors for increasing the competitiveness of an application. Therefore, monitoring the time for performing basic operations (such as launching an application, the time for receiving offline messages, displaying a contact list, etc.) is an urgent need. This process is associated with routine (and multiple) actions to reproduce the operations to be measured, the subsequent analysis of logs and the recording of data in the report. That is why it turned out to be a natural contender for automation.
Performance tests consist of two stages:
- Run test scripts from Performance.feature, which collected scripts to perform those actions, the time of which we want to measure. Each script is executed 5 times to minimize random deviations of values.
- Collecting logs, searching for relevant metrics, averaging values and generating a report

To generate a report, a library is written that implements the API for quickly adding new values to the report. The library uses the nokogiri gem to work with html.
Obviously, this type of testing should be carried out on physical devices. In fact, to run the test on the device, and not on the simulator, you need to change the UDID and add the IP address of the Wi-Fi connection.
The main testing artifact is a report by which one can judge the dynamics of changes in certain metrics. In case of exceeding the specified limits, a “debriefing” takes place to find out the reasons for the deterioration of performance.
Plans and prospects
The main direction of the further development of autotests is to reduce the influence of external factors and the introduction of "plugs". This will speed up the execution of scripts and eliminate the effect of server errors on the test results of the client application.
There are two possible options, different location of the "stub":
- inside the application
- outside application
The first option is the most flexible and convenient, but it has one major drawback - the potential impact of the test plugs on the application; in other words, the release application and the test will differ from each other.
The second option involves the implementation of the fake server, which implements only the interaction protocol and works locally with the client. With this approach, the application does not experience side effects, however, additional labor costs are required to implement the fake server.
Surely many of those reading this article have something to share in the field of test automation. I propose to share developments in this area in the comments.
Source: https://habr.com/ru/post/244807/
All Articles