Revised Grunt Beginner's Guide
Back in March 2013, I wrote an article Grunt guide for beginners and it became the most visited article on my site. I wrote it at the time when I was just starting my acquaintance with Grunt , and this was more of a guide for myself than for anyone else. Now, after 18 months, I felt that it was time to reconsider how I use Grunt because now I know much more than at that time.
If you can’t wait to just see the code, then it’s all on Github .
First of all, you should make sure that you have the Node and the Grunt CLI (command line interface) installed.
Our project will require several directories. Their structure is presented below:
First of all, I no longer use scaffolding tools (such as <br> grunt init or Yeoman ). I set everything up from scratch. This means that I have much more understanding of what is happening at the moment. It is not at all difficult once you have done this several times.
At the root of the project, create a file called Gruntfile.js
Add the following code to this file:
Believe it or not, that's all about our Gruntfile.
time-grunt tells you how long each task and overall build took, and jitGrunt: true tells load-grunt-config to use the faster jit-grunt task loader (this is optional, but speed is good, right?).
Let's move on and create our basic package.json file. This file will contain the dependencies of our project in the near future. Add the following (obviously, change the mention of my project to the real name of your project).
Now we have everything we need to start adding modules. Successively execute each line of code below:
If you look at package.json , you should see something like this:
Here is a list of what we just installed:
grunt : the task scheduler itself.
time-grunt : an optional, but pleasant addition - it tells you how long each task and the overall build took.
load-grunt-config : allows you to keep our main gruntfile short and concise. More on this below.
grunt-concurrent : perform tasks simultaneously. Out of the box, Grunt performs tasks one by one, which may take some time, depending on the size and type of tasks you need to complete. However, tasks often arise that are independent of other tasks and can be performed simultaneously.
grunt-contrib-clean : everything is very simple, this task removes garbage - use with caution!
grunt-contrib-imagemin : irreplaceable because All your images need optimization.
grunt-sass: compiles your files into SASS / SCSS files in CSS. Note: this module uses a faster, but experimental libsass compiler. If you are experiencing problems, you should probably use stable, but slower grunt-contrib-sass .
grunt-contrib-uglify : makes your javascript beautiful and ugly.
One of the best modules I've introduced is load-grunt-config . It allows us to place the config for each of our tasks in a separate file. This is much more convenient than storing all the settings in one large Gruntfile.
Create the following files in the grunt directory:
Please note: the names of these files must match the task names.
Copy and paste the config for each task below into the appropriate file.
Here we define different pseudonyms for our tasks:
default - performs prod tasks when running grunt on the command line.
dev - performs development tasks (but not image tasks).
img - performs image tasks.
devimg - performs design tasks and images.
prod - performs production and image tasks.
Click here for more information on setting up aliases for tasks using load-grunt-config .
For example, take the development tasks. You can see that they are set up to run clean first and then sass: dev and uglify at the same time to restore css and javascript.
Click here for more information on setting up grunt-concurrent .
Setting up grunt-contrib-clean is pretty simple. Here I just deleted the entire contents of the / dist directory. use this task with caution - it will indiscriminately delete everything you say without any warnings. So make sure you set it up correctly.
Click here for more information on setting up grunt-contrib-clean .
The config above simply optimizes all images in src / images / and saves them to dist / images / .
Click here for more information on setting up grunt-contrib-imagemin .
I have divided sass tasks into development and production processes. The config is very similar, but for development purposes I set the output style to " nested " and included a code card.
Click here for more information on setting up grunt-sass .
JShint checks your jsvascript and ensures that it is all type-top.
Click here for more information on setting up grunt-contrib-jshint .
Uglify just takes your javascript files and minifits them.
Click here for more information on setting up grunt-contrib-uglify .
Watch runs the specified tasks whenever the files for which it monitors in any way change - are added, deleted, edited.
Note: This is the easiest way to get the browser extension .
Click here for more information on configuring grunt-contrib-watch and Livereload.
If you have finished setting up your project as described above, then now you can run tasks. As discussed earlier, there are various task aliases that you can run. Now just type grunt on the command line at the root of your project.
If everything goes well, you will see the download text, scrolling down the screen, and then a message like this:
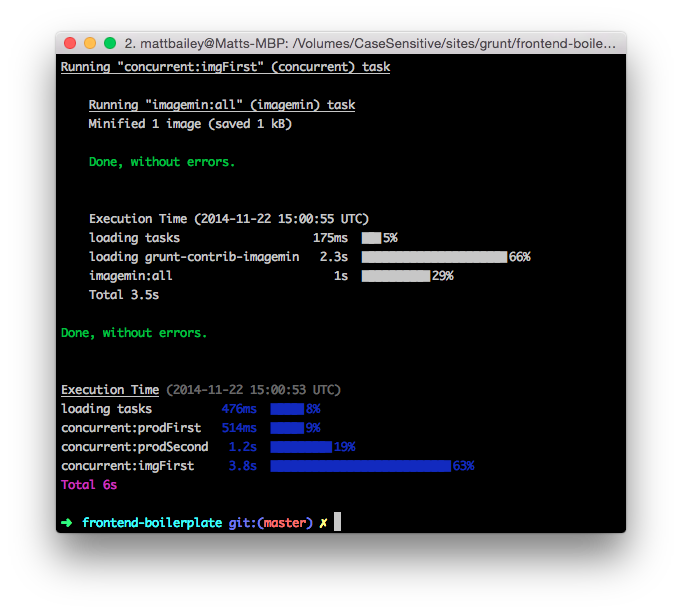
I love the little bulletins that grunt-time provides. I see how much time it took to complete each of the sets of tasks. Plus, how long the whole build process took.
Depending on your needs, you could also do grunt dev , grunt devimg , or grunt img .
You can also run grunt watch if you want grunt to monitor your .sass and .js changes and automatically start sass or jshint and uglify.
In fact, that's all. If you experiment with what is presented above, you will soon gain confidence, begin to add tasks and modify the workflow for the better in accordance with your requirements.
Once again, the code attached to this article can be found on Github .
If you can’t wait to just see the code, then it’s all on Github .
Installing Node and Grunt for all users
First of all, you should make sure that you have the Node and the Grunt CLI (command line interface) installed.
- The Node.js website has installers for various operating systems. All information can be found here .
- After installing Node.js, simply run the following command in your terminal (I use iTerm2 ) to install grunt-cli
')npm install -g grunt-cli
Creating a project directory
Our project will require several directories. Their structure is presented below:
grunt/ src/ src/images/ src/scripts/ src/styles/ Creating a gruntfile
First of all, I no longer use scaffolding tools (such as <br> grunt init or Yeoman ). I set everything up from scratch. This means that I have much more understanding of what is happening at the moment. It is not at all difficult once you have done this several times.
At the root of the project, create a file called Gruntfile.js
Add the following code to this file:
module.exports = function(grunt) { require('time-grunt')(grunt); require('load-grunt-config')(grunt, { jitGrunt: true }); }; Believe it or not, that's all about our Gruntfile.
time-grunt tells you how long each task and overall build took, and jitGrunt: true tells load-grunt-config to use the faster jit-grunt task loader (this is optional, but speed is good, right?).
Create Package File
Let's move on and create our basic package.json file. This file will contain the dependencies of our project in the near future. Add the following (obviously, change the mention of my project to the real name of your project).
{ "name": "my-project", "version": "0.0.1", "description": "My project" } Add dependencies
Now we have everything we need to start adding modules. Successively execute each line of code below:
npm install grunt --save-dev npm install time-grunt --save npm install load-grunt-config --save-dev npm install grunt-concurrent --save-dev npm install grunt-contrib-clean --save-dev npm install grunt-contrib-imagemin --save-dev npm install grunt-sass --save-dev npm install grunt-contrib-uglify --save-dev If you look at package.json , you should see something like this:
{ "name": "my-project", "version": "0.0.1", "description": "My project", "devDependencies": { "grunt": "^0.4.5", "grunt-concurrent": "^1.0.0", "grunt-contrib-clean": "^0.6.0", "grunt-contrib-imagemin": "^0.8.1", "grunt-contrib-uglify": "^0.6.0", "grunt-sass": "^0.16.1", "load-grunt-config": "^0.13.1" }, "dependencies": { "time-grunt": "^1.0.0" } } Here is a list of what we just installed:
grunt : the task scheduler itself.
time-grunt : an optional, but pleasant addition - it tells you how long each task and the overall build took.
load-grunt-config : allows you to keep our main gruntfile short and concise. More on this below.
grunt-concurrent : perform tasks simultaneously. Out of the box, Grunt performs tasks one by one, which may take some time, depending on the size and type of tasks you need to complete. However, tasks often arise that are independent of other tasks and can be performed simultaneously.
grunt-contrib-clean : everything is very simple, this task removes garbage - use with caution!
grunt-contrib-imagemin : irreplaceable because All your images need optimization.
grunt-sass: compiles your files into SASS / SCSS files in CSS. Note: this module uses a faster, but experimental libsass compiler. If you are experiencing problems, you should probably use stable, but slower grunt-contrib-sass .
grunt-contrib-uglify : makes your javascript beautiful and ugly.
Setting tasks
One of the best modules I've introduced is load-grunt-config . It allows us to place the config for each of our tasks in a separate file. This is much more convenient than storing all the settings in one large Gruntfile.
Create the following files in the grunt directory:
grunt/aliases.yaml grunt/concurrent.js grunt/clean.js grunt/imagemin.js grunt/jshint.js grunt/sass.js grunt/uglify.js grunt/watch.js Please note: the names of these files must match the task names.
Copy and paste the config for each task below into the appropriate file.
ALIASES.YAML
default: description: 'Default (production) build' tasks: - prod dev: description: 'Development build' tasks: - 'concurrent:devFirst' - 'concurrent:devSecond' img: description: 'Image tasks' tasks: - 'concurrent:imgFirst' devimg: description: 'Development build and image tasks' tasks: - dev - img prod: description: 'Production build' tasks: - 'concurrent:prodFirst' - 'concurrent:prodSecond' - img Here we define different pseudonyms for our tasks:
default - performs prod tasks when running grunt on the command line.
dev - performs development tasks (but not image tasks).
img - performs image tasks.
devimg - performs design tasks and images.
prod - performs production and image tasks.
Click here for more information on setting up aliases for tasks using load-grunt-config .
CONCURRENT.JS
module.exports = { // options: { limit: 3 }, // devFirst: [ 'clean', 'jshint' ], devSecond: [ 'sass:dev', 'uglify' ], // prodFirst: [ 'clean', 'jshint' ], prodSecond: [ 'sass:prod', 'uglify' ], // imgFirst: [ 'imagemin' ] }; For example, take the development tasks. You can see that they are set up to run clean first and then sass: dev and uglify at the same time to restore css and javascript.
Click here for more information on setting up grunt-concurrent .
CLEAN.JS
module.exports = { all: [ "dist/" ] }; Setting up grunt-contrib-clean is pretty simple. Here I just deleted the entire contents of the / dist directory. use this task with caution - it will indiscriminately delete everything you say without any warnings. So make sure you set it up correctly.
Click here for more information on setting up grunt-contrib-clean .
IMAGEMIN.JS
module.exports = { all: { files: [{ expand: true, cwd: 'src/', src: ['images/*.{png,jpg,gif}'], dest: 'dist/' }] } }; The config above simply optimizes all images in src / images / and saves them to dist / images / .
Click here for more information on setting up grunt-contrib-imagemin .
SASS.JS
module.exports = { // Development settings dev: { options: { outputStyle: 'nested', sourceMap: true }, files: [{ expand: true, cwd: 'src/styles', src: ['*.scss'], dest: 'dist/styles', ext: '.css' }] }, // Production settings prod: { options: { outputStyle: 'compressed', sourceMap: false }, files: [{ expand: true, cwd: 'src/styles', src: ['*.scss'], dest: 'dist/styles', ext: '.css' }] } }; I have divided sass tasks into development and production processes. The config is very similar, but for development purposes I set the output style to " nested " and included a code card.
Click here for more information on setting up grunt-sass .
JSHINT.JS
module.exports = { options: { reporter: require('jshint-stylish') }, main: [ 'src/scripts/*.js' ] }; JShint checks your jsvascript and ensures that it is all type-top.
Click here for more information on setting up grunt-contrib-jshint .
UGLIFY.JS
module.exports = { all: { files: [{ expand: true, cwd: 'src/scripts', src: '**/*.js', dest: 'dist/scripts', ext: '.min.js' }] } }; Uglify just takes your javascript files and minifits them.
Click here for more information on setting up grunt-contrib-uglify .
WATCH.JS
module.exports = { options: { spawn: false, livereload: true }, scripts: { files: [ 'src/scripts/*.js' ], tasks: [ 'jshint', 'uglify' ] }, styles: { files: [ 'src/styles/*.scss' ], tasks: [ 'sass:dev' ] }, }; Watch runs the specified tasks whenever the files for which it monitors in any way change - are added, deleted, edited.
Note: This is the easiest way to get the browser extension .
Click here for more information on configuring grunt-contrib-watch and Livereload.
Running tasks
If you have finished setting up your project as described above, then now you can run tasks. As discussed earlier, there are various task aliases that you can run. Now just type grunt on the command line at the root of your project.
If everything goes well, you will see the download text, scrolling down the screen, and then a message like this:
I love the little bulletins that grunt-time provides. I see how much time it took to complete each of the sets of tasks. Plus, how long the whole build process took.
Depending on your needs, you could also do grunt dev , grunt devimg , or grunt img .
You can also run grunt watch if you want grunt to monitor your .sass and .js changes and automatically start sass or jshint and uglify.
Summary
In fact, that's all. If you experiment with what is presented above, you will soon gain confidence, begin to add tasks and modify the workflow for the better in accordance with your requirements.
Once again, the code attached to this article can be found on Github .
Source: https://habr.com/ru/post/244721/
All Articles