Diskless booting using Windows-based iSCSI technology
Writing this post was preceded by the collection of information in parts and many hours of smoking of both Russian-language and English-language resources on the Internet in search of relatively simple ways to implement diskless PC boot.
A prerequisite for the study of this issue was the presence of a computer on the network, with a failed disk drive. It was necessary to run a “full-fledged” 64-bit Windows 7 operating system on this PC without using a Linux server, limiting itself only to the systems available on the Windows local network. The software products presented in this post are free and can work on both server and user versions of Windows.
The talk will be about the wonderful iSCSI technology, and how we can use it to boot via the local network to save on the cost of buying a new disk equipment. I will try to describe the entire configuration process in the most accessible language for both novice administrators and unenlightened users.
To understand what is happening, let's define a bit of terminology:
Modern operating systems Windows 7, Windows Server 2008 and everything older are able to connect directly to the iSCSI target. The only problem is how to initialize the remote block device when the PC is turned on.
')
Recall that almost all modern network cards are able to boot using PXE technology. But with iSCSI, only expensive server network cards, such as Intel , are mostly friendly . However, there are at least two open source projects gPXE and iPXE that allow iSCSI devices to be connected when the PC boots. The latter, by the way, fork of the first, with a slightly modified error output system and additional options.
There are many ways to boot via gPXE and iPXE. In this post we will look at booting using iPXE and connecting the necessary scripts for it during the boot process.
The bottom line is that when you start the computer, the network card gets the necessary settings through a DHCP server and loads PXELINUX. Next, the PXELINUX loader connects the necessary script and loads iPXE, which, in turn, is initiated by iSCSI and transfers control to the disk. Until the block device is initialized, file transfer over the network is provided by the TFTP protocol.
But first things first. Let's start with the installation and configuration in Windows of the necessary software for implementing DHCP, TFTP and iSCSI Target. For this, I used the free software Tftpd32 and StarWind Virtual SAN . The Tftpd32 program is used both as a DHCP server and as a TFTP server, and StarWind Virtual SAN will be used as an iSCSI target, respectively. You can download these programs on the developers website, the links of which are indicated in their names. To download the StarWind Virtual SAN program, you will need to select a version of the program on the Free website and go through the registration process, indicating the corporate email address. You will receive a license key and a link to download the program to the email address you specified.
This program is quite simple and intuitive, so I’ll just provide screenshots of my settings:


On the GLOBAL tab, I have ticked the TFTP Server, Syslog Server and DHCP Server services. On the TFTP tab, the Base Directory field contains a period, which means that the root directory will be the folder where the Tftpd32 program is installed. On the DHCP tab, the Boot File field contains the name of the file being downloaded, which we will look further into in the PXELINUX settings. On the tab SYSLOG settings are not required.
When installing, the program does not request any settings, the only thing that can additionally run the installation of the .NET Framework 4, if it is not already installed on the system. After installation, the program starts its services and is immediately ready for operation. A StarWind Management Console shortcut is created on the desktop for management.
Open the StarWind Management Console, click the Add Server button and create a new server with the IP address 192.168.0.1. The default server with the IP address 127.0.0.1 can be deleted.
Next, select the server we created and click the Add Target link. In the window that appears, we can indicate your name IQN goals by activating the Target Name checkbox. In particular, I specified iqn.2014-11.home: win7-64bit.
Next, select the Target we created and click the Add Device link.
In the window that appears, select the Hard Disk Device, then select the Virtual Disk, specify the location and volume of the disk to be created, set the volume and caching parameters, and create a disk device by clicking the Create button.
As a result, we get an iSCSI Target configured and ready for operation, which has the following form:

If necessary, we can create the required number of iSCSI Targets and connect the required number of iSCSI disks to each of them. And also provide security for access to iSCSI Targets using CHAP authentication of clients by clicking the Add Permission link.
PXELINUX is included in the syslinux suite. Therefore, we go to the site www.syslinux.org/wiki/index.php/Download , click on the Download link and download the zip archive with the syslinux downloader set. Open the downloaded archive file and unpack the pxelinux.0 files from the core directory and menu.c32 from the com32 / menu directory. The pxelinux.0 file is the bootloader, which is transmitted to the client PC by a DHCP server, and the menu.c32 file is responsible for building the boot menu. Unpacked files are placed in the folder where the Tftpd32 program is installed (where it points to the path in the Base Directory field in the TFTP settings).
In the Tftpd32 program folder, create the pxelinux.cfg subfolder, and in it create the default file with the following content:
default menu.c32
gfxmenu / erdpxe
prompt 0
MENU TITLE Boot Menu (select the OS to boot)
MENU AUTOBOOT Windows 7 64bit in # seconds
TIMEOUT 50
TOTALTIMEOUT 3000
LABEL Windows 7 64bit
MENU DEFAULT
KERNEL IPXE.KRN
INITRD win7.ipxe
I think it is unnecessary to write a detailed commentary on this file, consider only the last two lines:
KERNEL IPXE.KRN - indicates the iPXE core to be loaded.
INITRD win7.ipxe - points to a script file with iPXE parameters
The specified PXELINUX settings are quite enough to use the default configuration and you can proceed to further configure iPXE, so I decided to remove the remaining text under the spoiler.
So, then go to the site ipxe.org/download and download the iso-image of the iPXE loader. From the downloaded iso-image, pull out the IPXE.KRN file and save it in the program folder Tftpd32.
In the same folder we create a file win7.ipxe with the following content:
#! ipxe
dhcp net0
set keep-san 1
#login
sanboot iscsi: 192.168.0.1 :::: iqn.2014-11.home: win7-64bit
The dhcp net0 string of this script indicates that it is necessary to get the settings through a DHCP server on the network.
The set keep-san line 1 indicates that the connection to the iSCSI Target must be maintained even if the boot from this device failed (this parameter is necessary when installing the operating system from CD / DVD drives).
If the CHAP authentication of clients is configured in the iSCSI Target, then you need to uncomment the #login line, which will display a form for entering login and password.
The last line directly connects the specified iSCSI Target, initializes the remote disk and transfers the process of further loading to this device. The connection syntax will be iscsi: <ipc iSCSI target> :::: <target <iqn>.
Before you start installing Windows 7 on a diskless station, open its BIOS and configure the polling procedure for boot devices as follows:
1) Hard Disk
2) Network
3) CD / DVD
4) other devices
If the PC has an installed hard disk, it is advisable to disconnect it during the installation of Windows so that the computer does not try to boot from it.
Next, we place the Windows 7 installation disc in the CD / DVD drive and restart the computer.
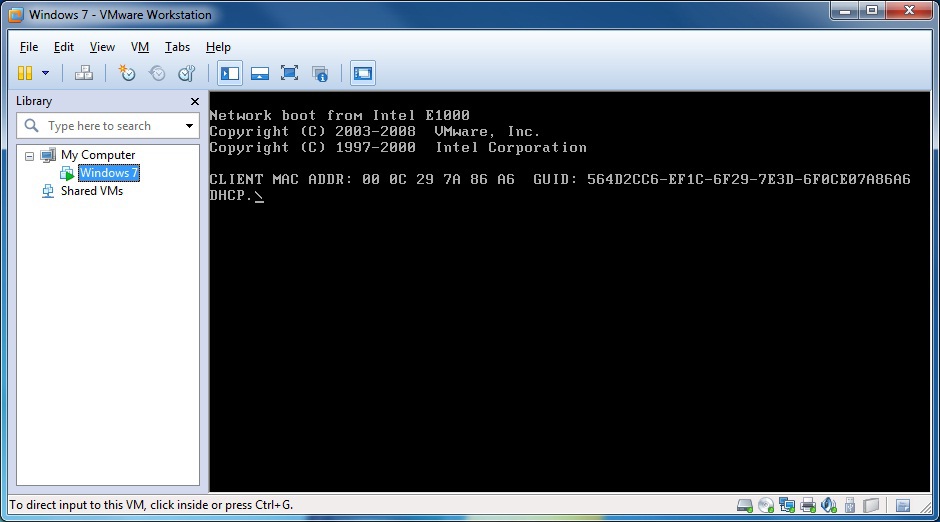
First we need to see the launch of the PXE boot. If this does not happen, then go back to the BIOS and allow the computer to boot via the network adapter.
Next, the PXELINUX boot menu appears on the screen. If this does not happen, we check whether the Tftpd32 program is running on another computer, whether it is configured correctly, and whether firewalls, antiviruses, or other programs are blocking its operation.

After selecting the necessary item of the PXELINUX boot menu, we should see the launch of iPXE.
The iPXE initialization process should flash the captions:
Registered as BIOS drive 0x80
Booting from BIOS drive 0x80
This means that the PC successfully connected to the iSCSi drive.

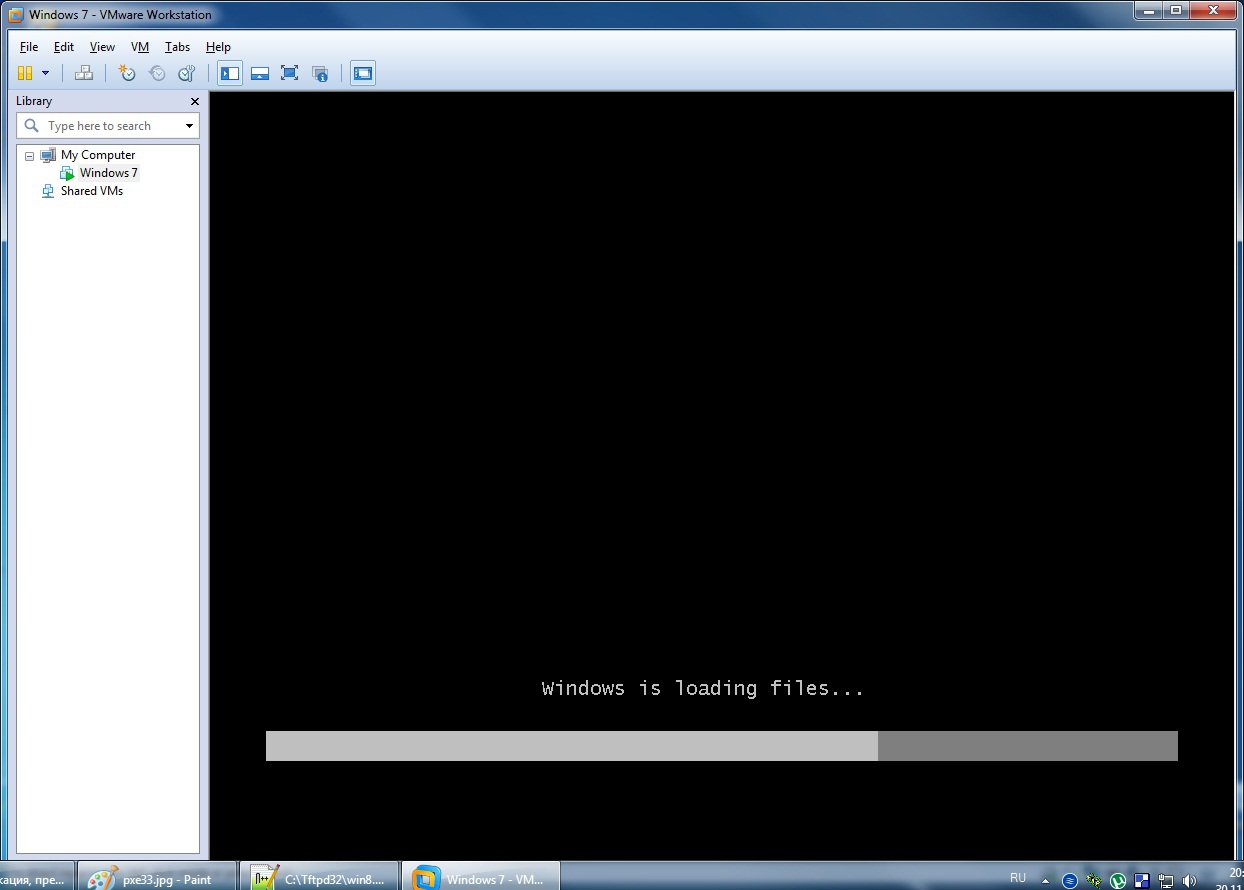
Then we will see a boot error through the iSCSi disk, after which the computer will proceed to the next boot device scan and start the installation of Windows 7 from the CD / DVD drive. At the same time, the connection to the iSCSi disk will remain active - the set keep-san 1 line specified in the script is responsible for this.
During the installation of Windows, at the stage of selecting a disk device, we should see the disk iSCSi connected to us. If the iSCSi disk is not listed, then the Windows installer could not automatically connect the necessary drivers for the network card. In this case, download the necessary network card drivers from the developer’s website and connect them to the Windows installer. After that, the iSCSi disk should appear in the list.

After selecting the disk device, the installation of Windows 7 will begin. There should be no further difficulties. After installation, we get a “full-fledged” Windows 7 operating system running on an iSCSI disk.

I don’t know how anyone, but I personally don’t find it convenient for each Windows installation image to burn a DVD.
I am accustomed to unpack the contents of the installation disk and run the installation of Windows from the hard disk. In addition, the operating system is installed faster from the hard disk.
I will give an example using the standard bootmgr bootloader found in any Windows distribution.
This method is also suitable for installing Windows from local hard drives.
In short, we create a small “active” partition on the iSCSI disk, copy the contents of the Windows installation disk there, and then configure the MBR to boot from the Windows Installer disk. Details under the spoiler.
I hope this article will be useful to you. Good luck to all!
References to the literature:
A prerequisite for the study of this issue was the presence of a computer on the network, with a failed disk drive. It was necessary to run a “full-fledged” 64-bit Windows 7 operating system on this PC without using a Linux server, limiting itself only to the systems available on the Windows local network. The software products presented in this post are free and can work on both server and user versions of Windows.
The talk will be about the wonderful iSCSI technology, and how we can use it to boot via the local network to save on the cost of buying a new disk equipment. I will try to describe the entire configuration process in the most accessible language for both novice administrators and unenlightened users.
To understand what is happening, let's define a bit of terminology:
- iSCSI (Internet Small Computer System Interface) - a protocol that is based on TCP / IP and is designed to establish communication and control storage systems, servers and clients;
- iSCSI Target: (iSCSI Target) - a program or hardware controller (HBA) that emulates a disk and executes iSCSI requests;
- iSCSI Initiator: (iSCSI Initiator) - a client program or hardware controller that interacts with an iSCSI Target;
- IQN: (iSCSI Qualified Name) - a unique identifier (name) of an iSCSI Target or iSCSI Initiator;
- LUN: (Logical Unit Number) - the address of the block device in the range 0-127;
- DHCP (born Dynamic Host Configuration Protocol) is a network protocol that allows computers to automatically obtain an IP address and other parameters necessary for working on a TCP / IP network;
- TFTP (English Trivial File Transfer Protocol - a simple file transfer protocol) is used mainly for the initial loading of diskless workstations.
Introduction
Modern operating systems Windows 7, Windows Server 2008 and everything older are able to connect directly to the iSCSI target. The only problem is how to initialize the remote block device when the PC is turned on.
')
Recall that almost all modern network cards are able to boot using PXE technology. But with iSCSI, only expensive server network cards, such as Intel , are mostly friendly . However, there are at least two open source projects gPXE and iPXE that allow iSCSI devices to be connected when the PC boots. The latter, by the way, fork of the first, with a slightly modified error output system and additional options.
There are many ways to boot via gPXE and iPXE. In this post we will look at booting using iPXE and connecting the necessary scripts for it during the boot process.
The bottom line is that when you start the computer, the network card gets the necessary settings through a DHCP server and loads PXELINUX. Next, the PXELINUX loader connects the necessary script and loads iPXE, which, in turn, is initiated by iSCSI and transfers control to the disk. Until the block device is initialized, file transfer over the network is provided by the TFTP protocol.
What are we loading PXELINUX for?
Some may ask, why download PXELINUX? First, through PXELINUX, the iPXE bootloader gets the necessary script to initialize the desired iSCSI target. Secondly, so that you can build a convenient menu with a choice of different boot options. Thirdly, if there are several diskless workstations in the network, then each PC needs to connect to its iSCSI disk and does not have access to foreign disks, which means that they need to be separated from each other, for example, via MAC Addresses For these purposes, a two-step load will be used using PXELINUX.
But first things first. Let's start with the installation and configuration in Windows of the necessary software for implementing DHCP, TFTP and iSCSI Target. For this, I used the free software Tftpd32 and StarWind Virtual SAN . The Tftpd32 program is used both as a DHCP server and as a TFTP server, and StarWind Virtual SAN will be used as an iSCSI target, respectively. You can download these programs on the developers website, the links of which are indicated in their names. To download the StarWind Virtual SAN program, you will need to select a version of the program on the Free website and go through the registration process, indicating the corporate email address. You will receive a license key and a link to download the program to the email address you specified.
Setup of the Tftpd32 program
This program is quite simple and intuitive, so I’ll just provide screenshots of my settings:
On the GLOBAL tab, I have ticked the TFTP Server, Syslog Server and DHCP Server services. On the TFTP tab, the Base Directory field contains a period, which means that the root directory will be the folder where the Tftpd32 program is installed. On the DHCP tab, the Boot File field contains the name of the file being downloaded, which we will look further into in the PXELINUX settings. On the tab SYSLOG settings are not required.
ISCSI target. Setting up the StarWind Virtual SAN program
When installing, the program does not request any settings, the only thing that can additionally run the installation of the .NET Framework 4, if it is not already installed on the system. After installation, the program starts its services and is immediately ready for operation. A StarWind Management Console shortcut is created on the desktop for management.
Open the StarWind Management Console, click the Add Server button and create a new server with the IP address 192.168.0.1. The default server with the IP address 127.0.0.1 can be deleted.
Next, select the server we created and click the Add Target link. In the window that appears, we can indicate your name IQN goals by activating the Target Name checkbox. In particular, I specified iqn.2014-11.home: win7-64bit.
Next, select the Target we created and click the Add Device link.
In the window that appears, select the Hard Disk Device, then select the Virtual Disk, specify the location and volume of the disk to be created, set the volume and caching parameters, and create a disk device by clicking the Create button.
As a result, we get an iSCSI Target configured and ready for operation, which has the following form:
If necessary, we can create the required number of iSCSI Targets and connect the required number of iSCSI disks to each of them. And also provide security for access to iSCSI Targets using CHAP authentication of clients by clicking the Add Permission link.
PXELINUX Setup
PXELINUX is included in the syslinux suite. Therefore, we go to the site www.syslinux.org/wiki/index.php/Download , click on the Download link and download the zip archive with the syslinux downloader set. Open the downloaded archive file and unpack the pxelinux.0 files from the core directory and menu.c32 from the com32 / menu directory. The pxelinux.0 file is the bootloader, which is transmitted to the client PC by a DHCP server, and the menu.c32 file is responsible for building the boot menu. Unpacked files are placed in the folder where the Tftpd32 program is installed (where it points to the path in the Base Directory field in the TFTP settings).
In the Tftpd32 program folder, create the pxelinux.cfg subfolder, and in it create the default file with the following content:
default menu.c32
gfxmenu / erdpxe
prompt 0
MENU TITLE Boot Menu (select the OS to boot)
MENU AUTOBOOT Windows 7 64bit in # seconds
TIMEOUT 50
TOTALTIMEOUT 3000
LABEL Windows 7 64bit
MENU DEFAULT
KERNEL IPXE.KRN
INITRD win7.ipxe
I think it is unnecessary to write a detailed commentary on this file, consider only the last two lines:
KERNEL IPXE.KRN - indicates the iPXE core to be loaded.
INITRD win7.ipxe - points to a script file with iPXE parameters
The specified PXELINUX settings are quite enough to use the default configuration and you can proceed to further configure iPXE, so I decided to remove the remaining text under the spoiler.
Creating a separate boot menu for each PC
If there are several diskless workstations on the network, and it is necessary that each PC has access only to its iSCSI disk and does not have access to someone else's disks, then we will need to create several files with boot menus for each PC.
When receiving a configuration file from the TFTP server, the client searches for the one that suits itself in the following order:
pxelinux.cfg / 01-88-99-aa-bb-cc-dd
pxelinux.cfg / C0A800FE
pxelinux.cfg / C0A800F
pxelinux.cfg / C0A800
pxelinux.cfg / C0A80
pxelinux.cfg / C0A8
pxelinux.cfg / C0A
pxelinux.cfg / C0
pxelinux.cfg / C
And if there is nothing suitable -
pxelinux.cfg / default
Here, pxelinux.cfg is the configuration files folder itself.
01-88-99-aa-bb-cc-dd - the file with the name MAC address of the client, in lower case, separated by a dash, with the prefix 01-.
Accordingly, for each diskless workstation, we need to write our “own” boot menu and place in the pxelinux.cfg folder with the file name the 01-mac-address of the client, in lower case. The contents of these files may differ, for example, only in the last line of INITRD win7.ipxe .
Initiator iSCSI. IPXE Setup
So, then go to the site ipxe.org/download and download the iso-image of the iPXE loader. From the downloaded iso-image, pull out the IPXE.KRN file and save it in the program folder Tftpd32.
In the same folder we create a file win7.ipxe with the following content:
#! ipxe
dhcp net0
set keep-san 1
#login
sanboot iscsi: 192.168.0.1 :::: iqn.2014-11.home: win7-64bit
The dhcp net0 string of this script indicates that it is necessary to get the settings through a DHCP server on the network.
The set keep-san line 1 indicates that the connection to the iSCSI Target must be maintained even if the boot from this device failed (this parameter is necessary when installing the operating system from CD / DVD drives).
If the CHAP authentication of clients is configured in the iSCSI Target, then you need to uncomment the #login line, which will display a form for entering login and password.
The last line directly connects the specified iSCSI Target, initializes the remote disk and transfers the process of further loading to this device. The connection syntax will be iscsi: <ipc iSCSI target> :::: <target <iqn>.
Adding additional items to the boot menu
If we want to add another item to the boot menu, for example, to boot Windws 8.1 OS, then create a new Target in StarWind Virtual SAN with an IQN indication of the goal iqn.2014-11.home: windows8.1, add a new iSCSI disk device to it , and then in the pxelinux.cfg / default file we add the following lines to the example:
LABEL Windows 8.1
KERNEL IPXE.KRN
INITRD win8.1.ipxe
Well, then create a file win8.1.ipxe as follows:
#! ipxe
dhcp net0
set keep-san 1
#login
sanboot iscsi: 192.168.0.1 :::: iqn.2014-11.home: windows8.1
LABEL Windows 8.1
KERNEL IPXE.KRN
INITRD win8.1.ipxe
Well, then create a file win8.1.ipxe as follows:
#! ipxe
dhcp net0
set keep-san 1
#login
sanboot iscsi: 192.168.0.1 :::: iqn.2014-11.home: windows8.1
Installing Windows 7
Before you start installing Windows 7 on a diskless station, open its BIOS and configure the polling procedure for boot devices as follows:
1) Hard Disk
2) Network
3) CD / DVD
4) other devices
If the PC has an installed hard disk, it is advisable to disconnect it during the installation of Windows so that the computer does not try to boot from it.
Next, we place the Windows 7 installation disc in the CD / DVD drive and restart the computer.
First we need to see the launch of the PXE boot. If this does not happen, then go back to the BIOS and allow the computer to boot via the network adapter.
Next, the PXELINUX boot menu appears on the screen. If this does not happen, we check whether the Tftpd32 program is running on another computer, whether it is configured correctly, and whether firewalls, antiviruses, or other programs are blocking its operation.
After selecting the necessary item of the PXELINUX boot menu, we should see the launch of iPXE.
The iPXE initialization process should flash the captions:
Registered as BIOS drive 0x80
Booting from BIOS drive 0x80
This means that the PC successfully connected to the iSCSi drive.
Then we will see a boot error through the iSCSi disk, after which the computer will proceed to the next boot device scan and start the installation of Windows 7 from the CD / DVD drive. At the same time, the connection to the iSCSi disk will remain active - the set keep-san 1 line specified in the script is responsible for this.
For those who do not start installing Windows from a CD / DVD drive
The BIOS of some computers, after an unsuccessful attempt to boot from iPXE, stops the startup process. Accordingly, further loading of the Windows Installer from the CD / DVD drive does not occur. This behavior was noticed, for example, on Hewlett-Packard laptops. In such cases, saves loading using gPXE. For this:
1) open the site page rom-o-matic.net/gpxe/gpxe-git/gpxe.git/contrib/rom-o-matic/build.php ,
2) in the Choose an output format field, select the PXE bootstrap loader keep [Keep PXE stack method 1] (.kpxe),
3) in the lowest field of Embedded Script we enter three lines of our script:
dhcp net0
set keep-san 1
sanboot iscsi: 192.168.0.1 :::: iqn.2014-11.home: win7-64bit
4) save the gPXE bootloader to the Tftpd32 program folder and write the file name on the DHCP server in the Boot File field,
5) Install the Windows OS and write the name of the file pxelinux.0 on the DHCP server in the Boot File field back.
During the installation of Windows, at the stage of selecting a disk device, we should see the disk iSCSi connected to us. If the iSCSi disk is not listed, then the Windows installer could not automatically connect the necessary drivers for the network card. In this case, download the necessary network card drivers from the developer’s website and connect them to the Windows installer. After that, the iSCSi disk should appear in the list.
If you received a message about the inability to install Windows on the selected drive
Sometimes at the stage of selecting a disk device, you can get a message about the impossibility of installing Windows on the selected disk and asking you to check whether the disk controller is enabled in the BIOS.
In this case, the first thing to check in the BIOS is the polling order for boot devices. The hard disk must be in the first position, even if the disk drive is not physically installed on the computer.
If the problem persists, try switching the SATA controller on / off in the BIOS, changing its IDE mode, ACHI, or plugging in the actual disk during the installation, but installing it on an iSCSI disk.
After selecting the disk device, the installation of Windows 7 will begin. There should be no further difficulties. After installation, we get a “full-fledged” Windows 7 operating system running on an iSCSI disk.
Installing Windows (alternative method)
I don’t know how anyone, but I personally don’t find it convenient for each Windows installation image to burn a DVD.
I am accustomed to unpack the contents of the installation disk and run the installation of Windows from the hard disk. In addition, the operating system is installed faster from the hard disk.
I will give an example using the standard bootmgr bootloader found in any Windows distribution.
This method is also suitable for installing Windows from local hard drives.
In short, we create a small “active” partition on the iSCSI disk, copy the contents of the Windows installation disk there, and then configure the MBR to boot from the Windows Installer disk. Details under the spoiler.
Alternative method of installing Windows
So, open the Windows operating system, the Control Panel - Administration - the iSCSI Initiator.
The "iSCSI Initiator Properties" window appears.
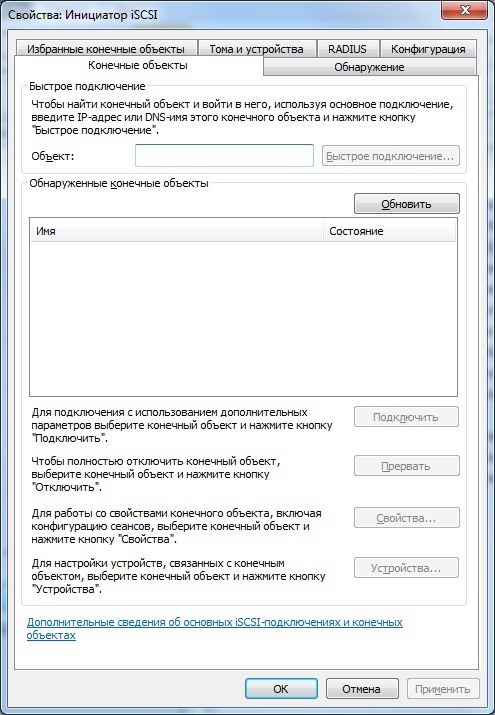
Go to the tab "Detection" and click the button "Detect the portal ...".
In the window that opens, enter the IP address of our iSCSI target - 192.168.0.1 and click OK.
Next, go back to the "Targets" tab and see all targets with IQN identifiers.
Select the desired target from the list and click the “Connect” button.
Another window will open requiring our confirmation, where we also click OK.
If in the opened window you leave a tick “Add this connection to the list of preferred targets”, then the specified target will automatically connect to the system upon each download.
Open the Computer Management snap-in and go to the Disk Management tab. Here we will see that another disk device has appeared in our system. We create a “Primary Partition” on this disk, specifying the size of the disk a little more than the size of our installation image. Next, we format it under the NTFS file system, connect any drive letter and make the partition “active”.
Open the required image of the installation disk using UltraISO or WinRar and unpack the contents of the image on the disk partition created in the previous section. It is important that after unpacking at least 100MB of free space remains on the disk (350MB of free space is recommended for Windows 8). If there is not enough free space, then expand the selected partition in the "Disk Management" snap-in.
Then we download the BOOTICE program from the Internet and launch it (I will not give you links, you can find them yourself without difficulty).
In the program, select the desired disk from the drop-down list. In my case HD6:
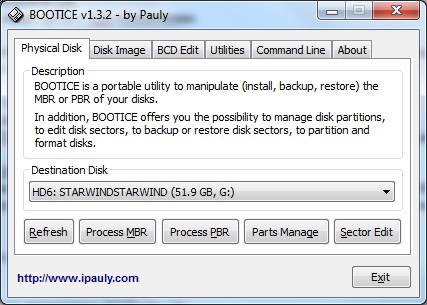
Then click the “Process MBR” button and the following window will open:
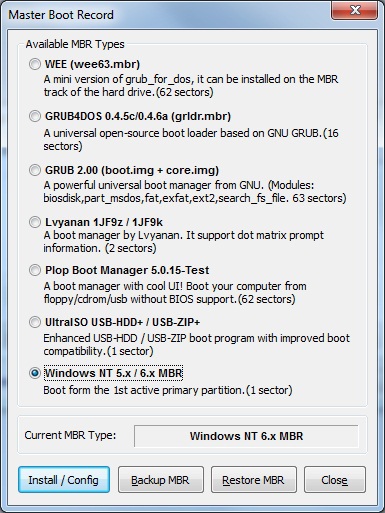
In this window, select the last item “Windows NT 5.x / 6.x MBR” and click the “Install / Config” button.
The disk will be configured with an MBR that loads the standard bootmgr bootloader from the active disk partition.
Then you can boot on a diskless PC from this iSCSI disk and immediately install WIndows OS.
Windows installation will start automatically.
But consider another point. If we want to make this section hidden from users and inaccessible for the operating system, then we run the command prompt as administrator and type the following commands:
Diskpart
List disk
Sel disk x (instead of x, substitute the number of the desired disk, the list of which is displayed by the previous command)
Sel part 1 (if necessary, the list of sections can be viewed with the List part command)
Remove
Set id = 27
After that, this disk partition will become technological and hidden. For this section, it is no longer possible to assign a drive letter and mount it to a working system, but installing Windows from this section is no problem.
It turns out something like a recovery partition)
The "iSCSI Initiator Properties" window appears.
Go to the tab "Detection" and click the button "Detect the portal ...".
In the window that opens, enter the IP address of our iSCSI target - 192.168.0.1 and click OK.
Next, go back to the "Targets" tab and see all targets with IQN identifiers.
Select the desired target from the list and click the “Connect” button.
Another window will open requiring our confirmation, where we also click OK.
If in the opened window you leave a tick “Add this connection to the list of preferred targets”, then the specified target will automatically connect to the system upon each download.
Open the Computer Management snap-in and go to the Disk Management tab. Here we will see that another disk device has appeared in our system. We create a “Primary Partition” on this disk, specifying the size of the disk a little more than the size of our installation image. Next, we format it under the NTFS file system, connect any drive letter and make the partition “active”.
Open the required image of the installation disk using UltraISO or WinRar and unpack the contents of the image on the disk partition created in the previous section. It is important that after unpacking at least 100MB of free space remains on the disk (350MB of free space is recommended for Windows 8). If there is not enough free space, then expand the selected partition in the "Disk Management" snap-in.
Then we download the BOOTICE program from the Internet and launch it (I will not give you links, you can find them yourself without difficulty).
In the program, select the desired disk from the drop-down list. In my case HD6:
Then click the “Process MBR” button and the following window will open:
In this window, select the last item “Windows NT 5.x / 6.x MBR” and click the “Install / Config” button.
The disk will be configured with an MBR that loads the standard bootmgr bootloader from the active disk partition.
Then you can boot on a diskless PC from this iSCSI disk and immediately install WIndows OS.
Windows installation will start automatically.
But consider another point. If we want to make this section hidden from users and inaccessible for the operating system, then we run the command prompt as administrator and type the following commands:
Diskpart
List disk
Sel disk x (instead of x, substitute the number of the desired disk, the list of which is displayed by the previous command)
Sel part 1 (if necessary, the list of sections can be viewed with the List part command)
Remove
Set id = 27
After that, this disk partition will become technological and hidden. For this section, it is no longer possible to assign a drive letter and mount it to a working system, but installing Windows from this section is no problem.
It turns out something like a recovery partition)
I hope this article will be useful to you. Good luck to all!
References to the literature:
Source: https://habr.com/ru/post/244661/
All Articles