Web on pure java. Learn Vaadin - a cool web application framework

In the client-server architecture, the place of a Java application is primarily on the server side, while the web interface is written by a separate group of front-end developers in JavaScript. Java does not offer adequate tools for creating a modern web interface (when was the last time you saw a Java applet ..?) Neither in terms of design, nor in terms of implementing client-server interaction.
And what if the entire client-server application was written entirely in Java, but its client part would be “native” for the browser and would correspond to the most modern concepts of usability?
Introduction

Fig. 1. Vaadin logo
')
Vaadin (by the way, translated from Finnish, the word means “deer”) supports all common browsers of both ordinary computers and mobile devices and tablets. All development is done in Java, but the Java code is executed only on the server, and the client runs pure JavaScript.
Structurally, Vaadin consists of a server API, a client API, a set of user interface components on both sides, an interface theme engine, and a data model that allows you to associate server components directly with data. Two main development models can be applied: on the server side and on the client side (browser).

Fig. 2. Architecture Vaadin
In fig. 2 shows the main architectural components of a web application built using Vaadin.
Server development model
Optimized for performance
The server development model for Vaadin is basic and allows you to create complete applications without development on the client side. It uses the AJAX engine Vaadin Client-Side Engine, which forms the user interface in the browser. The server approach allows you to virtually forget about the fact that development is carried out under the web, and develop the user interface almost like a traditional Java program with direct access to data and services on the server. In this case, the server part of Vaadin will take care of the formation of the user interface in the browser and the AJAX interaction between the browser and the server. The Vaadin engine renders the user interface of the server side application in a browser and implements all the details of the client and server exchange.
The server part of the Vaadin application is executed as a regular servlet of the Java application server. It is pure Java in a JAR file that can be added to any standard web application and runs on any servlet or portlet container from Tomcat to Oracle WebLogic. The servlet accepts HTTP requests from the client and interprets them as events of a specific user session. Events are associated with user interface components and delivered to event listeners defined in the application. If the user interface logic makes changes to the user interface components on the server side, the servlet renders them for display in a web browser and generates a response. The client-side engine, executed in the browser, receives an answer and, based on it, makes changes in the webpage loaded in the browser.
Client development model
Optimized for control
The client model allows you to develop Java widgets and applications that are then compiled into JavaScript that is executed in the browser using the Vaadin Compiler, a compiler based on the Google Web Toolkit (GWT). You can also use javascript directly. This provides full access to the DOM structure and maximum control over the browser.
Preparing the development environment
The following describes how Vaadin is used in NetBeans 8.0.2 (Vaadin Plug-in for NetBeans version 1.1.3); In the sidebar there are links to training videos for work in IntelliJ IDEA and Eclipse (the plugin for Eclipse includes a graphical user interface editor).
The first step in the NetBeans IDE is to install the plugin (Tools -> Plugins -> Available Plugins, enter vaadin in the Search field, tick the 'Vaadin Plug-in for NetBeans' and click Install, agreeing with all the questions).
Now when creating a new project (File -> New Project) a new category Vaadin has become available. Select Vaadin Web Application Project, click Next and specify the name of the new project, for example myvaadin.
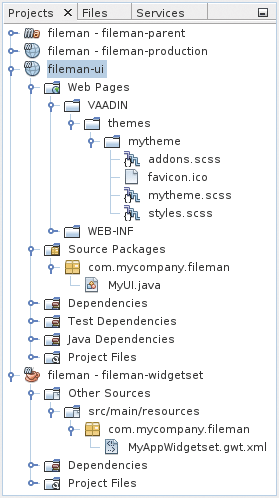
Fig. 3. Project structure
After clicking Finish, the default Vaadin application project group will be created. The main file with a minimal example of the source code of the Vaadin application is located in the myvaadin-ui project, the file / Source Packages / com.mycompany.myvaadin / MyUI.java; its key part looks like this (package and import instructions are omitted):
@Theme("mytheme") @Widgetset("com.mycompany.myvaadin.MyAppWidgetset") public class MyUI extends UI { @Override protected void init(VaadinRequest vaadinRequest) { final VerticalLayout layout = new VerticalLayout(); layout.setMargin(true); setContent(layout); Button button = new Button("Click Me"); button.addClickListener(new Button.ClickListener() { @Override public void buttonClick(ClickEvent event) { layout.addComponent(new Label("Thank you for clicking")); } }); layout.addComponent(button); } @WebServlet(urlPatterns = "/*", name = "MyUIServlet", asyncSupported = true) @VaadinServletConfiguration(ui = MyUI.class, productionMode = false) public static class MyUIServlet extends VaadinServlet { } } In this simplest project, the MyUI class is declared, which is a successor of the UI class. It overrides the init () method. Inside it creates a vertical layout VerticalLayout, it turns on the margin (margin), creates a new button with a click handler, which adds a component of the Label type with a text string. The button is then added to the layout by calling the addComponent () method. The Theme directive ("mytheme") sets the theme used (about them just below).
Before the first launch, we will rebuild all projects (right click on 'myvaadin - myvaadin-parent' -> Build)
You can use the Jetty plug-in or the GlassFish Server integrated into NetBeans to run in debug mode.
Right click on the project -> Debug -> in the Select Deployment Server window from the drop-down list select GlassFish Server.
After all the dependencies are installed and the application components are recompiled, the servlet will start and the browser window will automatically open.
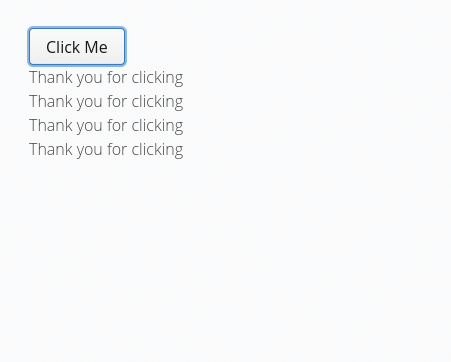
Fig. 4. Minimum Vaadin application
Themes and styles
Take a look directly in the inspector or Firebug, which is a button on our form (Fig. 5).

Fig. 5. UI button
<div tabindex="0" role="button" class="v-button v-widget"> <span class="v-button-wrap"> <span class="v-button-caption">Click Me</span> </span> </div> 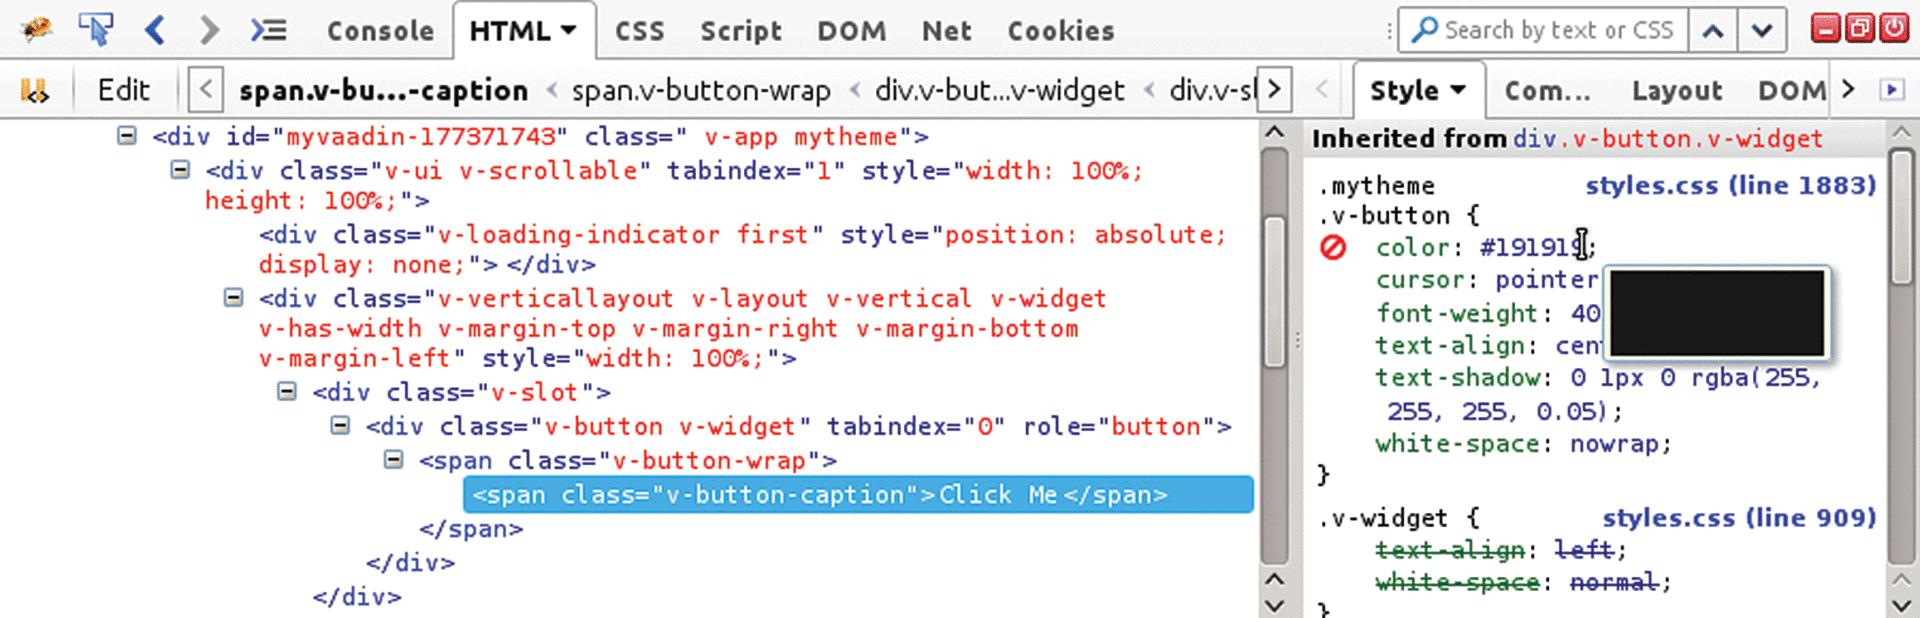
Fig. 6. View HTML and Styles in Firebug
All button styles are taken from the styles.css file. This file is located in the / Web Pages / VAADIN / themes / mytheme / myvaadin-ui project and is generated from the SASS-files styles.scss, mytheme.scss and addons.scss located in the same directory. They are based on the basic style, called Valo (its previous version was called Reindeer and is still mentioned in the documentation in some places). You can read about Valo here , and here you can see examples of all components.
The main parameters of the topic are in variables, and to completely change the appearance of the application, it is enough to change the number of parameters read. For example, the font color is automatically determined based on the background color. The background color itself is set by the $ v-background-color variable. To change it, add the following line to the beginning of the mytheme.scss file:
$v-background-color: #000; Then you need to right-click on the myvaadin-ui project and select Vaadin -> Compile Widgetset and Theme or Compile Theme, and then refresh the page in the browser.
At the same time, the background color of most project elements will change to black, the font color will change automatically.
Thanks to this approach, in order to completely redesign the application, say, for the flat Metro style, two dozen lines are enough to override the values of variables without changing the actual style. The result can be viewed here (by selecting the Metro theme in the upper right corner), and the source text is here :
You can override the style and directly. For example, you can change the color of the label on the button by adding the following lines to the mytheme.scss file (below the line “// Insert your own theme rules here”):
$textcolor: red; .v-button-caption { color: $textcolor; } Then recompile the themes and refresh the browser page.
Instead of creating your own theme, you can use one of the ready ones by changing the name of the theme from mytheme to one of the following: valo, runo, reindeer, chameleon, liferay.
Read more about the topics here .
Creating a browser-based file manager
To feel the full elegance of the approach offered by Vaadin, we implement the file manager prototype.
File system mapping - familiarity with TreeTable and containers
Container - Vaadin interface, which is a source of tabular or hierarchical data. Read more about containers here . The SQLContainer container is used to access the SQL database . For the file system there is also a ready-made container FilesystemContainer, which we use in this project.
The container can be set as a data source for elements of the Table (table data), Tree and TreeTable types (for displaying hierarchical data) and others.
Let's start by creating a new project called fileman. Add the MyUI class method for creating and initializing the TreeTable element that will display the directory structure (if the line in the source text is highlighted in red, this means that there is no corresponding import line for this class; to add it, you can press <Alt + Enter> and select " Add import for ... ". It is necessary to clarify that below for the class File you will need to choose from the proposed java.io.File):
public class MyUI extends UI { . . . private TreeTable treetable; private void initFileTree(ComponentContainer parentLayout) { // TreeTable treetable = new TreeTable("File System"); treetable.setSelectable(true); treetable.setColumnCollapsingAllowed(true); treetable.setColumnReorderingAllowed(true); treetable.setSizeFull(); parentLayout.addComponent(treetable); } . . . } Add a method for setting new TreeTable data from FilesystemContainer
private void updateFileTree(File sourcePath) { // FilesystemContainer currentFileSystem = new FilesystemContainer(sourcePath); currentFileSystem.setRecursive(false); // // TreeTable, treetable.setContainerDataSource(currentFileSystem); treetable.setItemIconPropertyId("Icon"); treetable.setVisibleColumns(new Object[]{"Name", "Size", "Last Modified"}); // , } Also add a method for defining the project directory by default.
private File currentPath; // // ~/NetBeansProjects/fileman/target/fileman-1.0-SNAPSHOT/ private void getDefaultDirectory() { UI ui = MyVaadinUI.getCurrent(); VaadinSession session = ui.getSession(); VaadinService service = session.getService(); currentPath = service.getBaseDirectory(); } initAll, : // private void initAll(VerticalLayout layout) { initFileTree(layout); getDefaultDirectory(); updateFileTree(currentPath); } In the init () method, remove everything related to the button, and add a call to the end of the new initAll () method at the end so that init () looks like this:
@Override protected void init(VaadinRequest request) { final VerticalLayout layout = new VerticalLayout(); layout.setMargin(true); setContent(layout); initAll(layout); } Add blanks for the functions for
// private void updateAll() { updateFileTree(currentPath); updateInfo(); } // / ( /) private void updateInfo() { } Save the file and run the application in debug mode. If the application has already been launched before, after saving and completing the deployment (deploy), it is enough just to refresh the page in the browser.
Event handling of the TreeTable component
At the end of the initFileTree method, add a handler for single and double mouse clicks:
// treetable.addItemClickListener(new ItemClickEvent.ItemClickListener() { @Override public void itemClick(ItemClickEvent itemClickEvent) { String clickedFilename = itemClickEvent.getItemId().toString(); // , System.out.println("ItemClick: pathname:" + clickedFilename); // if (itemClickEvent.isDoubleClick()) { doChangeDir(clickedFilename); } else { doSelectFile(clickedFilename); } } }); Add methods to the MyUI class to handle user actions.
private String selectedFilename; // — private void doRefresh() { updateAll(); } // — private void doChangeDir(String path) { currentPath = new File(path); if (currentPath.isDirectory()) { selectedFilename = null; updateAll(); } } // — private void doUpLevel() { currentPath = currentPath.getParentFile(); selectedFilename = null; updateAll(); } // — private void doSelectFile(String filename) { selectedFilename = filename; updateInfo(); } From this point on a double click you can already go to the directory, which is a level below.
Main menu - MenuBar component
Add the main menu with the Refresh and Up Level items to the File submenu, similar to the horizontal menu of traditional applications:
private void initMenuBar(Layout parentLayout) { // MenuBar // https://vaadin.com/book/-/page/components.menubar.html // MenuBar menuBar = new MenuBar(); // menuBar.setWidth("100%"); // 100% parentLayout.addComponent(menuBar); // layout // File final MenuItem fileMenuItem = menuBar.addItem("File", null, null); // File Refresh fileMenuItem.addItem("Refresh", FontAwesome.REFRESH, new MenuBar.Command() { @Override public void menuSelected(MenuItem selectedItem) { doRefresh(); } }); // File Up Level fileMenuItem.addItem("Up Level", FontAwesome.ARROW_UP, new MenuBar.Command() { @Override public void menuSelected(MenuItem selectedItem) { doUpLevel(); } }); } private void updateMenuBar() { // } And calling these methods in the InitAll () method in the first line (otherwise the menu will be below all other elements):
initMenuBar(layout); and in updateInfo ():
updateMenuBar(); Top and bottom panels
The next step is to add a panel at the top, on which we place the buttons and information about the current path / name of the selected file and the panel at the bottom to display information about the file. Inside the class MyUI add:
private Label labelFileName; // , / private void initTopPanel(Layout parentLayout) { // , HorizontalLayout topPanelLayout = new HorizontalLayout(); // 100% topPanelLayout.setWidth("100%"); // topPanelLayout.setSpacing(true); // parentLayout.addComponent(topPanelLayout); // Refresh // Button button = new Button("Refresh"); // FontAwesome button.setIcon(FontAwesome.REFRESH); // // button.addStyleName(ValoTheme.BUTTON_SMALL); // topPanelLayout.addComponent(button); // button.addClickListener(new Button.ClickListener() { @Override public void buttonClick(Button.ClickEvent event) { doRefresh(); } }); // Up Level // button = new Button("Up Level"); // FontAwesome button.setIcon(FontAwesome.ARROW_UP); // // button.addStyleName(ValoTheme.BUTTON_SMALL); // topPanelLayout.addComponent(button); // button.addClickListener(new Button.ClickListener() { @Override public void buttonClick(Button.ClickEvent event) { doUpLevel(); } }); // // labelFileName = new Label(); // topPanelLayout.addComponent(labelFileName); topPanelLayout.setComponentAlignment(labelFileName, Alignment.MIDDLE_CENTER); // topPanelLayout.setExpandRatio(labelFileName, 1); } // private void updateTopPanel(File currentPath, String selectedFilename) { if (selectedFilename != null) { labelFileName.setValue(selectedFilename); } else { labelFileName.setValue(currentPath.toString()); } } Initialization of the bottom panel containing information about the selected file
Label[] bottomLabels; private void initBottomPanel(Layout parentLayout) { final String[] captions = new String[]{ "File Size (Bytes)", "File Date", "Usable Space (Bytes)", "Total Space (Bytes)", "Free Space (Bytes)" }; HorizontalLayout bottomPanelLayout = new HorizontalLayout(); // 100% bottomPanelLayout.setWidth("100%"); parentLayout.addComponent(bottomPanelLayout); // Label bottomLabels = new Label[captions.length]; for (int i = 0; i < captions.length; i++) { bottomLabels[i] = new Label(); bottomLabels[i].setCaption(captions[i]); bottomLabels[i].setValue("NA"); bottomPanelLayout.addComponent(bottomLabels[i]); } } // private void updateBottomPanel(String pathname) { try { File file = new File(pathname); // Label — bottomLabels[0].setValue(Long.toString(file.length())); bottomLabels[1].setValue((new Date(file.lastModified())).toString()); // bottomLabels[2].setValue(Long.toString(file.getUsableSpace())); bottomLabels[3].setValue(Long.toString(file.getTotalSpace())); bottomLabels[4].setValue(Long.toString(file.getFreeSpace())); } catch (Exception e) { // for (Label bottomLabel : bottomLabels) { bottomLabel.setValue("NA"); } } } Add a call to these methods in the InitAll () method, bringing it to the following form:
private void initAll(VerticalLayout layout) { initMenuBar(layout); initTopPanel(layout); initFileTree(layout); getDefaultDirectory(); updateFileTree(currentPath); initBottomPanel(layout); } and in updateInfo (), bringing it to the following form:
private void updateInfo() { updateMenuBar(); updateTopPanel(currentPath, selectedFilename); updateBottomPanel(selectedFilename); } After saving and refreshing the page in the browser, the file manager will receive a menu, a toolbar and a status bar.
Preview and splitter - HorizontalSplitPanel, Embedded components
Let's add a graphic file preview pane to our file manager. By analogy, it is easy to preview for text files using the TextArea component.
private HorizontalLayout previewLayout; private Embedded previewEmbedded; // , private void initMainPanels(VerticalLayout parentLayout) { HorizontalSplitPanel mainPanels = new HorizontalSplitPanel(); mainPanels.setSizeFull(); parentLayout.addComponent(mainPanels); parentLayout.setExpandRatio(mainPanels, 1); initFileTree(mainPanels); initPreview(mainPanels); } // private void initPreview(ComponentContainer parentLayout) { previewLayout = new HorizontalLayout(); previewLayout.setSizeFull(); parentLayout.addComponent(previewLayout); // // Embedded previewEmbedded = new Embedded("Preview area", null); // previewEmbedded.setVisible(true); // previewLayout.addComponent(previewEmbedded); // previewLayout.setComponentAlignment(previewEmbedded, Alignment.MIDDLE_CENTER); } // private void clearPreview() { previewEmbedded.setSource(null); previewEmbedded.setVisible(true); } // private void updatePreview(String pathname) { if (pathname == null || pathname.length() == 0) { clearPreview(); return; } // File file = new File(pathname); int lastIndexOf = pathname.lastIndexOf("."); String extension = (lastIndexOf == -1) ? "" : pathname.substring(lastIndexOf); // — 128 final int PREVIEW_FILE_LIMIT = 128 * 1024; // Embedded (, Flash ) final String[] imageExtensions = new String[]{ ".gif", ".jpeg", ".jpg", ".png", ".bmp", ".ico", ".cur", "swf", "svg" }; // , previewEmbedded.setVisible(false); // , if (file.length() > PREVIEW_FILE_LIMIT) { clearPreview(); return; } // — if (Arrays.asList(imageExtensions).contains(extension)) { Resource resource = new FileResource(file); // previewEmbedded.setSource(resource); // Embedded previewEmbedded.setVisible(true); // previewLayout.setExpandRatio(previewEmbedded, 1.0f); // } } And we add the initMainPanels () method to the InitAll () method, instead of calling the initFileTree () tree initialization method, since now it is called from initMainPanels:
private void initAll(VerticalLayout layout) { initMenuBar(layout); initTopPanel(layout); // initFileTree(layout); initMainPanels(layout); getDefaultDirectory(); updateFileTree(currentPath); initBottomPanel(layout); } and add a line to the updateInfo ()
updatePreview(selectedFilename); Don't forget to copy the image to the default folder (<NetBeans Projects Directory (NetBeansProjects)> / fileman / fileman-ui / target / fileman-ui-1.0-SNAPSHOT
).
Well, that's all, with the help of our file manager, you can navigate through the file system, view files and their properties.
We got a client-server application for the browser, without writing a single line in JavaScript, without wasting time on implementing AJAX interaction, and without even thinking about all the nuances of web development.
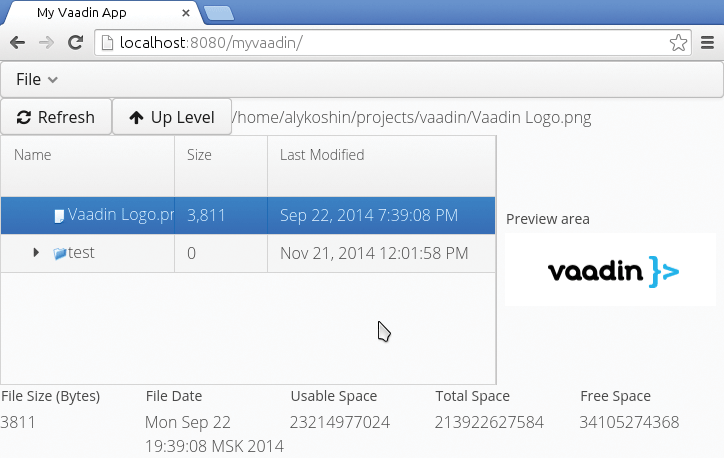
Fig. 6. Application interface
Conclusion
In general, the framework leaves a very pleasant impression with its thoughtfulness and documentation, with a large number of examples with GitHub source codes. Hacker magazine (the author, editor and chief editor has subscribed to this statement at the moment) recommends its use to you, including inside and in unlimited quantities!
Google Web Toolkit (GWT)
Google Web Toolkit (GWT) is an open source library that provides a set of Java APIs and visual components that allow you to develop Java AJAX applications and then compile their sources into highly optimized JavaScript, running on all major browsers, including Android and mobile browsers. iPhone. Read more - here .
VIDEO
Www
- Details on how to get started are described in the Getting Started with Vaadin section of the Book of Vaadin e-book.
- An excellent addition to the book is Book of Vaadin Examples , with fragments of source code for the vast majority of sections of the book and elements of Vaadin.
- A small sample application sample can be found here .
- More complex demos .
- API documentation is available here .
Vaadin TouchKit
Vaadin TouchKit is designed to develop applications for mobile devices. It includes components optimized for the mobile interface, as well as functions specific to mobile devices. In addition to the usual interface formed on the server, TouchKit supports a special offline mode, in which the client interface is stored in the browser's cache and is turned on automatically when the network is unavailable.
Vaadin TestBench
Based on the Selenium library, which allows you to control the browser directly from Java code.
With the help of Vaadin TestBench, automated testing is implemented at all levels and phases of development, up to a comparison of screenshots. More details can be found here .
Vaadin Add-ons
In the Vaadin Directory at the moment there are almost 500 different add-ons, among which you can, for example, mention the Vaadin Charts component for drawing graphs and charts.
To access the add-ons directory in the context menu of the project there is an Open Add-Ons Browser item.

First published in the magazine "Hacker" from 02/2015.
Author: Alexander Lykoshin, alykoshin@gmail.com
Subscribe to "Hacker"
Source: https://habr.com/ru/post/244477/
All Articles