Running applications in the Android Virtual Device on a remote Linux server
In the process of working on one project, a situation arose when it was necessary to automatically conduct a series of operations from a mobile application. Since the set of input data that the user enters for the operation of the application changes, an implementation was needed that would allow to simulate the user's actions. Moreover, it was necessary for the application to run automatically on a remote linux server, perform actions and save the results. About how to solve this problem, I want to tell the readers.
The first part of the problem was solved quite simply - take a library to test mobile applications and implement the necessary logic. The choice fell on Robotium. Firstly, it is free, and secondly, it makes it quite convenient to work with the application under test, at least for me. I will not focus on the implementation of tests, other articles are devoted to this, let me just remind you that this results in another application that can run the application under test, analyze what it displays, etc. The second part of the work had much more all kinds of pitfalls, but first things first.
The main requirement was that the application should run on a linux server. For me, this meant that the graphical interface would not be familiar to me, an inveterate "winery", with all the ensuing difficulties. Also among the useful wishes was the ability to debug everything on the same server if necessary.
For implementation were used:
')
Android SDK itself can be taken from here . Of course, it requires a pre-installed JDK to work, I had version 1.7. Previously, the x86 version was needed, but since some of the latest versions this problem has disappeared. After we have the Android SDK, we begin to install and configure it:
Further, for ease of management, you can add the adb , android , emulator utilities from the platform-tools and tools directories to the system variables, but I just ran them from the directory.
Now we need to create our virtual device, here too nothing complicated, the command for this is standard:
The name of the device - well, everything is clear here.
The sequence number of the Android OS version - it can be seen in the list of available versions for device creation. The list itself can be obtained with the command:
Processor instruction set - which processor to emulate, if only one processor version was used for the Android version, then this parameter can be ignored, otherwise, in response to the command, the utility will display a message about the need to explicitly specify a set of instructions, and also indicate possible options. For example, my value for this parameter was default / armeabi .
After this, it creates a folder with a set of virtual device files, it is located in the * /. Android / avd directory , which is located either in the root directory, or in the directory where the SDK itself is located (depending on user rights). The name of the file directory is the same as the name of the virtual device.
Now we start our device. I remind you that in the condition it is worth it that we have a server with terminal access, which means we did not have any graphic libraries, and never will. But we must pay tribute to the guys from Google, they have provided for this case:
-no-window - indicates the launch with the screen off.
The device name is the name we specified when creating the device above.
A more detailed description and other launch keys can be found here .
Now we need to wait until the device boots:
Now we just have to install our applications: the main one that accesses the server, and the robotium application that can access the main one and perform actions:
-r - this key indicates that if the application already exists, overwrite it.
Application name - the name of your apk-file with the extension.
On many resources I met the mention that AVD can be transferred simply by copying files from one machine to another, but I did not succeed: when I tried to start up, I started cheerfully cursing the absence of a kernel.ini file, although I didn’t create any files directly in the linux emulator with that name was not observed. But since the creation of an emulator is a matter of a minute, I waved my hand to it.
Launching a robotium application is quite simple (I’ll give a specific example for clarity):
emulator-5554 is the name of the emulator, usually it is standard if the emulator is running on the system alone, but you can see the list of available launched devices with the command:
e class com.example.robotium.Kernel is the name of the class in the robotium application that directly executes the tests.
com.example is the package name from the AndroidManifest.xml file for a robotium application.
It would seem that here and the finish, but it was not there. The application started, some time was executed and dropped out with an error. Everything turned out to be trite, when you start the emulator starts with a locked screen - and it still displays this screen or not. One of the first links in the search engine advises us to just drive a command:
The test on his windows-machine showed that it works, and regardless of whether the emulator is running with the –no-window parameter, and without it. But the launch on debian-e did not give anything, the error was repeated, which means the reason is different, I suggested. Long searches did not give anything concrete, apparently, very few people come to mind to drive tests for the GUI on the terminal server. There were mostly comments that, since these tests are for gui, they cannot work even when the screen is off, they say, there is no GUI displayed, and there are no tests for them. But my situation was from the category “the party said it is necessary” and I couldn’t come up with my answer to my teamlead, so I took it as an axiom that the screen simply didn’t unlock, unfortunately I didn’t check visually how it was smog, terminal server after all. I added additional checks on the state of the screen at the time of launch, and it turned out that the screen was not only not unlocked, but also turned off - the team had failed.
The problem was solved by software unlocking. To do this, add the code to the robotium application:
For this code to work in the AndroidManifest.xm file, you need to add the following lines:
It should be noted that you do not need to add to the robotium-application file, but to the file of the application under test, because all the work with the Android OS is done through it, which means that they need all access rights.
After this, once again we execute the command described earlier - hurray, everything started, everything works.
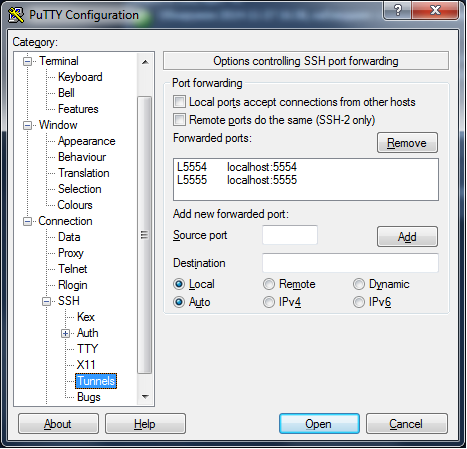
Unfortunately, from scratch, neither the Android SDK nor the IDEA can work with virtual devices on remote servers, which means we make them think that the device is nearby. To do this, set up a tunnel to our server in Putty. For this you need to add two ports - for the emulator-5554 device, these will be ports 5554 and 5555 . To clarify, just in case, the example in the image:
Now turn off the ADB service on the remote server:
And on the local machine, we start or restart (by turning it off immediately):
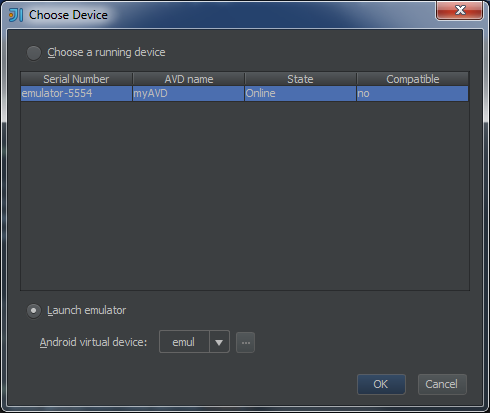
Now if we execute the command ./adb devices , we will see remote devices that are running. Unfortunately, we can not run emulators remotely, just see the already running, well, and work with them. Now, when launching a robotium application directly from IDEA, in the device selection dialog we will see our remote emulator (see image). You can work with it in the same way as with the local one.
Thank you for your attention, I hope this post will be useful to someone else, because I really missed it in due time.
The first part of the problem was solved quite simply - take a library to test mobile applications and implement the necessary logic. The choice fell on Robotium. Firstly, it is free, and secondly, it makes it quite convenient to work with the application under test, at least for me. I will not focus on the implementation of tests, other articles are devoted to this, let me just remind you that this results in another application that can run the application under test, analyze what it displays, etc. The second part of the work had much more all kinds of pitfalls, but first things first.
Requirements and tools
The main requirement was that the application should run on a linux server. For me, this meant that the graphical interface would not be familiar to me, an inveterate "winery", with all the ensuing difficulties. Also among the useful wishes was the ability to debug everything on the same server if necessary.
For implementation were used:
- Development Environment - IntelliJ IDEA ;
- Remote linux server - Debian 7 ;
- Android SDK ;
- Putty - to implement remote debugging.
')
Step 1. Deploy the SDK
Android SDK itself can be taken from here . Of course, it requires a pre-installed JDK to work, I had version 1.7. Previously, the x86 version was needed, but since some of the latest versions this problem has disappeared. After we have the Android SDK, we begin to install and configure it:
- Copy the archive to our linux-machine and unpack it in the desired directory;
- Next, update our SDK.
There are two options. First, when you know exactly what you need, then we get a list of available libraries:./android list sdk –all
As a result, we will get a long list of packages available for download, select the necessary ones and give the command to download from:./android update sdk --no-ui –filter< >
The second option is to download all that is available at the moment. It turned out to be closer to me, because I myself am not an Android developer, and I was not sure that I would choose everything I needed:./android update sdk --no-ui
Both of these commands are described on the official website in the documentation section, but for some reason I didn’t find the description of the key - no-ui , which indicates a launch without a graphical interface. - We are waiting for the end of the package download.
Further, for ease of management, you can add the adb , android , emulator utilities from the platform-tools and tools directories to the system variables, but I just ran them from the directory.
Step 2. Create and run the Android Virtual Device
Now we need to create our virtual device, here too nothing complicated, the command for this is standard:
./android create avd --name < > --target < Android> –b < > The name of the device - well, everything is clear here.
The sequence number of the Android OS version - it can be seen in the list of available versions for device creation. The list itself can be obtained with the command:
./android list target Processor instruction set - which processor to emulate, if only one processor version was used for the Android version, then this parameter can be ignored, otherwise, in response to the command, the utility will display a message about the need to explicitly specify a set of instructions, and also indicate possible options. For example, my value for this parameter was default / armeabi .
After this, it creates a folder with a set of virtual device files, it is located in the * /. Android / avd directory , which is located either in the root directory, or in the directory where the SDK itself is located (depending on user rights). The name of the file directory is the same as the name of the virtual device.
Now we start our device. I remind you that in the condition it is worth it that we have a server with terminal access, which means we did not have any graphic libraries, and never will. But we must pay tribute to the guys from Google, they have provided for this case:
./emulator -avd < > -no-window -no-window - indicates the launch with the screen off.
The device name is the name we specified when creating the device above.
A more detailed description and other launch keys can be found here .
Now we need to wait until the device boots:
./adb wait-for-device Now we just have to install our applications: the main one that accesses the server, and the robotium application that can access the main one and perform actions:
./adb install -r < > -r - this key indicates that if the application already exists, overwrite it.
Application name - the name of your apk-file with the extension.
On many resources I met the mention that AVD can be transferred simply by copying files from one machine to another, but I did not succeed: when I tried to start up, I started cheerfully cursing the absence of a kernel.ini file, although I didn’t create any files directly in the linux emulator with that name was not observed. But since the creation of an emulator is a matter of a minute, I waved my hand to it.
Step 3. Launch Applications
Launching a robotium application is quite simple (I’ll give a specific example for clarity):
./adb -s emulator-5554 shell am instrument -w -e class com.example.robotium.Kernel com.example/android.test.InstrumentationTestRunner emulator-5554 is the name of the emulator, usually it is standard if the emulator is running on the system alone, but you can see the list of available launched devices with the command:
./adb devices e class com.example.robotium.Kernel is the name of the class in the robotium application that directly executes the tests.
com.example is the package name from the AndroidManifest.xml file for a robotium application.
It would seem that here and the finish, but it was not there. The application started, some time was executed and dropped out with an error. Everything turned out to be trite, when you start the emulator starts with a locked screen - and it still displays this screen or not. One of the first links in the search engine advises us to just drive a command:
./adb shell input keyevent 82 The test on his windows-machine showed that it works, and regardless of whether the emulator is running with the –no-window parameter, and without it. But the launch on debian-e did not give anything, the error was repeated, which means the reason is different, I suggested. Long searches did not give anything concrete, apparently, very few people come to mind to drive tests for the GUI on the terminal server. There were mostly comments that, since these tests are for gui, they cannot work even when the screen is off, they say, there is no GUI displayed, and there are no tests for them. But my situation was from the category “the party said it is necessary” and I couldn’t come up with my answer to my teamlead, so I took it as an axiom that the screen simply didn’t unlock, unfortunately I didn’t check visually how it was smog, terminal server after all. I added additional checks on the state of the screen at the time of launch, and it turned out that the screen was not only not unlocked, but also turned off - the team had failed.
The problem was solved by software unlocking. To do this, add the code to the robotium application:
PowerManager.WakeLock wl; PowerManager pm = (PowerManager) solo.getCurrentActivity().getApplicationContext().getSystemService(Context.POWER_SERVICE); wl = pm.newWakeLock(PowerManager.FULL_WAKE_LOCK | PowerManager.ACQUIRE_CAUSES_WAKEUP | PowerManager.ON_AFTER_RELEASE, "INFO"); wl.acquire(); KeyguardManager km = (KeyguardManager) solo.getCurrentActivity().getApplicationContext().getSystemService(Context.KEYGUARD_SERVICE); KeyguardManager.KeyguardLock kl; kl = km.newKeyguardLock("name"); kl.disableKeyguard(); For this code to work in the AndroidManifest.xm file, you need to add the following lines:
<uses-permission android:name="android.permission.WAKE_LOCK" /> <uses-permission android:name="android.permission.DISABLE_KEYGUARD" /> It should be noted that you do not need to add to the robotium-application file, but to the file of the application under test, because all the work with the Android OS is done through it, which means that they need all access rights.
After this, once again we execute the command described earlier - hurray, everything started, everything works.
Step 4. Configuring Remote Debugging
Unfortunately, from scratch, neither the Android SDK nor the IDEA can work with virtual devices on remote servers, which means we make them think that the device is nearby. To do this, set up a tunnel to our server in Putty. For this you need to add two ports - for the emulator-5554 device, these will be ports 5554 and 5555 . To clarify, just in case, the example in the image:
Now turn off the ADB service on the remote server:
./adb kill-server And on the local machine, we start or restart (by turning it off immediately):
./adb start-server Now if we execute the command ./adb devices , we will see remote devices that are running. Unfortunately, we can not run emulators remotely, just see the already running, well, and work with them. Now, when launching a robotium application directly from IDEA, in the device selection dialog we will see our remote emulator (see image). You can work with it in the same way as with the local one.
Thank you for your attention, I hope this post will be useful to someone else, because I really missed it in due time.
Source: https://habr.com/ru/post/244443/
All Articles