My Ubunt - II
Well, once such a thing has gone, then it’s time to talk to us about shoes, ships, wax seals, kings and cabbages, as well as easy modification of the Ubuntu distribution file with a file in order to get the appearance described in this post due to numerous requests TV viewers, telling about what and how I did.
I’ll say right away that I’m asking you not to read to lovers of pawing in comments - there are a lot of graphics, explanations for newbies, it will still be of no interest to you. Anyway, I warned you ;-)
So, a little less lyrics - a little more work. Where to begin? You need to start with the inventory. We need nothing at all! Today we will need:
So, the guns are cleaned and loaded, go to the battle. As I have already said, there is nothing difficult at all here and there cannot be.
Point number zero go to System-> Preferences-> Appearance-> Visual Effects and select the Normal mode. If the system pounds and says that everything is fine, we continue. If it buzzes and says that it didn't work out - then this is not the topic of this article, read the forums, look for the name of your video card and the word Compiz - until complete enlightenment (although there is an assumption that if your chipset is blacklisted in this version of the compass, then it’s okay to work will not - either update the version, or wait for an update). If all is well, then try to hold Alt and twist the scroller - the transparency of the current window should change. This is important - without this, a stone flower will not come out.
Go.
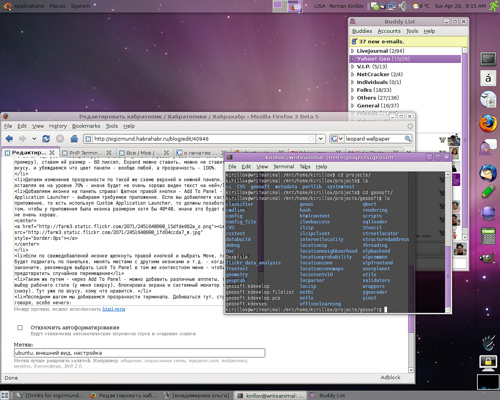
As a matter of fact, this is all - nothing more was here and no! If you did everything right, now you should have something very similar to the picture at the very beginning.
There will be questions - write, I will try to answer (especially while I'm at work and just behind this computer).
Update: as I said, a lot of things are tied to the desktop background. For example, if you use the background from Leopard Server and change the colors of Clearlooks to standard ones, you get this:

Update 2: the goal to remake Ubuntu in the Mac was not set even once - they are too different, and differently good, you do not have to cross the grass and the hedgehog to get as a result four meters of extremely questionable barbed wire.
I’ll say right away that I’m asking you not to read to lovers of pawing in comments - there are a lot of graphics, explanations for newbies, it will still be of no interest to you. Anyway, I warned you ;-)
So, a little less lyrics - a little more work. Where to begin? You need to start with the inventory. We need nothing at all! Today we will need:
- Computer with installed Ubuntu 7.10 / 8.04. In fact, any other distro will almost certainly go with GNOME as the desktop environment manager and ...
- Compiz is fixed and stable. This is important - without him all this beauty will not work.
- The third, in fact - the last point of the program - is the background of the desktop. I will reveal a terrible secret ... although not, I will reveal it later :-) So, I will not tell you exactly how to find this background, because with indignation I reject all claims of licensing uncleanliness, leave it as a home task (search by the word leopard wallpaper, size - extra large, first picture). I took it from my home computer (since no one uses it during working hours, I have every right to admire the picture at work :-))
So, the guns are cleaned and loaded, go to the battle. As I have already said, there is nothing difficult at all here and there cannot be.
Point number zero go to System-> Preferences-> Appearance-> Visual Effects and select the Normal mode. If the system pounds and says that everything is fine, we continue. If it buzzes and says that it didn't work out - then this is not the topic of this article, read the forums, look for the name of your video card and the word Compiz - until complete enlightenment (although there is an assumption that if your chipset is blacklisted in this version of the compass, then it’s okay to work will not - either update the version, or wait for an update). If all is well, then try to hold Alt and twist the scroller - the transparency of the current window should change. This is important - without this, a stone flower will not come out.
Go.
- First, set the desktop background. How to do this - I will not teach you (System-> Preferences-> Appearance-> Background, in fact, you can not close the previously open window). This is done then, that we will regulate all the transparency on the basis of our image.
- Now adjust the colors. All the same System-> Preferences-> Appearance, select Clearlooks as the current theme, and click Customize.

')
Changing the value of the Selected Items, we change the color of the window headers, scroll bars and progress bars. I didn't need to change anything personally. - Now we create panels. Clicking the "right mouse" on the top, for example, the socket of the gnome, select - "New Panel". Actually, a new panel is created, and somewhere is shown (usually on the left). Click on it with the right mouse, and select properties.


That is, once again - we position the panel (on my right, you can be on the left, for example), we set it to 60 pixels, Expand can be set, you can not put to taste, and make sure that the panel color is any and transparency - 100%. - We make a change in transparency according to the same scheme of the upper and lower panels, but only leaving it at the level of 70% - otherwise the text on it will not be very well visible.
- Add icons to the panel on the right! Right-click - Add To Panel - Application Launcher - select the desired application. If you add a custom application, that is, using Custom Application Launcher, you should take care that the application has an icon of at least 48 * 48 in size, otherwise it will not look very good.

- If you right-click on the newly added icon and select Move, you can move it around the panel, change places with other icons, etc. - when you're done, I recommend choosing Lock To Panel in the same context menu - to prevent accidental movement
- In the same way - via Add To Panel - you can add different applets, such as desktop selection (on my top), screen lock and system monitor (on the right-bottom). There is already to taste, who likes what.
- The final step is to achieve terminal transparency. To achieve here, strictly speaking, nothing special:

As a matter of fact, this is all - nothing more was here and no! If you did everything right, now you should have something very similar to the picture at the very beginning.
There will be questions - write, I will try to answer (especially while I'm at work and just behind this computer).
Update: as I said, a lot of things are tied to the desktop background. For example, if you use the background from Leopard Server and change the colors of Clearlooks to standard ones, you get this:
Update 2: the goal to remake Ubuntu in the Mac was not set even once - they are too different, and differently good, you do not have to cross the grass and the hedgehog to get as a result four meters of extremely questionable barbed wire.
Little disclaimer: I do not pretend that this setting will suit you personally, dear reader. I admit that you are sick of translucent windows, lilac interface and similar things. You like the harsh theme a la Motif. It is your right. But let's be friendly to each other - Linux is an open source system, we are all different, and what one likes is not necessarily suitable for another.
We are different, but each of us has a choice - and this is the main thing. Peace, Love, Linux! :-)
Source: https://habr.com/ru/post/24386/
All Articles