[LibGDX] Create Flappy Bird Clone - Zombie Bird
 Good day% username%. Not long ago I came across a good tutorial on creating a clone of the game Flappy Bird using LibGDX and I liked this tutorial because of its simplicity and detail.
I am aware that the theme of creating clones of this toy has withdrawn itself, but perhaps another good tutorial may be useful to someone.
The tutorial is divided into 12 days, contains a lot of pictures, cloths of the code and the source code is divided by days. Who cares, welcome under cat.
Content
- Day 1 - Flappy Bird - Deep Analysis
- Day 2 - Prepare and configure libGDX
- Day 3 - Understanding what libGDX is eating
- Day 4 - GameWorld, GameRenderer and Orthographic Camera
- Day 5 - Flight of the Dead - Add a bird
- Day 6 - Add Graphic Elements - Welcome to Necropolis
- Day 7 - Grass, Bird and Trumpet with Skull
- Day 8 - Collision Detection and Sound Effects
- Day 9 - Completing the Game Process and Basic UI
- Day 10 - GameStates and Best Score
- Day 11 - Add support for iOS / Android + SplashScreen, Menu and Tweening
- Day 12 - Final UI and Source Code
')
 Day 1 - Flappy Bird - Deep Analysis
To copy a game, we need to understand its logic and behavior perfectly. In this section, we will examine the various game mechanics and processes of Flappy Bird, so that we can simulate the gameplay quite accurately.
I'm going to define and paint each element of the game process. Of course, this is all pretty approximate and in general I can be completely mistaken, but again, we must very accurately describe the gameplay in order for our emulation to succeed. If there will be any major changes in the course of the plays - I will notify them.
Everything about the gameplay - GamePlay
To repeat Flappy Bird or even better - we should focus on the gameplay. The two main elements of the gameplay that we have to figure out are Bird and Pipes. Our bird should move like a Flappy Bird, and the pipes should be generated and move like their green “progenitors”.
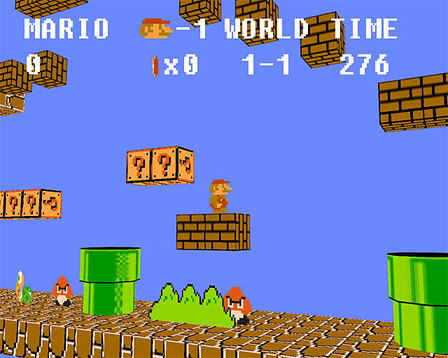
Birds
 After a quick analysis of the bird, it can be seen that the size thereof is 17 pixels (width) x 12 pixels (height). The bird also uses only 7 colors and occupies only 1/8 of the width of the game screen (by eye, the screen width is about 135-136 pixels). The bird also scales to look good on devices with different screen widths. The bird also has three different color schemes that are used randomly.
Bird physics
It was difficult to experiment with physics in this game without many deaths, but in the end I found out the following:
- During the fall - the bird accelerates.
- But there is a restriction - the bird cannot fall faster than the set limiter.
- If you poke on the screen - the bird will jump to the same value in height, regardless of the speed of the fall.
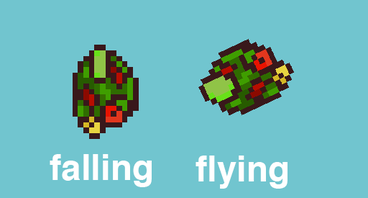
- The bird is turned in the appropriate direction of movement, i.e. falling - the bird looks down, soaring - up. Animation (flap) is present only when the bird flies up.
Our main goal will be to create everything, and all as close as possible to the original game. The whole gameplay depends mainly on physics.
Collision detection
What are the conditions for the death of our bird? I have no idea how it was implemented in the original game. But from what I see, checking for collisions by pixels is our option. We will create a hit box for our bird, and will use it to identify collisions with pipes.
If you make boxing hit too small, the game will be very easy, and if it is big, then people will get angry because of the unfounded death of the bird.
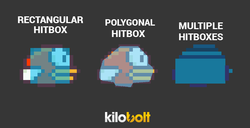 I will make a hitbox using Rectangle.
Pipes
 The pipes are probably the most difficult part to do properly, it is very important that we do everything correctly.
Most of the appeal of this toy is its complexity. If the complexity of our clone is somehow not the same as in the original game, the speed is not correctly calculated or pipes are generated inconsistently, the player will have negative emotions from the game. There will be no effect: frustration-reward-addiction.
At one point in time we have to generate 6 pipes, in the original game more than 6 pipes are never seen. The pipes appear at the same interval, so the distance between the pipes will be constant. As soon as one set of pipes disappears beyond the left edge of the screen, we will redefine the height (in more detail - below) of the pipes and move them beyond the right edge of the screen to the correct position in the next pipe line.
The empty space between the pipes has a different height position, but always the same size. The easiest way is to implement it - we will shift the pipe Y to a random value when moving along X. When we get to create the logic of our pipes, I will study the pattern in more detail whether the pipe really shifts to a random value and how much the shift can be up and down.
Animations
This is an incredibly simple game. The static elements in it are the background and the sand. They never change. The bird is fixed horizontally, about 1/3 of the width of the screen. Grass (?) And pipes are the only elements in the game that need to be scrolled horizontally, and they will scroll at the same speed. To create grass will be the easiest stage, we will not discuss it here.
Problem with different screen sizes
 On my device, the bird is centered vertically (note the red line in the image to the left). Looking at this, I assumed that the game is stretched evenly up and down, so that the size (or ratio) of the playing space remains the same.
I tested the game on an iPhone with a 3.5 inch screen, I believe that the game was originally made for this size, and the size of the game area was the same as in the picture on the left. So, we implement support for various screen sizes according to the following principles:
- As standard for our application, we will use a 3.6 inch Retina iPhone
- The whole gameplay will occur in a rectangle, obtained from the calculation of the screen used
- Bird Size - 17 pixels (proportionally scaled)
- Game width ~ 135 pixels, proportionally scaled (by a factor of 4.75 x on the iPhone)
- The height of the game will vary depending on the device, but the height of the playing field (where the whole game process takes place) will be (960/640) * 135 = 203 pixels.
Day 2 - Prepare and configure libGDX
In this section, we will set up the libGDX framework, which will generally perform a bunch of low-level tasks for us, so that we can focus more on the gameplay.Before you continue, look at the Zombie Bird on the left, the work of the Kilobolt artists department. Zombie Bird - the main character of our game. As always, installation / configuration is the most boring part of any manual. Thanks to the libGDX team, this process is quick and easy!
Install Java, download ADT
If you do not have Java installed and you do not have Eclipse with Android Development Tools, go here and install them (note: under this translation, the article at the indicated link will not be translated).
Download libGDX and create projects
LibGDX provides cross-platform development, so we write the code once and use it on a variety of platforms. This is possible thanks to the libGDX architecture, you have one main Java project in which you write all your first-class code (in particular, using various kinds of interfaces).
To set up the main Java project and auxiliary projects for each of the platforms, let's perform the following actions:
- Get here to download the libGDX installation.
- How to download, you will need to install in one of the following ways:
- On a Mac, try double clicking on the jar file.
- On the PC, copy the downloaded file to your desktop and open the Terminal / Console. Type the following:
cd path_to_desktop java -jar gdx-setup.jar
- Once you do this, the following window will appear:

- Enter the information listed below (as it is in the picture above), you can change the path to the project folder to any other:
Name : ZombieBird
Package : com.kilobolt.zombiebird
Game class : ZBGame
Destination : Your choice. Remember only this way.
Android SDK : Location of the Android SDK . If you are using the ADT Bundle ( Android Developer Tools : Eclipse + Android SDK) then the sdk is located inside the adt-bundle folder.
Make sure that Desktop, Android, iOS, and HTML projects are selected, and deselect all Extensions (additional classes with different auxiliary functionality for libGDX).
This installation will automatically create 5 Java projects in the folder to which you specified the Destination parameter. The main project (core project) is a project where we will write all the code for our game. Android, iOS and HTML projects will get access to our main project and execute it with implementation specific for each platform, it is necessary for our game to work on all platforms. - We will generate an Eclipse project by clicking on Advanced and selecting Eclipse.
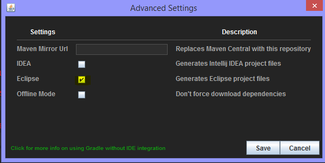
Note: libGDX uses a collector called Gradle. This builder automates the assembly of your project, managing .JAR dependencies, and also makes it easier to work with other people on the project. Grandle is a separate big topic, you need to have experience working with such collectors as Ant and Maven. Sometime later, we may publish an article about working with Gradle, but not within the scope of this article. - As soon as you are ready, with the words “Gone!”, Click the Generate button.
- The installer will download all the necessary files and configure your projects. As soon as you see the following message, you can close the installer.

- Now, in the folder that you specified in the Installer settings, 5 projects appeared, we can import them into Eclipse. Open your Eclipse.
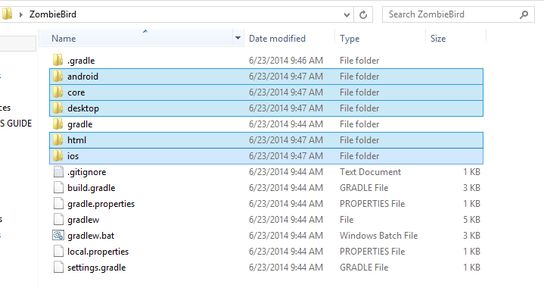
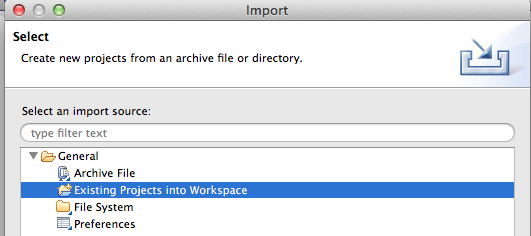
- Right-click in the Package Explorer and select Import, as shown below.
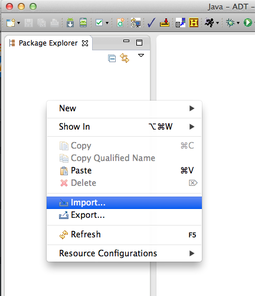
- Choose General> Existing Projects into Workspace
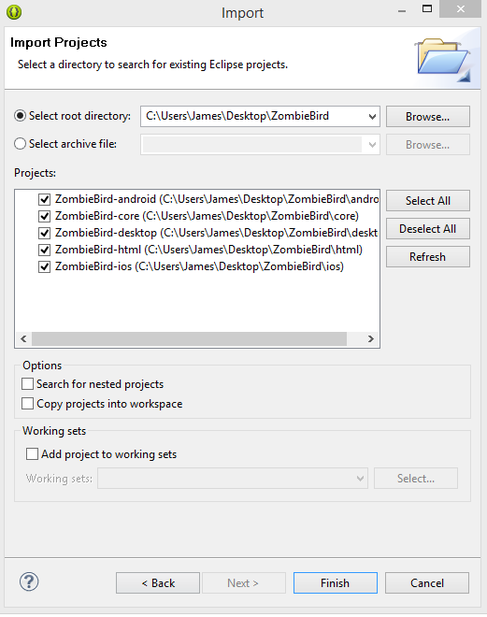
- Click Browse to the right of the select root directory:

- Navigate to the project folder (the path indicated in step six) and click Open.

- Select all 5 projects and click Finish.
- That's it, we imported our projects into Eclipse and now we are ready to start writing code.
Any error messages?
If your Eclipse swears at errors in the ANDROID project, right-click on this project, select Properties, click Android, and make sure that you have an installed version of Android. If not, click here and go to the step in which it is written:
Ii. Installing the Bundle: Eclipse / Android SDK / Eclipse ADT Plugin ,
before continuing with the current lesson. - To make sure everything is set up correctly, open the ZombieBird - desktop project and go to the DesktopLauncher.java class. Update it as follows:
package com.kilobolt.zombiebird.desktop; import com.badlogic.gdx.backends.lwjgl.LwjglApplication; import com.badlogic.gdx.backends.lwjgl.LwjglApplicationConfiguration; import com.kilobolt.zombiebird.ZBGame; public class DesktopLauncher { public static void main (String[] arg) { LwjglApplicationConfiguration config = new LwjglApplicationConfiguration(); config.title = "Zombie Bird"; config.width = 480; config.height = 320; new LwjglApplication(new ZBGame(), config); } } - Click the right mouse button on the desktop project, select Run and select the class DesktopLauncher,

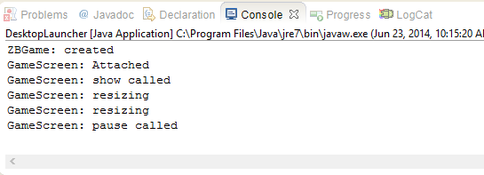
if everything is correct, you will see the following: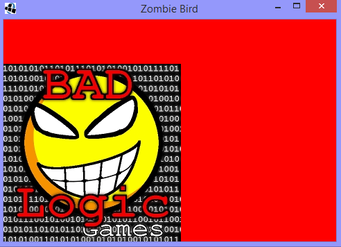
- If you get to this point, it means libGDX works for you correctly and we can continue further.
Day 3 - Understanding what libGDX is eating
In this section, we will create helper classes and methods that we will use during the creation of our game. But before you start writing code, you should be aware of the following technical details.
libGDX uses the Apache 2.0 license, which allows you to freely modify and distribute the code, with the mention of the author of the original. All built-in classes in libGDX have a comment about the Apache 2.0 license. Since we are not going to modify the original files as part of this lesson, and the license description file is already included in the project, we don’t need to worry about the license itself.
But just in case, read the license here (this file is present in the project): http://www.apache.org/licenses/LICENSE-2.0.html
The basic structure (how we will design, as well as create our game)
Let's spend a little time and discuss how we will create our game. Below is a diagram that generally displays our project.

We will start working with the ZBGame branch on the diagram. Let's create Framework Helpers and Screen Classes (on the GameScreen diagram).
GameScreen depends on two helper classes: World and Renderer. World will interact with the Gameplay classes and in the course of the plays will create the objects of our game.
If all the above is clear - go further.
Attention! Next will be the most conceptually difficult part in the whole lesson.
But ... you can skip it.
You can scroll through and try to understand the maximum you can, ask questions and continue further. Do not think about this part of the lesson, as most of the information in this section is not important. There is no point in sticking to non-important things.
If something puzzles you, skip boldly further to the " Write code " part. We can still create our Zombie Bird game.
Feeling confident? Keep reading. Are you nervous? Scroll further.
Extend and implement (You can skip)
If you need to refresh in memory what inheritance is, go here .
Let me remind you that Interface is a list of requirements, the name of methods without implementation. The Interface lists a list of all the methods that a class must implement (provide a description of the method, the body of the method), in case this class should become of the same type as Interface. The Java library contains an interface named List, which in itself does not provide any functionality. The List interface is a file that lists the methods that another class must implement in order to be assigned to the List of objects category.
For example, among all the methods of the List interface are the following:
- list.get (int index), which returns item with the specified index.
- list.add (), which adds item to the end of the List.
- list.isEmpty (), which returns true if the List is empty.
Let's create a new class called ArrayList. This class implements the List interface, i.e. it must implement all the methods of the List interface, such as list.add () and list.get (int index).
After we add the implementation of the List interface methods to the ArrayList class, our class can form itself as if it were a List class, as shown below:
List<String> strings = new ArrayList<String>(); Notice that the strings variable of type List was created as an ArrayList. Those. This variable can behave as a List or as an ArrayList depending on your needs.
Since we know that strings is an implementation of the List interface, we can be sure that strings contains all the methods of this interface. Thanks to this, if we ever need to transfer an object of type List to some method, we can safely transfer our object of type ArrayList with the name strings (polymorphism).
public void printLastWordFrom(List<String> someList) { if (someList.isEmpty()) { System.out.println("Your list is empty."); return; } String lastWord = someList.get(someList.size() - 1)); System.out.println("Your last word is" + lastWord); } These principles are necessary to know and understand, as we will use them further in the development process.
Agreements used in this tutorial (It is important to read!)
In the lesson there will be several references to the built-in classes in the libGDX library, for example, the Game class given below. These classes are built into the library and you DO NOT have to write them yourself. Just refer to the class I mention. All these classes are licensed under Apache 2.0, all authors are listed here: https://github.com/libgdx/libgdx/blob/master/gdx/AUTHORS .
For the built-in classes I will be in the header of the code, in the comments write Built-in.
Review the Game class below, do not copy or redo it, just browse through it.
Game class
//Built-in public abstract class Game implements ApplicationListener { private Screen screen; @Override public void dispose () { if (screen != null) screen.hide(); } @Override public void pause () { if (screen != null) screen.pause(); } @Override public void resume () { if (screen != null) screen.resume(); } @Override public void render () { if (screen != null) screen.render(Gdx.graphics.getDeltaTime()); } @Override public void resize (int width, int height) { if (screen != null) screen.resize(width, height); } /** Sets the current screen. {@link Screen#hide()} is called on any old screen, and {@link Screen#show()} is called on the new * screen, if any. * @param screen may be {@code null} */ public void setScreen (Screen screen) { if (this.screen != null) this.screen.hide(); this.screen = screen; if (this.screen != null) { this.screen.show(); this.screen.resize(Gdx.graphics.getWidth(), Gdx.graphics.getHeight()); } } /** @return the currently active {@link Screen}. */ public Screen getScreen () { return screen; } } Exploring the Game class (Skip)
The Game class is an implementation of the ApplicationListener interface; this class will be the interface between our code and the platform-dependent application that will run directly on the device.
For example, when Android launches our app, it will check for ApplicationListener. For our part, we can provide a Game object that implements the necessary interface.
There is only a small feature. Notice that the Game class is abstract. This means that the Game class implements far from all methods from the ApplicationListener interface and we will have to do it ourselves.
We can copy the contents of the Game class and implement the missing methods, the only thing missing is the create () method. But, to not do this, we will create our own class that inherits the Game class.
Inheritance is a much simpler thing than interface implementation. We simply take the abstract Game class and create a sub-class that inherits all public methods and variables from the Game class, as if they were part of our sub-class. And then we can add our own methods to our sub-class.
Let's create our class.
Write the code! (Finally!)
 Open ZBGame.java which we created during the second day. Remove all methods and all variables inside the class. Your code should now look like this:
 package com.kilobolt.zombiebird; public class ZBGame { } Expand the Game class
We are going to expand the base Game class, which will be a bridge between our code and a remote-independent code (on iOS, Android, etc.).
- Add extends Game
- Add the following import:
import com.badlogic.gdx.Game;
Import means the following: “Hey, Compiler, here’s the full address for the Game class I refer to.” It is necessary to do this, because there may be many classes with the name Game, and we want to specify which class with the name Game to use.
package com.kilobolt.ZombieBird; import com.badlogic.gdx.Game; public class ZBGame extends Game { } Eclipse will issue the following warning:
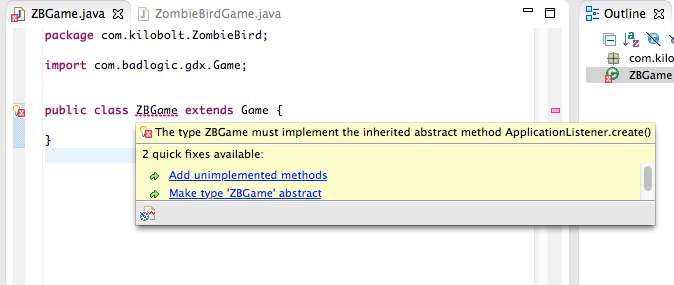
This means that in order for our ZBGame class to become a Game class, there is a requirement: our class must implement the create () method. Just click on “Add unimplemented methods,” and this method will automatically be added to our class. Let's add a line of code to our new method:
(Note, we will use Gdx.app.log instead of System.out.println (). The Gdx.app.log method is used to output values to the console, and this method is implemented for each platform in its own way (on Android, this method will use the Log class. In Java, it uses System.out.println (). In the role of parameters for this method may be the name of the class and the message body)).
package com.kilobolt.zombiebird; import com.badlogic.gdx.Game; import com.badlogic.gdx.Gdx; public class ZBGame extends Game { @Override public void create() { Gdx.app.log("ZBGame", "created"); } } Let's not slow down a lot for a couple of minutes ...
Why do we need our ZBGame class to be an object of type Game?
Reason # 1 :
As I mentioned earlier, libGDX hides the implementation of platform-specific code from us. All the code we would need to write for iOS / Android / HTML / Windows / Mac is already written for us. As game developers, we need to take care of our business logic, and we do this by creating an ApplicationInterface.
By expanding the Game class (ApplicationInterface sub-class), ZBGame becomes the interface between our code and the platform on which our application will run. Now all the code behind the scenes for Android, iOS, HTML, etc. can communicate with our ZBGame class and work wonders together.
Reason # 2 :
In addition to the above, ZBGame gains access to all useful methods from the Game class (scroll above if forgotten).
In general, this refers to the first reason. These methods will be twitched by cross-platform code.
Now, when we run our application on one of the platforms, the cross-platform code will run the create () method, and “created.” Will be displayed in the console.
Let's see what it all means.
We are going to create our first Screen (which will later become our GameScreen from the diagram) and use it in ZBGame.
GameScreen creation
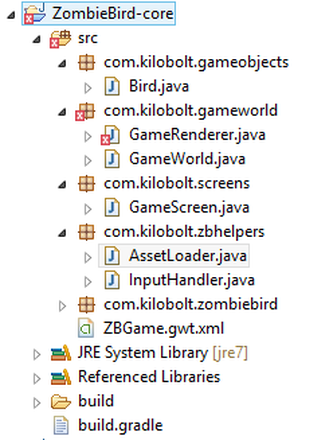
Right-click on the src folder inside the main (CORE) project of ZombieBird and create a new Java package called com.kilobolt.screens.
Inside it, create a new class and import the Screen class:
package com.kilobolt.screens; import com.badlogic.gdx.Screen; public class GameScreen implements Screen { } We have to implement the methods from the Screen interface. You can use auto-generation (as we did in ZBGame) by clicking on “Add unimplemented methods,” or add methods like I did below. Add the Gdx.app.log () method to each:
Gamescreen
package com.kilobolt.screens; import com.badlogic.gdx.Gdx; import com.badlogic.gdx.Screen; import com.badlogic.gdx.graphics.GL20; public class GameScreen implements Screen { public GameScreen() { Gdx.app.log("GameScreen", "Attached"); } @Override public void render(float delta) { // Sets a Color to Fill the Screen with (RGB = 10, 15, 230), Opacity of 1 (100%) Gdx.gl.glClearColor(10/255.0f, 15/255.0f, 230/255.0f, 1f); // Fills the screen with the selected color Gdx.gl.glClear(GL20.GL_COLOR_BUFFER_BIT); } @Override public void resize(int width, int height) { Gdx.app.log("GameScreen", "resizing"); } @Override public void show() { Gdx.app.log("GameScreen", "show called"); } @Override public void hide() { Gdx.app.log("GameScreen", "hide called"); } @Override public void pause() { Gdx.app.log("GameScreen", "pause called"); } @Override public void resume() { Gdx.app.log("GameScreen", "resume called"); } @Override public void dispose() { // Leave blank } } Add the use of GameScreen to our ZBGame class
Let's make our current screen in the ZBGame class an object of the GameScreen class that we just created. To do this, go back to the file ZBGame.java.
- Add the following to the create () method:
setScreen(new GameScreen());
Note: The setScreen () method is available due to inheritance! - Import the GameScreen class:
import com.kilobolt.screens.GameScreen;
package com.kilobolt.zombiebird; import com.badlogic.gdx.Game; import com.badlogic.gdx.Gdx; import com.kilobolt.screens.GameScreen; public class ZBGame extends Game { @Override public void create() { Gdx.app.log("ZBGame", "created"); setScreen(new GameScreen()); } } Now we can start our game (for this, as always, we will go to the ZombieBird - desktop project and run DesktopLauncher). You will see a beautiful blue window.
Look at what we got in the console:
I understand that this was not the coolest lesson, but please do not spend much time and look through your code, going through all the lines.
The important thing is that we do not call these methods ourselves. We have provided this libGDX job done for us.
It is very important that you understand the order of execution of each method, so that we can create objects in the right time span and smooth transitions in our game.
If you are ready, go further. In the next part, we will start creating gameplay.
Source code for the day
If you are out of the mood to write code yourself, download it from here:
Day 4 - GameWorld, GameRenderer and Orthographic Camera
Welcome to the Fourth Day! In this section, we will create two auxiliary classes for our GameScreen, so that we can start creating gameplay. After we add an orthographic camera and a few pieces to our game!
Quick reminder
We have five Java projects that we generated using the libGDX installer. But in general, we will use only three of them during the creation of our game:
- If I ask you to open a class or create a new package, do it as part of the ZombieBird project.
- If I ask you to start the project, you will open the ZombieBird-desktop project and execute the DesktopLauncher class
- If we need to add pictures or sounds, we will add them to the ZombieBird-android project in the assets folder. All other projects will receive a copy of the contents of this folder.
Exploring the GameScreen class
Launch Eclipse and open the GameScreen class. In the third day, we discussed how and when each of the methods in this class starts. Let's make minor changes to this class. Look at the render () method. It has one delta argument, type float. To understand why it is needed, add the following line to the method: Gdx.app.log ("GameScreen FPS", (1 / delta) + ""); :
@Override public void render(float delta) { // (RGB = 10, 15, 230), 1 (100%) Gdx.gl.glClearColor(10/255.0f, 15/255.0f, 230/255.0f, 1f); // Gdx.gl.glClear(GL20.GL_COLOR_BUFFER_BIT); // Gdx.app.log("GameScreen FPS", (1/delta) + ""); } Try running the game (DesktopLauncher.java inside your desktop project). You will see the following:
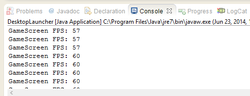
Float delta is the number of seconds (usually a very small value) that has passed since the last run of the render method. When I asked you to display the value 1 / delta in the console, this meant outputting the number of times the render method was called in one second. This value is equivalent to our FPS.
Tax, I think it is now clear that our method of render can be regarded as our game cycle . And in the game loop, we will do two things:
First, we will update all our game objects. Secondly, we will draw these objects.
To use OOP principles and design patterns, we must follow the following principles:
- GameScreen has to do one thing , so ...
- Updating game objects must lie on the shoulders of the auxiliary class .
- Rendering game objects should be the responsibility of another auxiliary class .
Good! We need two auxiliary classes. We will give them visual names: GameWorld and GameRenderer .
Create a new package called com.kilobolt.gameworld and create these two classes in it. Leave them empty for the time being:
GameWorld.java | GameRenderer.java |
In our GameScreen , we delegate the update and rendering to our GameWorld and GameRenderer classes, respectively. To do this, do the following:
- During the creation of GameScreen, we have to create two new objects like GameWorld and GameRenderer.
- Inside the render method of the GameScreen class, we need to request updates and rendering from the GameWorld and GameRenderer classes, respectively.
I will ask you to do it yourself now, if you get stuck on it - scroll below.
1. Creating GameWorld and GameRenderer
Open GameScreen. We will create GameWorld and GameRenderer objects in the class constructor. We will call their methods in the render () method. To do this:
- We need two variables for instance objects (these variables must be accessible anywhere within our class). Declare the following in our class header:
private GameWorld world; private GameRenderer renderer; - GameScreen created in the constructor. Add the following lines inside our constructor to initialize our variables:
world = new GameWorld(); // initialize world renderer = new GameRenderer(); // initialize renderer - Add the necessary data:
import com.kilobolt.gameworld.GameRenderer; import com.kilobolt.gameworld.GameWorld;
2. Request GameWorld to update and GameRenderer to draw
The whole point of having GameWorld and GameRenderer classes is that GameScreen should not do updates and rendering itself. He can ask our helper classes to do it for him.
Replace all the code in the render method with the following:
// delta update , , - world.update(delta); // GameWorld updates renderer.render(); // GameRenderer renders Your GameScreen should now look like this:
GameScreen.java
package com.kilobolt.screens; import com.badlogic.gdx.Gdx; import com.badlogic.gdx.Screen; import com.badlogic.gdx.graphics.GL20; import com.kilobolt.gameworld.GameRenderer; import com.kilobolt.gameworld.GameWorld; public class GameScreen implements Screen { private GameWorld world; private GameRenderer renderer; public GameScreen() { Gdx.app.log("GameScreen", "Attached"); world = new GameWorld(); renderer = new GameRenderer(); } @Override public void render(float delta) { world.update(delta); renderer.render(); } @Override public void resize(int width, int height) { } @Override public void show() { Gdx.app.log("GameScreen", "show called"); } @Override public void hide() { Gdx.app.log("GameScreen", "hide called"); } @Override public void pause() { Gdx.app.log("GameScreen", "pause called"); } @Override public void resume() { Gdx.app.log("GameScreen", "resume called"); } @Override public void dispose() { // } } Eclipse will curse that you have not declared the update methods in GameWorld and the render in GameRenderer . Let's do that:
Gameworld | Gamerenderer |
Try running the game ( DesktopLauncher class in the desktop project).
Warning : your game may flicker (we do not draw anything).
In the console we will see the following:

Sumptuously.To summarize what we did: we delegated two tasks (updating and drawing the game), so our GameScreen should not worry about that. Let's look again at our chart (do you see where we are now?):
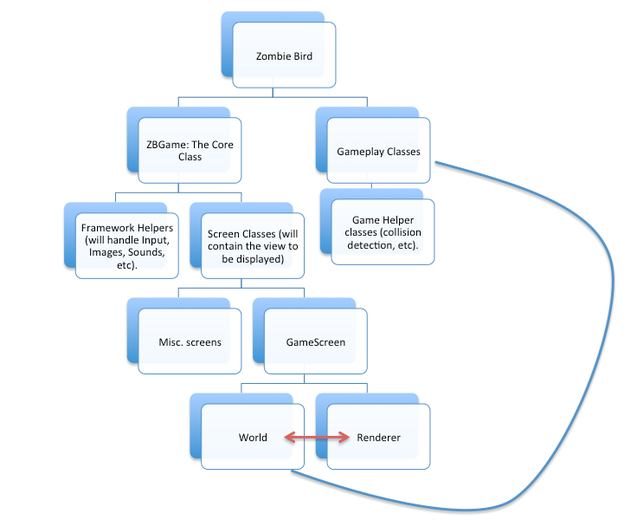
We need to make minor changes. Our GameRenderer must have access to GameWorld , which it will draw. To do this, we ask ourselves, "Who has access to both: GameRenderer and GameWorld ?". If you look at the diagram, you can see that this is a GameScreen . Let's open it and make the following changes to its constructor:
// , public GameScreen() { Gdx.app.log("GameScreen", "Attached"); world = new GameWorld(); renderer = new GameRenderer(world); } Oops, Eclipse swears at the wrong use of the constructor of the class GameRenderer . Let's change it.
Open the GameRenderer class. We need to save the world as a variable inside our GameRenderer class, so that in the future, when we need an object from GameWorld, we will be able to use the world variable .
- Create a variable:
private GameWorld myWorld; - Inside the constructor, add a new argument and assign its value to our myWorld variable :
package com.kilobolt.gameworld; import com.badlogic.gdx.Gdx; public class GameRenderer { private GameWorld myWorld; public GameRenderer(GameWorld world) { myWorld = world; } public void render() { Gdx.app.log("GameRenderer", "render"); } }
Distract from writing the code for a minute
Spend not a lot of time to understand what we just did. Review your code and make sure you see the 3-way relationship between the three classes you worked with. I hope you understand the roles of the GameScreen , GameWorld, and GameRenderer classes and how they work together.
Ready to continue?
We will do one more thing in this tutorial to show you how we can create GameObjects and how to implement them. But first we will talk about the Orthographic Camera .
Orthographic Camera
libGDX is a framework for creating 3D games. But, our game will be in 2D. What does all this mean to us? In general, nothing, because we will be able to use one thing, which is called an orthographic camera .
Many 2D games that you could see, in reality, made in 3D. Many modern platformers (even those that use pixel art) are drawn using the 3D engine, in which developers create scenes more in 3D space than in 2D.
For example, look at Mario made by her fan, in this game the whole world was built using 3D models.
Playing with Mario 2.5D above, it becomes clear that the game is in 3D. The characters have a "depth."
To make this game in 2D, we may need to rotate the camera so that we look at the game from the front. Believe me or not, the game will still remain in 3D. Try to play yourself.
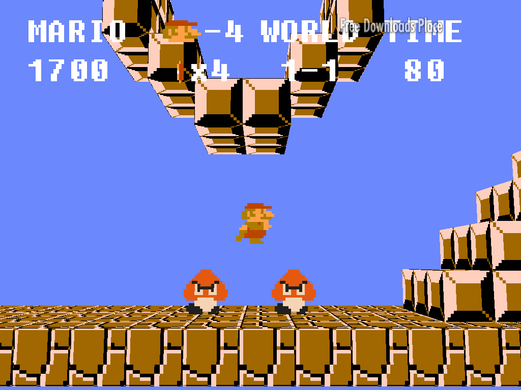
Why is that?Because in a 3D environment (look around), objects that are distant look small to the observer. Despite this, in Mario we look from a perpendicular angle, some objects in this 3D world, for example bricks / blocks, will be smaller than those blocks that are closer to us (to the camera).
This is how the orthographic camera appears on the scene in such cases . When we use orthographic projection, all objects on the stage, regardless of their distance, are projected under the same bar. Imagine a large canvas that covered all the objects on the stage, and this objects from contact with the canvas will be flat, with a fixed image size. This is what the orthographic camera provides for us, and this is how we can create a 2D game in 3D space.
And this is how the game looked like if it used an orthographic camera :
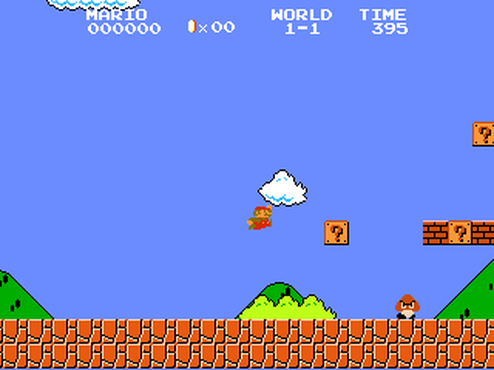
Using the orthographic camera , we can project 3D into a single plane for viewing.
I hope I did not scare you with this talk about 3D space and camera projection. You will understand everything when we write code, in fact, everything is very simple. So let's add a camera to our game.
Let's add another change to our DesktopLauncher.java in the Desktop Project (which we use to launch the game). We will change the screen resolution:
package com.kilobolt.zombiebird.desktop; import com.badlogic.gdx.backends.lwjgl.LwjglApplication; import com.badlogic.gdx.backends.lwjgl.LwjglApplicationConfiguration; import com.kilobolt.zombiebird.ZBGame; public class DesktopLauncher { public static void main (String[] arg) { LwjglApplicationConfiguration config = new LwjglApplicationConfiguration(); config.title = "Zombie Bird"; config.width = 272; config.height = 408; new LwjglApplication(new ZBGame(), config); } } Creating our Camera
Open our GameRenderer class . In it, we will create a new Orthographic Camera object .
- Declare a variable in the class:
private OrthographicCamera cam; - Add import:
import com.badlogic.gdx.graphics.OrthographicCamera; - Create an instance of the object inside the constructor:
cam = new OrthographicCamera(); cam.setToOrtho(true, 136, 204);
Three arguments mean the following:
- Do we want to use an orthographic projection (we want)
- What should be the width
- What should be the height
This is the size of our game world. Later we will make changes to this part of the code. So far, we have written this code for example. Remember, we set the resolution for our game in DesktopLauncher.java next 272 x 408. This means that everything that will be in our game, we will scale by a factor of 2 at the time of rendering.
Creating a ShapeRenderer
To test our camera, we will create an object of type ShapeRenderer that will draw shapes and lines for us. This functionality is provided by libGDX!
Inside the GameRenderer:
- Declare a variable in the class:
private ShapeRenderer shapeRenderer; - Add import:
import com.badlogic.gdx.graphics.glutils.ShapeRenderer; - Initialize the shapeRenderer and tie it to our camera inside the class constructor:
shapeRenderer = new ShapeRenderer(); shapeRenderer.setProjectionMatrix(cam.combined);
In the end, you should have the following:
package com.kilobolt.gameworld; import com.badlogic.gdx.Gdx; import com.badlogic.gdx.graphics.OrthographicCamera; import com.badlogic.gdx.graphics.glutils.ShapeRenderer; public class GameRenderer { private GameWorld myWorld; private OrthographicCamera cam; private ShapeRenderer shapeRenderer; public GameRenderer(GameWorld world) { myWorld = world; cam = new OrthographicCamera(); cam.setToOrtho(true, 136, 204); shapeRenderer = new ShapeRenderer(); shapeRenderer.setProjectionMatrix(cam.combined); } public void render() { Gdx.app.log("GameRenderer", "render"); } } Our ShapeRenderer is ready, let's create something that we can draw! We can create a square object inside our GameRenderer , but this violates our design principles. We have to create all the Game Objects inside our GameWorld and draw them into the GameRenderer .
Open GameWorld and make the following changes:
package com.kilobolt.gameworld; import com.badlogic.gdx.Gdx; import com.badlogic.gdx.math.Rectangle; public class GameWorld { private Rectangle rect = new Rectangle(0, 0, 17, 12); public void update(float delta) { Gdx.app.log("GameWorld", "update"); rect.x++; if (rect.x > 137) { rect.x = 0; } } public Rectangle getRect() { return rect; } } We created a new Rectangle and named it rect , and also added an import: import.com.badlogic.gdx.math.Rectangle . Note that we do not use the Java Rectangle, because it is not available on some platforms (the implementation of gdx.math.Rectangle creates the correct Rectangle depending on the platform).
We also added a private visibility to our Rectangle, and added a get method to access our Rectangle outside of the GameWorld object (a good explanation of why we used getter can be read here ).
Next, we added code that moves our rectright (and returns to the starting position)!
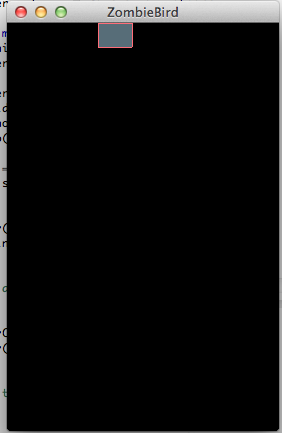
Now we can return to our GameRenderer, since our Rectangle is ready to be drawn. Open the GameRenderer and add changes to the render method (I divided the method into three main sections. Please read the comments to understand what is happening):
GameRenderer.java
package com.kilobolt.gameworld; import com.badlogic.gdx.Gdx; import com.badlogic.gdx.graphics.GL20; import com.badlogic.gdx.graphics.OrthographicCamera; import com.badlogic.gdx.graphics.glutils.ShapeRenderer; import com.badlogic.gdx.graphics.glutils.ShapeRenderer.ShapeType; public class GameRenderer { private GameWorld myWorld; private OrthographicCamera cam; private ShapeRenderer shapeRenderer; public GameRenderer(GameWorld world) { myWorld = world; cam = new OrthographicCamera(); cam.setToOrtho(true, 136, 204); shapeRenderer = new ShapeRenderer(); shapeRenderer.setProjectionMatrix(cam.combined); } public void render() { Gdx.app.log("GameRenderer", "render"); /* * 1. , */ Gdx.gl.glClearColor(0, 0, 0, 1); Gdx.gl.glClear(GL20.GL_COLOR_BUFFER_BIT); /* * 2. */ // shapeRenderer shapeRenderer.begin(ShapeType.Filled); // RGB Color 87, 109, 120, shapeRenderer.setColor(87 / 255.0f, 109 / 255.0f, 120 / 255.0f, 1); // myWorld ( ShapeType.Filled) shapeRenderer.rect(myWorld.getRect().x, myWorld.getRect().y, myWorld.getRect().width, myWorld.getRect().height); // shapeRenderer // shapeRenderer.end(); /* * 3. */ // shapeRenderer shapeRenderer.begin(ShapeType.Line); // RGB Color 255, 109, 120, shapeRenderer.setColor(255 / 255.0f, 109 / 255.0f, 120 / 255.0f, 1); // myWorld (Using ShapeType.Line) shapeRenderer.rect(myWorld.getRect().x, myWorld.getRect().y, myWorld.getRect().width, myWorld.getRect().height); shapeRenderer.end(); } } No mistakes? Sumptuously! You should see something like the image below:
Spend not much time, experiment with the code. If you have learned how to draw forms, then you can draw pictures, which we will do next.
I know that progress is very slow, but believe me, we are increasing the pace of development of our game, now we have a basic GameScreen!
Source code for the day
If you are out of the mood to write code yourself, download it from here:
Day 5 - Flight of the Dead - Add a bird
In this section, we will add the Bird to our game.
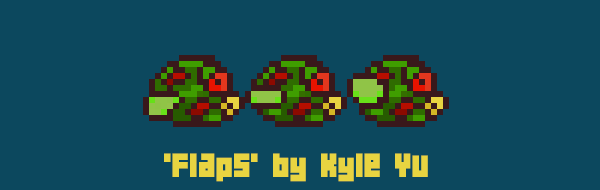
Let's talk a little about our main character. Flaps is a cheerful red bird that flies about its business here and there, until someone knocks it on the sewer. But now, Flapps is back, and is looking very closely at you! (Sorry Kyle, I still think this is the ugliest bird I've ever seen).
Now you are familiar with our main character, let's teach him how to fly.
Let's refresh our memory
We have five Java projects that we generated using the libGDX installer. But all the magic we will do only in three projects:
- If I ever ask to open a class or create a new package, do it in the ZombieBird project.
- If I ask you to run your code, open the ZombieBird desktop project and run DesktopLauncher.java .
- If we add pictures or sounds, we add them to the ZombieBird- android project in the assets folder. All other projects have a pointer to this folder.
Coordinate system
I forgot to mention (you probably already understood) that we will use the Y-Down coordinate system. This means that the left verzhniy angle has coordinates (0, 0).
What does it mean?If our bird has a positive acceleration on Y, then it will fly down .
Screen resolution
Our game will work on anything from iPhone to iPad and on numerous Android devices. We need to correctly handle the screen resolution.
To achieve this, we will set a fixed width of 136 pixels for the game. The height will be determined dynamically! After determining the screen resolution for the device, we will set the height for our game.
Creating the Bird.java class
Our Flaps must have its own class. Let's do this and do it.
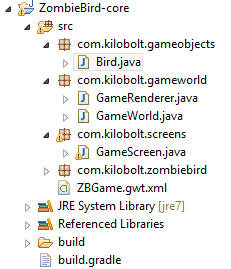
Create a new package and name it com.kilobolt.gameobjects , and in it create the class Bird .
Variables in the class:
Our Bird should have the following variables: position, speed, and acceleration (more on this later). We also need to store the value of the angle of rotation of our bird, as well as the width and height.
private Vector2 position; private Vector2 velocity; private Vector2 acceleration; private float rotation; // private int width; private int height; Vector2 is a very powerful class built into libGDX. If you are not strong with vectors in math - do not worry! Here we will use Vector2 as a container for two variables: x and y.
position.x - determines the position along the X axis, and velocity.y is responsible for the velocity along the Y axis. acceleration - this parameter controls our velocity, the greater the acceleration, the greater the velocity.
All this porridge will become more transparent a little later.
Constructor
What do we need to create our Birds? We need position values, as well as the size of our bird.
public Bird(float x, float y, int width, int height) { this.width = width; this.height = height; position = new Vector2(x, y); velocity = new Vector2(0, 0); acceleration = new Vector2(0, 460); } Our Bird object will be stored in Gameworld . We need the following methods:
- The update method, which will run during the GameWorld update.
- onClick method that will work out clicks / taps on the screen
We also need to create methods for accessing some variables of our Bird object:
Bird.java
package com.kilobolt.gameobjects; import com.badlogic.gdx.math.Vector2; public class Bird { private Vector2 position; private Vector2 velocity; private Vector2 acceleration; private float rotation; // For handling bird rotation private int width; private int height; public Bird(float x, float y, int width, int height) { this.width = width; this.height = height; position = new Vector2(x, y); velocity = new Vector2(0, 0); acceleration = new Vector2(0, 460); } public void update(float delta) { velocity.add(acceleration.cpy().scl(delta)); if (velocity.y > 200) { velocity.y = 200; } position.add(velocity.cpy().scl(delta)); } public void onClick() { velocity.y = -140; } public float getX() { return position.x; } public float getY() { return position.y; } public float getWidth() { return width; } public float getHeight() { return height; } public float getRotation() { return rotation; } } The logic for the above is very simple. Every time the update method of our Bird class is executed, we do two things:
- We add the scaled acceleration vector (we return to this) to our velocity vector. So we get our new speed. So basically, gravity works. The speed of attraction increases by 9.8 m / s every second.
- Remember that physics Flappy Bird has a maximum speed limit. After the experiments, I set the maximum for velocity.y at 200.
- ( ).
What do I mean by " scaled " in paragraphs 1 and 3? We will multiply our acceleration and speed by the delta, which is how much time has passed, from the last time the update method was run. This is the normalization effect.
If for some reason your game starts to slow down, your delta will increase (your processor has completed the last cycle, or repetition, or iteration over a longer time). By scaling our Vectors with the help of delta, we can achieve frame rate independence. If the update method was executed twice as long, then we simply shift our character to a speed increased by 2, and so on.
We will apply these principles a little later!
Our bird is ready, we will release it in GameWorld !
Attention
Every time you create a new Object , you allocate not much memory in RAM for this object (more precisely, in Heap ). As soon as your Heap is full, a subroutine called the Garbage Collector (hereinafter referred to as GC, Garbage Collector) collects itself on the scene and cleans your memory in order to avoid a memory shortage. It's cool, but not when you create a game. While the GC is running , your game starts to slow down for several significant milliseconds. To avoid frequent GC work , you should avoid creating new objects, if possible.
I recently discovered that the Vector2.cpy () methodIt creates a new type of an instance of a Vector2 , instead of re-use an existing instance. This means that at 60 FPS , by calling Vector2.cpy (), you will create 60 new objects of type Vector2 every second, which in turn will make Java GC appear on the scene very often.
Just keep it in mind. We will solve this problem a little later.
Open GameWorld class
Let's remove the Rect object we created earlier. Here is what you should have:
package com.kilobolt.gameworld; public class GameWorld { public void update(float delta) { } } If you want, you can also remove the Rect object's drawing logic in the GameRenderer to get rid of errors in Eclipse. We will do this in the next day.
Let's first create the constructor for our GameWorld class :
public GameWorld() { } Import the Bird class and create a new variable of type Bird in the GameWorld class (do not initialize it yet). Call our bird's update method in GameWorld.update (float delta) . Here is what we got:
package com.kilobolt.gameworld; import com.kilobolt.gameobjects.Bird; public class GameWorld { private Bird bird; public GameWorld() { // Bird } public void update(float delta) { bird.update(delta); } public Bird getBird() { return bird; } } Now we need to create our little bird. What information do we need? Coordinates and size ( x, y, width, height - these are the 4 variables that we need to call the constructor of the Bird class).
The value of X must be 33 (this is the place where the bird stays throughout the game time). The width should be 17. Height 12.
What about Y? For my reasons, this should be a value equal to 5 pixels above the vertical middle of the screen (Remember that we scale everything up to 137 x screen resolution, where the height is determined by the ratio between the height and width of the screen, multiplying it by 137).
Add this line to the constructor:
bird = new Bird(33, midPointY - 5, 17, 12); How do we get midPointY ? We will request this value from our GameScreen . Remember that the GameWorld constructor is called when the GameScreen creates an object of type GameWorld . So we can add a new argument to the constructor of the GameWorld class and pass it to the GameScreen.
Add this to the GameWorld constructor : (int midPointY)
This is what you should have:
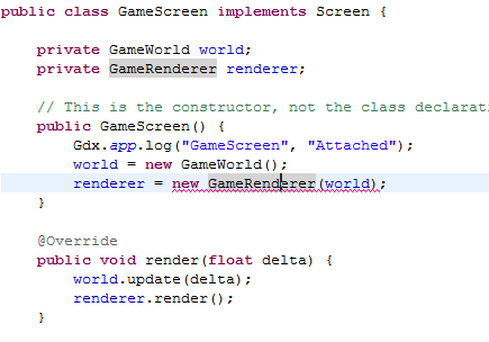
package com.kilobolt.gameworld; import com.kilobolt.gameobjects.Bird; public class GameWorld { private Bird bird; public GameWorld(int midPointY) { bird = new Bird(33, midPointY - 5, 17, 12); } public void update(float delta) { bird.update(delta); } public Bird getBird() { return bird; } } Now we need to make changes to our GameScreen class . Let's open it:

As expected, we have an error here, in the line where the challenge to the GameWorld constructor occurs . The error says this: " to create a new GameWorld, you must give us an integer " (to create a new GameWorld, you must pass an integer), let's do it!
But first, let's calculate the midPointY of our screen and then pass this value to the GameWorld constructor .
When I say midPointY, this is what I mean. Remember that our game will be 136 units wide. Our screen can be 1080 pixels wide, so we will scale everything to 1/8. To get the height of the game, we must take the height of the screen and scale it to the same factor!
To get the height and width of our screen, we can use the following methods: Gdx.graphics.getWidth () and Gdx.graphics.getHeight () .
Let's use this information to implement the logic of our constructor:
GameScreen.java
package com.kilobolt.screens; import com.badlogic.gdx.Gdx; import com.badlogic.gdx.Screen; import com.kilobolt.gameworld.GameRenderer; import com.kilobolt.gameworld.GameWorld; public class GameScreen implements Screen { private GameWorld world; private GameRenderer renderer; // This is the constructor, not the class declaration public GameScreen() { float screenWidth = Gdx.graphics.getWidth(); float screenHeight = Gdx.graphics.getHeight(); float gameWidth = 136; float gameHeight = screenHeight / (screenWidth / gameWidth); int midPointY = (int) (gameHeight / 2); world = new GameWorld(midPointY); renderer = new GameRenderer(world); } @Override public void render(float delta) { world.update(delta); renderer.render(); } @Override public void resize(int width, int height) { } @Override public void show() { Gdx.app.log("GameScreen", "show called"); } @Override public void hide() { Gdx.app.log("GameScreen", "hide called"); } @Override public void pause() { Gdx.app.log("GameScreen", "pause called"); } @Override public void resume() { Gdx.app.log("GameScreen", "resume called"); } @Override public void dispose() { // Leave blank } } Now that we have created our bird, we must learn to control it. Let's create our input handler !
Create ZBHelpers
 Chart Strikes Back! Now we will pay more attention to Framework Helpers at the third level. ZBGame needs functionality to work with input, pictures, sounds, etc.
We will create two classes right now.
The first class will be InputHandler , which, as the name suggests, will respond to various kinds of input actions, the only thing we have to worry about is touch (touch) (on PC / Mac, all clicks are converted to touches).
The second class is AssetLoader . This class will load pictures, animations, sounds, etc. for us.
We will be back to AssetLoader very soon. First, let's implement the InputHandler .
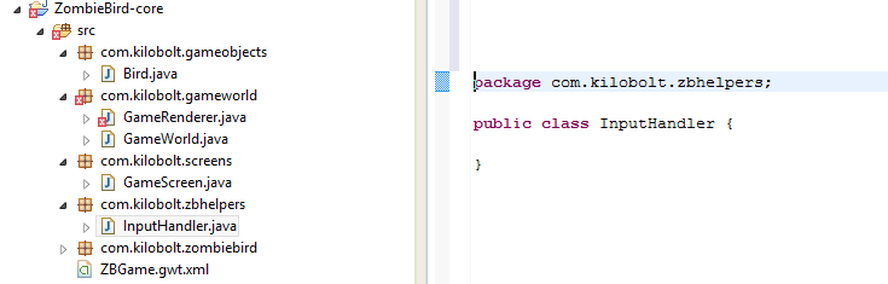
Create a new com.kilobolt.zbHelpers package , and in it create a new class InputHandler .
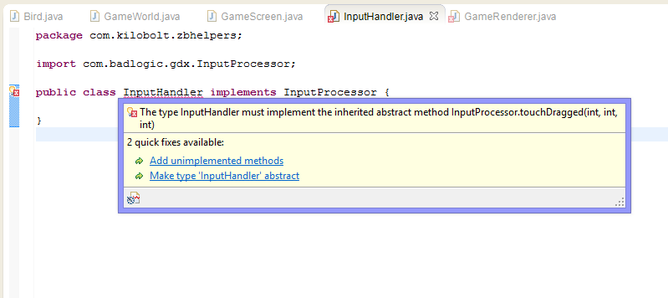
InputHandler is very easy to implement. We just need to implement InputProcessor , which is the interface between our code and the cross-platform code. When our platform (Android, iOS, etc.) receives some input, for example a touch (touch), it will call the method in InputProcessor, which we will provide by implementing it.
Add "implements InputProcessor" to the class declaration string (as well as import this class). An error will appear that we need to add unimplemented methods. Let's do that:
You should have the following:
InputHandler.java
package com.kilobolt.ZBHelpers; import com.badlogic.gdx.InputProcessor; import com.kilobolt.GameObjects.Bird; public class InputHandler implements InputProcessor { @Override public boolean touchDown(int screenX, int screenY, int pointer, int button) { return false; } @Override public boolean keyDown(int keycode) { return false; } @Override public boolean keyUp(int keycode) { return false; } @Override public boolean keyTyped(char character) { return false; } @Override public boolean touchUp(int screenX, int screenY, int pointer, int button) { return false; } @Override public boolean touchDragged(int screenX, int screenY, int pointer) { return false; } @Override public boolean mouseMoved(int screenX, int screenY) { return false; } @Override public boolean scrolled(int amount) { return false; } } As you see, we have many new methods that we can work with. For now, we need to take care of the touchDown () method .
TouchDown should call the onClick method in our Bird class , but we have not added a link to our Bird object. We will not be able to call any methods from the Bird object until there is a link to this object. Let's ask ourselves: who has a link to our bird object? Of course GameWorld, which is owned by GameScreen! So we will ask GameScreen to transfer Bird to InputHandler for us.
Before returning to GameScreen, let's first finish our InputHandler class:
- Create a variable in the InputHandler class to store a link to our bird in it:
private Bird myBird; - We need to request a link to Bird inside the InputHandler constructor:
public InputHandler(Bird bird) { myBird = bird; } - Now we can call onClick our bird in the touchDown method:
myBird.onClick()
InputHandler.java
package com.kilobolt.zbhelpers; import com.badlogic.gdx.InputProcessor; import com.kilobolt.gameobjects.Bird; public class InputHandler implements InputProcessor { private Bird myBird; // Bird InputHandler . public InputHandler(Bird bird) { // myBird bird gameWorld. myBird = bird; } @Override public boolean touchDown(int screenX, int screenY, int pointer, int button) { myBird.onClick(); return true; // true , . } @Override public boolean keyDown(int keycode) { return false; } @Override public boolean keyUp(int keycode) { return false; } @Override public boolean keyTyped(char character) { return false; } @Override public boolean touchUp(int screenX, int screenY, int pointer, int button) { return false; } @Override public boolean touchDragged(int screenX, int screenY, int pointer) { return false; } @Override public boolean mouseMoved(int screenX, int screenY) { return false; } @Override public boolean scrolled(int amount) { return false; } } Now we need to return to the GameScreen and create a new InputHandler, as well as tie it to our game!
Open GameScreen . Update the constructor as follows: At the end, we tell libGDX to use our new InputHandler as its own processor.
public GameScreen() { float screenWidth = Gdx.graphics.getWidth(); float screenHeight = Gdx.graphics.getHeight(); float gameWidth = 136; float gameHeight = screenHeight / (screenWidth / gameWidth); int midPointY = (int) (gameHeight / 2); world = new GameWorld(midPointY); renderer = new GameRenderer(world); Gdx.input.setInputProcessor(new InputHandler(world.getBird())); } Gdx.input.setInputProcessor () accepts an InputProcessor object . Since we implemented the InputProcessor in our InputHandler , we can pass our InputHandler to the input.
Notice that we call the constructor by passing a reference to our Bird object , which we get from World. This is a simplified explanation of the following:
Bird bird = world.getBird(); InputHandler handler = new InputHandler(bird); Gdx.input.setInputProcessor(handler); What light are we in now?
We created our Bird class , created an object of type Bird inside our GameWorld , and created an InputHandler that will call the onClick method in our Bird class, thanks to which our bird will fly up!
Join me in the next section, in which we will draw our little bird and its native Necropolis.
Source code for the day
If you are out of the mood to write code yourself, download it from here:
Day 6 - Add Graphic Elements - Welcome to Necropolis

Thank you for joining me in the sixth day. You have done a great job customizing the framework, but after this section, you will see that it was worth it.
The time has come to translate Flaps into its native habitat. In this tutorial, we will create our AssetLoader object , load the animation and a bunch of textures, and use our Renderer to draw the bird and its sinister city.
Class AssetLoader
We will start by creating the AssetLoader class in the com.kilobolt.zbhelpers package (you must have errors in the GameRenderer).
We will create the following types of objects (all of them are included in libGDX ):
- Texture - assume that this is a picture file. We will combine multiple images into one file and will work with this file.
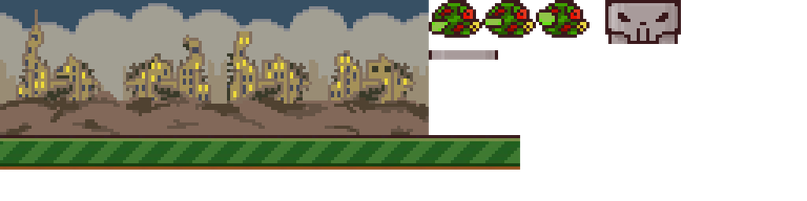
- TextureRegion is a square area of our Texture . Look at the picture below. In the picture there are many areas with textures, including the background, grass, Flaps and skull.
- Animation - we can take many areas with textures and create an Animation object that will know how to animate our bird.
Do not download the picture below! It has been increased 4-fold, so it will not work with our code. Instead, download the file that I will indicate below (thanks to the artists from Kilobolt for the images provided).
Full AssetLoader class:
AssetLoader.java
package com.kilobolt.zbhelpers; import com.badlogic.gdx.Gdx; import com.badlogic.gdx.graphics.Texture; import com.badlogic.gdx.graphics.Texture.TextureFilter; import com.badlogic.gdx.graphics.g2d.Animation; import com.badlogic.gdx.graphics.g2d.TextureRegion; public class AssetLoader { public static Texture texture; public static TextureRegion bg, grass; public static Animation birdAnimation; public static TextureRegion bird, birdDown, birdUp; public static TextureRegion skullUp, skullDown, bar; public static void load() { texture = new Texture(Gdx.files.internal("data/texture.png")); texture.setFilter(TextureFilter.Nearest, TextureFilter.Nearest); bg = new TextureRegion(texture, 0, 0, 136, 43); bg.flip(false, true); grass = new TextureRegion(texture, 0, 43, 143, 11); grass.flip(false, true); birdDown = new TextureRegion(texture, 136, 0, 17, 12); birdDown.flip(false, true); bird = new TextureRegion(texture, 153, 0, 17, 12); bird.flip(false, true); birdUp = new TextureRegion(texture, 170, 0, 17, 12); birdUp.flip(false, true); TextureRegion[] birds = { birdDown, bird, birdUp }; birdAnimation = new Animation(0.06f, birds); birdAnimation.setPlayMode(Animation.PlayMode.LOOP_PINGPONG); skullUp = new TextureRegion(texture, 192, 0, 24, 14); // Create by flipping existing skullUp skullDown = new TextureRegion(skullUp); skullDown.flip(false, true); bar = new TextureRegion(texture, 136, 16, 22, 3); bar.flip(false, true); } public static void dispose() { // , texture.dispose(); } } Let's go through the code. As you can see, we have a lot of static methods and variables, which means that we will not create instances of the Asset class - we will have only one copy.
We also have two methods: load and dispose .
The load method will be called when our game starts, and the dispose method when the game is closed.
Inspect the load () method
Texture
The load method begins by creating a new object of type Texture using the file texture.png , which I will provide to you just below. Next, reduce and enlarge filters are used (used when the image is enlarged or reduced) using enum constants: TextureFilter.Nearest . This is important, because when our small pixel-art image is stretched to a larger size, each pixel will retain its shape, and not be blurred!
TextureRegion
We can use our texture to create objects of type TextureRegion , we need 5 arguments: a suitable object of type Textureand the square borders of the required area on this texture. We pass x, y, width and height starting from the upper left corner of our image, for example, the background will have the following parameters: 0, 0, 136, 43.
All TextureRegion should be inverted, since libGDX uses the default Y-up coordinates . We use the Y-down coordinate system, and must flip every picture (except for skullUp, which can remain upside-down)!
Animation
We can create an array of objects of type TextureRegion and pass it to the constructor of a new object of type Animation :
TextureRegion[] birds = { birdDown, bird, birdUp }; // TextureRegion birdAnimation = new Animation(0.06f, birds); // Animation 0.06 , . birdAnimation.setPlayMode(Animation.PlayMode.LOOP_PINGPONG); // ping pong, -. We selected 3 frames for Animation . The frame change will occur every 0.06 seconds (down, middle, up, middle, down, ...).
Download file with texture
Download the texture provided below and place it inside the ZombieBird-android project, in the assets / data / folder! It is very important.
A note on using pictures: if you ever update pictures (and you will, if you use your own), you need to clean the project in Eclipse for the updates to take effect. Do it now, right after you add the downloaded texture, Project> Clean> Clean all projects .

Download file
 texture.png
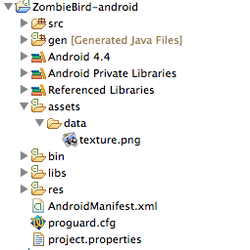 Make sure you put your picture in the correct folder, as shown on the left (note that we are inside the ZombieBird-android project. You can delete the libgdx.png file, which by default comes with libGDX).
If everything is correct, do not forget to clean the project and continue.
Call the Load method.
Our AssetLoader is ready (and you downloaded the picture and placed it in the correct folder, and also cleaned the project), we will open the ZBGame class , so that we can add a load of all the pictures before the GameScreen initialization . We will add the following line in the create method (before the GameScreen creation line):
AssetLoader.load(); (Import com.kilobolt.zbhelpers.AssetLoader) We also need to call AssetLoader.dispose () when the dispose method of our ZBGame class is called by cross-platform code. To do this, we need to add an override of an existing dispose method to our class.
It seems not a lot of confusing and complicated, but in fact we only need to do the following (complete code example):
package com.kilobolt.zombiebird; import com.badlogic.gdx.Game; import com.badlogic.gdx.Gdx; import com.kilobolt.screens.GameScreen; import com.kilobolt.zbhelpers.AssetLoader; public class ZBGame extends Game { @Override public void create() { Gdx.app.log("ZBGame", "created"); AssetLoader.load(); setScreen(new GameScreen()); } @Override public void dispose() { super.dispose(); AssetLoader.dispose(); } } Now that all of our images are loaded, we can start rendering them into the GameRenderer !
Let's open it.
To draw a TextureRegion , we need to create a SpriteBatch (just like we did with the ShapeRenderer). SpriteBatch draws pictures for us, using passed pointers (usually x, y, width and height ). Let's remove all non-essential code from the GameRenderer and create a SpriteBatch, as shown below.
package com.kilobolt.gameworld; import com.badlogic.gdx.Gdx; import com.badlogic.gdx.graphics.GL20; import com.badlogic.gdx.graphics.OrthographicCamera; import com.badlogic.gdx.graphics.g2d.SpriteBatch; import com.badlogic.gdx.graphics.glutils.ShapeRenderer; public class GameRenderer { private GameWorld myWorld; private OrthographicCamera cam; private ShapeRenderer shapeRenderer; private SpriteBatch batcher; public GameRenderer(GameWorld world) { myWorld = world; cam = new OrthographicCamera(); cam.setToOrtho(true, 137, 204); batcher = new SpriteBatch(); // batcher batcher.setProjectionMatrix(cam.combined); shapeRenderer = new ShapeRenderer(); shapeRenderer.setProjectionMatrix(cam.combined); } public void render() { Gdx.gl.glClearColor(0, 0, 0, 1); Gdx.gl.glClear(GL20.GL_COLOR_BUFFER_BIT); } } We must change the width of our camera to 136 , and also change the height to the height of the game defined in GameScreen . To do this, we change our constructor to get two arguments gameHeight and midPointY as input .
Add these two new variables to the class (do not delete the old four) and change the constructor as follows (make sure that you change the width and height to 136 and the value from gameHeight, respectively):
package com.kilobolt.gameworld; import com.badlogic.gdx.Gdx; import com.badlogic.gdx.graphics.GL20; import com.badlogic.gdx.graphics.OrthographicCamera; import com.badlogic.gdx.graphics.g2d.SpriteBatch; import com.badlogic.gdx.graphics.glutils.ShapeRenderer; public class GameRenderer { private GameWorld myWorld; private OrthographicCamera cam; private ShapeRenderer shapeRenderer; private SpriteBatch batcher; private int midPointY; private int gameHeight; public GameRenderer(GameWorld world, int gameHeight, int midPointY) { myWorld = world; // this // // GameScreen. this.gameHeight = gameHeight; this.midPointY = midPointY; cam = new OrthographicCamera(); cam.setToOrtho(true, 136, gameHeight); batcher = new SpriteBatch(); batcher.setProjectionMatrix(cam.combined); shapeRenderer = new ShapeRenderer(); shapeRenderer.setProjectionMatrix(cam.combined); } public void render() { Gdx.gl.glClearColor(0, 0, 0, 1); Gdx.gl.glClear(GL20.GL_COLOR_BUFFER_BIT); } } Next, we also need to add an argument to the render method:
public void render(float runTime) { ... } This argument is needed to determine which frame of the bird animation should we display. The Animation object will use this value (and the previously specified value for the frame length) to determine which area of the texture to show.
Due to the changes made to the constructor, we need to correct the errors that appeared in the GameScreen.
Open the GameScreen class and replace the following line:
renderer = new GameRenderer(world); on this:
renderer = new GameRenderer(world, (int) gameHeight, midPointY); We also need to create an additional variable called runTime , which will store the value of how long the game was going. We will pass this value to the render method of the GameRenderer class !
Create a variable in the class named runTime and give it a starting value of 0 .
private float runTime = 0; Inside the render method (float delta) , increase the runTime value by the value from delta and pass the new value to the render method (where we will use the resulting value to draw the animation):
@Override public void render(float delta) { runTime += delta; world.update(delta); renderer.render(runTime); } Your GameScreen class should look like this:
GameScreen.java
package com.kilobolt.screens; import com.badlogic.gdx.Gdx; import com.badlogic.gdx.Screen; import com.kilobolt.gameworld.GameRenderer; import com.kilobolt.gameworld.GameWorld; import com.kilobolt.zbhelpers.InputHandler; public class GameScreen implements Screen { private GameWorld world; private GameRenderer renderer; private float runTime; // , public GameScreen() { float screenWidth = Gdx.graphics.getWidth(); float screenHeight = Gdx.graphics.getHeight(); float gameWidth = 136; float gameHeight = screenHeight / (screenWidth / gameWidth); int midPointY = (int) (gameHeight / 2); world = new GameWorld(midPointY); renderer = new GameRenderer(world, (int) gameHeight, midPointY); Gdx.input.setInputProcessor(new InputHandler(world.getBird())); } @Override public void render(float delta) { runTime += delta; world.update(delta); renderer.render(runTime); } @Override public void resize(int width, int height) { } @Override public void show() { Gdx.app.log("GameScreen", "show called"); } @Override public void hide() { Gdx.app.log("GameScreen", "hide called"); } @Override public void pause() { Gdx.app.log("GameScreen", "pause called"); } @Override public void resume() { Gdx.app.log("GameScreen", "resume called"); } @Override public void dispose() { // } } I apologize for all these file jumps! We will focus on one method only to remember Day 6. :)
Return to the GameRenderer class and change the render method as follows:
GameRenderer.java
package com.kilobolt.gameworld; import com.badlogic.gdx.Gdx; import com.badlogic.gdx.graphics.GL20; import com.badlogic.gdx.graphics.OrthographicCamera; import com.badlogic.gdx.graphics.g2d.SpriteBatch; import com.badlogic.gdx.graphics.glutils.ShapeRenderer; import com.badlogic.gdx.graphics.glutils.ShapeRenderer.ShapeType; import com.kilobolt.gameobjects.Bird; import com.kilobolt.zbhelpers.AssetLoader; public class GameRenderer { private GameWorld myWorld; private OrthographicCamera cam; private ShapeRenderer shapeRenderer; private SpriteBatch batcher; private int midPointY; private int gameHeight; public GameRenderer(GameWorld world, int gameHeight, int midPointY) { myWorld = world; // this // // GameScreen. this.gameHeight = gameHeight; this.midPointY = midPointY; cam = new OrthographicCamera(); cam.setToOrtho(true, 136, gameHeight); batcher = new SpriteBatch(); batcher.setProjectionMatrix(cam.combined); shapeRenderer = new ShapeRenderer(); shapeRenderer.setProjectionMatrix(cam.combined); } public void render(float runTime) { // , Bird bird = myWorld.getBird(); // Gdx.gl.glClearColor(0, 0, 0, 1); Gdx.gl.glClear(GL20.GL_COLOR_BUFFER_BIT); // ShapeRenderer shapeRenderer.begin(ShapeType.Filled); // Background shapeRenderer.setColor(55 / 255.0f, 80 / 255.0f, 100 / 255.0f, 1); shapeRenderer.rect(0, 0, 136, midPointY + 66); // Grass shapeRenderer.setColor(111 / 255.0f, 186 / 255.0f, 45 / 255.0f, 1); shapeRenderer.rect(0, midPointY + 66, 136, 11); // Dirt shapeRenderer.setColor(147 / 255.0f, 80 / 255.0f, 27 / 255.0f, 1); shapeRenderer.rect(0, midPointY + 77, 136, 52); // ShapeRenderer shapeRenderer.end(); // SpriteBatch batcher.begin(); // // , batcher.disableBlending(); batcher.draw(AssetLoader.bg, 0, midPointY + 23, 136, 43); // , batcher.enableBlending(); // . Animation AssetLoader // runTime . batcher.draw(AssetLoader.birdAnimation.getKeyFrame(runTime), bird.getX(), bird.getY(), bird.getWidth(), bird.getHeight()); // SpriteBatch batcher.end(); } } Try running your code (DesktopLauncher.java) and start clicking (otherwise your bird will fly away)! You should have the following:
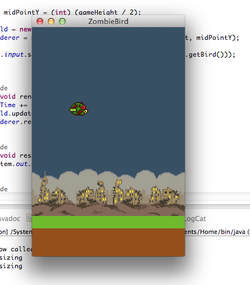
Let's go back to our render method and see what the logic is. We always draw the background first, because the drawing always goes on layers. We start to draw some ordinary colors. We chose to draw a single-color-filled Shape than using a TextureRegion to fill the background.
We draw a temporary green rectangle to show where the grass should be, and a brown rectangle where we will have dirt.
Next we start SpriteBatch, again, starting to draw a picture of the background - the city. Next, we get the current TextureRegion from our Animation object using runTime and draw the bird with blending turned on. Read the comments I made inside the render () method !
They are important for your understanding.
Well, we can say - we started! Our character Flaps flies again, and the game begins to take shape. Join me next day 7, where we will add scrollable elements of our game: grass and pipes.
Source code for the day
If you are out of the mood to write code yourself, download it from here:
Day 7 - Grass, Bird and Trumpet with Skull
Welcome to the seventh day! In today's lesson we will learn how to rotate our bird and how to scroll through grass and pipes with skulls. We have to make changes to the Bird class and create new classes that will contain logic for grass and pipes.
Let's start!
Rotating the bird
Before we start writing the code, let's explore how our bird can rotate. In Flappy Bird, a bird has two main states. The bird either takes off after a click or falls. In these two states, the bird rotates as follows:
Rotation speed is controlled by using Y . In our game, it is accelerated downward due to gravity (this means that the speed increases). When our speed is negative (this means that our bird is moving up), the bird will begin to rotate counterclockwise. When our speed is more than a certain positive value, the bird will begin to rotate clockwise (we do not begin to rotate the bird until it starts to accelerate).
Animations
We should also pay attention to the animation. The bird should not flap its wings while falling. Instead, her wings should return to the middle. As soon as the bird begins to take off, it will again begin to flap its wings.
Let's implement this in our code:
- We will start by creating two methods. We will use the empirically derived values in these methods. Create this method somewhere in the Bird class :
public boolean isFalling() { return velocity.y > 110; } public boolean shouldntFlap() { return velocity.y > 70; }
We will use the isFalling method to determine whether to turn the bird down.
And the method shouldntFlap to determine when our bird should stop flapping its wings. - Next, we need to make a few changes to the update method . Remember that we have a variable of type float with the name rotation? This variable will keep the value as far as our bird should be rotated. A positive value is a clockwise rotation, a negative value is counterclockwise.
Add these two code blocks to the end of the update method . They will take care of hour and anti-clock rotation (rise and fall).
// if (velocity.y < 0) { rotation -= 600 * delta; if (rotation < -20) { rotation = -20; } } // if (isFalling()) { rotation += 480 * delta; if (rotation > 90) { rotation = 90; } } Remember, we increase our rotation by delta , so that the bird will rotate at the same speed, even if the game starts to slow down (or it starts working faster).
Both of these checks have a sort of rotation restriction. If we overdo it with a turn, our game will fix it for us.
Here’s what your Bird class should look like :
package com.kilobolt.gameobjects; import com.badlogic.gdx.math.Vector2; public class Bird { private Vector2 position; private Vector2 velocity; private Vector2 acceleration; private float rotation; // For handling bird rotation private int width; private int height; public Bird(float x, float y, int width, int height) { this.width = width; this.height = height; position = new Vector2(x, y); velocity = new Vector2(0, 0); acceleration = new Vector2(0, 460); } public void update(float delta) { velocity.add(acceleration.cpy().scl(delta)); if (velocity.y > 200) { velocity.y = 200; } position.add(velocity.cpy().scl(delta)); // if (velocity.y < 0) { rotation -= 600 * delta; if (rotation < -20) { rotation = -20; } } // if (isFalling()) { rotation += 480 * delta; if (rotation > 90) { rotation = 90; } } } public boolean isFalling() { return velocity.y > 110; } public boolean shouldntFlap() { return velocity.y > 70; } public void onClick() { velocity.y = -140; } public float getX() { return position.x; } public float getY() { return position.y; } public float getWidth() { return width; } public float getHeight() { return height; } public float getRotation() { return rotation; } } Sumptuously.When we are all added, we can only go in GameRenderer and use the method shouldntFlap , to determine whether it is necessary to animate our bird or not.
Attention
Earlier mentioned in Day 5 (repeated here, because this is important!).
Every time you create a new Object , you allocate not much memory in RAM for this object (more precisely, in Heap ). As soon as your Heap is full, a subroutine called the Garbage Collector (hereinafter referred to as GC, Garbage Collector) collects itself on the scene and cleans your memory in order to avoid a memory shortage situation. It's cool, but not when you create a game. While the GC is running , your game starts to slow down for several significant milliseconds. To avoid frequent GC work , you should avoid creating new objects, if possible.
I recently discovered that the method Vector2.cpy () creates an instance of the new type of a Vector2 , instead of re-use an existing instance. This means that at 60 FPS , by calling Vector2.cpy (), you will create 60 new objects of type Vector2 every second, which in turn will make Java GC appear on the scene very often.
Just keep it in mind. We will solve this problem not much later.
Scrub GameRenderer
To achieve high performance in games, you must minimize the work that is performed in the game cycle. In the sixth day, we wrote code that violates this principle. Look at the render method . We have the following line there:
Bird bird = myWorld.getBird(); Every time the render method is called (about 60 times per second), we ask our game to find our myWorld , then find the Bird object and return it to the GameRenderer and put it on the stack as a local variable.
We will modify this code to get the Bird object once when the GameRenderer is first created and save the Bird object as a variable of the GameRenderer class.
We're going to do the same with the AssetLoader's TextureRegions and with all the new objects we will ever create.
- Start by adding the following variables to the GameRenderer class (also import the classes if necessary, use the import com.badlogic.gdx.graphics.g2d.Animation to import the animation):
// Game Objects private Bird bird; // Game Assets private TextureRegion bg, grass; private Animation birdAnimation; private TextureRegion birdMid, birdDown, birdUp; private TextureRegion skullUp, skullDown, bar;
Next, we initialize them in the constructor. But better than a constructor is cluttered, let's create two helper methods that initialize these variables. - Add the following two methods to the GameRenderer:
private void initGameObjects() { bird = myWorld.getBird(); } private void initAssets() { bg = AssetLoader.bg; grass = AssetLoader.grass; birdAnimation = AssetLoader.birdAnimation; birdMid = AssetLoader.bird; birdDown = AssetLoader.birdDown; birdUp = AssetLoader.birdUp; skullUp = AssetLoader.skullUp; skullDown = AssetLoader.skullDown; bar = AssetLoader.bar; }
Next we call these methods in the constructor:
public GameRenderer(GameWorld world, int gameHeight, int midPointY) { myWorld = world; this.gameHeight = gameHeight; this.midPointY = midPointY; cam = new OrthographicCamera(); cam.setToOrtho(true, 136, gameHeight); batcher = new SpriteBatch(); batcher.setProjectionMatrix(cam.combined); shapeRenderer = new ShapeRenderer(); shapeRenderer.setProjectionMatrix(cam.combined); // , initGameObjects(); initAssets(); } Finally, we need to make changes to the render method. To be more precise, we will remove all references to the AssetLoader and delete the line:
Bird bird = myWorld.getBird(). Next, we modify the methods that draw our little bird, so that we can use rotation . Also we will change all references to AssetLoader (in particular AssetLoader.bg). Here's what the result of your work should look like:
public void render(float runTime) { Gdx.gl.glClearColor(0, 0, 0, 1); Gdx.gl.glClear(GL20.GL_COLOR_BUFFER_BIT); shapeRenderer.begin(ShapeType.Filled); // shapeRenderer.setColor(55 / 255.0f, 80 / 255.0f, 100 / 255.0f, 1); shapeRenderer.rect(0, 0, 136, midPointY + 66); // Grass shapeRenderer.setColor(111 / 255.0f, 186 / 255.0f, 45 / 255.0f, 1); shapeRenderer.rect(0, midPointY + 66, 136, 11); // Dirt shapeRenderer.setColor(147 / 255.0f, 80 / 255.0f, 27 / 255.0f, 1); shapeRenderer.rect(0, midPointY + 77, 136, 52); shapeRenderer.end(); batcher.begin(); batcher.disableBlending(); batcher.draw(bg, 0, midPointY + 23, 136, 43); batcher.enableBlending(); if (bird.shouldntFlap()) { batcher.draw(birdMid, bird.getX(), bird.getY(), bird.getWidth() / 2.0f, bird.getHeight() / 2.0f, bird.getWidth(), bird.getHeight(), 1, 1, bird.getRotation()); } else { batcher.draw(birdAnimation.getKeyFrame(runTime), bird.getX(), bird.getY(), bird.getWidth() / 2.0f, bird.getHeight() / 2.0f, bird.getWidth(), bird.getHeight(), 1, 1, bird.getRotation()); } batcher.end(); } And your GameRenderer class should look like this:
GameRenderer.java
package com.kilobolt.gameworld; import com.badlogic.gdx.Gdx; import com.badlogic.gdx.graphics.GL20; import com.badlogic.gdx.graphics.OrthographicCamera; import com.badlogic.gdx.graphics.g2d.Animation; import com.badlogic.gdx.graphics.g2d.SpriteBatch; import com.badlogic.gdx.graphics.g2d.TextureRegion; import com.badlogic.gdx.graphics.glutils.ShapeRenderer; import com.badlogic.gdx.graphics.glutils.ShapeRenderer.ShapeType; import com.kilobolt.gameobjects.Bird; import com.kilobolt.zbhelpers.AssetLoader; public class GameRenderer { private GameWorld myWorld; private OrthographicCamera cam; private ShapeRenderer shapeRenderer; private SpriteBatch batcher; private int midPointY; private int gameHeight; // private Bird bird; // Assets private TextureRegion bg, grass; private Animation birdAnimation; private TextureRegion birdMid, birdDown, birdUp; private TextureRegion skullUp, skullDown, bar; public GameRenderer(GameWorld world, int gameHeight, int midPointY) { myWorld = world; this.gameHeight = gameHeight; this.midPointY = midPointY; cam = new OrthographicCamera(); cam.setToOrtho(true, 136, gameHeight); batcher = new SpriteBatch(); batcher.setProjectionMatrix(cam.combined); shapeRenderer = new ShapeRenderer(); shapeRenderer.setProjectionMatrix(cam.combined); // , initGameObjects(); initAssets(); } public void render(float runTime) { Gdx.gl.glClearColor(0, 0, 0, 1); Gdx.gl.glClear(GL20.GL_COLOR_BUFFER_BIT); shapeRenderer.begin(ShapeType.Filled); // shapeRenderer.setColor(55 / 255.0f, 80 / 255.0f, 100 / 255.0f, 1); shapeRenderer.rect(0, 0, 136, midPointY + 66); // Grass shapeRenderer.setColor(111 / 255.0f, 186 / 255.0f, 45 / 255.0f, 1); shapeRenderer.rect(0, midPointY + 66, 136, 11); // Dirt shapeRenderer.setColor(147 / 255.0f, 80 / 255.0f, 27 / 255.0f, 1); shapeRenderer.rect(0, midPointY + 77, 136, 52); shapeRenderer.end(); batcher.begin(); batcher.disableBlending(); batcher.draw(bg, 0, midPointY + 23, 136, 43); batcher.enableBlending(); if (bird.shouldntFlap()) { batcher.draw(birdMid, bird.getX(), bird.getY(), bird.getWidth() / 2.0f, bird.getHeight() / 2.0f, bird.getWidth(), bird.getHeight(), 1, 1, bird.getRotation()); } else { batcher.draw(birdAnimation.getKeyFrame(runTime), bird.getX(), bird.getY(), bird.getWidth() / 2.0f, bird.getHeight() / 2.0f, bird.getWidth(), bird.getHeight(), 1, 1, bird.getRotation()); } batcher.end(); } private void initGameObjects() { bird = myWorld.getBird(); } private void initAssets() { bg = AssetLoader.bg; grass = AssetLoader.grass; birdAnimation = AssetLoader.birdAnimation; birdMid = AssetLoader.bird; birdDown = AssetLoader.birdDown; birdUp = AssetLoader.birdUp; skullUp = AssetLoader.skullUp; skullDown = AssetLoader.skullDown; bar = AssetLoader.bar; } } Try running your code! Your bird will flap its wings and spin as we expected.
Create a class Scrollable
Now we are going to create Grass and Pipes in our game:
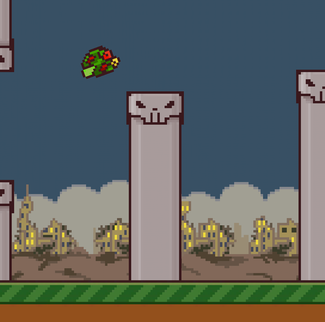
Grass and pipes have the same speed of movement from right to left. We will work with the following parameters:
- We will have 3 pipes (each column is one pipe)
- We will use two long strips of grass, connected horizontally to each other (in length)
- When a pipe or grass is not completely visible - we reset their position.
- To reset the position of the grass, we simply move it to the right and attach it to the end of the second grass strip.
- To reset the position of the pipe, we will place it at the end of the pipe queue, immediately after the third pipe, and we will also change the height of the pipe.
Note that pipes and grass have the same behavior. We will allocate the same logic to a separate Scrollable class and will inherit it from child classes such as Pipe and Grass .
The part where we reset the parameters of objects may not seem much confusing.
Here is an example of logic, if we have 3 pipes:
- Pipe 1, when resetting the position, should insert immediately after Pipe 3
- Pipe 2, when resetting the position, should insert immediately after Pipe 1
- Pipe 3, when resetting the position, should insert immediately after Pipe 2
Instead of associating objects with each other, and clearly knowing which object will stand behind which object, we will create a ScrollHandler object that will facilitate the movement of objects.
We'll start by creating the Scrollable class (inside the com.kilobolt.gameobjects package ) that will use the available Pipe and Grass parameters.
Pipe and Grass will have the following parameters:
Class parameters
position, velocity, width, height and isScrolledLeft of type boolean to determine when an object of type Scrollable is no longer visible and its parameters need to be reset.
Methods:
update and resetand access methods for various class variables.
The complete code example (it is very simple and straightforward). There is nothing new in it that we have not seen before, except for the reset method. Please read the comments:
package com.kilobolt.gameobjects; import com.badlogic.gdx.math.Vector2; public class Scrollable { // Protected private, . protected Vector2 position; protected Vector2 velocity; protected int width; protected int height; protected boolean isScrolledLeft; public Scrollable(float x, float y, int width, int height, float scrollSpeed) { position = new Vector2(x, y); velocity = new Vector2(scrollSpeed, 0); this.width = width; this.height = height; isScrolledLeft = false; } public void update(float delta) { position.add(velocity.cpy().scl(delta)); // Scrollable : if (position.x + width < 0) { isScrolledLeft = true; } } // Reset: , // public void reset(float newX) { position.x = newX; isScrolledLeft = false; } // public boolean isScrolledLeft() { return isScrolledLeft; } public float getTailX() { return position.x + width; } public float getX() { return position.x; } public float getY() { return position.y; } public int getWidth() { return width; } public int getHeight() { return height; } } Now, as we have the base Scrollable class, we can create child classes to inherit it. Create the following two classes, also in the com.kilobolt.gameobjects: Pipe package
package com.kilobolt.gameobjects; import java.util.Random; public class Pipe extends Scrollable { private Random r; // Pipe – (Scrollable) public Pipe(float x, float y, int width, int height, float scrollSpeed) { super(x, y, width, height, scrollSpeed); // Random r = new Random(); } @Override public void reset(float newX) { // reset (Scrollable) super.reset(newX); // height = r.nextInt(90) + 15; } } Grass
package com.kilobolt.gameobjects; public class Grass extends Scrollable { // Grass – (Scrollable) public Grass(float x, float y, int width, int height, float scrollSpeed) { super(x, y, width, height, scrollSpeed); } } Both of the above classes will use the Scrollable class as a parent (due to inheritance ), they will also add their own parameters and methods (in the case of Pipe, a new argument in the constructor and a new method).
What is Override and super ?
In inheritance, child classes have access to the methods of the parent class. This means that Pipe and Grass will be able to use the reset method without even redefining it. This is because they, child classes, are some kind of functional extenders for the Scrollable class, which already has a reset method.
For example, we can do something like this:
Grass g = new Grass(...); g.reset(); // reset Scrollable. If we need more specific logic for some method from the parent class, we can use Override , which tells the compiler the following: use this reset method from the child class, instead of the reset method in the parent class. We override the reset method in the Pipe child class.
So when we do this:
Pipe p = new Pipe(...); p.reset(); // reset Pipe. And what is the word super ?
Even during the override, the child class has access to the original method in the parent class. Calling super.reset (...) inside the overridden reset method means that both the override and the parent will be called.
Why do we need a Grass class?
At the moment, the Grass class is meaningless, because it does not have its own parameters. But later we will add the parameters for the definition of the colisee and because of this we have created a separate class for the grass.
Now that our Scrollable classes are ready, we can implement the logic for the ScrollHandler , which will take over the creation of Grass and Pipe objects, update them, and process reset parameters.
Create a new ScrollHandler class inside the com.kilobolt.gameobjects package .
We will start with easy things:
- We need to transfer the value of the coordinate along the Y axis to the constructor in order to know where to create our earth (where there will be grass and lower pipes)
- We also need 5 variables in the class: 2 for objects of type Grass and 3 for objects of type Pipe (for the moment, we will assume that one column is one Pipe object)
- We need access methods to all these objects.
- We also need an update method.
package com.kilobolt.gameobjects; public class ScrollHandler { // ScrollHandler private Grass frontGrass, backGrass; private Pipe pipe1, pipe2, pipe3; // ScrollHandler // , // // public static final int SCROLL_SPEED = -59; public static final int PIPE_GAP = 49; // Y , // Grass Pipe . public ScrollHandler(float yPos) { } public void update(float delta) { } // public Grass getFrontGrass() { return frontGrass; } public Grass getBackGrass() { return backGrass; } public Pipe getPipe1() { return pipe1; } public Pipe getPipe2() { return pipe2; } public Pipe getPipe3() { return pipe3; } } Now we need to focus on the constructor and the update method . Inside the constructor, we initialize all the Scrollable objects:
frontGrass = new Grass(0, yPos, 143, 11, SCROLL_SPEED); backGrass = new Grass(frontGrass.getTailX(), yPos, 143, 11, SCROLL_SPEED); pipe1 = new Pipe(210, 0, 22, 60, SCROLL_SPEED); pipe2 = new Pipe(pipe1.getTailX() + PIPE_GAP, 0, 22, 70, SCROLL_SPEED); pipe3 = new Pipe(pipe2.getTailX() + PIPE_GAP, 0, 22, 60, SCROLL_SPEED); The logic here is simple. Remember that the constructor of objects of type Scrollable asks to transfer to it: x, y, width, height and scrolling speed . We pass each of these parameters.
The backGrass object must dock with the tail of the frontGrass object, so we create it in the tail of the frontGrass.
Pipe type objects are created in a similar fashion, except that we add PIPE_GAP to create a gap between pipes of 49 pixels (calculated experimentally).
We will now finish our update method, in which we call the update method for all five objects. In addition, we use simple logic, for one of our designers, to reset the parameters of our objects. The code should be as follows:
package com.kilobolt.gameobjects; public class ScrollHandler { private Grass frontGrass, backGrass; private Pipe pipe1, pipe2, pipe3; public static final int SCROLL_SPEED = -59; public static final int PIPE_GAP = 49; public ScrollHandler(float yPos) { frontGrass = new Grass(0, yPos, 143, 11, SCROLL_SPEED); backGrass = new Grass(frontGrass.getTailX(), yPos, 143, 11, SCROLL_SPEED); pipe1 = new Pipe(210, 0, 22, 60, SCROLL_SPEED); pipe2 = new Pipe(pipe1.getTailX() + PIPE_GAP, 0, 22, 70, SCROLL_SPEED); pipe3 = new Pipe(pipe2.getTailX() + PIPE_GAP, 0, 22, 60, SCROLL_SPEED); } public void update(float delta) { // frontGrass.update(delta); backGrass.update(delta); pipe1.update(delta); pipe2.update(delta); pipe3.update(delta); // // if (pipe1.isScrolledLeft()) { pipe1.reset(pipe3.getTailX() + PIPE_GAP); } else if (pipe2.isScrolledLeft()) { pipe2.reset(pipe1.getTailX() + PIPE_GAP); } else if (pipe3.isScrolledLeft()) { pipe3.reset(pipe2.getTailX() + PIPE_GAP); } // - if (frontGrass.isScrolledLeft()) { frontGrass.reset(backGrass.getTailX()); } else if (backGrass.isScrolledLeft()) { backGrass.reset(frontGrass.getTailX()); } } public Grass getFrontGrass() { return frontGrass; } public Grass getBackGrass() { return backGrass; } public Pipe getPipe1() { return pipe1; } public Pipe getPipe2() { return pipe2; } public Pipe getPipe3() { return pipe3; } } Our Scrollable objects are fully configured! Our next steps will be:
- Create a ScrollHandler object inside GameWorld (this action will automatically create our 5 objects)
- Draw ScrollHandler objects inside GameRenderer
1. Creating a ScrollHandler Object
Open GameWorld. We will make minor changes.
- Add a variable to the class (just add import)
private ScrollHandler scroller - Initialize the scrolling in the constructor (including the Y coordinate where the grass should start, 66 pixels below midPointY ):
scroller = new ScrollHandler(midPointY + 66); - Call the update method of our Scroller inside the update method of the GameWorld
scroller.update(delta); - Create an access method to the Scroller object (return the ScrollHandler scroll)
The source code for this step is as follows:
package com.kilobolt.gameworld; import com.kilobolt.gameobjects.Bird; import com.kilobolt.gameobjects.ScrollHandler; public class GameWorld { private Bird bird; private ScrollHandler scroller; public GameWorld(int midPointY) { bird = new Bird(33, midPointY - 5, 17, 12); // 66 midPointY scroller = new ScrollHandler(midPointY + 66); } public void update(float delta) { bird.update(delta); scroller.update(delta); } public Bird getBird() { return bird; } public ScrollHandler getScroller() { return scroller; } } 2. Drawing ScrollHandler objects
We will start by creating 6 variables in a class:
1 for ScrollHandler
5 for 3 tubes + 2 for grass
- Add the following immediately after the declaration of the Bird object:
// Game Objects private Bird bird; private ScrollHandler scroller; private Grass frontGrass, backGrass; private Pipe pipe1, pipe2, pipe3; - Add the following imports:
import com.kilobolt.gameobjects.Bird; import com.kilobolt.gameobjects.Grass; import com.kilobolt.gameobjects.Pipe; - Now we need to initialize these variables inside the initGameObjects method:
private void initGameObjects() { bird = myWorld.getBird(); scroller = myWorld.getScroller(); frontGrass = scroller.getFrontGrass(); backGrass = scroller.getBackGrass(); pipe1 = scroller.getPipe1(); pipe2 = scroller.getPipe2(); pipe3 = scroller.getPipe3(); }
Next we just have to draw these objects in the render method . Since the Pipe object is not ready yet, we will add an empty draw method and replace it later. Let's create helper methods so that our code is more or less readable:
The values of the widths / heights / etc variables that you see were obtained by a neat calculation. I thought you would prefer ready-made readings than calculate them yourself!
private void drawGrass() { // batcher.draw(grass, frontGrass.getX(), frontGrass.getY(), frontGrass.getWidth(), frontGrass.getHeight()); batcher.draw(grass, backGrass.getX(), backGrass.getY(), backGrass.getWidth(), backGrass.getHeight()); } private void drawSkulls() { // , :) // , Pipe . batcher.draw(skullUp, pipe1.getX() - 1, pipe1.getY() + pipe1.getHeight() - 14, 24, 14); batcher.draw(skullDown, pipe1.getX() - 1, pipe1.getY() + pipe1.getHeight() + 45, 24, 14); batcher.draw(skullUp, pipe2.getX() - 1, pipe2.getY() + pipe2.getHeight() - 14, 24, 14); batcher.draw(skullDown, pipe2.getX() - 1, pipe2.getY() + pipe2.getHeight() + 45, 24, 14); batcher.draw(skullUp, pipe3.getX() - 1, pipe3.getY() + pipe3.getHeight() - 14, 24, 14); batcher.draw(skullDown, pipe3.getX() - 1, pipe3.getY() + pipe3.getHeight() + 45, 24, 14); } private void drawPipes() { // , :) // , Pipe . batcher.draw(bar, pipe1.getX(), pipe1.getY(), pipe1.getWidth(), pipe1.getHeight()); batcher.draw(bar, pipe1.getX(), pipe1.getY() + pipe1.getHeight() + 45, pipe1.getWidth(), midPointY + 66 - (pipe1.getHeight() + 45)); batcher.draw(bar, pipe2.getX(), pipe2.getY(), pipe2.getWidth(), pipe2.getHeight()); batcher.draw(bar, pipe2.getX(), pipe2.getY() + pipe2.getHeight() + 45, pipe2.getWidth(), midPointY + 66 - (pipe2.getHeight() + 45)); batcher.draw(bar, pipe3.getX(), pipe3.getY(), pipe3.getWidth(), pipe3.getHeight()); batcher.draw(bar, pipe3.getX(), pipe3.getY() + pipe3.getHeight() + 45, pipe3.getWidth(), midPointY + 66 - (pipe3.getHeight() + 45)); } Now it remains to call these methods in the correct order in the render method. I added tags to all changes (1 ... 2 ... 3 ...). An example of all the code:
GameRenderer.java
package com.kilobolt.gameworld; import com.badlogic.gdx.Gdx; import com.badlogic.gdx.graphics.GL20; import com.badlogic.gdx.graphics.OrthographicCamera; import com.badlogic.gdx.graphics.g2d.Animation; import com.badlogic.gdx.graphics.g2d.SpriteBatch; import com.badlogic.gdx.graphics.g2d.TextureRegion; import com.badlogic.gdx.graphics.glutils.ShapeRenderer; import com.badlogic.gdx.graphics.glutils.ShapeRenderer.ShapeType; import com.kilobolt.gameobjects.Bird; import com.kilobolt.gameobjects.Grass; import com.kilobolt.gameobjects.Pipe; import com.kilobolt.gameobjects.ScrollHandler; import com.kilobolt.zbhelpers.AssetLoader; public class GameRenderer { private GameWorld myWorld; private OrthographicCamera cam; private ShapeRenderer shapeRenderer; private SpriteBatch batcher; private int midPointY; private int gameHeight; // Game Objects private Bird bird; private ScrollHandler scroller; private Grass frontGrass, backGrass; private Pipe pipe1, pipe2, pipe3; // Game Assets private TextureRegion bg, grass; private Animation birdAnimation; private TextureRegion birdMid, birdDown, birdUp; private TextureRegion skullUp, skullDown, bar; public GameRenderer(GameWorld world, int gameHeight, int midPointY) { myWorld = world; this.gameHeight = gameHeight; this.midPointY = midPointY; cam = new OrthographicCamera(); cam.setToOrtho(true, 136, gameHeight); batcher = new SpriteBatch(); batcher.setProjectionMatrix(cam.combined); shapeRenderer = new ShapeRenderer(); shapeRenderer.setProjectionMatrix(cam.combined); // initGameObjects(); initAssets(); } private void initGameObjects() { bird = myWorld.getBird(); scroller = myWorld.getScroller(); frontGrass = scroller.getFrontGrass(); backGrass = scroller.getBackGrass(); pipe1 = scroller.getPipe1(); pipe2 = scroller.getPipe2(); pipe3 = scroller.getPipe3(); } private void initAssets() { bg = AssetLoader.bg; grass = AssetLoader.grass; birdAnimation = AssetLoader.birdAnimation; birdMid = AssetLoader.bird; birdDown = AssetLoader.birdDown; birdUp = AssetLoader.birdUp; skullUp = AssetLoader.skullUp; skullDown = AssetLoader.skullDown; bar = AssetLoader.bar; } private void drawGrass() { // batcher.draw(grass, frontGrass.getX(), frontGrass.getY(), frontGrass.getWidth(), frontGrass.getHeight()); batcher.draw(grass, backGrass.getX(), backGrass.getY(), backGrass.getWidth(), backGrass.getHeight()); } private void drawSkulls() { // , :) // , Pipe . batcher.draw(skullUp, pipe1.getX() - 1, pipe1.getY() + pipe1.getHeight() - 14, 24, 14); batcher.draw(skullDown, pipe1.getX() - 1, pipe1.getY() + pipe1.getHeight() + 45, 24, 14); batcher.draw(skullUp, pipe2.getX() - 1, pipe2.getY() + pipe2.getHeight() - 14, 24, 14); batcher.draw(skullDown, pipe2.getX() - 1, pipe2.getY() + pipe2.getHeight() + 45, 24, 14); batcher.draw(skullUp, pipe3.getX() - 1, pipe3.getY() + pipe3.getHeight() - 14, 24, 14); batcher.draw(skullDown, pipe3.getX() - 1, pipe3.getY() + pipe3.getHeight() + 45, 24, 14); } private void drawPipes() { // , :) // , Pipe . batcher.draw(bar, pipe1.getX(), pipe1.getY(), pipe1.getWidth(), pipe1.getHeight()); batcher.draw(bar, pipe1.getX(), pipe1.getY() + pipe1.getHeight() + 45, pipe1.getWidth(), midPointY + 66 - (pipe1.getHeight() + 45)); batcher.draw(bar, pipe2.getX(), pipe2.getY(), pipe2.getWidth(), pipe2.getHeight()); batcher.draw(bar, pipe2.getX(), pipe2.getY() + pipe2.getHeight() + 45, pipe2.getWidth(), midPointY + 66 - (pipe2.getHeight() + 45)); batcher.draw(bar, pipe3.getX(), pipe3.getY(), pipe3.getWidth(), pipe3.getHeight()); batcher.draw(bar, pipe3.getX(), pipe3.getY() + pipe3.getHeight() + 45, pipe3.getWidth(), midPointY + 66 - (pipe3.getHeight() + 45)); } public void render(float runTime) { Gdx.gl.glClearColor(0, 0, 0, 1); Gdx.gl.glClear(GL20.GL_COLOR_BUFFER_BIT); shapeRenderer.begin(ShapeType.Filled); // shapeRenderer.setColor(55 / 255.0f, 80 / 255.0f, 100 / 255.0f, 1); shapeRenderer.rect(0, 0, 136, midPointY + 66); // Grass shapeRenderer.setColor(111 / 255.0f, 186 / 255.0f, 45 / 255.0f, 1); shapeRenderer.rect(0, midPointY + 66, 136, 11); // Dirt shapeRenderer.setColor(147 / 255.0f, 80 / 255.0f, 27 / 255.0f, 1); shapeRenderer.rect(0, midPointY + 77, 136, 52); shapeRenderer.end(); batcher.begin(); batcher.disableBlending(); batcher.draw(bg, 0, midPointY + 23, 136, 43); // 1. Grass drawGrass(); // 2. Pipes drawPipes(); batcher.enableBlending(); // 3. Skulls ( ) drawSkulls(); if (bird.shouldntFlap()) { batcher.draw(birdMid, bird.getX(), bird.getY(), bird.getWidth() / 2.0f, bird.getHeight() / 2.0f, bird.getWidth(), bird.getHeight(), 1, 1, bird.getRotation()); } else { batcher.draw(birdAnimation.getKeyFrame(runTime), bird.getX(), bird.getY(), bird.getWidth() / 2.0f, bird.getHeight() / 2.0f, bird.getWidth(), bird.getHeight(), 1, 1, bird.getRotation()); } batcher.end(); } } We have done a lot in the seventh day! Let's see what our game now looks like:

Thank you for taking the time to read and congratulations! We now have everything you need to render. It's time to work on a coliseum. Join me next day!
Source code for the day
If you are out of the mood to write code yourself, download it from here:
Day 8 - Collision Detection and Sound Effects
Welcome back to your libGDX tutorial on creating a flappy bird game clone! Today we are going to add logic to define the colisees, and later we will use it to determine when our bird should die.
In Flappy Bird, a bird may die in two ways: The bird hit the ground or collides with one of the pipes.
We will implement the second type of death in today's lesson, and also we will add a sound effect that will be played during the collision! Let's start. I will start with what we stopped on the seventh day. If you want to continue from today, download the source code from the seventh day and come back.
We will get rid of some mistakes
If you used my source code, you must have 100% errors :). I accidentally duplicated the same if ... then, and we also need to get rid of the excess.
Open the Bird class , scroll down to the update method and delete one of the following repetitions (if you yourself wrote your code, you do not have this code block):
if (velocity.y > 200) { velocity.y = 200; } if (velocity.y > 200) { velocity.y = 200; } Discuss the coliseum
Initially, I thought about using a rotating polygon to determine the coliseum, but after the experiments, I realized that creating a circle is much easier and it will be more efficient. So we implement the simplest solution.
The idea is that the circle is always centered at the same point. He does not need to rotate. A circle will always cover the bird's head area. Because the bird always flies forward, we do not need to think about the coliseum of the back of the bird with the pipes. So we will not bother with checking the colisees in this area.
The Pipe object , in our game, will keep both pipes: upper and lower. Each of these pipes will be created using rectangles. One rectangle will cover the skull, the others will cover the main part of the pipe.
During the colisee checkout, we will use the built-in Intersector class, which has a method to check the colisees between the rectangle and the circle. As soon as we stumble upon a coliseum, we will notify our game of this event and tell all our moving objects to stop.

Bird Class - Technical Circle
We will start by creating a circle frame for our bird. Open the Bird class :
- Add a variable to the class type Circle and add the import class import com.badlogic.gdx.math.Circle; and call it boundingCircle:
private Circle boundingCircle; - Initialize it in the class constructor:
boundingCircle = new Circle();
We must change the coordinates of the circle each time our bird moves. The bird moves when we add velocity to our position , so add immediately after this line position.add (velocity.cpy (). Scl (delta)) the following:boundingCircle.set(position.x + 9, position.y + 6, 6.5f); - Add the access method to our new boundingCircle variable .
This is what your Bird class should now look like:
Bird.java
package com.kilobolt.gameobjects; import com.badlogic.gdx.math.Circle; import com.badlogic.gdx.math.Vector2; public class Bird { private Vector2 position; private Vector2 velocity; private Vector2 acceleration; private float rotation; private int width; private int height; private Circle boundingCircle; public Bird(float x, float y, int width, int height) { this.width = width; this.height = height; position = new Vector2(x, y); velocity = new Vector2(0, 0); acceleration = new Vector2(0, 460); boundingCircle = new Circle(); } public void update(float delta) { velocity.add(acceleration.cpy().scl(delta)); if (velocity.y > 200) { velocity.y = 200; } position.add(velocity.cpy().scl(delta)); // (9, 6) . // 6.5f; boundingCircle.set(position.x + 9, position.y + 6, 6.5f); // if (velocity.y < 0) { rotation -= 600 * delta; if (rotation < -20) { rotation = -20; } } // if (isFalling()) { rotation += 480 * delta; if (rotation > 90) { rotation = 90; } } } public boolean isFalling() { return velocity.y > 110; } public boolean shouldntFlap() { return velocity.y > 70; } public void onClick() { velocity.y = -140; } public float getX() { return position.x; } public float getY() { return position.y; } public float getWidth() { return width; } public float getHeight() { return height; } public float getRotation() { return rotation; } public Circle getBoundingCircle() { return boundingCircle; } } Next, we make sure our Circle is properly positioned. Open the GameRenderer class and add the following code to the bottom of the render method . We are going to draw our boundingCircle object :
shapeRenderer.begin(ShapeType.Filled); shapeRenderer.setColor(Color.RED); shapeRenderer.circle(bird.getBoundingCircle().x, bird.getBoundingCircle().y, bird.getBoundingCircle().radius); shapeRenderer.end(); Start the game, it should look like this:

Pipe class - technical rectangles
Now that we have a circle for the bird, we need to create Rectangle objects to draw our Pipe objects as shown below. Open the Pipe class .

Matching Mathematics
Further along the plays, a number of visually similar values of width and height in pixels will be used, so use the diagram below. And also read carefully the comments I left in the code, so that you can grab my idea.

We are going to implement everything that is drawn on the diagram above.
- Create the following variables in the class and add an import ( import com.badlogic.gdx.math.Rectangle ):
private Rectangle skullUp, skullDown, barUp, barDown; - 45 :
public static final int VERTICAL_GAP = 45; public static final int SKULL_WIDTH = 24; public static final int SKULL_HEIGHT = 11; - , , ( ). :
private float groundY; - , skullUp, skullDown, barUp, barDown groundY :
public Pipe(float x, float y, int width, int height, float scrollSpeed, float groundY) { super(x, y, width, height, scrollSpeed); // Random r = new Random(); skullUp = new Rectangle(); skullDown = new Rectangle(); barUp = new Rectangle(); barDown = new Rectangle(); this.groundY = groundY; } - , , :
public Rectangle getSkullUp() { return skullUp; } public Rectangle getSkullDown() { return skullDown; } public Rectangle getBarUp() { return barUp; } public Rectangle getBarDown() { return barDown; }
As in the case of the bounding Circle for our bird, we need to update all four rectangles when the Pipe position changes. In our Pipe class, there is no update method . But this class inherits the update method from the Scrollable class . We could try to update our rectangles in the Scrollable class, but it is easier to do this with the Override update method (check the seventh day for this topic if you forget).
By calling super , we call the original update method, which belongs to the Scrollable class.. Any code that comes after calling super is an additional functionality. In this case, we will easily update our four rectangles.
Using Math and the calculations described in the image above, we will make the following changes to the update method (this is how the Pipe class should look like now):
Pipe.java
package com.kilobolt.gameobjects; import java.util.Random; import com.badlogic.gdx.math.Rectangle; public class Pipe extends Scrollable { private Random r; private Rectangle skullUp, skullDown, barUp, barDown; public static final int VERTICAL_GAP = 45; public static final int SKULL_WIDTH = 24; public static final int SKULL_HEIGHT = 11; private float groundY; // Pipe – super (Scrollable) public Pipe(float x, float y, int width, int height, float scrollSpeed, float groundY) { super(x, y, width, height, scrollSpeed); // Random r = new Random(); skullUp = new Rectangle(); skullDown = new Rectangle(); barUp = new Rectangle(); barDown = new Rectangle(); this.groundY = groundY; } @Override public void update(float delta) { // update (Scrollable) super.update(delta); // set() - x, y // width height barUp.set(position.x, position.y, width, height); barDown.set(position.x, position.y + height + VERTICAL_GAP, width, groundY - (position.y + height + VERTICAL_GAP)); // 24 . 22 . // 1 ( // ). // : (SKULL_WIDTH - width) / 2 skullUp.set(position.x - (SKULL_WIDTH - width) / 2, position.y + height - SKULL_HEIGHT, SKULL_WIDTH, SKULL_HEIGHT); skullDown.set(position.x - (SKULL_WIDTH - width) / 2, barDown.y, SKULL_WIDTH, SKULL_HEIGHT); } @Override public void reset(float newX) { // reset (Scrollable) super.reset(newX); // height = r.nextInt(90) + 15; } public Rectangle getSkullUp() { return skullUp; } public Rectangle getSkullDown() { return skullDown; } public Rectangle getBarUp() { return barUp; } public Rectangle getBarDown() { return barDown; } } ScrollHandler class update
We changed the constructor of our Pipe class, now that we are creating a new Pipe object, we need to add another argument to the input. Put in the following lines:
pipe1 = new Pipe(210, 0, 22, 60, SCROLL_SPEED); pipe2 = new Pipe(pipe1.getTailX() + PIPE_GAP, 0, 22, 70, SCROLL_SPEED); pipe3 = new Pipe(pipe2.getTailX() + PIPE_GAP, 0, 22, 60, SCROLL_SPEED); These changes:
pipe1 = new Pipe(210, 0, 22, 60, SCROLL_SPEED, yPos); pipe2 = new Pipe(pipe1.getTailX() + PIPE_GAP, 0, 22, 70, SCROLL_SPEED, yPos); pipe3 = new Pipe(pipe2.getTailX() + PIPE_GAP, 0, 22, 60, SCROLL_SPEED, yPos); Let's go back to the GameRenderer and add a couple of lines of code to the end of the render method . This is a temporary code for the test. Just copy and paste it as shown below.
GameRenderer.render ()
public void render(float runTime) { Gdx.gl.glClearColor(0, 0, 0, 1); Gdx.gl.glClear(GL20.GL_COLOR_BUFFER_BIT); shapeRenderer.begin(ShapeType.Filled); // shapeRenderer.setColor(55 / 255.0f, 80 / 255.0f, 100 / 255.0f, 1); shapeRenderer.rect(0, 0, 136, midPointY + 66); // Grass shapeRenderer.setColor(111 / 255.0f, 186 / 255.0f, 45 / 255.0f, 1); shapeRenderer.rect(0, midPointY + 66, 136, 11); // Dirt shapeRenderer.setColor(147 / 255.0f, 80 / 255.0f, 27 / 255.0f, 1); shapeRenderer.rect(0, midPointY + 77, 136, 52); shapeRenderer.end(); batcher.begin(); batcher.disableBlending(); batcher.draw(bg, 0, midPointY + 23, 136, 43); // 1. Grass drawGrass(); // 2. Pipes drawPipes(); batcher.enableBlending(); // 3. Skulls ( ) drawSkulls(); if (bird.shouldntFlap()) { batcher.draw(birdMid, bird.getX(), bird.getY(), bird.getWidth() / 2.0f, bird.getHeight() / 2.0f, bird.getWidth(), bird.getHeight(), 1, 1, bird.getRotation()); } else { batcher.draw(birdAnimation.getKeyFrame(runTime), bird.getX(), bird.getY(), bird.getWidth() / 2.0f, bird.getHeight() / 2.0f, bird.getWidth(), bird.getHeight(), 1, 1, bird.getRotation()); } batcher.end(); shapeRenderer.begin(ShapeType.Filled); shapeRenderer.setColor(Color.RED); shapeRenderer.circle(bird.getBoundingCircle().x, bird.getBoundingCircle().y, bird.getBoundingCircle().radius); /* * . * . */ // 1, 2 3 shapeRenderer.rect(pipe1.getBarUp().x, pipe1.getBarUp().y, pipe1.getBarUp().width, pipe1.getBarUp().height); shapeRenderer.rect(pipe2.getBarUp().x, pipe2.getBarUp().y, pipe2.getBarUp().width, pipe2.getBarUp().height); shapeRenderer.rect(pipe3.getBarUp().x, pipe3.getBarUp().y, pipe3.getBarUp().width, pipe3.getBarUp().height); // 1, 2 3 shapeRenderer.rect(pipe1.getBarDown().x, pipe1.getBarDown().y, pipe1.getBarDown().width, pipe1.getBarDown().height); shapeRenderer.rect(pipe2.getBarDown().x, pipe2.getBarDown().y, pipe2.getBarDown().width, pipe2.getBarDown().height); shapeRenderer.rect(pipe3.getBarDown().x, pipe3.getBarDown().y, pipe3.getBarDown().width, pipe3.getBarDown().height); // 1, 2 3 shapeRenderer.rect(pipe1.getSkullUp().x, pipe1.getSkullUp().y, pipe1.getSkullUp().width, pipe1.getSkullUp().height); shapeRenderer.rect(pipe2.getSkullUp().x, pipe2.getSkullUp().y, pipe2.getSkullUp().width, pipe2.getSkullUp().height); shapeRenderer.rect(pipe3.getSkullUp().x, pipe3.getSkullUp().y, pipe3.getSkullUp().width, pipe3.getSkullUp().height); // 1, 2 and 3 shapeRenderer.rect(pipe1.getSkullDown().x, pipe1.getSkullDown().y, pipe1.getSkullDown().width, pipe1.getSkullDown().height); shapeRenderer.rect(pipe2.getSkullDown().x, pipe2.getSkullDown().y, pipe2.getSkullDown().width, pipe2.getSkullDown().height); shapeRenderer.rect(pipe3.getSkullDown().x, pipe3.getSkullDown().y, pipe3.getSkullDown().width, pipe3.getSkullDown().height); shapeRenderer.end(); } Run our game! The game should look just like in the picture below:

We now have the necessary blocks to check the colisee. Now we just add logic to handle the coliseum.
Determine the colysis between objects.
The definition of a colisee involves several classes.
- The ScrollHandler class has access to all pipes and their technical rectangles, so in essence, this is the class where we need to check for a coliseum.
- The GameWorld class should be aware of when a colisee occurs, so that it can process it correctly (get a current account, stop a bird, stop playing music, etc.).
- The GameRenderer class , as soon as the bird dies, should be able to respond (show the score, show the flash).
We will start with the GameWorld class . Add the following to the update method :
public void update(float delta) { bird.update(delta); scroller.update(delta); if (scroller.collides(bird)) { // Clean up on game over scroller.stop(); } } Next, create two methods in the ScrollHandler class : the stop method and the collides method . Let's go to the ScrollHandler class and add these methods:
public void stop() { frontGrass.stop(); backGrass.stop(); pipe1.stop(); pipe2.stop(); pipe3.stop();} // True - public boolean collides(Bird bird) { return (pipe1.collides(bird) || pipe2.collides(bird) || pipe3.collides(bird)); } Full class code:
<spoiler title = "ScrollHandler.java>
package com.kilobolt.gameobjects; public class ScrollHandler { private Grass frontGrass, backGrass; private Pipe pipe1, pipe2, pipe3; public static final int SCROLL_SPEED = -59; public static final int PIPE_GAP = 49; public ScrollHandler(float yPos) { frontGrass = new Grass(0, yPos, 143, 11, SCROLL_SPEED); backGrass = new Grass(frontGrass.getTailX(), yPos, 143, 11, SCROLL_SPEED); pipe1 = new Pipe(210, 0, 22, 60, SCROLL_SPEED, yPos); pipe2 = new Pipe(pipe1.getTailX() + PIPE_GAP, 0, 22, 70, SCROLL_SPEED, yPos); pipe3 = new Pipe(pipe2.getTailX() + PIPE_GAP, 0, 22, 60, SCROLL_SPEED, yPos); } public void update(float delta) { // frontGrass.update(delta); backGrass.update(delta); pipe1.update(delta); pipe2.update(delta); pipe3.update(delta); // // if (pipe1.isScrolledLeft()) { pipe1.reset(pipe3.getTailX() + PIPE_GAP); } else if (pipe2.isScrolledLeft()) { pipe2.reset(pipe1.getTailX() + PIPE_GAP); } else if (pipe3.isScrolledLeft()) { pipe3.reset(pipe2.getTailX() + PIPE_GAP); } // if (frontGrass.isScrolledLeft()) { frontGrass.reset(backGrass.getTailX()); } else if (backGrass.isScrolledLeft()) { backGrass.reset(frontGrass.getTailX()); } } public void stop() { frontGrass.stop(); backGrass.stop(); pipe1.stop(); pipe2.stop(); pipe3.stop(); } public boolean collides(Bird bird) { return (pipe1.collides(bird) || pipe2.collides(bird) || pipe3 .collides(bird)); } public Grass getFrontGrass() { return frontGrass; } public Grass getBackGrass() { return backGrass; } public Pipe getPipe1() { return pipe1; } public Pipe getPipe2() { return pipe2; } public Pipe getPipe3() { return pipe3; } } And now, in order to correct the errors, you need to make two changes. Our objects of type Scrollable (Pipe and Grass) should be able to be stopped, so we add a stop method inside the Scrollable class.
- Open the Scrollable class and add the following method:
public void stop() { velocity.x = 0; } - , Pipe , . Pipe :
public boolean collides(Bird bird) { if (position.x < bird.getX() + bird.getWidth()) { return (Intersector.overlaps(bird.getBoundingCircle(), barUp) || Intersector.overlaps(bird.getBoundingCircle(), barDown) || Intersector.overlaps(bird.getBoundingCircle(), skullUp) || Intersector .overlaps(bird.getBoundingCircle(), skullDown)); } return false; }
In this method, we start with a check if position.x is less than bird.getX + bird.getWidth , otherwise colicles are not possible. This is a very cheap test (will not affect the performance of the game). In most cases, this condition will return false , and we will not need to perform high-load checks.
If this condition returns true, we will execute the “expensive” Intersector.overlaps () call (which will return true if the circle intersects with the rectangle). We will return true if any of the four rectangles intersects with the technical circle of our bird.
The full code for the updated Pipe and Scrollable classes:
<spoiler title = ”Updated Pipe.java>
package com.kilobolt.gameobjects; import java.util.Random; import com.badlogic.gdx.math.Intersector; import com.badlogic.gdx.math.Rectangle; public class Pipe extends Scrollable { private Random r; private Rectangle skullUp, skullDown, barUp, barDown; public static final int VERTICAL_GAP = 45; public static final int SKULL_WIDTH = 24; public static final int SKULL_HEIGHT = 11; private float groundY; // Pipe – (Scrollable) public Pipe(float x, float y, int width, int height, float scrollSpeed, float groundY) { super(x, y, width, height, scrollSpeed); // Random r = new Random(); skullUp = new Rectangle(); skullDown = new Rectangle(); barUp = new Rectangle(); barDown = new Rectangle(); this.groundY = groundY; } @Override public void update(float delta) { // update (Scrollable) super.update(delta); // set() - x, y // width height barUp.set(position.x, position.y, width, height); barDown.set(position.x, position.y + height + VERTICAL_GAP, width, groundY - (position.y + height + VERTICAL_GAP)); // 24 . 22 . // 1 ( // ). // This shift is equivalent to: (SKULL_WIDTH - width) / 2 skullUp.set(position.x - (SKULL_WIDTH - width) / 2, position.y + height - SKULL_HEIGHT, SKULL_WIDTH, SKULL_HEIGHT); skullDown.set(position.x - (SKULL_WIDTH - width) / 2, barDown.y, SKULL_WIDTH, SKULL_HEIGHT); } @Override public void reset(float newX) { // reset (Scrollable) super.reset(newX); // height = r.nextInt(90) + 15; } public Rectangle getSkullUp() { return skullUp; } public Rectangle getSkullDown() { return skullDown; } public Rectangle getBarUp() { return barUp; } public Rectangle getBarDown() { return barDown; } public boolean collides(Bird bird) { if (position.x < bird.getX() + bird.getWidth()) { return (Intersector.overlaps(bird.getBoundingCircle(), barUp) || Intersector.overlaps(bird.getBoundingCircle(), barDown) || Intersector.overlaps(bird.getBoundingCircle(), skullUp) || Intersector .overlaps(bird.getBoundingCircle(), skullDown)); } return false; } } <spoiler title = "Updated Scrollable.java>
package com.kilobolt.gameobjects; import com.badlogic.gdx.math.Vector2; public class Scrollable { // Protected private, // . protected Vector2 position; protected Vector2 velocity; protected int width; protected int height; protected boolean isScrolledLeft; public Scrollable(float x, float y, int width, int height, float scrollSpeed) { position = new Vector2(x, y); velocity = new Vector2(scrollSpeed, 0); this.width = width; this.height = height; isScrolledLeft = false; } public void update(float delta) { position.add(velocity.cpy().scl(delta)); // Scollable : if (position.x + width < 0) { isScrolledLeft = true; } } // Reset: . public void reset(float newX) { position.x = newX; isScrolledLeft = false; } public void stop() { velocity.x = 0; } // public boolean isScrolledLeft() { return isScrolledLeft; } public float getTailX() { return position.x + width; } public float getX() { return position.x; } public float getY() { return position.y; } public int getWidth() { return width; } public int getHeight() { return height; } } We are testing our code!
Now that we’ve finished writing the code to check all the collosies, start your game and make sure everything works! We will add a more refined death in the ninth day. But now, let's try to play the sound from the file when our bird dies.
Download sound file
I created this sound file using bfxr.
 Download the dead.wav file .
Download and place this file in the ZombieBird-android project in the assets / data folder.

Make sure you copy the file here, and not create a link.
Update the AssetLoder class
Finally, we have a sound file, and we can create an object of type Sound in our AssetLoader class . Sound objects are stored in memory and loaded only once and it is very easy to use them (this applies to files of small size, short sounds).
- Create the following variable in the AssetLoader class:
public static Sound dead; - Initialize it in the load method as follows:
dead = Gdx.audio.newSound(Gdx.files.internal("data/dead.wav"));
An example of a complete code:
AssetLoader.java
package com.kilobolt.zbhelpers; import com.badlogic.gdx.Gdx; import com.badlogic.gdx.audio.Sound; import com.badlogic.gdx.graphics.Texture; import com.badlogic.gdx.graphics.Texture.TextureFilter; import com.badlogic.gdx.graphics.g2d.Animation; import com.badlogic.gdx.graphics.g2d.TextureRegion; public class AssetLoader { public static Texture texture; public static TextureRegion bg, grass; public static Animation birdAnimation; public static TextureRegion bird, birdDown, birdUp; public static TextureRegion skullUp, skullDown, bar; public static Sound dead; public static void load() { texture = new Texture(Gdx.files.internal("data/texture.png")); texture.setFilter(TextureFilter.Nearest, TextureFilter.Nearest); bg = new TextureRegion(texture, 0, 0, 136, 43); bg.flip(false, true); grass = new TextureRegion(texture, 0, 43, 143, 11); grass.flip(false, true); birdDown = new TextureRegion(texture, 136, 0, 17, 12); birdDown.flip(false, true); bird = new TextureRegion(texture, 153, 0, 17, 12); bird.flip(false, true); birdUp = new TextureRegion(texture, 170, 0, 17, 12); birdUp.flip(false, true); TextureRegion[] birds = { birdDown, bird, birdUp }; birdAnimation = new Animation(0.06f, birds); birdAnimation.setPlayMode(Animation.PlayMode.LOOP_PINGPONG); skullUp = new TextureRegion(texture, 192, 0, 24, 14); // skullUp skullDown = new TextureRegion(skullUp); skullDown.flip(false, true); bar = new TextureRegion(texture, 136, 16, 22, 3); bar.flip(false, true); dead = Gdx.audio.newSound(Gdx.files.internal("data/dead.wav")); } public static void dispose() { // , dispose. texture.dispose(); } } Let's program the sound file
Now that we have a Sound object, we can play it in the game. Open the GameWorld class and create the following variable in the class:
private boolean isAlive = true; And make the following changes to the update method:
public void update(float delta) { bird.update(delta); scroller.update(delta); if (isAlive && scroller.collides(bird)) { scroller.stop(); AssetLoader.dead.play(); isAlive = false; } } Now, when our bird will die, a sound file will be played (only once, without repetition)! Updated GameWorld class. Try running the game!
package com.kilobolt.gameworld; import com.kilobolt.gameobjects.Bird; import com.kilobolt.gameobjects.ScrollHandler; import com.kilobolt.zbhelpers.AssetLoader; public class GameWorld { private Bird bird; private ScrollHandler scroller; private boolean isAlive = true; public GameWorld(int midPointY) { bird = new Bird(33, midPointY - 5, 17, 12); // 66 midPointY scroller = new ScrollHandler(midPointY + 66); } public void update(float delta) { bird.update(delta); scroller.update(delta); if (scroller.collides(bird) && isAlive) { scroller.stop(); AssetLoader.dead.play(); isAlive = false; } } public Bird getBird() { return bird; } public ScrollHandler getScroller() { return scroller; } } Finally, you can remove all the technical rectangles and circles from the GameRenderer, our logic for defining the colisee works correctly. Here is an example of your GameRenderer class:
GameRenderer.java
package com.kilobolt.gameworld; import com.badlogic.gdx.Gdx; import com.badlogic.gdx.graphics.GL20; import com.badlogic.gdx.graphics.OrthographicCamera; import com.badlogic.gdx.graphics.g2d.Animation; import com.badlogic.gdx.graphics.g2d.SpriteBatch; import com.badlogic.gdx.graphics.g2d.TextureRegion; import com.badlogic.gdx.graphics.glutils.ShapeRenderer; import com.badlogic.gdx.graphics.glutils.ShapeRenderer.ShapeType; import com.kilobolt.gameobjects.Bird; import com.kilobolt.gameobjects.Grass; import com.kilobolt.gameobjects.Pipe; import com.kilobolt.gameobjects.ScrollHandler; import com.kilobolt.zbhelpers.AssetLoader; public class GameRenderer { private GameWorld myWorld; private OrthographicCamera cam; private ShapeRenderer shapeRenderer; private SpriteBatch batcher; private int midPointY; private int gameHeight; // private Bird bird; private ScrollHandler scroller; private Grass frontGrass, backGrass; private Pipe pipe1, pipe2, pipe3; // Assets private TextureRegion bg, grass; private Animation birdAnimation; private TextureRegion birdMid, birdDown, birdUp; private TextureRegion skullUp, skullDown, bar; public GameRenderer(GameWorld world, int gameHeight, int midPointY) { myWorld = world; this.gameHeight = gameHeight; this.midPointY = midPointY; cam = new OrthographicCamera(); cam.setToOrtho(true, 136, gameHeight); batcher = new SpriteBatch(); batcher.setProjectionMatrix(cam.combined); shapeRenderer = new ShapeRenderer(); shapeRenderer.setProjectionMatrix(cam.combined); // , initGameObjects(); initAssets(); } private void initGameObjects() { bird = myWorld.getBird(); scroller = myWorld.getScroller(); frontGrass = scroller.getFrontGrass(); backGrass = scroller.getBackGrass(); pipe1 = scroller.getPipe1(); pipe2 = scroller.getPipe2(); pipe3 = scroller.getPipe3(); } private void initAssets() { bg = AssetLoader.bg; grass = AssetLoader.grass; birdAnimation = AssetLoader.birdAnimation; birdMid = AssetLoader.bird; birdDown = AssetLoader.birdDown; birdUp = AssetLoader.birdUp; skullUp = AssetLoader.skullUp; skullDown = AssetLoader.skullDown; bar = AssetLoader.bar; } private void drawGrass() { // batcher.draw(grass, frontGrass.getX(), frontGrass.getY(), frontGrass.getWidth(), frontGrass.getHeight()); batcher.draw(grass, backGrass.getX(), backGrass.getY(), backGrass.getWidth(), backGrass.getHeight()); } private void drawSkulls() { // , :) // Pipe. batcher.draw(skullUp, pipe1.getX() - 1, pipe1.getY() + pipe1.getHeight() - 14, 24, 14); batcher.draw(skullDown, pipe1.getX() - 1, pipe1.getY() + pipe1.getHeight() + 45, 24, 14); batcher.draw(skullUp, pipe2.getX() - 1, pipe2.getY() + pipe2.getHeight() - 14, 24, 14); batcher.draw(skullDown, pipe2.getX() - 1, pipe2.getY() + pipe2.getHeight() + 45, 24, 14); batcher.draw(skullUp, pipe3.getX() - 1, pipe3.getY() + pipe3.getHeight() - 14, 24, 14); batcher.draw(skullDown, pipe3.getX() - 1, pipe3.getY() + pipe3.getHeight() + 45, 24, 14); } private void drawPipes() { // , :) // Grass. batcher.draw(bar, pipe1.getX(), pipe1.getY(), pipe1.getWidth(), pipe1.getHeight()); batcher.draw(bar, pipe1.getX(), pipe1.getY() + pipe1.getHeight() + 45, pipe1.getWidth(), midPointY + 66 - (pipe1.getHeight() + 45)); batcher.draw(bar, pipe2.getX(), pipe2.getY(), pipe2.getWidth(), pipe2.getHeight()); batcher.draw(bar, pipe2.getX(), pipe2.getY() + pipe2.getHeight() + 45, pipe2.getWidth(), midPointY + 66 - (pipe2.getHeight() + 45)); batcher.draw(bar, pipe3.getX(), pipe3.getY(), pipe3.getWidth(), pipe3.getHeight()); batcher.draw(bar, pipe3.getX(), pipe3.getY() + pipe3.getHeight() + 45, pipe3.getWidth(), midPointY + 66 - (pipe3.getHeight() + 45)); } public void render(float runTime) { Gdx.gl.glClearColor(0, 0, 0, 1); Gdx.gl.glClear(GL20.GL_COLOR_BUFFER_BIT); shapeRenderer.begin(ShapeType.Filled); // shapeRenderer.setColor(55 / 255.0f, 80 / 255.0f, 100 / 255.0f, 1); shapeRenderer.rect(0, 0, 136, midPointY + 66); // Grass shapeRenderer.setColor(111 / 255.0f, 186 / 255.0f, 45 / 255.0f, 1); shapeRenderer.rect(0, midPointY + 66, 136, 11); // Dirt shapeRenderer.setColor(147 / 255.0f, 80 / 255.0f, 27 / 255.0f, 1); shapeRenderer.rect(0, midPointY + 77, 136, 52); shapeRenderer.end(); batcher.begin(); batcher.disableBlending(); batcher.draw(bg, 0, midPointY + 23, 136, 43); // 1. Grass drawGrass(); // 2. Pipes drawPipes(); batcher.enableBlending(); // 3. Skulls ( ) drawSkulls(); if (bird.shouldntFlap()) { batcher.draw(birdMid, bird.getX(), bird.getY(), bird.getWidth() / 2.0f, bird.getHeight() / 2.0f, bird.getWidth(), bird.getHeight(), 1, 1, bird.getRotation()); } else { batcher.draw(birdAnimation.getKeyFrame(runTime), bird.getX(), bird.getY(), bird.getWidth() / 2.0f, bird.getHeight() / 2.0f, bird.getWidth(), bird.getHeight(), 1, 1, bird.getRotation()); } batcher.end(); } } We are almost done!
Our game is almost that lawful. The next day, the ninth, we will finish the rest of our game world and begin to add a user interface. Brave yourself! Necropolis close!
Source code for the day
If you are out of the mood to write code yourself, download it from here:
Day 9 - Completing the Game Process and Basic UI
Welcome to the ninth day. Today we are going to end up with the gameplay by adding the definition of a coliseum to the ground and improve the death of the bird. Next, we will implement account management and configure BitmapFont to display the account!
We will continue right from where we ended in the previous day. If you do not have the source, download them by going to the eighth day.
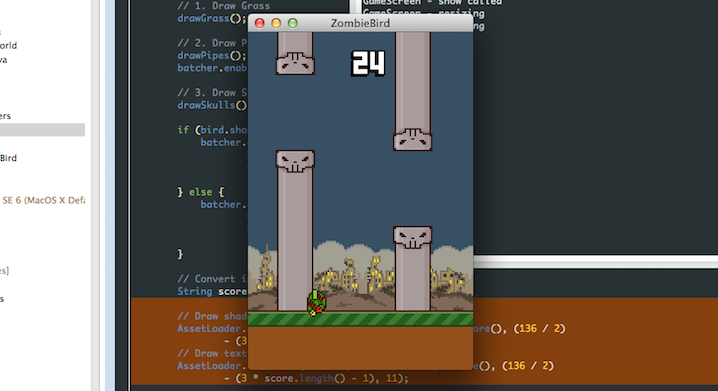
Add a few more sound effects
We need to add the sound of our bird's flight, as well as the sound of an increase in the bill.
- Create two new variables in the class and name them flap and coin , and initiate them inside the load method :
flap = Gdx.audio.newSound(Gdx.files.internal("data/flap.wav")); coin = Gdx.audio.newSound(Gdx.files.internal("data/coin.wav")); - Also in the dispose method add:
dead.dispose(); flap.dispose(); coin.dispose();
Download and place the following files in the assets / data folder in the ZombieGame-android project :
coin.wav flap.wavAdd text!
Just in order to seem very active, we will add a .font file generated using Hiero. Hiero converts a text file into a .png Texture image, similar to the texture in our game. Just Hiero creates .fnt configuration file that libGDX able to read and recognize where what letter in the picture.
I created these files for you and you can download them below. I will show how you can use them in our game.

The font is called 04b_19, it is used in Flappy Bird and it is free.
Download the following 4 files:
 shadow.fnt text.fnt shadow.png text.png
I insist that you open each of these files and see how they work! Put all four files inside the folderassets / data in the ZombieGame-android project .
We can use these pairs. fnt and .png files to create a BitmapFont object that allows us to draw strings using SpriteBatch in our GameRenderer , without having to create a new String every time. BitmapFont uses .fnt to determine where each letter and number is in a TextureRegion . So in general, we do not need to do unnecessary work, they will do everything for us.
Do the following to create these fonts in our AssetLoader :
- Create new variables in the class:
public static BitmapFont font, shadow; - Add the following to the load method .
font = new BitmapFont(Gdx.files.internal("data/text.fnt")); font.setScale(.25f, -.25f); shadow = new BitmapFont(Gdx.files.internal("data/shadow.fnt")); shadow.setScale(.25f, -.25f);
This will load the files and change their size to the one we need. - Also add the following to the dispose method :
font.dispose(); shadow.dispose();
Here is what your AssetLoader should look like:
Assetloader
package com.kilobolt.ZBHelpers; import com.badlogic.gdx.Gdx; import com.badlogic.gdx.audio.Sound; import com.badlogic.gdx.graphics.Texture; import com.badlogic.gdx.graphics.Texture.TextureFilter; import com.badlogic.gdx.graphics.g2d.Animation; import com.badlogic.gdx.graphics.g2d.BitmapFont; import com.badlogic.gdx.graphics.g2d.TextureRegion; public class AssetLoader { public static Texture texture; public static TextureRegion bg, grass; public static Animation birdAnimation; public static TextureRegion bird, birdDown, birdUp; public static TextureRegion skullUp, skullDown, bar; public static Sound dead, flap, coin; public static BitmapFont font, shadow; public static void load() { texture = new Texture(Gdx.files.internal("data/texture.png")); texture.setFilter(TextureFilter.Nearest, TextureFilter.Nearest); bg = new TextureRegion(texture, 0, 0, 136, 43); bg.flip(false, true); grass = new TextureRegion(texture, 0, 43, 143, 11); grass.flip(false, true); birdDown = new TextureRegion(texture, 136, 0, 17, 12); birdDown.flip(false, true); bird = new TextureRegion(texture, 153, 0, 17, 12); bird.flip(false, true); birdUp = new TextureRegion(texture, 170, 0, 17, 12); birdUp.flip(false, true); TextureRegion[] birds = { birdDown, bird, birdUp }; birdAnimation = new Animation(0.06f, birds); birdAnimation.setPlayMode(Animation.LOOP_PINGPONG); skullUp = new TextureRegion(texture, 192, 0, 24, 14); // skullUp skullDown = new TextureRegion(skullUp); skullDown.flip(false, true); bar = new TextureRegion(texture, 136, 16, 22, 3); bar.flip(false, true); dead = Gdx.audio.newSound(Gdx.files.internal("data/dead.wav")); flap = Gdx.audio.newSound(Gdx.files.internal("data/flap.wav")); coin = Gdx.audio.newSound(Gdx.files.internal("data/coin.wav")); font = new BitmapFont(Gdx.files.internal("data/text.fnt")); font.setScale(.25f, -.25f); shadow = new BitmapFont(Gdx.files.internal("data/shadow.fnt")); shadow.setScale(.25f, -.25f); } public static void dispose() { // – texture.dispose(); // dead.dispose(); flap.dispose(); coin.dispose(); font.dispose(); shadow.dispose(); } Earth hurts
Go to the GameWorld class .
- Start by removing the isALive variable . We will revise as the logic of the fact of the death of our bird.
- We want our bird to die when it hits the ground. Now we are going to do this.
Instead of creating rectangles for defining a coliseum with grass objects and updating them, we will define the ground as a static box, for simplicity.
- Start by creating a new variable in the class:
(import com.badlogic.gdx.math) private Rectangle ground; - Initialize it in the constructor as:
ground = new Rectangle(0, midPointY + 66, 136, 11); - Next, we will change our update method to the following:
public void update(float delta) { // delta, // , if (delta > .15f) { delta = .15f; } bird.update(delta); scroller.update(delta); if (scroller.collides(bird) && bird.isAlive()) { scroller.stop(); bird.die(); AssetLoader.dead.play(); } if (Intersector.overlaps(bird.getBoundingCircle(), ground)) { scroller.stop(); bird.die(); bird.decelerate(); } }
Let's fix our little bird
Now we need to correct our mistakes in the Bird class .
- :
private boolean isAlive - :
isAlive = true; - :
public boolean isAlive() { return isAlive; } - isAlive , shouldntFlap . , , ( , , ):
public boolean shouldntFlap() { return velocity.y > 70 || !isAlive; }
true (, Y – ). - onClick , :
public void onClick() { if (isAlive) { AssetLoader.flap.play(); velocity.y = -140; } }
: com.kilobolt.ZBHelpers.AssetLoader; - Add two new methods: die and decelerate . Everything is very simple:
public void die() { isAlive = false; velocity.y = 0; } public void decelerate() { // acceleration.y = 0; } - Lastly, add a new condition to the last if in the update method :
if (isFalling() || !isAlive) { ... }
So if our little bird soars upward, it hits its nose in the direction of the earth, just like a bird from the game Flappy Bird.
Full Bird Class:
Bird.java
package com.kilobolt.GameObjects; import com.badlogic.gdx.math.Circle; import com.badlogic.gdx.math.Vector2; import com.kilobolt.ZBHelpers.AssetLoader; public class Bird { private Vector2 position; private Vector2 velocity; private Vector2 acceleration; private float rotation; private int width; private int height; private boolean isAlive; private Circle boundingCircle; public Bird(float x, float y, int width, int height) { this.width = width; this.height = height; position = new Vector2(x, y); velocity = new Vector2(0, 0); acceleration = new Vector2(0, 460); boundingCircle = new Circle(); isAlive = true; } public void update(float delta) { velocity.add(acceleration.cpy().scl(delta)); if (velocity.y > 200) { velocity.y = 200; } position.add(velocity.cpy().scl(delta)); // (9, 6) // 6.5f; boundingCircle.set(position.x + 9, position.y + 6, 6.5f); // if (velocity.y < 0) { rotation -= 600 * delta; if (rotation < -20) { rotation = -20; } } // if (isFalling() || !isAlive) { rotation += 480 * delta; if (rotation > 90) { rotation = 90; } } } public boolean isFalling() { return velocity.y > 110; } public boolean shouldntFlap() { return velocity.y > 70 || !isAlive; } public void onClick() { if (isAlive) { AssetLoader.flap.play(); velocity.y = -140; } } public void die() { isAlive = false; velocity.y = 0; } public void decelerate() { acceleration.y = 0; } public float getX() { return position.x; } public float getY() { return position.y; } public float getWidth() { return width; } public float getHeight() { return height; } public float getRotation() { return rotation; } public Circle getBoundingCircle() { return boundingCircle; } public boolean isAlive() { return isAlive; } } Run your code!
The game must be playable, with the definition of colisees and death. Next, we implement the account management system.
Account management

In Flappy Bird you get a point when a bird flies about half of each span of the pipes. We will emulate this behavior and will also keep score. We need to create an integer variable in which we will store the player's account. We will do this in the GameWorld class .
Open the GameWorld class.
- Create a new variable in the class:
private int score = 0; - Next, create an access method for this variable and a method that will increase the score:
public int getScore() { return score; } public void addScore(int increment) { score += increment; }
Your GameWorld class should look like this:
GameWorld.java
package com.kilobolt.GameWorld; import com.badlogic.gdx.math.Intersector; import com.badlogic.gdx.math.Rectangle; import com.kilobolt.GameObjects.Bird; import com.kilobolt.GameObjects.ScrollHandler; import com.kilobolt.ZBHelpers.AssetLoader; public class GameWorld { private Bird bird; private ScrollHandler scroller; private Rectangle ground; private int score = 0; public GameWorld(int midPointY) { bird = new Bird(33, midPointY - 5, 17, 12); // 66 midPointY scroller = new ScrollHandler(midPointY + 66); ground = new Rectangle(0, midPointY + 66, 137, 11); } public void update(float delta) { // , // , if (delta > .15f) { delta = .15f; } bird.update(delta); scroller.update(delta); if (scroller.collides(bird) && bird.isAlive()) { scroller.stop(); bird.die(); AssetLoader.dead.play(); } if (Intersector.overlaps(bird.getBoundingCircle(), ground)) { scroller.stop(); bird.die(); bird.decelerate(); } } public Bird getBird() { return bird; } public ScrollHandler getScroller() { return scroller; } public int getScore() { return score; } public void addScore(int increment) { score += increment; } } Increase Account
The logic responsible for increasing the score will be in our class ScrollHandler . Let's open it.
We need a link to GameWorld so that we can operate the account. So, we pass the link to the GameWorld object to the constructor, and store it in a class variable named gameWorld . Make sure you add the import of the GameWorld class ( com.kilobolt.GameWorld.GameWorld ).
Our new ScrollHandler class constructor:
public ScrollHandler(GameWorld gameWorld, float yPos) { this.gameWorld = gameWorld; frontGrass = new Grass(0, yPos, 143, 11, SCROLL_SPEED); backGrass = new Grass(frontGrass.getTailX(), yPos, 143, 11, SCROLL_SPEED); pipe1 = new Pipe(210, 0, 22, 60, SCROLL_SPEED, yPos); pipe2 = new Pipe(pipe1.getTailX() + PIPE_GAP, 0, 22, 70, SCROLL_SPEED, yPos); pipe3 = new Pipe(pipe2.getTailX() + PIPE_GAP, 0, 22, 60, SCROLL_SPEED, yPos); } Go to the GameWorld class and update the creation of our ScrollHandler as follows:
scroller = new ScrollHandler(this, midPointY + 66); In general, the logic is as follows:
- If the middle of the pipe in relation to X is less than the bird's beak, we add 1 point to the score.
- , , isScored Boolean. isScored false ( isScore true . isScored false ).
, :
public boolean collides(Bird bird) { if (!pipe1.isScored() && pipe1.getX() + (pipe1.getWidth() / 2) < bird.getX() + bird.getWidth()) { addScore(1); pipe1.setScored(true); AssetLoader.coin.play(); } else if (!pipe2.isScored() && pipe2.getX() + (pipe2.getWidth() / 2) < bird.getX() + bird.getWidth()) { addScore(1); pipe2.setScored(true); AssetLoader.coin.play(); } else if (!pipe3.isScored() && pipe3.getX() + (pipe3.getWidth() / 2) < bird.getX() + bird.getWidth()) { addScore(1); pipe3.setScored(true); AssetLoader.coin.play(); } return (pipe1.collides(bird) || pipe2.collides(bird) || pipe3 .collides(bird)); } , , :
- AseetLoader ( com.kilobolt.ZBHelpers.AssetLoader ).
- addScore :
private void addScore(int increment) { gameWorld.addScore(increment); } - Pipe Boolean isScored .
A complete example of the ScrollHandler class:
ScrollHandler.java
package com.kilobolt.GameObjects; import com.kilobolt.GameWorld.GameWorld; import com.kilobolt.ZBHelpers.AssetLoader; public class ScrollHandler { private Grass frontGrass, backGrass; private Pipe pipe1, pipe2, pipe3; public static final int SCROLL_SPEED = -59; public static final int PIPE_GAP = 49; private GameWorld gameWorld; public ScrollHandler(GameWorld gameWorld, float yPos) { this.gameWorld = gameWorld; frontGrass = new Grass(0, yPos, 143, 11, SCROLL_SPEED); backGrass = new Grass(frontGrass.getTailX(), yPos, 143, 11, SCROLL_SPEED); pipe1 = new Pipe(210, 0, 22, 60, SCROLL_SPEED, yPos); pipe2 = new Pipe(pipe1.getTailX() + PIPE_GAP, 0, 22, 70, SCROLL_SPEED, yPos); pipe3 = new Pipe(pipe2.getTailX() + PIPE_GAP, 0, 22, 60, SCROLL_SPEED, yPos); } public void update(float delta) { // frontGrass.update(delta); backGrass.update(delta); pipe1.update(delta); pipe2.update(delta); pipe3.update(delta); // , // if (pipe1.isScrolledLeft()) { pipe1.reset(pipe3.getTailX() + PIPE_GAP); } else if (pipe2.isScrolledLeft()) { pipe2.reset(pipe1.getTailX() + PIPE_GAP); } else if (pipe3.isScrolledLeft()) { pipe3.reset(pipe2.getTailX() + PIPE_GAP); } // if (frontGrass.isScrolledLeft()) { frontGrass.reset(backGrass.getTailX()); } else if (backGrass.isScrolledLeft()) { backGrass.reset(frontGrass.getTailX()); } } public void stop() { frontGrass.stop(); backGrass.stop(); pipe1.stop(); pipe2.stop(); pipe3.stop(); } public boolean collides(Bird bird) { if (!pipe1.isScored() && pipe1.getX() + (pipe1.getWidth() / 2) < bird.getX() + bird.getWidth()) { addScore(1); pipe1.setScored(true); AssetLoader.coin.play(); } else if (!pipe2.isScored() && pipe2.getX() + (pipe2.getWidth() / 2) < bird.getX() + bird.getWidth()) { addScore(1); pipe2.setScored(true); AssetLoader.coin.play(); } else if (!pipe3.isScored() && pipe3.getX() + (pipe3.getWidth() / 2) < bird.getX() + bird.getWidth()) { addScore(1); pipe3.setScored(true); AssetLoader.coin.play(); } return (pipe1.collides(bird) || pipe2.collides(bird) || pipe3 .collides(bird)); } private void addScore(int increment) { gameWorld.addScore(increment); } public Grass getFrontGrass() { return frontGrass; } public Grass getBackGrass() { return backGrass; } public Pipe getPipe1() { return pipe1; } public Pipe getPipe2() { return pipe2; } public Pipe getPipe3() { return pipe3; } } Pipe class - isScored boolean
- Create a new variable in the class:
private boolean isScored = false;
This variable will be set to true when the user is awarded a point for passing the current Pipe object. - Update the reset method , set isScored to false when the pipe position is reset.
@Override public void reset(float newX) { super.reset(newX); height = r.nextInt(90) + 15; isScored = false; }
Next, create access methods for this variable:public boolean isScored() { return isScored; } public void setScored(boolean b) { isScored = b; }
Here’s what your Pipe class should look like:
Pipe.java
package com.kilobolt.GameObjects; import java.util.Random; import com.badlogic.gdx.math.Intersector; import com.badlogic.gdx.math.Rectangle; public class Pipe extends Scrollable { private Random r; private Rectangle skullUp, skullDown, barUp, barDown; public static final int VERTICAL_GAP = 45; public static final int SKULL_WIDTH = 24; public static final int SKULL_HEIGHT = 11; private float groundY; private boolean isScored = false; // Pipe – (Scrollable) public Pipe(float x, float y, int width, int height, float scrollSpeed, float groundY) { super(x, y, width, height, scrollSpeed); // Random, r = new Random(); skullUp = new Rectangle(); skullDown = new Rectangle(); barUp = new Rectangle(); barDown = new Rectangle(); this.groundY = groundY; } @Override public void update(float delta) { // update (Scrollable) super.update(delta); barUp.set(position.x, position.y, width, height); barDown.set(position.x, position.y + height + VERTICAL_GAP, width, groundY - (position.y + height + VERTICAL_GAP)); // : (SKULL_WIDTH - width) / 2 skullUp.set(position.x - (SKULL_WIDTH - width) / 2, position.y + height - SKULL_HEIGHT, SKULL_WIDTH, SKULL_HEIGHT); skullDown.set(position.x - (SKULL_WIDTH - width) / 2, barDown.y, SKULL_WIDTH, SKULL_HEIGHT); } @Override public void reset(float newX) { // reset (Scrollable) super.reset(newX); // height = r.nextInt(90) + 15; isScored = false; } public Rectangle getSkullUp() { return skullUp; } public Rectangle getSkullDown() { return skullDown; } public Rectangle getBarUp() { return barUp; } public Rectangle getBarDown() { return barDown; } public boolean collides(Bird bird) { if (position.x < bird.getX() + bird.getWidth()) { return (Intersector.overlaps(bird.getBoundingCircle(), barUp) || Intersector.overlaps(bird.getBoundingCircle(), barDown) || Intersector.overlaps(bird.getBoundingCircle(), skullUp) || Intersector .overlaps(bird.getBoundingCircle(), skullDown)); } return false; } public boolean isScored() { return isScored; } public void setScored(boolean b) { isScored = b; } } Run the code!
You have to hear Coin.wav being played every time you get a point for passing a pair of pipe. But we don’t just want to hear our account grow. We want to see how our bill changes!
We are going to draw text on the screen to display our account.
Display Score in GameRenderer
Displaying text is a simple task. Between our batcher.begin () and batcher.end () calls, we need to add the following line:
AssetLoader.shadow.draw(batcher, "hello world", x, y); An object of type BitmapFont , as shown above, has a draw method that receives at the input a SpriteBatch, a string, and x and y coordinates where to draw this string.
- Add the following lines of code before the batcher.end () call in the render method :
AssetLoader.shadow.draw(batcher, "hello world", x, y);
// Convert integer to String
String score = myWorld.getScore () + "";
// First, draw the shadow
AssetLoader.shadow.draw (batcher, „+ myWorld.getScore (), (136/2) - (3 * score.length ()), 12);
// Draw the text itself
AssetLoader.font.draw (batcher, „“ + myWorld.getScore (), (136/2) - (3 * score.length () - 1), 11);
batcher.end ();
First we translate the Integer into a String so that we can draw the value using our BitmapFont. We calculate the appropriate value of X coordinates based on the length of the account, so that we can center the text well on the center of the screen.
A complete example of the GameRenderer class:
GameRenderer.java
package com.kilobolt.GameWorld; import com.badlogic.gdx.Gdx; import com.badlogic.gdx.graphics.Color; import com.badlogic.gdx.graphics.GL20; import com.badlogic.gdx.graphics.OrthographicCamera; import com.badlogic.gdx.graphics.g2d.Animation; import com.badlogic.gdx.graphics.g2d.SpriteBatch; import com.badlogic.gdx.graphics.g2d.TextureRegion; import com.badlogic.gdx.graphics.glutils.ShapeRenderer; import com.badlogic.gdx.graphics.glutils.ShapeRenderer.ShapeType; import com.badlogic.gdx.math.Rectangle; import com.kilobolt.GameObjects.Bird; import com.kilobolt.GameObjects.Grass; import com.kilobolt.GameObjects.Pipe; import com.kilobolt.GameObjects.ScrollHandler; import com.kilobolt.ZBHelpers.AssetLoader; public class GameRenderer { private GameWorld myWorld; private OrthographicCamera cam; private ShapeRenderer shapeRenderer; private SpriteBatch batcher; private int midPointY; private int gameHeight; // private Bird bird; private ScrollHandler scroller; private Grass frontGrass, backGrass; private Pipe pipe1, pipe2, pipe3; // private TextureRegion bg, grass; private Animation birdAnimation; private TextureRegion birdMid, birdDown, birdUp; private TextureRegion skullUp, skullDown, bar; public GameRenderer(GameWorld world, int gameHeight, int midPointY) { myWorld = world; this.gameHeight = gameHeight; this.midPointY = midPointY; cam = new OrthographicCamera(); cam.setToOrtho(true, 136, gameHeight); batcher = new SpriteBatch(); batcher.setProjectionMatrix(cam.combined); shapeRenderer = new ShapeRenderer(); shapeRenderer.setProjectionMatrix(cam.combined); // , initGameObjects(); initAssets(); } private void initGameObjects() { bird = myWorld.getBird(); scroller = myWorld.getScroller(); frontGrass = scroller.getFrontGrass(); backGrass = scroller.getBackGrass(); pipe1 = scroller.getPipe1(); pipe2 = scroller.getPipe2(); pipe3 = scroller.getPipe3(); } private void initAssets() { bg = AssetLoader.bg; grass = AssetLoader.grass; birdAnimation = AssetLoader.birdAnimation; birdMid = AssetLoader.bird; birdDown = AssetLoader.birdDown; birdUp = AssetLoader.birdUp; skullUp = AssetLoader.skullUp; skullDown = AssetLoader.skullDown; bar = AssetLoader.bar; } private void drawGrass() { // batcher.draw(grass, frontGrass.getX(), frontGrass.getY(), frontGrass.getWidth(), frontGrass.getHeight()); batcher.draw(grass, backGrass.getX(), backGrass.getY(), backGrass.getWidth(), backGrass.getHeight()); } private void drawSkulls() { batcher.draw(skullUp, pipe1.getX() - 1, pipe1.getY() + pipe1.getHeight() - 14, 24, 14); batcher.draw(skullDown, pipe1.getX() - 1, pipe1.getY() + pipe1.getHeight() + 45, 24, 14); batcher.draw(skullUp, pipe2.getX() - 1, pipe2.getY() + pipe2.getHeight() - 14, 24, 14); batcher.draw(skullDown, pipe2.getX() - 1, pipe2.getY() + pipe2.getHeight() + 45, 24, 14); batcher.draw(skullUp, pipe3.getX() - 1, pipe3.getY() + pipe3.getHeight() - 14, 24, 14); batcher.draw(skullDown, pipe3.getX() - 1, pipe3.getY() + pipe3.getHeight() + 45, 24, 14); } private void drawPipes() { batcher.draw(bar, pipe1.getX(), pipe1.getY(), pipe1.getWidth(), pipe1.getHeight()); batcher.draw(bar, pipe1.getX(), pipe1.getY() + pipe1.getHeight() + 45, pipe1.getWidth(), midPointY + 66 - (pipe1.getHeight() + 45)); batcher.draw(bar, pipe2.getX(), pipe2.getY(), pipe2.getWidth(), pipe2.getHeight()); batcher.draw(bar, pipe2.getX(), pipe2.getY() + pipe2.getHeight() + 45, pipe2.getWidth(), midPointY + 66 - (pipe2.getHeight() + 45)); batcher.draw(bar, pipe3.getX(), pipe3.getY(), pipe3.getWidth(), pipe3.getHeight()); batcher.draw(bar, pipe3.getX(), pipe3.getY() + pipe3.getHeight() + 45, pipe3.getWidth(), midPointY + 66 - (pipe3.getHeight() + 45)); } public void render(float runTime) { Gdx.gl.glClearColor(0, 0, 0, 1); Gdx.gl.glClear(GL20.GL_COLOR_BUFFER_BIT); shapeRenderer.begin(ShapeType.Filled); // shapeRenderer.setColor(55 / 255.0f, 80 / 255.0f, 100 / 255.0f, 1); shapeRenderer.rect(0, 0, 136, midPointY + 66); // shapeRenderer.setColor(111 / 255.0f, 186 / 255.0f, 45 / 255.0f, 1); shapeRenderer.rect(0, midPointY + 66, 136, 11); // shapeRenderer.setColor(147 / 255.0f, 80 / 255.0f, 27 / 255.0f, 1); shapeRenderer.rect(0, midPointY + 77, 136, 52); shapeRenderer.end(); batcher.begin(); batcher.disableBlending(); batcher.draw(bg, 0, midPointY + 23, 136, 43); // 1. drawGrass(); // 2. drawPipes(); batcher.enableBlending(); // 3. ( ) drawSkulls(); if (bird.shouldntFlap()) { batcher.draw(birdMid, bird.getX(), bird.getY(), bird.getWidth() / 2.0f, bird.getHeight() / 2.0f, bird.getWidth(), bird.getHeight(), 1, 1, bird.getRotation()); } else { batcher.draw(birdAnimation.getKeyFrame(runTime), bird.getX(), bird.getY(), bird.getWidth() / 2.0f, bird.getHeight() / 2.0f, bird.getWidth(), bird.getHeight(), 1, 1, bird.getRotation()); } // integer String String score = myWorld.getScore() + ""; // AssetLoader.shadow.draw(batcher, "" + myWorld.getScore(), (136 / 2) - (3 * score.length()), 12); // AssetLoader.font.draw(batcher, "" + myWorld.getScore(), (136 / 2) - (3 * score.length() - 1), 11); batcher.end(); } } Now we have a working system of points and we even displayed some text on the screen! The next day, we will implement GameStates, so that we can restart the game. And after that, we will try to add some UI!
Source code for the day
If you are out of the mood to write code yourself, download it from here:
Day 10 - GameStates and Best Score
In this section, we will discuss GameStates , which ultimately implement: “touch / click start”, pause and restart. After that, we will use the libGDX functionality for working with “preferences” to keep the “best score”. At the end of the tenth day you will have a full-fledged clone of the game Flappy Bird. On the eleventh day we will add some recent changes.
If you are ready, let's get started!
Quick Edit - Coliseum with a ceiling
I forgot to add a check on the ceiling with a coliseum. Update the update method inside the Bird class !
public void update(float delta) { velocity.add(acceleration.cpy().scl(delta)); if (velocity.y > 200) { velocity.y = 200; } // if (position.y < -13) { position.y = -13; velocity.y = 0; } position.add(velocity.cpy().scl(delta)); // (9, 6) . // 6.5f; boundingCircle.set(position.x + 9, position.y + 6, 6.5f); // if (velocity.y < 0) { rotation -= 600 * delta; if (rotation < -20) { rotation = -20; } } // if (isFalling() || !isAlive) { rotation += 480 * delta; if (rotation > 90) { rotation = 90; } } } Add GameStates
The essence of using GameState is to split our game into several states, such as “RUNNING" or "GAMEOVER". We will also use IF or SWITCH to control the course of the game depending on the current state.
A simple implementation of the GameState is to create an Enum , this is just a variable that can only take on the values that we specified for it. Read more about Enum here if you're interested. If you prefer to see the code, keep reading!
We will add enum to our gameworld . Add the following code somewhere inside the GameWorld class:
public enum GameState { READY, RUNNING, GAMEOVER } - Now we can create a variable of type GameState just like we create other variables. Create a variable inside the class:
private GameState currentState; - Initialize it in the constructor:
currentState = GameState.READY;

Next, we need to make a packet of changes to our update method . In essence, we will rename this method to updateRunning .
Once you make these changes, create a new update method and updateReady method as shown below:
public void update(float delta) { switch (currentState) { case READY: updateReady(delta); break; case RUNNING: default: updateRunning(delta); break; } } private void updateReady(float delta) { // } Now the update method checks the current state of the game before running the desired update logic.
Next, we need to change our GameState , in case our bird dies. We assume that the bird is completely dead when it touched the ground. Inside the updateRunning method (the previously renamed update method ), add the following line to the last if :
currentState = GameState.GAMEOVER; Finally, add the following methods to help control GameState .
isReady will return true when curentState is GameState.READY.
start changes the currentState to GameState.RUNNING.
restart is more interesting than previous methods - it resets all variables in an object that have been changed during the game. That's all our logic for restarting the game.
When the restart method is called, we will go over all the dependent objects and call their onRestart method . The result will be a full reset to the default values of all objects.
What arguments do we pass to the onRestart methods ?? These are the default values for variables that may have changed during the game. For example, our bird has a position value for Y, so we pass the starting value for the position for Y.
public void restart() { currentState = GameState.READY; score = 0; bird.onRestart(midPointY - 5); scroller.onRestart(); currentState = GameState.READY; } We also need access to the midpoint variable , which is currently not stored in the class constructor. Let's change this.
Add the following variable to the class:
public int midPointY; Initialize it in the class constructor:
this.midPointY = midPointY; In case you are confused, here is the complete code of the GameWorld class:
GameWorld.java
package com.kilobolt.GameWorld; import com.badlogic.gdx.math.Intersector; import com.badlogic.gdx.math.Rectangle; import com.kilobolt.GameObjects.Bird; import com.kilobolt.GameObjects.ScrollHandler; import com.kilobolt.ZBHelpers.AssetLoader; public class GameWorld { private Bird bird; private ScrollHandler scroller; private Rectangle ground; private int score = 0; private int midPointY; private GameState currentState; public enum GameState { READY, RUNNING, GAMEOVER } public GameWorld(int midPointY) { currentState = GameState.READY; this.midPointY = midPointY; bird = new Bird(33, midPointY - 5, 17, 12); // 66 midPointY scroller = new ScrollHandler(this, midPointY + 66); ground = new Rectangle(0, midPointY + 66, 137, 11); } public void update(float delta) { switch (currentState) { case READY: updateReady(delta); break; case RUNNING: default: updateRunning(delta); break; } } private void updateReady(float delta) { // } public void updateRunning(float delta) { if (delta > .15f) { delta = .15f; } bird.update(delta); scroller.update(delta); if (scroller.collides(bird) && bird.isAlive()) { scroller.stop(); bird.die(); AssetLoader.dead.play(); } if (Intersector.overlaps(bird.getBoundingCircle(), ground)) { scroller.stop(); bird.die(); bird.decelerate(); currentState = GameState.GAMEOVER; } } public Bird getBird() { return bird; } public ScrollHandler getScroller() { return scroller; } public int getScore() { return score; } public void addScore(int increment) { score += increment; } public boolean isReady() { return currentState == GameState.READY; } public void start() { currentState = GameState.RUNNING; } public void restart() { currentState = GameState.READY; score = 0; bird.onRestart(midPointY - 5); scroller.onRestart(); currentState = GameState.READY; } public boolean isGameOver() { return currentState == GameState.GAMEOVER; } } Now let's add the onRestart method to our Bird and Scroller classes. Let's start with the easiest class - Bird.
Reset the Bird
Create an onRestart method in our little bird. Inside the method, we need to return the default values for all class variables:
public void onRestart(int y) { rotation = 0; position.y = y; velocity.x = 0; velocity.y = 0; acceleration.x = 0; acceleration.y = 460; isAlive = true; } Well that's all! You should end up with something like this:
Bird.java
package com.kilobolt.GameObjects; import com.badlogic.gdx.math.Circle; import com.badlogic.gdx.math.Vector2; import com.kilobolt.ZBHelpers.AssetLoader; public class Bird { private Vector2 position; private Vector2 velocity; private Vector2 acceleration; private float rotation; private int width; private int height; private boolean isAlive; private Circle boundingCircle; public Bird(float x, float y, int width, int height) { this.width = width; this.height = height; position = new Vector2(x, y); velocity = new Vector2(0, 0); acceleration = new Vector2(0, 460); boundingCircle = new Circle(); isAlive = true; } public void update(float delta) { velocity.add(acceleration.cpy().scl(delta)); if (velocity.y > 200) { velocity.y = 200; } position.add(velocity.cpy().scl(delta)); boundingCircle.set(position.x + 9, position.y + 6, 6.5f); // if (velocity.y < 0) { rotation -= 600 * delta; if (rotation < -20) { rotation = -20; } } // if (isFalling() || !isAlive) { rotation += 480 * delta; if (rotation > 90) { rotation = 90; } } } public boolean isFalling() { return velocity.y > 110; } public boolean shouldntFlap() { return velocity.y > 70 || !isAlive; } public void onClick() { if (isAlive) { AssetLoader.flap.play(); velocity.y = -140; } } public void die() { isAlive = false; velocity.y = 0; } public void decelerate() { acceleration.y = 0; } public void onRestart(int y) { rotation = 0; position.y = y; velocity.x = 0; velocity.y = 0; acceleration.x = 0; acceleration.y = 460; isAlive = true; } public float getX() { return position.x; } public float getY() { return position.y; } public float getWidth() { return width; } public float getHeight() { return height; } public float getRotation() { return rotation; } public Circle getBoundingCircle() { return boundingCircle; } public boolean isAlive() { return isAlive; } } OnRestart - ScrollHandler
Now we need to go to the ScrollHandler class and create a similar method that will reset the values of the class variables! Notice that we call a non-existing onRestart method on several objects. We will continue further and add them.
public void onRestart() { frontGrass.onRestart(0, SCROLL_SPEED); backGrass.onRestart(frontGrass.getTailX(), SCROLL_SPEED); pipe1.onRestart(210, SCROLL_SPEED); pipe2.onRestart(pipe1.getTailX() + PIPE_GAP, SCROLL_SPEED); pipe3.onRestart(pipe2.getTailX() + PIPE_GAP, SCROLL_SPEED); } OnRestart - Grass
It is easy to do. We just need to return the grass to its original position, and change the speed to SCROLL_SPEED .
package com.kilobolt.GameObjects; public class Grass extends Scrollable { public Grass(float x, float y, int width, int height, float scrollSpeed) { super(x, y, width, height, scrollSpeed); } public void onRestart(float x, float scrollSpeed) { position.x = x; velocity.x = scrollSpeed; } } OnRestart - Pipe
The onRestart method for a pipe is not much more complicated than for a grass. Add the following method:
public void onRestart(float x, float scrollSpeed) { velocity.x = scrollSpeed; reset(x); } Full example of pipe class:
Pipe.java
package com.kilobolt.GameObjects; import java.util.Random; import com.badlogic.gdx.math.Intersector; import com.badlogic.gdx.math.Rectangle; public class Pipe extends Scrollable { private Random r; private Rectangle skullUp, skullDown, barUp, barDown; public static final int VERTICAL_GAP = 45; public static final int SKULL_WIDTH = 24; public static final int SKULL_HEIGHT = 11; private float groundY; private boolean isScored = false; public Pipe(float x, float y, int width, int height, float scrollSpeed, float groundY) { super(x, y, width, height, scrollSpeed); r = new Random(); skullUp = new Rectangle(); skullDown = new Rectangle(); barUp = new Rectangle(); barDown = new Rectangle(); this.groundY = groundY; } @Override public void update(float delta) { super.update(delta); barUp.set(position.x, position.y, width, height); barDown.set(position.x, position.y + height + VERTICAL_GAP, width, groundY - (position.y + height + VERTICAL_GAP)); skullUp.set(position.x - (SKULL_WIDTH - width) / 2, position.y + height - SKULL_HEIGHT, SKULL_WIDTH, SKULL_HEIGHT); skullDown.set(position.x - (SKULL_WIDTH - width) / 2, barDown.y, SKULL_WIDTH, SKULL_HEIGHT); } @Override public void reset(float newX) { super.reset(newX); height = r.nextInt(90) + 15; isScored = false; } public void onRestart(float x, float scrollSpeed) { velocity.x = scrollSpeed; reset(x); } public Rectangle getSkullUp() { return skullUp; } public Rectangle getSkullDown() { return skullDown; } public Rectangle getBarUp() { return barUp; } public Rectangle getBarDown() { return barDown; } public boolean collides(Bird bird) { if (position.x < bird.getX() + bird.getWidth()) { return (Intersector.overlaps(bird.getBoundingCircle(), barUp) || Intersector.overlaps(bird.getBoundingCircle(), barDown) || Intersector.overlaps(bird.getBoundingCircle(), skullUp) || Intersector .overlaps(bird.getBoundingCircle(), skullDown)); } return false; } public boolean isScored() { return isScored; } public void setScored(boolean b) { isScored = b; } } ! , . GameState GameWorld . restart , restart Bird ScrollHandler , reset Pipe Grass . – , restart .
InputHandler
Our InputHandler should have a reference to the GameWorld object so that it can check the current GameState and handle touch / click correctly. Instead of adding another argument to the constructor, I will change the existing constructor as follows:
public InputHandler(GameWorld myWorld) { this.myWorld = myWorld; myBird = myWorld.getBird(); } - Create a variable in the class:
private GameWorld myWorld; - Do not forget to add import class!
Next we update the touchDown method :
@Override public boolean touchDown(int screenX, int screenY, int pointer, int button) { if (myWorld.isReady()) { myWorld.start(); } myBird.onClick(); if (myWorld.isGameOver()) { // , GameState.READ myWorld.restart(); } return true; } Full class code:
InputHandler.java
package com.kilobolt.ZBHelpers; import com.badlogic.gdx.InputProcessor; import com.kilobolt.GameObjects.Bird; import com.kilobolt.GameWorld.GameWorld; public class InputHandler implements InputProcessor { private Bird myBird; private GameWorld myWorld; // Bird InputHandler . public InputHandler(GameWorld myWorld) { // myBird Bird gameWorld. this.myWorld = myWorld; myBird = myWorld.getBird(); } @Override public boolean touchDown(int screenX, int screenY, int pointer, int button) { if (myWorld.isReady()) { myWorld.start(); } myBird.onClick(); if (myWorld.isGameOver()) { // , GameState.READ myWorld.restart(); } return true; } @Override public boolean keyDown(int keycode) { return false; } @Override public boolean keyUp(int keycode) { return false; } @Override public boolean keyTyped(char character) { return false; } @Override public boolean touchUp(int screenX, int screenY, int pointer, int button) { return false; } @Override public boolean touchDragged(int screenX, int screenY, int pointer) { return false; } @Override public boolean mouseMoved(int screenX, int screenY) { return false; } @Override public boolean scrolled(int amount) { return false; } } Fix GameScreen
Of course, because of our evaporations in the InputHandler constructor , we need to update our GameScreen , or rather, the initialization of the InputHandler.
Change this line:
Gdx.input.setInputProcessor(new InputHandler(world.getBird())); On this:
Gdx.input.setInputProcessor(new InputHandler(world)); Full class example:
GameScreen.java
package com.kilobolt.Screens; import com.badlogic.gdx.Gdx; import com.badlogic.gdx.Screen; import com.kilobolt.GameWorld.GameRenderer; import com.kilobolt.GameWorld.GameWorld; import com.kilobolt.ZBHelpers.InputHandler; public class GameScreen implements Screen { private GameWorld world; private GameRenderer renderer; private float runTime; public GameScreen() { float screenWidth = Gdx.graphics.getWidth(); float screenHeight = Gdx.graphics.getHeight(); float gameWidth = 136; float gameHeight = screenHeight / (screenWidth / gameWidth); int midPointY = (int) (gameHeight / 2); world = new GameWorld(midPointY); renderer = new GameRenderer(world, (int) gameHeight, midPointY); Gdx.input.setInputProcessor(new InputHandler(world)); } @Override public void render(float delta) { runTime += delta; world.update(delta); renderer.render(runTime); } @Override public void resize(int width, int height) { System.out.println("GameScreen - resizing"); } @Override public void show() { System.out.println("GameScreen - show called"); } @Override public void hide() { System.out.println("GameScreen - hide called"); } @Override public void pause() { System.out.println("GameScreen - pause called"); } @Override public void resume() { System.out.println("GameScreen - resume called"); } @Override public void dispose() { // } } Change GameRenderer
We are done with the restart code. Now, when the game starts, it will start in READY status , in which nothing will happen. We have to click on the screen for the game to start. When our bird dies, we will transfer the game to GAMEOVER status , in which we can click on the screen to start the game from the beginning.
So far without buttons, but this is only the beginning!
Now, in order to make the whole process more intuitive, we will make some changes to the GameRenderer, display useful information.
Change the method in the class GameRenderer render as shown below:
GameRenderer.java
package com.kilobolt.GameWorld; import com.badlogic.gdx.Gdx; import com.badlogic.gdx.graphics.Color; import com.badlogic.gdx.graphics.GL20; import com.badlogic.gdx.graphics.OrthographicCamera; import com.badlogic.gdx.graphics.g2d.Animation; import com.badlogic.gdx.graphics.g2d.SpriteBatch; import com.badlogic.gdx.graphics.g2d.TextureRegion; import com.badlogic.gdx.graphics.glutils.ShapeRenderer; import com.badlogic.gdx.graphics.glutils.ShapeRenderer.ShapeType; import com.badlogic.gdx.math.Rectangle; import com.kilobolt.GameObjects.Bird; import com.kilobolt.GameObjects.Grass; import com.kilobolt.GameObjects.Pipe; import com.kilobolt.GameObjects.ScrollHandler; import com.kilobolt.ZBHelpers.AssetLoader; public class GameRenderer { private GameWorld myWorld; private OrthographicCamera cam; private ShapeRenderer shapeRenderer; private SpriteBatch batcher; private int midPointY; private int gameHeight; private Bird bird; private ScrollHandler scroller; private Grass frontGrass, backGrass; private Pipe pipe1, pipe2, pipe3; private TextureRegion bg, grass; private Animation birdAnimation; private TextureRegion birdMid, birdDown, birdUp; private TextureRegion skullUp, skullDown, bar; public GameRenderer(GameWorld world, int gameHeight, int midPointY) { myWorld = world; this.gameHeight = gameHeight; this.midPointY = midPointY; cam = new OrthographicCamera(); cam.setToOrtho(true, 136, gameHeight); batcher = new SpriteBatch(); batcher.setProjectionMatrix(cam.combined); shapeRenderer = new ShapeRenderer(); shapeRenderer.setProjectionMatrix(cam.combined); initGameObjects(); initAssets(); } private void initGameObjects() { bird = myWorld.getBird(); scroller = myWorld.getScroller(); frontGrass = scroller.getFrontGrass(); backGrass = scroller.getBackGrass(); pipe1 = scroller.getPipe1(); pipe2 = scroller.getPipe2(); pipe3 = scroller.getPipe3(); } private void initAssets() { bg = AssetLoader.bg; grass = AssetLoader.grass; birdAnimation = AssetLoader.birdAnimation; birdMid = AssetLoader.bird; birdDown = AssetLoader.birdDown; birdUp = AssetLoader.birdUp; skullUp = AssetLoader.skullUp; skullDown = AssetLoader.skullDown; bar = AssetLoader.bar; } private void drawGrass() { batcher.draw(grass, frontGrass.getX(), frontGrass.getY(), frontGrass.getWidth(), frontGrass.getHeight()); batcher.draw(grass, backGrass.getX(), backGrass.getY(), backGrass.getWidth(), backGrass.getHeight()); } private void drawSkulls() { batcher.draw(skullUp, pipe1.getX() - 1, pipe1.getY() + pipe1.getHeight() - 14, 24, 14); batcher.draw(skullDown, pipe1.getX() - 1, pipe1.getY() + pipe1.getHeight() + 45, 24, 14); batcher.draw(skullUp, pipe2.getX() - 1, pipe2.getY() + pipe2.getHeight() - 14, 24, 14); batcher.draw(skullDown, pipe2.getX() - 1, pipe2.getY() + pipe2.getHeight() + 45, 24, 14); batcher.draw(skullUp, pipe3.getX() - 1, pipe3.getY() + pipe3.getHeight() - 14, 24, 14); batcher.draw(skullDown, pipe3.getX() - 1, pipe3.getY() + pipe3.getHeight() + 45, 24, 14); } private void drawPipes() { batcher.draw(bar, pipe1.getX(), pipe1.getY(), pipe1.getWidth(), pipe1.getHeight()); batcher.draw(bar, pipe1.getX(), pipe1.getY() + pipe1.getHeight() + 45, pipe1.getWidth(), midPointY + 66 - (pipe1.getHeight() + 45)); batcher.draw(bar, pipe2.getX(), pipe2.getY(), pipe2.getWidth(), pipe2.getHeight()); batcher.draw(bar, pipe2.getX(), pipe2.getY() + pipe2.getHeight() + 45, pipe2.getWidth(), midPointY + 66 - (pipe2.getHeight() + 45)); batcher.draw(bar, pipe3.getX(), pipe3.getY(), pipe3.getWidth(), pipe3.getHeight()); batcher.draw(bar, pipe3.getX(), pipe3.getY() + pipe3.getHeight() + 45, pipe3.getWidth(), midPointY + 66 - (pipe3.getHeight() + 45)); } public void render(float runTime) { Gdx.gl.glClearColor(0, 0, 0, 1); Gdx.gl.glClear(GL20.GL_COLOR_BUFFER_BIT); shapeRenderer.begin(ShapeType.Filled); shapeRenderer.setColor(55 / 255.0f, 80 / 255.0f, 100 / 255.0f, 1); shapeRenderer.rect(0, 0, 136, midPointY + 66); shapeRenderer.setColor(111 / 255.0f, 186 / 255.0f, 45 / 255.0f, 1); shapeRenderer.rect(0, midPointY + 66, 136, 11); shapeRenderer.setColor(147 / 255.0f, 80 / 255.0f, 27 / 255.0f, 1); shapeRenderer.rect(0, midPointY + 77, 136, 52); shapeRenderer.end(); batcher.begin(); batcher.disableBlending(); batcher.draw(bg, 0, midPointY + 23, 136, 43); drawGrass(); drawPipes(); batcher.enableBlending(); drawSkulls(); if (bird.shouldntFlap()) { batcher.draw(birdMid, bird.getX(), bird.getY(), bird.getWidth() / 2.0f, bird.getHeight() / 2.0f, bird.getWidth(), bird.getHeight(), 1, 1, bird.getRotation()); } else { batcher.draw(birdAnimation.getKeyFrame(runTime), bird.getX(), bird.getY(), bird.getWidth() / 2.0f, bird.getHeight() / 2.0f, bird.getWidth(), bird.getHeight(), 1, 1, bird.getRotation()); } // ! : if (myWorld.isReady()) { // AssetLoader.shadow.draw(batcher, "Touch me", (136 / 2) - (42), 76); // AssetLoader.font.draw(batcher, "Touch me", (136 / 2) - (42 - 1), 75); } else { if (myWorld.isGameOver()) { AssetLoader.shadow.draw(batcher, "Game Over", 25, 56); AssetLoader.font.draw(batcher, "Game Over", 24, 55); AssetLoader.shadow.draw(batcher, "Try again?", 23, 76); AssetLoader.font.draw(batcher, "Try again?", 24, 75); } String score = myWorld.getScore() + ""; AssetLoader.shadow.draw(batcher, "" + myWorld.getScore(), (136 / 2) - (3 * score.length()), 12); AssetLoader.font.draw(batcher, "" + myWorld.getScore(), (136 / 2) - (3 * score.length() - 1), 11); } batcher.end(); } } Finished Gameplay!


That's it, our gameplay is over. Let's put things in order and implement account management!
Realizing the Best Account
The easy way to store a small amount of data for a game written with LibGDX is to use the Preferences class . This class binds key-value pairs. This means that you can save some key and its corresponding value, and also you can get values by key!
Let's look at an example:
// Preferences Preferences prefs = Gdx.app.getPreferences("PreferenceName"); // 10 "highScore" prefs.putInteger("highScore", 10); prefs.flush(); // Preferences A week later, you try to do:
System.out.println(prefs.getInteger("highScore")); The result will be console output of 10!
So, three important methods that you should know:
- put ...
- get ...
- and flush (to save)
You can save various data types as follows:
putBoolean("soundEnabled", true); // getBoolean("soundEnabled") boolean. putString("playerName", "James"); Let's apply this knowledge to preserve the Best Score.
Open the AssetLoader class.
Create a static variable in the class:
public static Preferences prefs; Inside the load method, add the following lines of code:
// ( ) preferences prefs = Gdx.app.getPreferences("ZombieBird"); // 0 if (!prefs.contains("highScore")) { prefs.putInteger("highScore", 0); } Now we can reach the prefs variable from anywhere in our game! Let's create helper methods that will do the work with preferences inside the AssetsLoader .
Add the following methods:
// hishScore public static void setHighScore(int val) { prefs.putInteger("highScore", val); prefs.flush(); } // hishScore public static int getHighScore() { return prefs.getInteger("highScore"); } Full class example:
AssetLoader.java
package com.kilobolt.ZBHelpers; import com.badlogic.gdx.Gdx; import com.badlogic.gdx.Preferences; import com.badlogic.gdx.audio.Sound; import com.badlogic.gdx.graphics.Texture; import com.badlogic.gdx.graphics.Texture.TextureFilter; import com.badlogic.gdx.graphics.g2d.Animation; import com.badlogic.gdx.graphics.g2d.BitmapFont; import com.badlogic.gdx.graphics.g2d.TextureRegion; public class AssetLoader { public static Texture texture; public static TextureRegion bg, grass; public static Animation birdAnimation; public static TextureRegion bird, birdDown, birdUp; public static TextureRegion skullUp, skullDown, bar; public static Sound dead, flap, coin; public static BitmapFont font, shadow; private static Preferences prefs; public static void load() { texture = new Texture(Gdx.files.internal("data/texture.png")); texture.setFilter(TextureFilter.Nearest, TextureFilter.Nearest); bg = new TextureRegion(texture, 0, 0, 136, 43); bg.flip(false, true); grass = new TextureRegion(texture, 0, 43, 143, 11); grass.flip(false, true); birdDown = new TextureRegion(texture, 136, 0, 17, 12); birdDown.flip(false, true); bird = new TextureRegion(texture, 153, 0, 17, 12); bird.flip(false, true); birdUp = new TextureRegion(texture, 170, 0, 17, 12); birdUp.flip(false, true); TextureRegion[] birds = { birdDown, bird, birdUp }; birdAnimation = new Animation(0.06f, birds); birdAnimation.setPlayMode(Animation.LOOP_PINGPONG); skullUp = new TextureRegion(texture, 192, 0, 24, 14); skullDown = new TextureRegion(skullUp); skullDown.flip(false, true); bar = new TextureRegion(texture, 136, 16, 22, 3); bar.flip(false, true); dead = Gdx.audio.newSound(Gdx.files.internal("data/dead.wav")); flap = Gdx.audio.newSound(Gdx.files.internal("data/flap.wav")); coin = Gdx.audio.newSound(Gdx.files.internal("data/coin.wav")); font = new BitmapFont(Gdx.files.internal("data/text.fnt")); font.setScale(.25f, -.25f); shadow = new BitmapFont(Gdx.files.internal("data/shadow.fnt")); shadow.setScale(.25f, -.25f); // ( ) preferences prefs = Gdx.app.getPreferences("ZombieBird"); if (!prefs.contains("highScore")) { prefs.putInteger("highScore", 0); } } public static void setHighScore(int val) { prefs.putInteger("highScore", val); prefs.flush(); } public static int getHighScore() { return prefs.getInteger("highScore"); } public static void dispose() { texture.dispose(); dead.dispose(); flap.dispose(); coin.dispose(); font.dispose(); shadow.dispose(); } } Let's go back to GameWorld and add the logic for saving / updating the Best Score!
Let's start by adding the fourth enum constant HIGHSCORE :
public enum GameState { READY, RUNNING, GAMEOVER, HIGHSCORE } Let us expand the logic of processing the event of the death of our bird (the update method, where we check the colysis between the bird and the ground). We will simply add a check if our new account is more than the Best Account previously saved, and if so, we will update the Best Account with the new value:
if (Intersector.overlaps(bird.getBoundingCircle(), ground)) { scroller.stop(); bird.die(); bird.decelerate(); currentState = GameState.GAMEOVER; if (score > AssetLoader.getHighScore()) { AssetLoader.setHighScore(score); currentState = GameState.HIGHSCORE; } } HIGHSCORE :
public boolean isHighScore() { return currentState == GameState.HIGHSCORE; } GameRenderer HIGHSCORE gameState , :
UpdateRenderer:
: , :
GameRenderer.java
package com.kilobolt.GameWorld; import com.badlogic.gdx.Gdx; import com.badlogic.gdx.graphics.Color; import com.badlogic.gdx.graphics.GL20; import com.badlogic.gdx.graphics.OrthographicCamera; import com.badlogic.gdx.graphics.g2d.Animation; import com.badlogic.gdx.graphics.g2d.SpriteBatch; import com.badlogic.gdx.graphics.g2d.TextureRegion; import com.badlogic.gdx.graphics.glutils.ShapeRenderer; import com.badlogic.gdx.graphics.glutils.ShapeRenderer.ShapeType; import com.badlogic.gdx.math.Rectangle; import com.kilobolt.GameObjects.Bird; import com.kilobolt.GameObjects.Grass; import com.kilobolt.GameObjects.Pipe; import com.kilobolt.GameObjects.ScrollHandler; import com.kilobolt.ZBHelpers.AssetLoader; public class GameRenderer { private GameWorld myWorld; private OrthographicCamera cam; private ShapeRenderer shapeRenderer; private SpriteBatch batcher; private int midPointY; private int gameHeight; private Bird bird; private ScrollHandler scroller; private Grass frontGrass, backGrass; private Pipe pipe1, pipe2, pipe3; private TextureRegion bg, grass; private Animation birdAnimation; private TextureRegion birdMid, birdDown, birdUp; private TextureRegion skullUp, skullDown, bar; public GameRenderer(GameWorld world, int gameHeight, int midPointY) { myWorld = world; this.gameHeight = gameHeight; this.midPointY = midPointY; cam = new OrthographicCamera(); cam.setToOrtho(true, 136, gameHeight); batcher = new SpriteBatch(); batcher.setProjectionMatrix(cam.combined); shapeRenderer = new ShapeRenderer(); shapeRenderer.setProjectionMatrix(cam.combined); initGameObjects(); initAssets(); } private void initGameObjects() { bird = myWorld.getBird(); scroller = myWorld.getScroller(); frontGrass = scroller.getFrontGrass(); backGrass = scroller.getBackGrass(); pipe1 = scroller.getPipe1(); pipe2 = scroller.getPipe2(); pipe3 = scroller.getPipe3(); } private void initAssets() { bg = AssetLoader.bg; grass = AssetLoader.grass; birdAnimation = AssetLoader.birdAnimation; birdMid = AssetLoader.bird; birdDown = AssetLoader.birdDown; birdUp = AssetLoader.birdUp; skullUp = AssetLoader.skullUp; skullDown = AssetLoader.skullDown; bar = AssetLoader.bar; } private void drawGrass() { batcher.draw(grass, frontGrass.getX(), frontGrass.getY(), frontGrass.getWidth(), frontGrass.getHeight()); batcher.draw(grass, backGrass.getX(), backGrass.getY(), backGrass.getWidth(), backGrass.getHeight()); } private void drawSkulls() { batcher.draw(skullUp, pipe1.getX() - 1, pipe1.getY() + pipe1.getHeight() - 14, 24, 14); batcher.draw(skullDown, pipe1.getX() - 1, pipe1.getY() + pipe1.getHeight() + 45, 24, 14); batcher.draw(skullUp, pipe2.getX() - 1, pipe2.getY() + pipe2.getHeight() - 14, 24, 14); batcher.draw(skullDown, pipe2.getX() - 1, pipe2.getY() + pipe2.getHeight() + 45, 24, 14); batcher.draw(skullUp, pipe3.getX() - 1, pipe3.getY() + pipe3.getHeight() - 14, 24, 14); batcher.draw(skullDown, pipe3.getX() - 1, pipe3.getY() + pipe3.getHeight() + 45, 24, 14); } private void drawPipes() { batcher.draw(bar, pipe1.getX(), pipe1.getY(), pipe1.getWidth(), pipe1.getHeight()); batcher.draw(bar, pipe1.getX(), pipe1.getY() + pipe1.getHeight() + 45, pipe1.getWidth(), midPointY + 66 - (pipe1.getHeight() + 45)); batcher.draw(bar, pipe2.getX(), pipe2.getY(), pipe2.getWidth(), pipe2.getHeight()); batcher.draw(bar, pipe2.getX(), pipe2.getY() + pipe2.getHeight() + 45, pipe2.getWidth(), midPointY + 66 - (pipe2.getHeight() + 45)); batcher.draw(bar, pipe3.getX(), pipe3.getY(), pipe3.getWidth(), pipe3.getHeight()); batcher.draw(bar, pipe3.getX(), pipe3.getY() + pipe3.getHeight() + 45, pipe3.getWidth(), midPointY + 66 - (pipe3.getHeight() + 45)); } public void render(float runTime) { Gdx.gl.glClearColor(0, 0, 0, 1); Gdx.gl.glClear(GL20.GL_COLOR_BUFFER_BIT); shapeRenderer.begin(ShapeType.Filled); shapeRenderer.setColor(55 / 255.0f, 80 / 255.0f, 100 / 255.0f, 1); shapeRenderer.rect(0, 0, 136, midPointY + 66); shapeRenderer.setColor(111 / 255.0f, 186 / 255.0f, 45 / 255.0f, 1); shapeRenderer.rect(0, midPointY + 66, 136, 11); shapeRenderer.setColor(147 / 255.0f, 80 / 255.0f, 27 / 255.0f, 1); shapeRenderer.rect(0, midPointY + 77, 136, 52); shapeRenderer.end(); batcher.begin(); batcher.disableBlending(); batcher.draw(bg, 0, midPointY + 23, 136, 43); drawGrass(); drawPipes(); batcher.enableBlending(); drawSkulls(); if (bird.shouldntFlap()) { batcher.draw(birdMid, bird.getX(), bird.getY(), bird.getWidth() / 2.0f, bird.getHeight() / 2.0f, bird.getWidth(), bird.getHeight(), 1, 1, bird.getRotation()); } else { batcher.draw(birdAnimation.getKeyFrame(runTime), bird.getX(), bird.getY(), bird.getWidth() / 2.0f, bird.getHeight() / 2.0f, bird.getWidth(), bird.getHeight(), 1, 1, bird.getRotation()); } // ! ! if (myWorld.isReady()) { // AssetLoader.shadow.draw(batcher, "Touch me", (136 / 2) - (42), 76); // AssetLoader.font .draw(batcher, "Touch me", (136 / 2) - (42 - 1), 75); } else { if (myWorld.isGameOver() || myWorld.isHighScore()) { if (myWorld.isGameOver()) { AssetLoader.shadow.draw(batcher, "Game Over", 25, 56); AssetLoader.font.draw(batcher, "Game Over", 24, 55); AssetLoader.shadow.draw(batcher, "High Score:", 23, 106); AssetLoader.font.draw(batcher, "High Score:", 22, 105); String highScore = AssetLoader.getHighScore() + ""; AssetLoader.shadow.draw(batcher, highScore, (136 / 2) - (3 * highScore.length()), 128); AssetLoader.font.draw(batcher, highScore, (136 / 2) - (3 * highScore.length() - 1), 127); } else { AssetLoader.shadow.draw(batcher, "High Score!", 19, 56); AssetLoader.font.draw(batcher, "High Score!", 18, 55); } AssetLoader.shadow.draw(batcher, "Try again?", 23, 76); AssetLoader.font.draw(batcher, "Try again?", 24, 75); // integer String String score = myWorld.getScore() + ""; AssetLoader.shadow.draw(batcher, score, (136 / 2) - (3 * score.length()), 12); AssetLoader.font.draw(batcher, score, (136 / 2) - (3 * score.length() - 1), 11); } String score = myWorld.getScore() + ""; AssetLoader.shadow.draw(batcher, "" + myWorld.getScore(), (136 / 2) - (3 * score.length()), 12); AssetLoader.font.draw(batcher, "" + myWorld.getScore(), (136 / 2) - (3 * score.length() - 1), 11); } batcher.end(); } } 
update GameWorld :
public void update(float delta) { switch (currentState) { case READY: updateReady(delta); break; case RUNNING: updateRunning(delta); break; default: break; } } , InputHandler :
if (myWorld.isGameOver() || myWorld.isHighScore()) { // Reset all variables, go to GameState.READ myWorld.restart(); } ! . .
If you are out of the mood to write code yourself, download it from here:
Day 11 - Add support for iOS / Android + SplashScreen, Menu and Tweening
Welcome to Day 11! Now that the Gameplay is ready for us, we will deal with the UI , create additional screens and add transitions using the Tween Engine from Aurelien Ribon . In day 2, I asked you to download the Universal Tween Engine package using the libGDX installer . I forgot to select this option in my project, so I use the libGDX installer again to update my project.

Adding the Tween Engine Library to our libGDX project
To make sure that your Tween Engine library is configured correctly , you need to check the core project in Eclipse. You should have these two files, which are highlighted in the image below:

If your project includes these files, then you are a happy person and you are fine! If not, then we will need to add them using the libGDX installer. To do this, follow these steps (or simply download the day_11_starting.zip file at the end of this section):
- Find where your core project is physically located . You can find out by clicking the right mouse button (Control + click on Mac) on the project and selecting Properties . Remember the value in the Location .
- Open gdx-setup-ui.jar , as we did in Day 2. If necessary, download this file from here.
- Specify the path to the core project as shown in the picture below.
- Make sure the “Universal Tween Engine” option is selected.

- On the right, click "Open the update screen"
- You should see a screen like the image below. Click Launch!
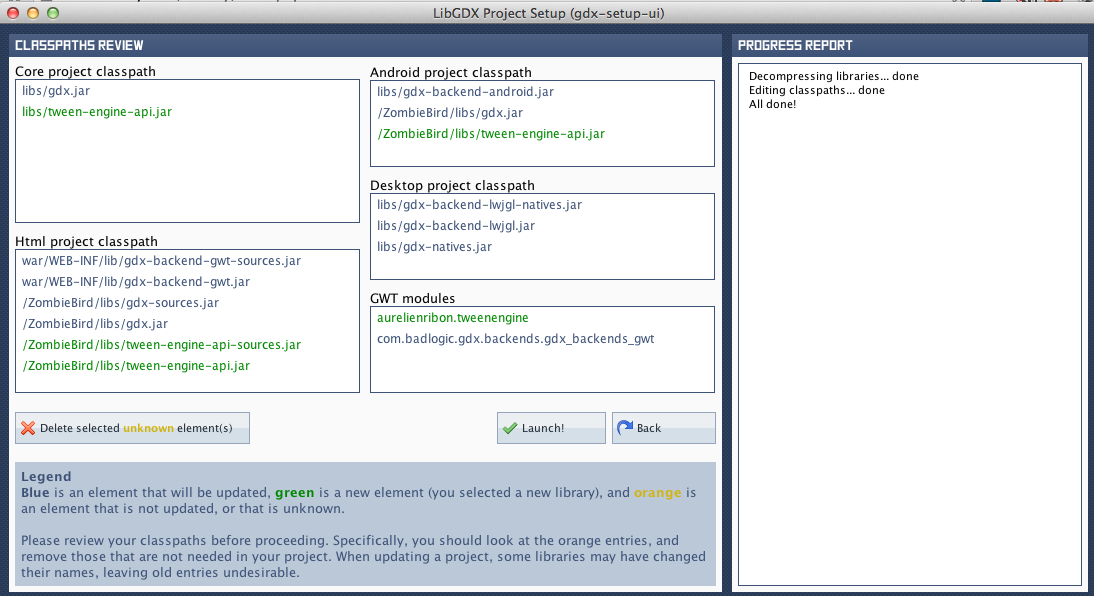


That's all. Now our Eclipse project can use tween-engine-api .
Updated source code
Setting up an Android project
Now we will set up our Android project, so that you can test the game on Android devices. Open the ZombieGame-android project .
- .
, res -> drawable-hdpi . ic_launcher.png , , : ic_launcher.png
 - .
libGDX – landscape . portrait . AndroidManifest.xml :android:screenOrientation="landscape"android:screenOrientation="portrait"
- , .
values -> string.xml :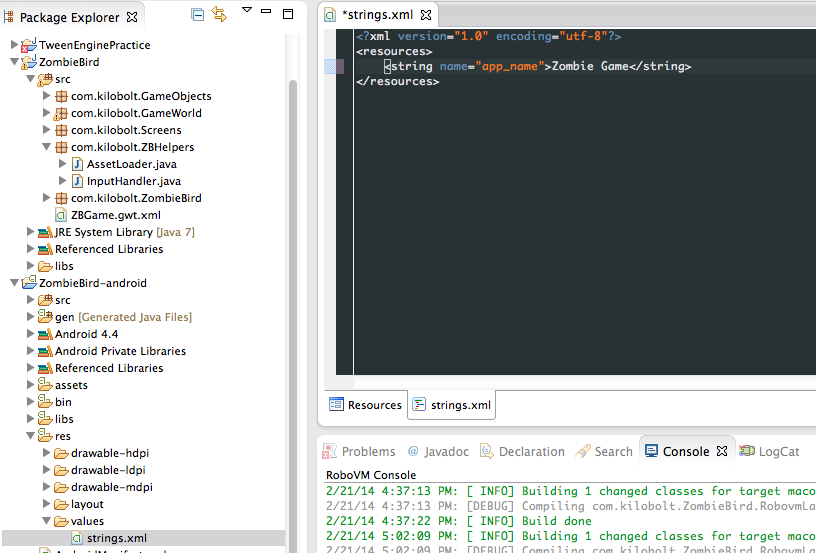


Well, now our Android project is ready! You can play with the project on your mobile device or in a virtual environment by running the project as an Android application .
Setting up an iOS project
iOS Intel-based Mac . , RoboVM . http://www.robovm.org/docs#start JDK 7, XCode, RoboVM Eclipse.
RoboVM Eclipse, Help -> Install New Software :
download.robovm.org/eclipse
, Eclipse.
, XCode.
, , Eclipse JDK 7. Eclipse JDK 7:


Restart Eclipse again.
You can change your icons in the data folder . It stores icons for various screen sizes, according to the Apple Human Interface . Read more here .
When you launch a mobile application on iOS, the default image for the application is displayed, which creates an application for quick loading. You can also add a default image to the data folder .

Next, change the screen orientation. Open the Info.plist.xml file . Find the following keys:
<key>UISupportedInterfaceOrientations</key> <array> <string>UIInterfaceOrientationLandscapeLeft</string> <string>UIInterfaceOrientationLandscapeRight</string> </array> <key>UISupportedInterfaceOrientations~ipad</key> <array> <string>UIInterfaceOrientationLandscapeLeft</string> <string>UIInterfaceOrientationLandscapeRight</string> </array> And change them to this:
<key>UISupportedInterfaceOrientations</key> <array> <string>UIInterfaceOrientationPortrait</string> </array> <key>UISupportedInterfaceOrientations~ipad</key> <array> <string>UIInterfaceOrientationPortrait</string> </array> It remains only to change the name of the application. Open the file robovm.properties and make the following changes:
#Fri May 31 13:01:40 CEST 2013 app.version=1.0 app.id=com.kilobolt.ZombieBird app.main.kilobolt.ZombieBird.RobovmLauncher app.executable=ZBGame app.build=1 app.name=Zombie Bird Now you can run your application as an iPhone Simulator Application . This process will take a long time, have patience.

As soon as you launch your app, it should load in your iOS simulator as shown below! If you see the libGDX image, this is the default image, so everything is fine.


Download updated image files:
 logo.png texture.png
SimpleButton object
Create a new package named com.kilobolt.ui . Inside, create a new class SimpleButton . We will use it for a simple UI. Review the code below, it is clear without further explanation.
package com.kilobolt.ui; import com.badlogic.gdx.graphics.g2d.SpriteBatch; import com.badlogic.gdx.graphics.g2d.TextureRegion; import com.badlogic.gdx.math.Rectangle; public class SimpleButton { private float x, y, width, height; private TextureRegion buttonUp; private TextureRegion buttonDown; private Rectangle bounds; private boolean isPressed = false; public SimpleButton(float x, float y, float width, float height, TextureRegion buttonUp, TextureRegion buttonDown) { this.x = x; this.y = y; this.width = width; this.height = height; this.buttonUp = buttonUp; this.buttonDown = buttonDown; bounds = new Rectangle(x, y, width, height); } public boolean isClicked(int screenX, int screenY) { return bounds.contains(screenX, screenY); } public void draw(SpriteBatch batcher) { if (isPressed) { batcher.draw(buttonDown, x, y, width, height); } else { batcher.draw(buttonUp, x, y, width, height); } } public boolean isTouchDown(int screenX, int screenY) { if (bounds.contains(screenX, screenY)) { isPressed = true; return true; } return false; } public boolean isTouchUp(int screenX, int screenY) { // touchUp . if (bounds.contains(screenX, screenY) && isPressed) { isPressed = false; return true; } // , , . isPressed = false; return false; } } Update AssetLoader
Since we updated the old texture and added a new image, we need to make these changes to our AssetLoader :
AssetLoader.java
package com.kilobolt.ZBHelpers; import com.badlogic.gdx.Gdx; import com.badlogic.gdx.Preferences; import com.badlogic.gdx.audio.Sound; import com.badlogic.gdx.graphics.Texture; import com.badlogic.gdx.graphics.Texture.TextureFilter; import com.badlogic.gdx.graphics.g2d.Animation; import com.badlogic.gdx.graphics.g2d.BitmapFont; import com.badlogic.gdx.graphics.g2d.TextureRegion; public class AssetLoader { public static Texture texture, logoTexture; public static TextureRegion logo, zbLogo, bg, grass, bird, birdDown, birdUp, skullUp, skullDown, bar, playButtonUp, playButtonDown; public static Animation birdAnimation; public static Sound dead, flap, coin; public static BitmapFont font, shadow; private static Preferences prefs; public static void load() { logoTexture = new Texture(Gdx.files.internal("data/logo.png")); logoTexture.setFilter(TextureFilter.Linear, TextureFilter.Linear); logo = new TextureRegion(logoTexture, 0, 0, 512, 114); texture = new Texture(Gdx.files.internal("data/texture.png")); texture.setFilter(TextureFilter.Nearest, TextureFilter.Nearest); playButtonUp = new TextureRegion(texture, 0, 83, 29, 16); playButtonDown = new TextureRegion(texture, 29, 83, 29, 16); playButtonUp.flip(false, true); playButtonDown.flip(false, true); zbLogo = new TextureRegion(texture, 0, 55, 135, 24); zbLogo.flip(false, true); bg = new TextureRegion(texture, 0, 0, 136, 43); bg.flip(false, true); grass = new TextureRegion(texture, 0, 43, 143, 11); grass.flip(false, true); birdDown = new TextureRegion(texture, 136, 0, 17, 12); birdDown.flip(false, true); bird = new TextureRegion(texture, 153, 0, 17, 12); bird.flip(false, true); birdUp = new TextureRegion(texture, 170, 0, 17, 12); birdUp.flip(false, true); TextureRegion[] birds = { birdDown, bird, birdUp }; birdAnimation = new Animation(0.06f, birds); birdAnimation.setPlayMode(Animation.LOOP_PINGPONG); skullUp = new TextureRegion(texture, 192, 0, 24, 14); skullDown = new TextureRegion(skullUp); skullDown.flip(false, true); bar = new TextureRegion(texture, 136, 16, 22, 3); bar.flip(false, true); dead = Gdx.audio.newSound(Gdx.files.internal("data/dead.wav")); flap = Gdx.audio.newSound(Gdx.files.internal("data/flap.wav")); coin = Gdx.audio.newSound(Gdx.files.internal("data/coin.wav")); font = new BitmapFont(Gdx.files.internal("data/text.fnt")); font.setScale(.25f, -.25f); shadow = new BitmapFont(Gdx.files.internal("data/shadow.fnt")); shadow.setScale(.25f, -.25f); prefs = Gdx.app.getPreferences("ZombieBird"); if (!prefs.contains("highScore")) { prefs.putInteger("highScore", 0); } } public static void setHighScore(int val) { prefs.putInteger("highScore", val); prefs.flush(); } public static int getHighScore() { return prefs.getInteger("highScore"); } public static void dispose() { texture.dispose(); dead.dispose(); flap.dispose(); coin.dispose(); font.dispose(); shadow.dispose(); } } Tweenengine
We added the Tween Engine library to our project. Let's see why it is needed.
Tween Engine allows you to perform mathematical interpolation between the first value and the second.
For example, we have a float variable x with a value of 0. I want to exponentially change this value to 1 (gradually increasing from 0 to 1 as the rate of change increases). Let's do it in just 2.8 seconds.
This is exactly what Tween Engine can do.
In a general sense, the Tween Engine works as follows:
You have a class Point, whose default values are:
float x = 0;
float y = 0;
To use the Tween Engine, to interpolate mathematically x to 1, and y to 5, you will need to create a TweenAccessor named PointAccessor .
This class will have two of your methods. The first method is getter. It gets all the parameters you want to change in the Point object and stores them inside the array.
Next, the Tween Engine will get these values and change them. The modified values will be obtained from the second setter method, in which you can pass to your Point object.
Let's take an example.
Create a new package and name it com.kilobolt.TweenAccessors and create the class SpriteAccessor :
package com.kilobolt.TweenAccessors; import aurelienribon.tweenengine.TweenAccessor; import com.badlogic.gdx.graphics.g2d.Sprite; public class SpriteAccessor implements TweenAccessor<Sprite> { public static final int ALPHA = 1; @Override public int getValues(Sprite target, int tweenType, float[] returnValues) { switch (tweenType) { case ALPHA: returnValues[0] = target.getColor().a; return 1; default: return 0; } } @Override public void setValues(Sprite target, int tweenType, float[] newValues) { switch (tweenType) { case ALPHA: target.setColor(1, 1, 1, newValues[0]); break; } } } The class above is the implementation of TweenAccessor for the class Sprite . As I mentioned earlier, any classes that you want to modify using TweenEngine should have their own Accessor.
Our TweenAccessor changes only one value (transparency). If we need to change more parameters, we will create more constants to designate other parameters that our Accessor is capable of changing (for example, the angle of rotation).
All TweenAccessors should have two methods: getValues and setValues , each of which is aimed at a specific class for changes, in our case it is Sprite.
TweenAccessor : 1. , . Tween Engine . 2. , .
, :
1. getValues , , Sprite returnValues. , returnValues:
returnValues[0] Further, this value will be changed by the automaton using the TweenEngine logic.
2. After this magic, the changed value is passed to the setValues method (in the same order as you left in the getValues method). Anything you put in returnValues [0] is now available in newValues [0] . Then you simply pass this value to an object of type Sprite.
These methods are called automatically. You need to pass only the initial value, and the value to which it is necessary to lead. I think everything written will make more sense when we see Accessor in action.
Create a new SplashScreen class inside com.kilobolt.Screens as shown below:
SplashScreen.java
package com.kilobolt.Screens; import aurelienribon.tweenengine.BaseTween; import aurelienribon.tweenengine.Tween; import aurelienribon.tweenengine.TweenCallback; import aurelienribon.tweenengine.TweenEquations; import aurelienribon.tweenengine.TweenManager; import com.badlogic.gdx.Gdx; import com.badlogic.gdx.Screen; import com.badlogic.gdx.graphics.GL10; import com.badlogic.gdx.graphics.g2d.Sprite; import com.badlogic.gdx.graphics.g2d.SpriteBatch; import com.kilobolt.TweenAccessors.SpriteAccessor; import com.kilobolt.ZBHelpers.AssetLoader; import com.kilobolt.ZombieBird.ZBGame; public class SplashScreen implements Screen { private TweenManager manager; private SpriteBatch batcher; private Sprite sprite; private ZBGame game; public SplashScreen(ZBGame game) { this.game = game; } @Override public void show() { sprite = new Sprite(AssetLoader.logo); sprite.setColor(1, 1, 1, 0); float width = Gdx.graphics.getWidth(); float height = Gdx.graphics.getHeight(); float desiredWidth = width * .7f; float scale = desiredWidth / sprite.getWidth(); sprite.setSize(sprite.getWidth() * scale, sprite.getHeight() * scale); sprite.setPosition((width / 2) - (sprite.getWidth() / 2), (height / 2) - (sprite.getHeight() / 2)); setupTween(); batcher = new SpriteBatch(); } private void setupTween() { Tween.registerAccessor(Sprite.class, new SpriteAccessor()); manager = new TweenManager(); TweenCallback cb = new TweenCallback() { @Override public void onEvent(int type, BaseTween<?> source) { game.setScreen(new GameScreen()); } }; Tween.to(sprite, SpriteAccessor.ALPHA, .8f).target(1) .ease(TweenEquations.easeInOutQuad).repeatYoyo(1, .4f) .setCallback(cb).setCallbackTriggers(TweenCallback.COMPLETE) .start(manager); } @Override public void render(float delta) { manager.update(delta); Gdx.gl.glClearColor(1, 1, 1, 1); Gdx.gl.glClear(GL10.GL_COLOR_BUFFER_BIT); batcher.begin(); sprite.draw(batcher); batcher.end(); } @Override public void resize(int width, int height) { } @Override public void hide() { } @Override public void pause() { } @Override public void resume() { } @Override public void dispose() { } } Change ZBGame
, SplashScreen , GameScreen ZBGame , SplashScreen, GameScreen. ZBGame :
package com.kilobolt.ZombieBird; import com.badlogic.gdx.Game; import com.kilobolt.Screens.SplashScreen; import com.kilobolt.ZBHelpers.AssetLoader; public class ZBGame extends Game { @Override public void create() { AssetLoader.load(); setScreen(new SplashScreen(this)); } @Override public void dispose() { super.dispose(); AssetLoader.dispose(); } } SpashScreen.
setupTween , .
privateTween.registerAccessor(Sprite.class, new SpriteAccessor()); 1. Accessor. , , « Sprite Tween Engine. Accessor, ( getValues setValues)».
manager = new TweenManager(); 2. Tween Engine , TweenManager, render delta. SpriteAccessor.
TweenCallback cb = new TweenCallback() { @Override public void onEvent(int type, BaseTween<?> source) { game.setScreen(new GameScreen()); } }; 3. TweenCallback , , Tweening . TweenCallback cb , onEvent ( , Tweening ), GameScreen.
, , . logo , 0, 1 (100%) 0.
:
Tween.to(sprite, SpriteAccessor.ALPHA, .8f).target(1).ease(TweenEquations.easeInOutQuad).repeatYoyo(1, .4f) .setCallback(cb).setCallbackTriggers(TweenCallback.COMPLETE) .start(manager); Tween.to(sprite, SpriteAccessor.ALPHA, .8f).target(1) - We want to change our sprite object using tweenType ALPHA from our SpriteAccessor. We want this operation to last .8 seconds. We want to change the starting value (this is specified in the SpriteAccessor class) to a new value of 1.
.ease(TweenEquations.easeInOutQuad).repeatYoyo(1, .4f) - We want to use quadratic interpolation (you will see what this means), and repeat this action once as Yoyo (for .4 seconds between repetitions).
.setCallback(cb).setCallbackTriggers(TweenCallback.COMPLETE) - Use the callback that we previously created and named as cb , and notify it when Tweening is over.
.start(manager); - Finally, we indicate which manager will do all this work.
Now go to the render method and see what the manager is doing and execute your code.
Perhaps this is very confusing! And it's hard to understand all this right away, but you just have to experiment. Before continuing, I advise you to play with various options and effects.
We need more TweenAccessors
Now that you know how TweenAccessors works, create two new classes inside the com.kilobolt.TweenAccessors package .
The first class is the Value class, which will be a wrapper for float variables. We will use the class for this, because only objects can be used in the Tween Engine (with primitives it will not work). So, to change the float, we need a class for this.
package com.kilobolt.TweenAccessors; public class Value { private float val = 1; public float getValue() { return val; } public void setValue(float newVal) { val = newVal; } } The ValueAccessor class helps us change the val variable in the Value class:
package com.kilobolt.TweenAccessors; import aurelienribon.tweenengine.TweenAccessor; public class ValueAccessor implements TweenAccessor<Value> { @Override public int getValues(Value target, int tweenType, float[] returnValues) { returnValues[0] = target.getValue(); return 1; } @Override public void setValues(Value target, int tweenType, float[] newValues) { target.setValue(newValues[0]); } } ValueAccessor will be used when we want to interpol a float variable. For example, if we want to make a flash on the screen by changing the transparency of the square, we will create a new Value object and transfer it to our ValueAccessor for processing. In fact, we use this logic to smoothly transition from SpalshScreen to GameScreen.
Let's make a few changes to our GameScreen class, which consists of: InputHandler, GameWorld, and GameRenderer.
In order not to stretch Day 11 to three separate lessons, I will explain only the main changes in the code. In most cases, the changes are easy and understandable, and you will definitely understand everything when you experiment.
Let's start with changes to the InputHandler class:
InputHandler.java
package com.kilobolt.ZBHelpers; import java.util.ArrayList; import java.util.List; import com.badlogic.gdx.Input.Keys; import com.badlogic.gdx.InputProcessor; import com.kilobolt.GameObjects.Bird; import com.kilobolt.GameWorld.GameWorld; import com.kilobolt.ui.SimpleButton; public class InputHandler implements InputProcessor { private Bird myBird; private GameWorld myWorld; private List<SimpleButton> menuButtons; private SimpleButton playButton; private float scaleFactorX; private float scaleFactorY; public InputHandler(GameWorld myWorld, float scaleFactorX, float scaleFactorY) { this.myWorld = myWorld; myBird = myWorld.getBird(); int midPointY = myWorld.getMidPointY(); this.scaleFactorX = scaleFactorX; this.scaleFactorY = scaleFactorY; menuButtons = new ArrayList<SimpleButton>(); playButton = new SimpleButton( 136 / 2 - (AssetLoader.playButtonUp.getRegionWidth() / 2), midPointY + 50, 29, 16, AssetLoader.playButtonUp, AssetLoader.playButtonDown); menuButtons.add(playButton); } @Override public boolean touchDown(int screenX, int screenY, int pointer, int button) { screenX = scaleX(screenX); screenY = scaleY(screenY); System.out.println(screenX + " " + screenY); if (myWorld.isMenu()) { playButton.isTouchDown(screenX, screenY); } else if (myWorld.isReady()) { myWorld.start(); } myBird.onClick(); if (myWorld.isGameOver() || myWorld.isHighScore()) { myWorld.restart(); } return true; } @Override public boolean touchUp(int screenX, int screenY, int pointer, int button) { screenX = scaleX(screenX); screenY = scaleY(screenY); if (myWorld.isMenu()) { if (playButton.isTouchUp(screenX, screenY)) { myWorld.ready(); return true; } } return false; } @Override public boolean keyDown(int keycode) { if (keycode == Keys.SPACE) { if (myWorld.isMenu()) { myWorld.ready(); } else if (myWorld.isReady()) { myWorld.start(); } myBird.onClick(); if (myWorld.isGameOver() || myWorld.isHighScore()) { myWorld.restart(); } } return false; } @Override public boolean keyUp(int keycode) { return false; } @Override public boolean keyTyped(char character) { return false; } @Override public boolean touchDragged(int screenX, int screenY, int pointer) { return false; } @Override public boolean mouseMoved(int screenX, int screenY) { return false; } @Override public boolean scrolled(int amount) { return false; } private int scaleX(int screenX) { return (int) (screenX / scaleFactorX); } private int scaleY(int screenY) { return (int) (screenY / scaleFactorY); } public List<SimpleButton> getMenuButtons() { return menuButtons; } } The big change for InputHandler is that we will generate buttons here. This is not the best way, but since the buttons depend closely on the input, I created them here.
The role of InputHandler is to create buttons and handle interactions with them, as shown above.
I also created methods by which we will scale the touches (which now depend on the screen size) to the size of our screen, regardless of the width and height of the game world. Now, touch coordinates will be translated as GameWorld coordinates.
I also added the ability to use Spacebar (Spacebar) for those who want to use the keyboard.
In order for our changes to work, we need to update the GameScreen class. These changes are too small, so try to notice them yourself :) (Note the modified call renderer.render () ).
GameScreen.java
package com.kilobolt.Screens; import com.badlogic.gdx.Gdx; import com.badlogic.gdx.Screen; import com.kilobolt.GameWorld.GameRenderer; import com.kilobolt.GameWorld.GameWorld; import com.kilobolt.ZBHelpers.InputHandler; public class GameScreen implements Screen { private GameWorld world; private GameRenderer renderer; private float runTime; public GameScreen() { float screenWidth = Gdx.graphics.getWidth(); float screenHeight = Gdx.graphics.getHeight(); float gameWidth = 136; float gameHeight = screenHeight / (screenWidth / gameWidth); int midPointY = (int) (gameHeight / 2); world = new GameWorld(midPointY); Gdx.input.setInputProcessor(new InputHandler(world, screenWidth / gameWidth, screenHeight / gameHeight)); renderer = new GameRenderer(world, (int) gameHeight, midPointY); } @Override public void render(float delta) { runTime += delta; world.update(delta); renderer.render(delta, runTime); } @Override public void resize(int width, int height) { } @Override public void show() { } @Override public void hide() { } @Override public void pause() { } @Override public void resume() { } @Override public void dispose() { } } In the GameWorld class, we also made minor changes (note GameState and several new methods):
GameWorld.java
package com.kilobolt.GameWorld; import com.badlogic.gdx.math.Intersector; import com.badlogic.gdx.math.Rectangle; import com.kilobolt.GameObjects.Bird; import com.kilobolt.GameObjects.ScrollHandler; import com.kilobolt.ZBHelpers.AssetLoader; public class GameWorld { private Bird bird; private ScrollHandler scroller; private Rectangle ground; private int score = 0; private float runTime = 0; private int midPointY; private GameState currentState; public enum GameState { MENU, READY, RUNNING, GAMEOVER, HIGHSCORE } public GameWorld(int midPointY) { currentState = GameState.MENU; this.midPointY = midPointY; bird = new Bird(33, midPointY - 5, 17, 12); scroller = new ScrollHandler(this, midPointY + 66); ground = new Rectangle(0, midPointY + 66, 137, 11); } public void update(float delta) { runTime += delta; switch (currentState) { case READY: case MENU: updateReady(delta); break; case RUNNING: updateRunning(delta); break; default: break; } } private void updateReady(float delta) { bird.updateReady(runTime); scroller.updateReady(delta); } public void updateRunning(float delta) { if (delta > .15f) { delta = .15f; } bird.update(delta); scroller.update(delta); if (scroller.collides(bird) && bird.isAlive()) { scroller.stop(); bird.die(); AssetLoader.dead.play(); } if (Intersector.overlaps(bird.getBoundingCircle(), ground)) { scroller.stop(); bird.die(); bird.decelerate(); currentState = GameState.GAMEOVER; if (score > AssetLoader.getHighScore()) { AssetLoader.setHighScore(score); currentState = GameState.HIGHSCORE; } } } public Bird getBird() { return bird; } public int getMidPointY() { return midPointY; } public ScrollHandler getScroller() { return scroller; } public int getScore() { return score; } public void addScore(int increment) { score += increment; } public void start() { currentState = GameState.RUNNING; } public void ready() { currentState = GameState.READY; } public void restart() { currentState = GameState.READY; score = 0; bird.onRestart(midPointY - 5); scroller.onRestart(); currentState = GameState.READY; } public boolean isReady() { return currentState == GameState.READY; } public boolean isGameOver() { return currentState == GameState.GAMEOVER; } public boolean isHighScore() { return currentState == GameState.HIGHSCORE; } public boolean isMenu() { return currentState == GameState.MENU; } public boolean isRunning() { return currentState == GameState.RUNNING; } } It remains to make minor changes to the classes Bird and ScrollHandler:
Bird.java
package com.kilobolt.GameObjects; import com.badlogic.gdx.math.Circle; import com.badlogic.gdx.math.Vector2; import com.kilobolt.ZBHelpers.AssetLoader; public class Bird { private Vector2 position; private Vector2 velocity; private Vector2 acceleration; private float rotation; private int width; private float height; private float originalY; private boolean isAlive; private Circle boundingCircle; public Bird(float x, float y, int width, int height) { this.width = width; this.height = height; this.originalY = y; position = new Vector2(x, y); velocity = new Vector2(0, 0); acceleration = new Vector2(0, 460); boundingCircle = new Circle(); isAlive = true; } public void update(float delta) { velocity.add(acceleration.cpy().scl(delta)); if (velocity.y > 200) { velocity.y = 200; } if (position.y < -13) { position.y = -13; velocity.y = 0; } position.add(velocity.cpy().scl(delta)); boundingCircle.set(position.x + 9, position.y + 6, 6.5f); if (velocity.y < 0) { rotation -= 600 * delta; if (rotation < -20) { rotation = -20; } } if (isFalling() || !isAlive) { rotation += 480 * delta; if (rotation > 90) { rotation = 90; } } } public void updateReady(float runTime) { position.y = 2 * (float) Math.sin(7 * runTime) + originalY; } public boolean isFalling() { return velocity.y > 110; } public boolean shouldntFlap() { return velocity.y > 70 || !isAlive; } public void onClick() { if (isAlive) { AssetLoader.flap.play(); velocity.y = -140; } } public void die() { isAlive = false; velocity.y = 0; } public void decelerate() { acceleration.y = 0; } public void onRestart(int y) { rotation = 0; position.y = y; velocity.x = 0; velocity.y = 0; acceleration.x = 0; acceleration.y = 460; isAlive = true; } public float getX() { return position.x; } public float getY() { return position.y; } public float getWidth() { return width; } public float getHeight() { return height; } public float getRotation() { return rotation; } public Circle getBoundingCircle() { return boundingCircle; } public boolean isAlive() { return isAlive; } } ScrollHandler.java
package com.kilobolt.GameObjects; import com.kilobolt.GameWorld.GameWorld; import com.kilobolt.ZBHelpers.AssetLoader; public class ScrollHandler { private Grass frontGrass, backGrass; private Pipe pipe1, pipe2, pipe3; public static final int SCROLL_SPEED = -59; public static final int PIPE_GAP = 49; private GameWorld gameWorld; public ScrollHandler(GameWorld gameWorld, float yPos) { this.gameWorld = gameWorld; frontGrass = new Grass(0, yPos, 143, 11, SCROLL_SPEED); backGrass = new Grass(frontGrass.getTailX(), yPos, 143, 11, SCROLL_SPEED); pipe1 = new Pipe(210, 0, 22, 60, SCROLL_SPEED, yPos); pipe2 = new Pipe(pipe1.getTailX() + PIPE_GAP, 0, 22, 70, SCROLL_SPEED, yPos); pipe3 = new Pipe(pipe2.getTailX() + PIPE_GAP, 0, 22, 60, SCROLL_SPEED, yPos); } public void updateReady(float delta) { frontGrass.update(delta); backGrass.update(delta); if (frontGrass.isScrolledLeft()) { frontGrass.reset(backGrass.getTailX()); } else if (backGrass.isScrolledLeft()) { backGrass.reset(frontGrass.getTailX()); } } public void update(float delta) { frontGrass.update(delta); backGrass.update(delta); pipe1.update(delta); pipe2.update(delta); pipe3.update(delta); if (pipe1.isScrolledLeft()) { pipe1.reset(pipe3.getTailX() + PIPE_GAP); } else if (pipe2.isScrolledLeft()) { pipe2.reset(pipe1.getTailX() + PIPE_GAP); } else if (pipe3.isScrolledLeft()) { pipe3.reset(pipe2.getTailX() + PIPE_GAP); } if (frontGrass.isScrolledLeft()) { frontGrass.reset(backGrass.getTailX()); } else if (backGrass.isScrolledLeft()) { backGrass.reset(frontGrass.getTailX()); } } public void stop() { frontGrass.stop(); backGrass.stop(); pipe1.stop(); pipe2.stop(); pipe3.stop(); } public boolean collides(Bird bird) { if (!pipe1.isScored() && pipe1.getX() + (pipe1.getWidth() / 2) < bird.getX() + bird.getWidth()) { addScore(1); pipe1.setScored(true); AssetLoader.coin.play(); } else if (!pipe2.isScored() && pipe2.getX() + (pipe2.getWidth() / 2) < bird.getX() + bird.getWidth()) { addScore(1); pipe2.setScored(true); AssetLoader.coin.play(); } else if (!pipe3.isScored() && pipe3.getX() + (pipe3.getWidth() / 2) < bird.getX() + bird.getWidth()) { addScore(1); pipe3.setScored(true); AssetLoader.coin.play(); } return (pipe1.collides(bird) || pipe2.collides(bird) || pipe3 .collides(bird)); } private void addScore(int increment) { gameWorld.addScore(increment); } public Grass getFrontGrass() { return frontGrass; } public Grass getBackGrass() { return backGrass; } public Pipe getPipe1() { return pipe1; } public Pipe getPipe2() { return pipe2; } public Pipe getPipe3() { return pipe3; } public void onRestart() { frontGrass.onRestart(0, SCROLL_SPEED); backGrass.onRestart(frontGrass.getTailX(), SCROLL_SPEED); pipe1.onRestart(210, SCROLL_SPEED); pipe2.onRestart(pipe1.getTailX() + PIPE_GAP, SCROLL_SPEED); pipe3.onRestart(pipe2.getTailX() + PIPE_GAP, SCROLL_SPEED); } } The largest number of changes per capita in the GameRenderer class , but again, they are all minor.
GameRenderer.java
package com.kilobolt.GameWorld; import java.util.List; import aurelienribon.tweenengine.Tween; import aurelienribon.tweenengine.TweenEquations; import aurelienribon.tweenengine.TweenManager; import com.badlogic.gdx.Gdx; import com.badlogic.gdx.graphics.GL10; import com.badlogic.gdx.graphics.OrthographicCamera; import com.badlogic.gdx.graphics.g2d.Animation; import com.badlogic.gdx.graphics.g2d.SpriteBatch; import com.badlogic.gdx.graphics.g2d.TextureRegion; import com.badlogic.gdx.graphics.glutils.ShapeRenderer; import com.badlogic.gdx.graphics.glutils.ShapeRenderer.ShapeType; import com.kilobolt.GameObjects.Bird; import com.kilobolt.GameObjects.Grass; import com.kilobolt.GameObjects.Pipe; import com.kilobolt.GameObjects.ScrollHandler; import com.kilobolt.TweenAccessors.Value; import com.kilobolt.TweenAccessors.ValueAccessor; import com.kilobolt.ZBHelpers.AssetLoader; import com.kilobolt.ZBHelpers.InputHandler; import com.kilobolt.ui.SimpleButton; public class GameRenderer { private GameWorld myWorld; private OrthographicCamera cam; private ShapeRenderer shapeRenderer; private SpriteBatch batcher; private int midPointY; private Bird bird; private ScrollHandler scroller; private Grass frontGrass, backGrass; private Pipe pipe1, pipe2, pipe3; private TextureRegion bg, grass, birdMid, skullUp, skullDown, bar; private Animation birdAnimation; private TweenManager manager; private Value alpha = new Value(); private List<SimpleButton> menuButtons; public GameRenderer(GameWorld world, int gameHeight, int midPointY) { myWorld = world; this.midPointY = midPointY; this.menuButtons = ((InputHandler) Gdx.input.getInputProcessor()) .getMenuButtons(); cam = new OrthographicCamera(); cam.setToOrtho(true, 136, gameHeight); batcher = new SpriteBatch(); batcher.setProjectionMatrix(cam.combined); shapeRenderer = new ShapeRenderer(); shapeRenderer.setProjectionMatrix(cam.combined); initGameObjects(); initAssets(); setupTweens(); } private void setupTweens() { Tween.registerAccessor(Value.class, new ValueAccessor()); manager = new TweenManager(); Tween.to(alpha, -1, .5f).target(0).ease(TweenEquations.easeOutQuad) .start(manager); } private void initGameObjects() { bird = myWorld.getBird(); scroller = myWorld.getScroller(); frontGrass = scroller.getFrontGrass(); backGrass = scroller.getBackGrass(); pipe1 = scroller.getPipe1(); pipe2 = scroller.getPipe2(); pipe3 = scroller.getPipe3(); } private void initAssets() { bg = AssetLoader.bg; grass = AssetLoader.grass; birdAnimation = AssetLoader.birdAnimation; birdMid = AssetLoader.bird; skullUp = AssetLoader.skullUp; skullDown = AssetLoader.skullDown; bar = AssetLoader.bar; } private void drawGrass() { batcher.draw(grass, frontGrass.getX(), frontGrass.getY(), frontGrass.getWidth(), frontGrass.getHeight()); batcher.draw(grass, backGrass.getX(), backGrass.getY(), backGrass.getWidth(), backGrass.getHeight()); } private void drawSkulls() { batcher.draw(skullUp, pipe1.getX() - 1, pipe1.getY() + pipe1.getHeight() - 14, 24, 14); batcher.draw(skullDown, pipe1.getX() - 1, pipe1.getY() + pipe1.getHeight() + 45, 24, 14); batcher.draw(skullUp, pipe2.getX() - 1, pipe2.getY() + pipe2.getHeight() - 14, 24, 14); batcher.draw(skullDown, pipe2.getX() - 1, pipe2.getY() + pipe2.getHeight() + 45, 24, 14); batcher.draw(skullUp, pipe3.getX() - 1, pipe3.getY() + pipe3.getHeight() - 14, 24, 14); batcher.draw(skullDown, pipe3.getX() - 1, pipe3.getY() + pipe3.getHeight() + 45, 24, 14); } private void drawPipes() { batcher.draw(bar, pipe1.getX(), pipe1.getY(), pipe1.getWidth(), pipe1.getHeight()); batcher.draw(bar, pipe1.getX(), pipe1.getY() + pipe1.getHeight() + 45, pipe1.getWidth(), midPointY + 66 - (pipe1.getHeight() + 45)); batcher.draw(bar, pipe2.getX(), pipe2.getY(), pipe2.getWidth(), pipe2.getHeight()); batcher.draw(bar, pipe2.getX(), pipe2.getY() + pipe2.getHeight() + 45, pipe2.getWidth(), midPointY + 66 - (pipe2.getHeight() + 45)); batcher.draw(bar, pipe3.getX(), pipe3.getY(), pipe3.getWidth(), pipe3.getHeight()); batcher.draw(bar, pipe3.getX(), pipe3.getY() + pipe3.getHeight() + 45, pipe3.getWidth(), midPointY + 66 - (pipe3.getHeight() + 45)); } private void drawBirdCentered(float runTime) { batcher.draw(birdAnimation.getKeyFrame(runTime), 59, bird.getY() - 15, bird.getWidth() / 2.0f, bird.getHeight() / 2.0f, bird.getWidth(), bird.getHeight(), 1, 1, bird.getRotation()); } private void drawBird(float runTime) { if (bird.shouldntFlap()) { batcher.draw(birdMid, bird.getX(), bird.getY(), bird.getWidth() / 2.0f, bird.getHeight() / 2.0f, bird.getWidth(), bird.getHeight(), 1, 1, bird.getRotation()); } else { batcher.draw(birdAnimation.getKeyFrame(runTime), bird.getX(), bird.getY(), bird.getWidth() / 2.0f, bird.getHeight() / 2.0f, bird.getWidth(), bird.getHeight(), 1, 1, bird.getRotation()); } } private void drawMenuUI() { batcher.draw(AssetLoader.zbLogo, 136 / 2 - 56, midPointY - 50, AssetLoader.zbLogo.getRegionWidth() / 1.2f, AssetLoader.zbLogo.getRegionHeight() / 1.2f); for (SimpleButton button : menuButtons) { button.draw(batcher); } } private void drawScore() { int length = ("" + myWorld.getScore()).length(); AssetLoader.shadow.draw(batcher, "" + myWorld.getScore(), 68 - (3 * length), midPointY - 82); AssetLoader.font.draw(batcher, "" + myWorld.getScore(), 68 - (3 * length), midPointY - 83); } public void render(float delta, float runTime) { Gdx.gl.glClearColor(0, 0, 0, 1); Gdx.gl.glClear(GL10.GL_COLOR_BUFFER_BIT); shapeRenderer.begin(ShapeType.Filled); shapeRenderer.setColor(55 / 255.0f, 80 / 255.0f, 100 / 255.0f, 1); shapeRenderer.rect(0, 0, 136, midPointY + 66); shapeRenderer.setColor(111 / 255.0f, 186 / 255.0f, 45 / 255.0f, 1); shapeRenderer.rect(0, midPointY + 66, 136, 11); shapeRenderer.setColor(147 / 255.0f, 80 / 255.0f, 27 / 255.0f, 1); shapeRenderer.rect(0, midPointY + 77, 136, 52); shapeRenderer.end(); batcher.begin(); batcher.disableBlending(); batcher.draw(bg, 0, midPointY + 23, 136, 43); drawGrass(); drawPipes(); batcher.enableBlending(); drawSkulls(); if (myWorld.isRunning()) { drawBird(runTime); drawScore(); } else if (myWorld.isReady()) { drawBird(runTime); drawScore(); } else if (myWorld.isMenu()) { drawBirdCentered(runTime); drawMenuUI(); } else if (myWorld.isGameOver()) { drawBird(runTime); drawScore(); } else if (myWorld.isHighScore()) { drawBird(runTime); drawScore(); } batcher.end(); drawTransition(delta); } private void drawTransition(float delta) { if (alpha.getValue() > 0) { manager.update(delta); Gdx.gl.glEnable(GL10.GL_BLEND); Gdx.gl.glBlendFunc(GL10.GL_SRC_ALPHA, GL10.GL_ONE_MINUS_SRC_ALPHA); shapeRenderer.begin(ShapeType.Filled); shapeRenderer.setColor(1, 1, 1, alpha.getValue()); shapeRenderer.rect(0, 0, 136, 300); shapeRenderer.end(); Gdx.gl.glDisable(GL10.GL_BLEND); } } } Of course, there is still a lot of work to improve our UI. And that's how we do it. I will lay out the example code for the finished game as Day 12, this example will include the completed UI. And this will be the end of Section 1, the purpose of which was to copy the behavior of Flappy Bird .
Source code for the day
If you are out of the mood to write code yourself, download it from here:
Day 12 - Final UI and Source Code
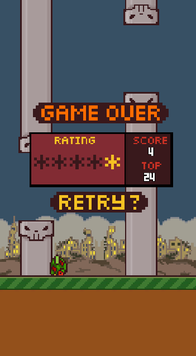 Welcome to Day 12. Below you will find the final version of the code, which includes the following:
- Finished UI
- Added a simplified way to apply transitions.
- Added Game Over screen
- Added rating display in the form of stars on the Game Over screen.
- Added a new sound effect (drop birds)
- Changed logic for sound effects
, 12 . , !
. Eclipse.
, .
Source: https://habr.com/ru/post/243471/
All Articles