Solar system on graphics2d.js
Good {{timeOfDay}}
The canvas theme on Habré somehow subsided ...
Let's remember the solar system on it (the beginning , LibCanvas , Fabric.js ) and write another version? Now on graphics2d.js .
Just in case, let me remind you
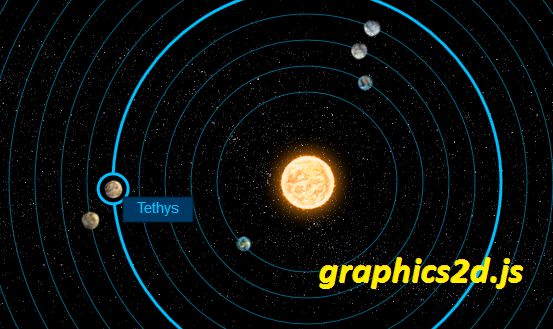
The planets revolve around the star in a clockwise direction. The rotation speed of the nearest planet is 40 seconds per revolution. The time for the rotation of each subsequent planet is 20 seconds longer than the previous one. The composition of the system is random. With each update, the planets occupy a random place in their orbit, from which they start the rotation and the picture for the planet is also random.
')
When you hover the mouse on a planet, it is highlighted with a round frame, the image of the orbit also changes as indicated in the layout.
When you click on the planet, the menu appears. When you hover the mouse on the planet and when you click on it, the animation of this planet stops, the rest of the planets continue to move.
When you hover the mouse into orbit - the orbit is highlighted, the planet does not.
When you hover over a planet or orbit, the mouse cursor changes to a pointer.
Should work: Opera 12+, IE9 +, current versions of Chrome, FF and Safari under the stub.
Note: sprites and some magic numbers are taken from the LibCanvas example, the implementation is likewise slightly different from the TK.
Immediately: View live ; Sources (all in examples.js) .
Getting started
We need 2 plugins: Layers and Sprites.
JSFiddle with connected Graphics2D and plugins .
The first layer will have a background (stars and the Sun) - it will not change at all (you can replace it with a static picture, but once you decide on a canvas ..).
On the second - the orbits of the planets.
On the third - the planet. They change every second, so that only they will be redrawn constantly, without affecting objects on other layers.
Tooltips with the names of the planets will also appear on the third layer. Moreover, it was created during the guidance (we do not want 24 additional iterations every millisecond on invisible objects?).
Getting started: let's declare the dimensions and center of the canvas and the names of the planets. And also the array
planetarray . var width = 840, height = 840, center = [width/2, height/2], planetNames = [ "Selene", "Mimas", "Ares", "Enceladus", "Tethys", "Dione", "Zeus", "Rhea", "Titan", "Janus", "Hyperion", "Iapetus" ], planetarray = []; Create an
app object (container for layers) from a div and 3 layers for the background + sun, orbits, planets and tooltips. // <div id="solarsystem"></div> var app = Graphics2D.app('#solarsystem', width, height), // background = app.layer(0), orbits = app.layer(1), planets = app.layer(2); Fill the first layer - the background and the sun.
background.image('images/sky.png', 0, 0); background.image('images/sun.png', center[0]-50, center[1]-50); // 50,50 -- 
Planets
The class of the planet. It transmits the radius, turnover time and the name of the planet. And put each planet on
planetarray . function Planet(options){ // this.radius = options.radius; this.rotatePerMs = 360 / 100 / options.time; this.time = options.time; this.name = options.name; // this.createOrbit(options); this.createPlanet(options); planetarray.push(this); } Immediately create everything:
for(var i = 0; i < 12; i++){ new Planet({ image: i, // ( - ) radius: 90 + i * 26, // LibCanvas :) time: 40 + i * 20, name: planetNames[i] }); } At this point, the browser will swear for the absence of
createOrbit and createPlanet :) Next.Orbit
We draw on the
orbits layer (it is under the layer with the planets). For each orbit, in addition to itself, we draw the outline of the planet (it appears when hovering and highlights the planet itself, and not the orbit). Stroke will rotate with the planet, appearing only when hovering (I agree, not very economically, but not difficult). And yes, it will be on a layer with planets (). Planet.prototype.createOrbit = function(options){ var orbit = orbits.circle({ cx: center[0], cy: center[1], radius: this.radius, stroke: '1px rgba(0,192,255,0.5)' }); var stroke = planets.circle({ cx: center[0] + this.radius, // cy: center[1], radius: 15, fill: 'black', // ( - orbit.clip(stroke)). stroke: '3px rgba(0,192,255,1)', visible: false // }); // -, Planet orbit.mouseover(this.overOrbit.bind(this)).mouseout(this.out.bind(this)); this.orbit = orbit; this.stroke = stroke; // , ( ) this.startAngle = rand(360); // ( canvas-) stroke.rotate(this.startAngle, center); } Rand function
It is quite elementary, just so that there is no understatement.
function rand(num){ return Math.floor(Math.random() * num); } An interesting question arises - Circle processes events only within itself, and we need to catch only a stroke. You can arrange the orbits on top of each other in descending order so that each overlaps the events of the next, but 1) IMHO, a bit of a crutch :) :) 2) when you hover in the sun, the smallest orbit will be highlighted, and this is not in the TOR.
The solution is quite simple - Graphics2D uses the function of the isPointIn object to see if the cursor is in the object. We can simply redefine it:
orbit.isPointIn = function(x, y){ x -= center[0]; y -= center[1]; return (x*x + y*y) <= Math.pow(this._radius + 20, 2) && ((x*x + y*y) > Math.pow(this._radius - 20, 2)); } 
(if you temporarily comment out the call to createPlanet, because it is not there yet)
Planet
Sprite with planets looks like this:

The size of each planet is 26.26, so that we can create a sprite, automatically split it into frames and select the desired one.
The function createPlanet is passed the frame number, radius, time, name:
Planet.prototype.createPlanet = function(options){ // , // x var sprite = planets.sprite('images/planets.png', center[0] - 13 + options.radius, center[1] - 13); // 13,13 - sprite.autoslice(26, 26); // sprite.frame(options.image); // // sprite.mouseover(this.overPlanet.bind(this)).mouseout(this.out.bind(this)); sprite.click(this.click.bind(this)); sprite.cursor('pointer'); this.sprite = sprite; // sprite.rotate(this.startAngle, center);}} Event handlers are also in the Planet class prototype, four of them are overOrbit, overPlanet (also shows the name of the planet), out and click (turns off / on animation).

Developments
Planet.prototype.overOrbit = function(e){ this.stroke.show(); // this.orbit.stroke('3px rgba(0,192,255,1)'); // } Planet.prototype.overPlanet = function(e){ this.stroke.show(); this.orbit.stroke('3px rgba(0,192,255,1)'); if(this.rect){ // - mouseover this.rect.remove(); this.text.remove(); } this.rect = planets.rect(e.contextX, e.contextY, 70, 25, 'rgb(0,56,100)', '1px rgb(0,30,50)'); this.text = planets.text({ text: this.name, // font: 'Arial 11pt', x: e.contextX + 35, // 35,12 -- , .. y: e.contextY + 12, align: 'center', baseline: 'middle', fill: "rgba(0,192,255,1)" }); } Planet.prototype.out = function(){ this.stroke.hide(); this.orbit.stroke('1px rgba(0,192,255,0.5)'); if(this.text){ this.text.remove(); this.rect.remove(); } } Planet.prototype.click = function(){ if(this.rotatePerMs){ this.rotatePerMs = 0; // - , .. . } else { this.rotatePerMs = 360 / 100 / this.time; } } 
Run!
To animate, we will add a function to the Planet class, which will be triggered once per 1 ms for each planet:
Planet.prototype.update = function(){ this.sprite.rotate(this.rotatePerMs, center); this.stroke.rotate(this.rotatePerMs, center); } Go! :)
window.setInterval(function(){ for(var i = 0; i < 12; i++){ planetarray[i].update(); } }, 1); Total in JSFiddle
Source: https://habr.com/ru/post/243457/
All Articles