Print from Google Apps Script
Part 1. Challenge
Reading the tape on oDesk , I came across an interesting project in my direction (and I track, basically, the tasks to write something, to screw something or another way to torture Google Apps Script or Google Apps application). The client asked to write a script that will send him a selection from Google Spreadsheet at the click of a button. But there was one phrase in the description that hooked me - "I was told that it was impossible to create a script that would print from Google Apps." I have always loved and love “impossible” tasks:
“We ourselves know that she has no solution,” said Junta, immediately bristling. - We want to know how to solve it.
Arkady and Boris Strugatsky. Monday begins on Saturday
The article is intended for readers already familiar with Google Apps Script and related technologies.
Part 2. Torment
The decision was initially obvious - to use the Google Cloud Print service , and to transfer the printed document in PDF form. Studying the API has shown that it is necessary to initially authenticate with the service, then send a print request. So, I set up the service, set up the printers, and started pulling the API. Everything works and is printed (from the client's REST)! It's time to write the script ...
Authentication
... and immediately with all my might I fly on the first pitfall: authentication. Google Cloud Print lacks a simple login, it has its own authentication scope. Games in the OAuth Playground allowed us to select the desired scope (easily guessed, but for some reason did not find it in the documentation) -
https://www.googleapis.com/auth/cloudprint Authentication through oAuth 1.0
function authorize_() { var oauthConfig = UrlFetchApp.addOAuthService("print"); oauthConfig.setConsumerKey("anonymous"); oauthConfig.setConsumerSecret("anonymous"); oauthConfig.setRequestTokenUrl("https://www.google.com/accounts/OAuthGetRequestToken?scope=https://www.googleapis.com/auth/cloudprint"); oauthConfig.setAuthorizationUrl("https://accounts.google.com/OAuthAuthorizeToken"); oauthConfig.setAccessTokenUrl("https://www.google.com/accounts/OAuthGetAccessToken"); } function invokeCloudPrint_(method,payload) { var baseurl = "https://www.google.com/cloudprint/"; var options = { method: "post", muteHttpExceptions: true, oAuthServiceName: "print", oAuthUseToken: "always" }; if (payload != undefined) options.payload = payload; authorize_(); var response = UrlFetchApp.fetch(baseurl+method,options); if (response.getResponseCode() == 403) { Browser.msgBox("Please authorize me to print!"); } return JSON.parse(response.getContentText()); } function test() { var searchAnswer = invokeCloudPrint_("search"); Logger.log(searchAnswer); } After launching the test () function, an authorization request appears, after which everything works fine and the response from Google Cloud Print is visible in the console log. Problem solved? Not really. First, as it turned out, authorization works out only if it is run from the script editor. That is, the user of the copy of the script should go into the script editor and call any function there that will access Google Cloud Print with the authorization request. Secondly,…
')
oAuth 2.0
... oAuth 1.0 survives the last months and after April 20, 2015 support for this protocol is not guaranteed. When you go to oAuth 2.0 authorization in Google services, if necessary, replicate the solution, there is a problem with client_id and redirect. Namely, the authentication request specifies a unique client_id, it corresponds to a specific redirect URL (or several URLs) after authentication and a secret password. In general terms, the redirection process follows the following scenario:
- Sent the user to the authorization request page.
- On the URL redirect received a response with the code.
- Received from the code token for access to services.
The problem arises precisely with the redirect, since every script has a unique identifier in the cloud, and the URL of the redirect must correspond to this identifier. Therefore, in the replicable solution, there are such options:
- explain to each client how to register oAuth 2.0 client_id in the Google Developer Console;
- or each time you have to make a new client_id with the URL of the redirect corresponding to a new copy of the script (link to your account);
- or write a universal script that will generate a token by the parameters passed ... but, again, the script will be tied to a developer account and for any problems with this account the program will simply cease to function for all clients.
All these methods are not very convenient, they are either for themselves (first) or for in-house development (the second, sometimes the third). Unfortunately, the oAuth architecture itself does not imply the possibility that something will change in this respect. I would recommend the third option for a replicable solution or, if the client agrees to provide access to his account / create a neutral new one, the first one.
I will give an example of the code in the first option, since I did not write the third option, I only thought it over, and the second one is no different from the first one; the only difference is in whether the client_id is created — from the client or the developer.
Authentication with oAuth 2.0
It should look like this:

Everything is simple here - we show the user a button that will transfer it to the URL for authorization using oAuth 2.0. Redirect will go back to the function we specified:
Auth.html:
Here, the key is the ScriptApp.newStateToken () function, which allows you to create a parameter for the usercallback method that involves calling the specified function ( getAuthResponse ). When the test () function is launched, a dialog box opens on the tab of the table with a button to go to the authorization page.
After the callback we get into getAuthResponse () . Let's write this method and call some Google Cloud Print method with the received token, displaying the result on the screen:
If everything is done correctly, as a result, after clicking the Authorize button and authorization in the window that opens, the JSON response will be displayed on the screen with a list of connected printers.
Step 1. Create client_id
- Open the Google Developers Console and create a new project.
- Go to APIs & auth -> Credentials , click Create new Client ID.
- Type - Web Application; Authorized JavaScript origins - script.google.com/; Authorized redirect URIs - look at the top of the Script Editor URL of our script, not including / edit and further, adding at the end / usercallback
It should look like this:
Step 2. Authorization code
Everything is simple here - we show the user a button that will transfer it to the URL for authorization using oAuth 2.0. Redirect will go back to the function we specified:
function test() { var html = HtmlService.createTemplateFromFile("Auth").evaluate().setSandboxMode(HtmlService.SandboxMode.NATIVE).setTitle("Test"); SpreadsheetApp.getUi().showModalDialog(html, "Test"); } function getAuthURL() { var options= { client_id : "110560935370-jdoq9cc7tvna2r94va4j9o3310m6ghth.apps.googleusercontent.com", // scope : "https://www.googleapis.com/auth/cloudprint", redirect_uri : "https://script.google.com/macros/d/MDYeOxxxxxxxxxxxxxxxxxxxxxxxxxxxxxxxxxxxxx/usercallback", // state : ScriptApp.newStateToken().withMethod("getAuthResponse").createToken() }; var url = "https://accounts.google.com/o/oauth2/auth?response_type=code&access_type=offline"; for(var i in options) url += "&"+i+"="+encodeURIComponent(options[i]); return url; } Auth.html:
<a href='<?!= getAuthURL(); ?>' target='_blank'> <button>Authorize!</button> </a> Here, the key is the ScriptApp.newStateToken () function, which allows you to create a parameter for the usercallback method that involves calling the specified function ( getAuthResponse ). When the test () function is launched, a dialog box opens on the tab of the table with a button to go to the authorization page.
Step 3. Getting oAuth token and calling Google Cloud Print
After the callback we get into getAuthResponse () . Let's write this method and call some Google Cloud Print method with the received token, displaying the result on the screen:
function getAuthResponse(q) { var options = { method: "post", muteHttpExceptions: true, payload: { code: q.parameter.code, client_id : "110560935370-jdoq9cc7tvna2r94va4j9o3310m6ghth.apps.googleusercontent.com", // client_secret : "xxxxxxxxxxxxxxxxxxxxxxxx", // redirect_uri: "https://script.google.com/macros/d/MDYeOxxxxxxxxxxxxxxxxxxxxxxxxxxxxxxxxxxxx/usercallback", // grant_type: "authorization_code" } } var response = JSON.parse(UrlFetchApp.fetch("https://accounts.google.com/o/oauth2/token", options)); var auth_string = response.token_type+" "+response.access_token; options.method = "get"; options.payload = null; options.headers = {Authorization: auth_string}; response = UrlFetchApp.fetch("https://www.google.com/cloudprint/search",options); return ContentService.createTextOutput(response.getContentText()); } If everything is done correctly, as a result, after clicking the Authorize button and authorization in the window that opens, the JSON response will be displayed on the screen with a list of connected printers.
I will not recommend another method, but for “myself” it will be also easier to perform:
Dirty hack
In general, Google Apps Script supports its own oAuth 2.0 authorization token. You can get it by calling ScriptApp.getOAuthToken () . But in this token, of course, no access rights to Google Cloud Print are provided.
However, there is a way to add these rights to it. To do this, call the authorization request window (if necessary, reset the current token by calling ScriptApp.invalidateAuth () ) and copy the URL of this window (close the window without confirmation!):
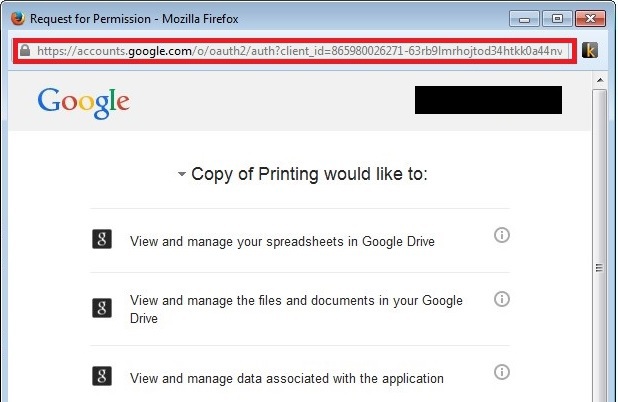
In the copied URL, one of the parameters will look like "scope = https: // + https: //" (the set of permissions required by the script). Just add at the end of this parameter
However, there is a way to add these rights to it. To do this, call the authorization request window (if necessary, reset the current token by calling ScriptApp.invalidateAuth () ) and copy the URL of this window (close the window without confirmation!):
In the copied URL, one of the parameters will look like "scope = https: // + https: //" (the set of permissions required by the script). Just add at the end of this parameter
+ https: //www.googleapis.com/auth/cloudprintand open the modified URL in a new browser tab, then confirm authorization. As a result, the script will get access rights to Google Cloud Print and these rights will remain until the moment of reauthorization (for example, if you reset the token by the above invalidateAuth call).
GCP Web Element
Because of these difficulties with oAuth 2.0, I decided to try GCP Web Element . Not very long digging this topic, since I already had working solutions. In short: the result is completely negative. The fact is that Google Apps Script rewrites the JavaScript code for display in the browser. As a result, GCP Web Element simply does not work. Here is a sample code, creating a gadget does not occur:
GCP Web Element
Code.gs:
Print.html:
function test() { var html = HtmlService.createTemplateFromFile("Print").evaluate().setSandboxMode(HtmlService.SandboxMode.NATIVE).setTitle("Test"); SpreadsheetApp.getUi().showModalDialog(html, "Test"); } Print.html:
<button onclick="alert(window.gadget); window.gadget=new cloudprint.Gadget(); alert(window.gadget);">Initiate Gadget</button> <script src="https://www.google.com/cloudprint/client/cpgadget.js" /> As a result, I stopped at oAuth 1.0, as the most replicable version (although the method works until April 20, however, it is better suited as the first solution - it's easier to explain to the client and the client will not be scared by the complexity of oAuth 2.0).
Content and print
If the Google Apps Script API would work as stated in the documentation, life would undoubtedly be much simpler. Google Spreadsheet (more precisely, the SpreadsheetApp spreadsheet application) supports on-the-fly conversion to pdf:
function test() { var pdf = SpreadsheetApp.getActiveSpreadsheet().getAs("application/pdf"); } The idea was to transfer the selected range to the new Spreadsheet and convert it to pdf. Unfortunately, a bug in Google Apps Script hinders - a PDF document is created, but it is completely empty, so this way disappears. Workarounds:
- Google Cloud Print can print Google Spreadsheet, as it turned out. You can transfer the selection to a new table and issue a print command.
- A more elegant way: in the Google Spreadsheet menu there is an option “Download as ...” with a choice of PDF-format. And this option, in contrast to the conversion by Google Apps Script, works.
In the second version, the browser follows a specially formed link. Let's write a code that turns the transferred Spreadsheet range into PDF:
PDF conversion
function cloudPrint_(strrange,portrait) { var searchAnswer = invokeCloudPrint_("search"); var ss = SpreadsheetApp.getActiveSpreadsheet(); var rangess = ss.getRange(strrange); var gid = rangess.getSheet().getSheetId(); var r1=rangess.getRow()-1; var c1=rangess.getColumn()-1; var r2=r1+rangess.getHeight(); var c2=c1+rangess.getWidth(); var docurl="https://docs.google.com/spreadsheets/d/"+SpreadsheetApp.getActiveSpreadsheet().getId()+"/export?format=pdf&size=0&fzr=false&portrait="+portrait+"&fitw=true&gid="+gid+"&r1="+r1+"&c1="+c1+"&r2="+r2+"&c2="+c2+"&ir=false&ic=false&gridlines=false&printtitle=false&sheetnames=false&pagenum=UNDEFINED&attachment=true"; return docurl; } function test() { Logger.log(cloudPrint_("A1:D12",true)); } Great, URL received! It remains a trifle - upload the file and send the request to Google Cloud Print to enjoy the print. Additionally, you must specify printerid (the id list is returned by the API search method) and xsrf from the previously received response:
Attempt 1. Does not work
function test() { var searchAnswer = invokeCloudPrint_("search"); var url = cloudPrint_("A1:D12",true); var file = UrlFetchApp.fetch(url); var payload = { printerid: printer, xsrf: searchAnswer.xsrf_token, title: rangess.getSheet().getName(), ticket: "{\"version\": \"1.0\",\"print\": {}}", contentType: "application/pdf", content: file.getBlob() }; var printstatus = invokeCloudPrint_("submit",payload); Browser.msgBox(printstatus.message); } But this code does not work, problems arise in two places. First, oAuth 1.0 falls off and does not work when you try to transfer a file (hi Google Apps Script bugs). Secondly, the script authentication context does not match the context of the user who called the script, and there is simply no access to the URL for uploading. It turns out that it is necessary to open spreadsheet at the time of printing for the “outside world” and close it at the end of printing. But then there is no point in intermediate PDF uploading (it still doesn’t work with oAuth), you can immediately send the upload URL to Google Cloud Print:
Attempt 2. Works!
function test() { var searchAnswer = invokeCloudPrint_("search"); var url = cloudPrint_("A1:D12",true); var payload = { printerid: printer, xsrf: searchAnswer.xsrf_token, title: rangess.getSheet().getName(), ticket: "{\"version\": \"1.0\",\"print\": {}}", contentType: "url", content: url }; var drivefile = DriveApp.getFileById(SpreadsheetApp.getActiveSpreadsheet().getId()); var oldaccess = drivefile.getSharingAccess(); var oldpermission = drivefile.getSharingPermission(); drivefile.setSharing(DriveApp.Access.ANYONE_WITH_LINK, DriveApp.Permission.VIEW); var printstatus = invokeCloudPrint_("submit",payload); drivefile.setSharing(oldaccess, oldpermission); Browser.msgBox(printstatus.message); } Part 3. Results
As a result, after traveling through a maze of bugs and problems, the seal worked. I cite the full code with oAuth 1.0 (as a self-contained solution):
Print from Google Apps Script
var contextauth=false; function cloudPrint_(strrange,portrait,size) { var searchAnswer = invokeCloudPrint_("search"); var ss = SpreadsheetApp.getActiveSpreadsheet(); var rangess = ss.getRange(strrange); var gid = rangess.getSheet().getSheetId(); var r1=rangess.getRow()-1; var c1=rangess.getColumn()-1; var r2=r1+rangess.getHeight(); var c2=c1+rangess.getWidth(); portrait = typeof portrait !== 'undefined' ? portrait : true; size = typeof size !== 'undefined' ? size : 0; var docurl="https://docs.google.com/spreadsheets/d/"+SpreadsheetApp.getActiveSpreadsheet().getId()+"/export?format=pdf&size=0&fzr=false&portrait="+portrait+"&fitw=true&gid="+gid+"&r1="+r1+"&c1="+c1+"&r2="+r2+"&c2="+c2+"&ir=false&ic=false&gridlines=false&printtitle=false&sheetnames=false&pagenum=UNDEFINED&attachment=true"; var prop = PropertiesService.getUserProperties(); var printer = prop.getProperty("printer"); if (printer == null) { selectPrinterDlg(strrange,portrait,size); return; } ss.toast("Printing..."); var drivefile = DriveApp.getFileById(SpreadsheetApp.getActiveSpreadsheet().getId()); var oldaccess = drivefile.getSharingAccess(); var oldpermission = drivefile.getSharingPermission(); drivefile.setSharing(DriveApp.Access.ANYONE_WITH_LINK, DriveApp.Permission.VIEW); var payload={ printerid: printer, xsrf: searchAnswer.xsrf_token, title: rangess.getSheet().getName(), ticket: "{\"version\": \"1.0\",\"print\": {}}", contentType: "url", content: docurl }; var printstatus = invokeCloudPrint_("submit",payload); drivefile.setSharing(oldaccess, oldpermission); Browser.msgBox(printstatus.message); } function selectPrinterDlg(strrange,portrait,size) { var searchAnswer = invokeCloudPrint_("search"); var ui = UiApp.createApplication(); var panel = ui.createVerticalPanel(); var lb = ui.createListBox(false).setId('lb').setName('lb'); strrange = typeof strrange !== 'undefined' ? strrange : ""; portrait = typeof portrait !== 'undefined' ? portrait : ""; size = typeof size !== 'undefined' ? size : ""; var hidden1 = ui.createTextBox().setVisible(false).setValue(strrange).setId("range").setName("range"); var hidden2 = ui.createTextBox().setVisible(false).setValue(portrait.toString()).setId("portrait").setName("portrait"); var hidden3 = ui.createTextBox().setVisible(false).setValue(size.toString()).setId("printsize").setName("printsize"); for (var i in searchAnswer.printers) { var connPrinter = searchAnswer.printers[i]; lb.addItem(connPrinter.displayName, connPrinter.id); } var button = ui.createButton("Save"); var handler = ui.createServerHandler("SavePrinter_").addCallbackElement(panel); button.addClickHandler(ui.createClientHandler().forEventSource().setEnabled(false).setText("Saving...")); button.addClickHandler(handler); panel.add(lb).setCellHorizontalAlignment(button, UiApp.HorizontalAlignment.CENTER); panel.add(hidden1); panel.add(hidden2); panel.add(button); ui.add(panel); SpreadsheetApp.getUi().showModalDialog(ui, "Select printer"); return; } function clear() { PropertiesService.getUserProperties().deleteProperty("printer"); ScriptApp.invalidateAuth(); } function SavePrinter_(e) { var ui = UiApp.getActiveApplication(); PropertiesService.getUserProperties().setProperty("printer", e.parameter.lb); ui.close(); if (e.parameter.range != "") cloudPrint_(e.parameter.range,e.parameter.portrait == "true",parseInt(e.parameter.printsize)); return ui; } function invokeCloudPrint_(method,payload) { var baseurl = "https://www.google.com/cloudprint/"; var options = { method: "post", muteHttpExceptions: true, oAuthServiceName: "print", oAuthUseToken: "always" }; if (payload != undefined) options.payload = payload; authorize_(); var response = UrlFetchApp.fetch(baseurl+method,options); if (response.getResponseCode() == 403) { Browser.msgBox("Please authorize me to print!"); } return JSON.parse(response.getContentText()); } function validate() { var searchAnswer = invokeCloudPrint_("search"); } function authorize_() { if (contextauth) return; var oauthConfig = UrlFetchApp.addOAuthService("print"); oauthConfig.setConsumerKey("anonymous"); oauthConfig.setConsumerSecret("anonymous"); oauthConfig.setRequestTokenUrl("https://www.google.com/accounts/OAuthGetRequestToken?scope=https://www.googleapis.com/auth/cloudprint"); oauthConfig.setAuthorizationUrl("https://accounts.google.com/OAuthAuthorizeToken"); oauthConfig.setAccessTokenUrl("https://www.google.com/accounts/OAuthGetAccessToken"); contextauth = true; } function onOpen() { SpreadsheetApp.getUi().createMenu("Printing").addItem("Select printer...", "selectPrinterDlg").addToUi(); } function Print() { cloudPrint_("A1:D12",true); } In addition to the disassembled pieces of code, a dialog (and menu item) for selecting a printer is made. Installation Instructions:
- Pre: set up Google Cloud Print, check test print
- Create a new Google Spreadsheet, write something in the range A1: D12
- Open Script Editor, create a new empty project.
- Copy code, save, call the function validate - to authorize all the necessary rights
- Call the Print function. At the first call on the tab of the table, the printer selection dialog will open.
Source: https://habr.com/ru/post/243421/
All Articles