npm for mere mortals
This article is intended for those who are not very friendly with Node.js, but want to use applications like Grunt, Gulp, and the like. The process of working with these applications involves editing the package.json file and using the npm commands, so understanding how npm works will help you cope with difficulties.
Node.js in 5 minutes
Understanding what Node.js is will help you better deal with npm. In a nutshell, Node.js is an interpreter of the JavaScript language. Node.js itself is a
Let's create a simple program. Create a file helloworld.js and place the following code in it:
console.log("Hello World"); Now open the terminal, go to the folder with your program and execute the
node helloworld.js . Instead of helloworld.js there can be any other file with ')
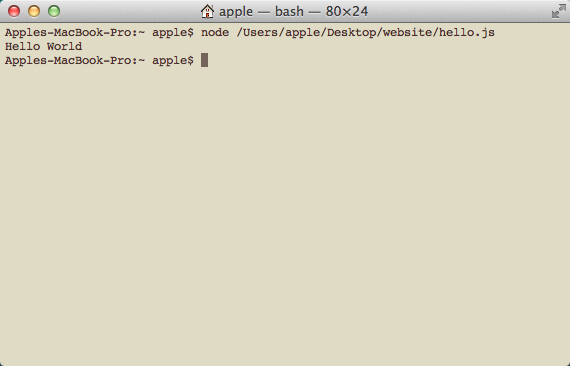
The program will simply output the string “Hello World” to the terminal.
Packages in Node.js
In short, a package in Node.js is one or more
npm (abb. node package manager) is a standard package manager that automatically installs with Node.js. It is used to download packages from the npm cloud server, or to download packages to these servers.
Package.json file
The package.json file contains information about your application: name, version, dependencies, and the like. Any directory that has this file is interpreted as a Node.
The method of using the package.json file depends on whether you are going to download the package or publish it.
Downloading packages
If you want to download a package manually, you do not need to use package.json for this. You can execute the npm command in the terminal with the name of the desired package as an argument of the command, and the package will be automatically downloaded to the current directory. For example:
$ npm install canvas-chart You can also use package.json to download packages. Create the package.json file in your project directory and add the following code to it (we do not specify the name of our package and version,
{ "devDependencies": { "canvas-chart": "~1.3.0" } } Then save the file and execute the
npm install command in the terminal.If you want to use a lot of packages in your project, it is better to specify their package.json instead of downloading them through the terminal each time.
If you use package.json to download packages, it turns out that you are creating a package for downloading packages. I know this is strange, but it works.
If
Package publishing
To publish a package, you will need to collect all the source codes and the package.json file in one directory. Package.json must specify the name, version and dependencies of the package. For example:
{ "name": "canvas-project", "version": "0.1.0", "devDependencies": { "canvas-chart": "~1.3.0" } } Looking at this code, we can say that the
npm publish command.Using the package as an executable file
When npm downloads a package, it searches for the “bin” property in the package.json file. If it finds this property, then it will convert this package into an executable file and place it in the specified directory.
For example, the command below loads
$ npm install grunt-cli Now you know what a package is and how it can depend on other packages. You also learned how npm works with packages. Let's move from theory to practice and install Grunt.
Installing Grunt with npm
Grunt is a
Follow the steps below to install Grunt and get started with it.
- Create a directory for your project. From the server’s point of view, this directory will be the root.
- Open this directory through the terminal.
- Now download and install Grunt. The
-gargument tells npm that the package should be downloaded to the main folder for storing packages, and not to the current directory.$ npm install -g grunt-cli - There is a separate package for each task performed by grunt. For example, you can find packages for minifying JavaScript, pasting files, and so on. You can also create your own packages to perform
any tasks; such packages will be calledGrunt-plugins . Let's install the packages we need in our project directory. To do this, we need to create the package.json file and place the code below in it. Then run thenpm installcommand. She will download the necessary packages. Remember that the directory containing package.json itself is a package.{ "devDependencies": { "grunt-contrib-concat": "~0.3.0" } } - We have installed a package for gluing files. Now we need to describe the task for Grunt. This is done using the Gruntfile.js file. When you run the
gruntcommand in the project directory, Grunt will search for Gruntfile.js to load and execute the tasks. Let's connect our plugin for pasting files and describe a simple task.module.exports = function(grunt) { // 1. grunt.initConfig({ pkg: grunt.file.readJSON('package.json'), concat: { // 2. dist: { src: [ 'js/libs/*.js', // js- libs 'js/global.js' // ], dest: 'js/build/production.js', } } }); // 3. , grunt.loadNpmTasks('grunt-contrib-concat'); // 4. , grunt . grunt.registerTask('default', ['concat']); }; - By this principle, you can download and connect the necessary plugins yourself.
- Now you can run the
gruntcommand in your project directory to gluejs files .
Total
In this article I tried to explain how npm works for newbies in Node.js. You should now be able to install and use different Node.
Source: https://habr.com/ru/post/243335/
All Articles