Creating plug-ins for AutoCAD using the .NET API (Part 2 - Working with Ribbon [Ribbon])
In my last article, I promised that I would write a few more short notes on the development of plug-ins for AutoCAD. On Habré information on this topic is extremely small - perhaps you can add a couple of materials to the clip. In this article I will give an example of creating a new tab on the AutoCAD ribbon with several controls.
When I once started working with a tape, the example I gave here most helped me. Basically, I will rely on him.
In addition, some information can be gathered from this post by Kean Walmsley.
First, let's remember how the ribbon looks in AutoCAD:

In the upper part there is a list of ribbon tabs ( Home, Mesh Modeling, Render ... ). When you select a tab on the ribbon, the controls on this tab are displayed, grouped in panels ( Modeling, Mesh, Solid Editing ... ).
')
Well, let's get started.
This was the last article . The following examples specify .NET Framework 3.5 as the required version of the .NET Framework.
In this case, useful libraries AutoCAD .NET API with the names AcMgd.dll , AcDbMgd.dll and AdWindows.dll (do not forget to disable
From the point of view of the code, everything looks very simple. The AutoCAD .NET API already has classes that are responsible for working with the tape. They are in the
To create a new tab on the ribbon, you must:
We assemble the project, launch AutoCAD, load our plugin with the NETLOAD command, execute the TestCommand command ...

Yes, not the most impressive result. :)
But never mind, a little later we'll make the tab more fun. In the meantime, let's deal with what is already there.
You can use the
There are similar methods for searching the panel (
If the element is successfully found, the above functions will return the corresponding object, otherwise the value
To bind a button click handler, use the
As part of the
Now, after pressing the button, a message box will appear on the screen.

6. Interaction with the drop-down list (
All items in the

To get a decent drop-down list, you can use instances of the
As a result, we will see this:
If necessary, you can use the properties and methods of
When you select the
Result:
The classes available in AutoCAD .NET API, in my opinion, do not have the widest possibilities for customizing their appearance. However, basic things are definitely there.
First, the controls can be placed under each other - this is especially convenient if “narrow” elements like drop-down lists are used.
Secondly, each control has properties that allow you to change its appearance. For example, for the drop-down list, you can set the title and width, for the button - the size (large or small) and signature. In addition, you can add tooltips (in the example it is added for the third button).
Result:

This article comes to an end. Next time I will write about working with layers and simple graphic objects.
public static string disclaimer = " AutoCAD. – ."; Introduction
When I once started working with a tape, the example I gave here most helped me. Basically, I will rely on him.
In addition, some information can be gathered from this post by Kean Walmsley.
First, let's remember how the ribbon looks in AutoCAD:
In the upper part there is a list of ribbon tabs ( Home, Mesh Modeling, Render ... ). When you select a tab on the ribbon, the controls on this tab are displayed, grouped in panels ( Modeling, Mesh, Solid Editing ... ).
')
Well, let's get started.
1. Creating a new plugin project
This was the last article . The following examples specify .NET Framework 3.5 as the required version of the .NET Framework.
You can immediately add a code framework:
using System; using Autodesk.AutoCAD.Runtime; using Autodesk.Windows; namespace MyAutoCADDll { public class Commands : IExtensionApplication { // AutoCAD "TestCommand" [CommandMethod("TestCommand")] public void MyCommand() { } // Initialize() Terminate() , IExtensionApplication public void Initialize() { } public void Terminate() { } } } 2. Adding links to the necessary libraries
In this case, useful libraries AutoCAD .NET API with the names AcMgd.dll , AcDbMgd.dll and AdWindows.dll (do not forget to disable
CopyLocal !). In addition, you need to add links to the three assemblies of .NET itself: Presentation Core , Presentation Framework, and WindowsBase .3. Actually writing code to create a new tab.
From the point of view of the code, everything looks very simple. The AutoCAD .NET API already has classes that are responsible for working with the tape. They are in the
Autodesk.Windows namespace (it contains the AdWindows.dll container).To create a new tab on the ribbon, you must:
- create interface elements;
- group these items into containers;
- create panels on which these containers will be placed;
- create a tab on which these panels will be placed;
- Add the created tab to the AutoCAD feed.
Code:
// AutoCAD «TestCommand» [CommandMethod("TestCommand")] public void MyCommand() { // Autodesk.Windows.RibbonCombo comboBox1 = new RibbonCombo(); comboBox1.Id = "_combobox1"; // Autodesk.Windows.RibbonButton button1 = new Autodesk.Windows.RibbonButton(); button1.Id = "_button1"; // Autodesk.Windows.RibbonPanelSource rbPanelSource = new Autodesk.Windows.RibbonPanelSource(); rbPanelSource.Title = " "; // rbPanelSource.Items.Add(comboBox1); rbPanelSource.Items.Add(new RibbonSeparator()); rbPanelSource.Items.Add(button1); // RibbonPanel rbPanel = new RibbonPanel(); // rbPanel.Source = rbPanelSource; // RibbonTab rbTab = new RibbonTab(); rbTab.Title = " "; rbTab.Id = "HabrRibbon"; // rbTab.Panels.Add(rbPanel); // AutoCAD Autodesk.Windows.RibbonControl rbCtrl = ComponentManager.Ribbon; // rbCtrl.Tabs.Add(rbTab); // ("") rbTab.IsActive = true; } We assemble the project, launch AutoCAD, load our plugin with the NETLOAD command, execute the TestCommand command ...
Yes, not the most impressive result. :)
But never mind, a little later we'll make the tab more fun. In the meantime, let's deal with what is already there.
4. Search for items on the tape
You can use the
ComponentManager.Ribbon.FindTab(string id) method to search for a tab on a ribbon. As an argument, you must specify the tab Id specified when it was created.There are similar methods for searching the panel (
ComponentManager.Ribbon.FindPanel(string id, bool SearchActiveTabOnly) ) and other controls ( ComponentManager.Ribbon.FindItem(string id, bool SearchActiveTabOnly) ).If the element is successfully found, the above functions will return the corresponding object, otherwise the value
null will be returned.5. Handle button processing
To bind a button click handler, use the
CommandHandler class's RibbonButton . In this property, you must specify a method that implements the System.Windows.Input.ICommand interface.As part of the
ICommand interface, the class must implement the CanExecuteChanged event, as well as the CanExecute and Execute functions.Example code with a button click handler:
using System; using Autodesk.AutoCAD.Runtime; using Autodesk.Windows; namespace MyAutoCADDll { public class Commands : IExtensionApplication { // AutoCAD "TestCommand" [CommandMethod("TestCommand")] public void MyCommand() { // Autodesk.Windows.RibbonCombo comboBox1 = new RibbonCombo(); comboBox1.Id = "_combobox1"; // Autodesk.Windows.RibbonButton button1 = new Autodesk.Windows.RibbonButton(); button1.Id = "_button1"; // button1.CommandHandler = new CommandHandler_Button1(); // Autodesk.Windows.RibbonPanelSource rbPanelSource = new Autodesk.Windows.RibbonPanelSource(); rbPanelSource.Title = " "; // rbPanelSource.Items.Add(comboBox1); rbPanelSource.Items.Add(new RibbonSeparator()); rbPanelSource.Items.Add(button1); // RibbonPanel rbPanel = new RibbonPanel(); // rbPanel.Source = rbPanelSource; // RibbonTab rbTab = new RibbonTab(); rbTab.Title = " "; rbTab.Id = "HabrRibbon"; // rbTab.Panels.Add(rbPanel); // AutoCAD Autodesk.Windows.RibbonControl rbCtrl = ComponentManager.Ribbon; // rbCtrl.Tabs.Add(rbTab); // ("") rbTab.IsActive = true; } // Initialize() Terminate() , IExtensionApplication public void Initialize() { } public void Terminate() { } } // public class CommandHandler_Button1 : System.Windows.Input.ICommand { public event EventHandler CanExecuteChanged; public bool CanExecute(object param) { return true; } public void Execute(object parameter) { System.Windows.MessageBox.Show("Habr!"); } } } Nb:
The
In this example, the command is always available, and this state does not change. In my real-life task, too, I never needed to somehow use the first two parameters.)
CanExecuteChanged event notifies users of a team about a possible change in its availability for execution (in short, it works or does not work). The CanExecute function allows CanExecute to find out if a command is available for execution at a given point in time. And the Execute function is actually those actions that the command should perform when it was called.In this example, the command is always available, and this state does not change. In my real-life task, too, I never needed to somehow use the first two parameters.)
Now, after pressing the button, a message box will appear on the screen.
6. Interaction with the drop-down list ( RibbonCombo )
6.1 Adding, Modifying, Deleting List Items
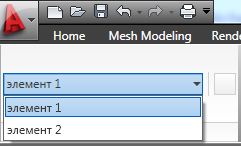
All items in the
RibbonCombo drop-down list RibbonCombo contained in its Items property. It has the type System.Collections.ObjectModel.ObservableCollection , with System.Object acting as the content type. Thus, a collection item can be an object of any class. Unfortunately, if we simply add several text lines to this array, we will not get the desired effect: comboBox1.Items.Add(""); comboBox1.Items.Add(""); comboBox1.Items.Add(""); To get a decent drop-down list, you can use instances of the
RibbonButton class discussed above as its elements: Autodesk.Windows.RibbonButton tempRibBut1 = new Autodesk.Windows.RibbonButton(); tempRibBut1.Id = "_temp_button_1"; tempRibBut1.Text = " 1"; tempRibBut1.ShowText = true; Autodesk.Windows.RibbonButton tempRibBut2 = new Autodesk.Windows.RibbonButton(); tempRibBut2.Id = "_temp_button_2"; tempRibBut2.Text = " 2"; tempRibBut2.ShowText = true; comboBox1.Items.Add(tempRibBut1); comboBox1.Items.Add(tempRibBut2); As a result, we will see this:
If necessary, you can use the properties and methods of
ObservableCollection , in particular:- method
Remove(object item)- to delete the specified item; RemoveAt(int index)methodRemoveAt(int index)- to delete an element at a specified position;Clear()methodClear()- to remove all items from the collection;Countproperty - to get the number of items in the collection.
RibbonButton is stored in its Current property.Nb:
Usually the list item corresponds with some kind of domain object. To be able to quickly determine what a particular list item is associated with, you can use the
Then, when processing the list item, you can see which tag was set:
You can go even further. Since the
After that, you can refer to any property of this object:
In the event of a strong desire to save the line there is an opportunity to write constructions
Of course, in real code you need to make sure that the values obtained are not equal to
Tag property of the RibbonButton class: Autodesk.Windows.RibbonButton tempRibBut1 = new Autodesk.Windows.RibbonButton(); tempRibBut1.Id = "_temp_button_1"; tempRibBut1.Text = " 1"; tempRibBut1.ShowText = true; tempRibBut1.Tag = "elementTag"; // comboBox1.Items.Add(tempRibBut1); Then, when processing the list item, you can see which tag was set:
object obj = comboBox1.Items[0]; string itemTag = (obj as RibbonButton).Tag; // "elementTag" You can go even further. Since the
Tag property is of type System.Object , an object of any class, including one created by the programmer itself, can act as a tag: tempRibBut1.Tag = new MyClass("objectDecription"); After that, you can refer to any property of this object:
object obj = comboBox1.Items[0]; MyClass itemTag = (obj as RibbonButton).Tag as MyClass; string myClassDecription = itemTag.Description; string myClassDecription = ((comboBox1.Items[0] as RibbonButton).Tag as MyClass).Description Of course, in real code you need to make sure that the values obtained are not equal to
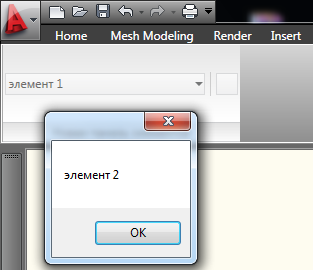
null .6.2 Handling the event of selecting a list item
When you select the
RibbonCombo list RibbonCombo , a CurrentChanged event is generated. Here is a simple example of the event handler: // public static void comboBox1_CurrentChanged(object o, RibbonPropertyChangedEventArgs args) { if (args.NewValue != null) { System.Windows.MessageBox.Show((args.NewValue as RibbonButton).Text); } } Full sample code:
using System; using Autodesk.AutoCAD.Runtime; using Autodesk.Windows; namespace MyAutoCADDll { public class Commands : IExtensionApplication { // AutoCAD "TestCommand" [CommandMethod("TestCommand")] public void MyCommand() { // Autodesk.Windows.RibbonCombo comboBox1 = new RibbonCombo(); comboBox1.Id = "_combobox1"; // Autodesk.Windows.RibbonButton tempRibBut1 = new Autodesk.Windows.RibbonButton(); tempRibBut1.Id = "_temp_button_1"; tempRibBut1.Text = " 1"; tempRibBut1.ShowText = true; tempRibBut1.Tag = "btn1"; Autodesk.Windows.RibbonButton tempRibBut2 = new Autodesk.Windows.RibbonButton(); tempRibBut2.Id = "_temp_button_2"; tempRibBut2.Text = " 2"; tempRibBut2.ShowText = true; tempRibBut2.Tag = "btn2"; comboBox1.Items.Add(tempRibBut1); comboBox1.Items.Add(tempRibBut2); // comboBox1.CurrentChanged += comboBox1_CurrentChanged; // Autodesk.Windows.RibbonButton button1 = new Autodesk.Windows.RibbonButton(); button1.Id = "_button1"; // button1.CommandHandler = new CommandHandler_Button1(); // Autodesk.Windows.RibbonPanelSource rbPanelSource = new Autodesk.Windows.RibbonPanelSource(); rbPanelSource.Title = " "; // rbPanelSource.Items.Add(comboBox1); rbPanelSource.Items.Add(new RibbonSeparator()); rbPanelSource.Items.Add(button1); // RibbonPanel rbPanel = new RibbonPanel(); // rbPanel.Source = rbPanelSource; // RibbonTab rbTab = new RibbonTab(); rbTab.Title = " "; rbTab.Id = "HabrRibbon"; // rbTab.Panels.Add(rbPanel); // AutoCAD Autodesk.Windows.RibbonControl rbCtrl = ComponentManager.Ribbon; // rbCtrl.Tabs.Add(rbTab); // ("") rbTab.IsActive = true; } // public static void comboBox1_CurrentChanged(object o, RibbonPropertyChangedEventArgs args) { if (args.NewValue != null) { System.Windows.MessageBox.Show((args.NewValue as RibbonButton).Text); } } // Initialize() Terminate() , IExtensionApplication public void Initialize() { } public void Terminate() { } } // public class CommandHandler_Button1 : System.Windows.Input.ICommand { public event EventHandler CanExecuteChanged; public bool CanExecute(object param) { return true; } public void Execute(object parameter) { System.Windows.MessageBox.Show("Habr!"); } } } Result:
7. Customize the appearance of controls
The classes available in AutoCAD .NET API, in my opinion, do not have the widest possibilities for customizing their appearance. However, basic things are definitely there.
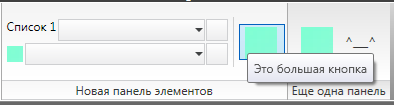
First, the controls can be placed under each other - this is especially convenient if “narrow” elements like drop-down lists are used.
Secondly, each control has properties that allow you to change its appearance. For example, for the drop-down list, you can set the title and width, for the button - the size (large or small) and signature. In addition, you can add tooltips (in the example it is added for the third button).
Code (note that a reference to the assembly and the System.Drawing namespace has been added):
using System; using System.Drawing; using Autodesk.AutoCAD.Runtime; using Autodesk.Windows; namespace MyAutoCADDll { public class Commands : IExtensionApplication { // AutoCAD "TestCommand" [CommandMethod("TestCommand")] public void MyCommand() { // ( ) Bitmap bmp = new Bitmap(1, 1); bmp.SetPixel(0, 0, Color.Aquamarine); bmp = new Bitmap(bmp, 1024, 1024); IntPtr hBitmap = bmp.GetHbitmap(); System.Windows.Media.Imaging.BitmapSource bs = System.Windows.Interop.Imaging.CreateBitmapSourceFromHBitmap( hBitmap, IntPtr.Zero, System.Windows.Int32Rect.Empty, System.Windows.Media.Imaging.BitmapSizeOptions.FromEmptyOptions()); // Autodesk.Windows.RibbonCombo comboBox1 = new RibbonCombo(); comboBox1.Id = "_combobox1"; comboBox1.Width = 200; comboBox1.Text = " 1"; comboBox1.ShowText = true; Autodesk.Windows.RibbonCombo comboBox2 = new RibbonCombo(); comboBox2.Id = "_combobox2"; comboBox2.Width = 200; comboBox2.Image = bs; comboBox2.ShowImage = true; // Autodesk.Windows.RibbonButton button1 = new Autodesk.Windows.RibbonButton(); button1.Id = "_button1"; Autodesk.Windows.RibbonButton button2 = new Autodesk.Windows.RibbonButton(); button2.Id = "_button2"; // , Autodesk.Windows.RibbonRowPanel RowPanel1 = new Autodesk.Windows.RibbonRowPanel(); Autodesk.Windows.RibbonRowPanel RowPanel2 = new Autodesk.Windows.RibbonRowPanel(); // RowPanel1.Items.Add(comboBox1); RowPanel1.Items.Add(new RibbonRowBreak()); RowPanel1.Items.Add(comboBox2); RowPanel2.Items.Add(button1); RowPanel2.Items.Add(new RibbonRowBreak()); RowPanel2.Items.Add(button2); // Autodesk.Windows.RibbonButton button3 = new Autodesk.Windows.RibbonButton(); button3.Id = "_button3"; button3.IsToolTipEnabled = true; button3.ToolTip = " "; button3.Size = Autodesk.Windows.RibbonItemSize.Large; button3.LargeImage = bs; Autodesk.Windows.RibbonButton button4 = new Autodesk.Windows.RibbonButton(); button4.Id = "_button4"; button4.Text = "^___^"; button4.ShowText = true; button4.Size = Autodesk.Windows.RibbonItemSize.Large; button4.LargeImage = bs; // Autodesk.Windows.RibbonPanelSource rbPanelSource1 = new Autodesk.Windows.RibbonPanelSource(); rbPanelSource1.Title = " "; Autodesk.Windows.RibbonPanelSource rbPanelSource2 = new Autodesk.Windows.RibbonPanelSource(); rbPanelSource2.Title = " "; // rbPanelSource1.Items.Add(RowPanel1); rbPanelSource1.Items.Add(RowPanel2); rbPanelSource1.Items.Add(new RibbonSeparator()); rbPanelSource1.Items.Add(button3); rbPanelSource2.Items.Add(button4); // RibbonPanel rbPanel1 = new RibbonPanel(); RibbonPanel rbPanel2 = new RibbonPanel(); // rbPanel1.Source = rbPanelSource1; rbPanel2.Source = rbPanelSource2; // RibbonTab rbTab = new RibbonTab(); rbTab.Title = " "; rbTab.Id = "HabrRibbon"; // rbTab.Panels.Add(rbPanel1); rbTab.Panels.Add(rbPanel2); // AutoCAD Autodesk.Windows.RibbonControl rbCtrl = ComponentManager.Ribbon; // rbCtrl.Tabs.Add(rbTab); // ("") rbTab.IsActive = true; } // Initialize() Terminate() , IExtensionApplication public void Initialize() { } public void Terminate() { } } } Result:
This article comes to an end. Next time I will write about working with layers and simple graphic objects.
Source: https://habr.com/ru/post/243305/
All Articles