We make our own indication of an incoming call
 After the last post about our Android application , some readers of the article had a question, how exactly to show their own information plate during a call? Well, today we will answer this question.
The general plan is quite simple:
- intercept the "incoming call" event using an intent filter ;
- we draw our window with the necessary information over the telephone dialer window.
Let's go through the same for each item.
We intercept a call
In order to be able to intercept the “call us” event, you need to add to the application manifest a request for rights to read the status of the phone.
</application> <uses-permission android:name="android.permission.READ_PHONE_STATE"/> In the same place to register service for interception of event "call".
')
<receiver android:name=".CallReceiver"> <intent-filter> <action android:name="android.intent.action.PHONE_STATE"/> </intent-filter> </receiver> </application> Finally, write some handling code for this event.
public class CallReceiver extends BroadcastReceiver { private static boolean incomingCall = false; @Override public void onReceive(Context context, Intent intent) { if (intent.getAction().equals("android.intent.action.PHONE_STATE")) { String phoneState = intent.getStringExtra(TelephonyManager.EXTRA_STATE); if (phoneState.equals(TelephonyManager.EXTRA_STATE_RINGING)) { // , String phoneNumber = intent.getStringExtra(TelephonyManager.EXTRA_INCOMING_NUMBER); incomingCall = true; Log.debug("Show window: " + phoneNumber); } else if (phoneState.equals(TelephonyManager.EXTRA_STATE_OFFHOOK)) { // ( / ) if (incomingCall) { Log.debug("Close window."); incomingCall = false; } } else if (phoneState.equals(TelephonyManager.EXTRA_STATE_IDLE)) { // - // " ". if (incomingCall) { Log.debug("Close window."); incomingCall = false; } } } } } Please note - in this example, we catch only the "incoming call" event, but the code shows how it can be redone if you need to track the outgoing too. The variable with information about the call is static, because the BroadcastReceiver lives according to the principle “received the message - processed it - died”, and the events of “picked up the phone / ended the conversation” will be received by a new instance of the object.
Call debugging
Of course, you can debug a call on a real phone, but it's easier and faster to test on an emulator. A call from one native emulator to another is made using the standard dialer application, 4 numbers are used as a phone number - the port of this emulator.
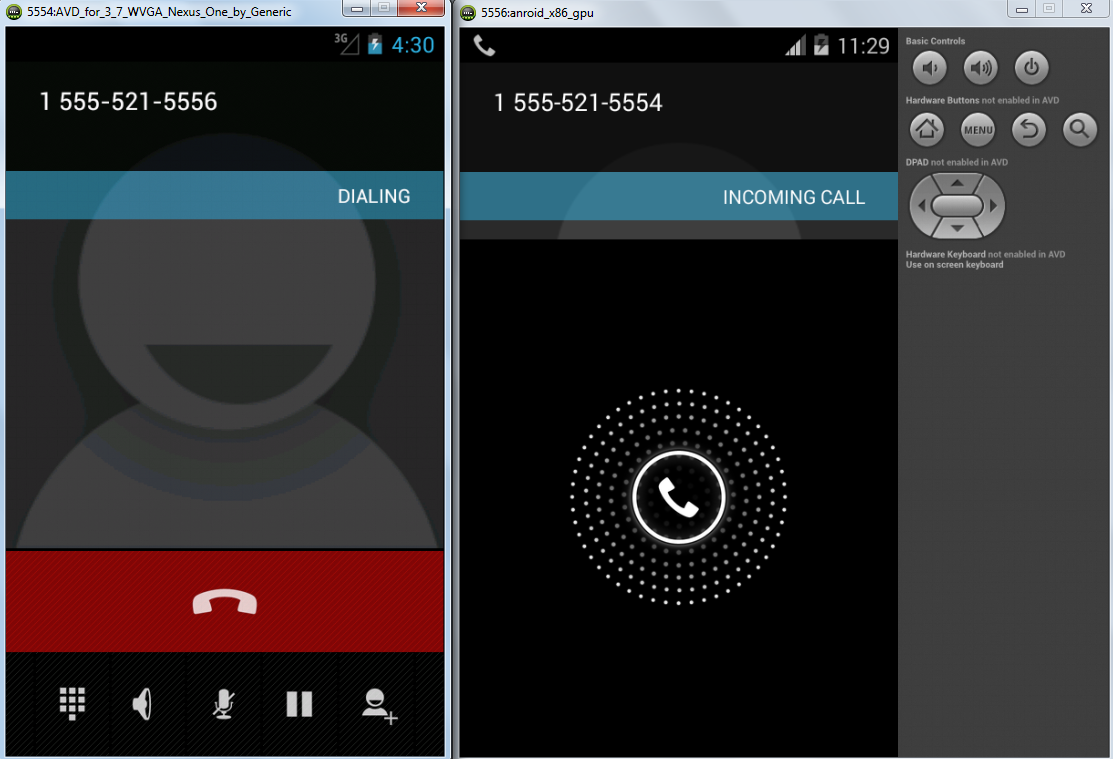
An alternative way is to call from the Android Device Monitor utility or from the console using ADB . A noticeable minus of all these methods is that the emulator breaks the connection with the debugger for the duration of the call, but the opportunity to test the behavior of the window on different OS versions and different resolutions is worth it.
Show dice
Well, now the most interesting thing is showing our plate. To do this, first, we need to add a request for rights to the manifest to create windows with the “system notification” flag.
<uses-permission android:name="android.permission.SYSTEM_ALERT_WINDOW"/> Secondly, we will edit the OnRecieve method and replace the simple logging with a call or close our window.
Log.debug("Show window: " + phoneNumber); showWindow(context, phoneNumber);// //[...] Log.debug("Close window."); closeWindow();// Well, the most interesting - the opening and closing of our window.
private static WindowManager windowManager; private static ViewGroup windowLayout; private void showWindow(Context context, String phone) { windowManager = (WindowManager) context.getSystemService(Context.WINDOW_SERVICE); LayoutInflater layoutInflater = (LayoutInflater) context.getSystemService(Context.LAYOUT_INFLATER_SERVICE); WindowManager.LayoutParams params = new WindowManager.LayoutParams( WindowManager.LayoutParams.MATCH_PARENT, WindowManager.LayoutParams.WRAP_CONTENT, WindowManager.LayoutParams.TYPE_SYSTEM_ALERT, WindowManager.LayoutParams.FLAG_NOT_FOCUSABLE | WindowManager.LayoutParams.FLAG_NOT_TOUCH_MODAL, PixelFormat.TRANSLUCENT); params.gravity = Gravity.TOP; windowLayout = (ViewGroup) layoutInflater.inflate(R.layout.info, null); TextView textViewNumber=(TextView) windowLayout.findViewById(R.id.textViewNumber); Button buttonClose=(Button) windowLayout.findViewById(R.id.buttonClose); textViewNumber.setText(phone); buttonClose.setOnClickListener(new View.OnClickListener() { @Override public void onClick(View v) { closeWindow(); } }); windowManager.addView(windowLayout, params); } private void closeWindow() { if (windowLayout !=null){ windowManager.removeView(windowLayout); windowLayout =null; } } Please note that to display the window, we do not start a separate activity , but with our hands we draw a new window through WindowManager . Why? The new activity falls into the general stack of screens, so if your application has at least one screen and at the time of the call it is running, the following will occur:
- native phone dialer is displayed on the screen
- The screen displays the active screen of your application.
- your “window over the top” dialer is displayed on the screen
As a result, the user will not be able to answer or reject the call without switching to the caller himself. In the case of manual window creation, point 2 is not performed and the user will see exactly what we wanted: a telephone dialer and our window on top of it.
Underwater rocks
Unfortunately, everything is not as rosy as it seems. As often happens in android, 100% compatibility tricky features difficult to achieve.
First, you need to understand that users can have phones with different screen sizes, different resolutions and different versions of android, and you have to pretty much try to keep your window from overlapping native controls in all possible configurations.
Secondly, on the part of HTC phones with their own program of the call, the block with information simply does not appear! It seems that their dialer application is also displayed with system priority, so our plate appears to be “under their window”. It is unpleasant, but we have not yet found a solution to this problem. It is possible that the callers of some other phones also conflict with this opportunity, but so far we have a negative experience with only some models from HTC.
Demonstration project on GitHub.
Source: https://habr.com/ru/post/243063/
All Articles