Another simple state machine for Unity
I want to share another version of the implementation of the state machine (state machine) for Unity. There were already articles about state machines linked to Unity and / or C # on Habré, for example, here and here , but I want to demonstrate a slightly different approach based on the use of Unity components.
Link to unitypackage with the code from the article .
For those who still don't know what a state machine is
For eager definitions, I'll give links to Wikipedia:
')
State machine (in Russian)
Finite-state machine (in English)
I myself will try to describe in simple language on the game example.
A state machine is a set of states , for example, character states:
of which only one can be actively active at the current time ; that is, according to the above list, the character can:
and the transition between which is carried out by meeting predetermined conditions , for example:
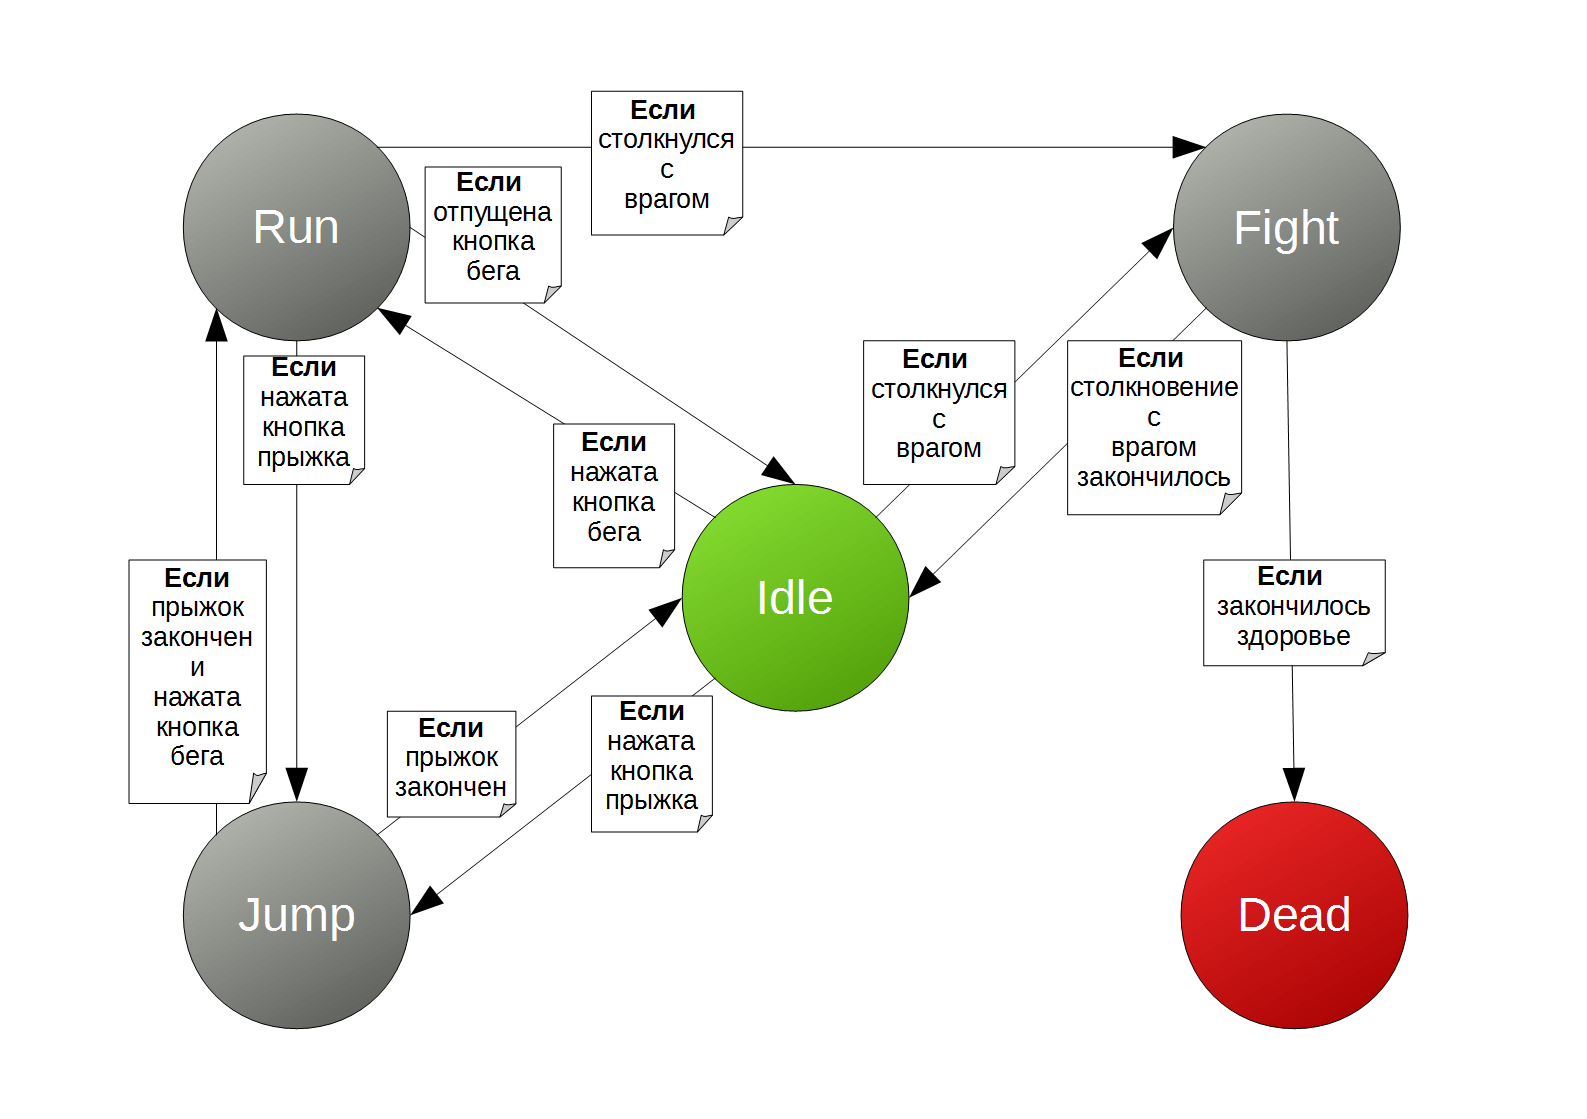
For clarity, we represent the above-described state machine in the form of a graph, where green is the initial state of the state machine, red is the final state.
')
State machine (in Russian)
Finite-state machine (in English)
I myself will try to describe in simple language on the game example.
A state machine is a set of states , for example, character states:
- Idle (Rest)
- Run
- Jump
- Fight
- Dead
of which only one can be actively active at the current time ; that is, according to the above list, the character can:
- either rest
- either run
- either jump
- either fight
- either be dead
and the transition between which is carried out by meeting predetermined conditions , for example:
- Rest-> Running, if the key is pressed
- Rest-> Jump, if the key is pressed jump
- Running-> Fight if a collision with an opponent occurs
- Draka-> Dead, if health ended
- ...
For clarity, we represent the above-described state machine in the form of a graph, where green is the initial state of the state machine, red is the final state.
Implementation
The implementation of the state machine we will consist of three classes: StateMachine , State and Transition , located in the same files. All three classes are inherited from MonoBehaviour . The StateMachine class is used directly, but from the abstract State and Transition it is proposed to inherit specific states and transitions. As a result, the state machine itself, as well as all its states and transitions, are components and must be assigned to an object in the scene. Well, and to switch states, then you can use the already existing mechanism of switching components on / off (the enabled property). This saves us from the need to create specialized callbacks for the state machine, checking for "on / off" and the like. Instead, the usual Unity event functions are used: OnEnable , OnDisable , Update , Awake, and others. True, there are two subtleties:
- It is worth being careful with the Start event: initially, the state and transitions of the state machine must be “turned off”, and for a component that is turned off, this event will occur not at the start of the scene, but when it is “turned on” for the first time. This is standard Unity behavior.
- When inheriting from State, you will have to override ( override ) the FixedUpdate method (if you need it, of course): it is implemented in the State class so that the Inspector always shows the checkbox “on / off” for the state. With this tick, you can watch the switching of states in real time, the most “visual debugging”.
Finally, let's turn to the code (with comments in Russian):
Transition
using UnityEngine; /// . /// (disabled) Inspector'. public abstract class Transition : MonoBehaviour { /// ( ). /// Inspector'. [SerializeField] State targetState; /// . /// State . public State TargetState { get { return targetState; } } /// , /// true. /// State. public bool NeedTransit { get; protected set; } } State
using UnityEngine; using System.Collections.Generic; /// . /// (disabled) Inspector'. public abstract class State : MonoBehaviour { /// . /// Inspector'. [SerializeField, Tooltip("List of transitions from this state.")] List<Transition> transitions = new List<Transition> (); /// , /// , null. /// StateMachine. public virtual State GetNext() { foreach (var transition in transitions) { if (transition.NeedTransit ) return transition.TargetState; } return null; } /// . /// OnDisable, . public virtual void Exit() { if(enabled) { foreach(var transition in transitions) { transition.enabled = false; } enabled = false; } } /// . /// OnEnable, . public virtual void Enter() { if(!enabled) { enabled = true; foreach(var transition in transitions) { transition.enabled = true; } } } /// , Inspector' /// enabled/disabled . /// . protected virtual void FixedUpdate() { } } Statemachine
using UnityEngine; /// . public class StateMachine : MonoBehaviour { /// . /// Inspector'. [SerializeField] State startingState; /// . State current; /// . public State Current { get { return current; } } /// ( ). void Start() { Reset(); } /// . public void Reset() { Transit(startingState); } /// , /// . - . void Update () { if(current == null) return; var next = current.GetNext(); if(next != null) Transit(next); } /// , . /// , /// /// . void Transit(State next) { if(current != null) current.Exit(); current = next; if(current != null) current.Enter(); } } Use the resulting state machine
Let's create a small test project in which we will move the cube left-right across the screen. The project can be created both in 2D and in 3D, the differences should be only visual. Create a scene or use the default. It will already have a camera, and now we will also add a cube using the GameObject-> Create Other-> Cube menu. Cuba needs to set a position on the X axis equal to -4, since then it will move 8 units in each direction. In addition to the cube, we will create a child empty object for our state machine. To do this, select the cube in the Hierarchy and use the menu GameObject-> Create Empty Child . It will be clearer to rename it to StateMachine.
Get
Something like this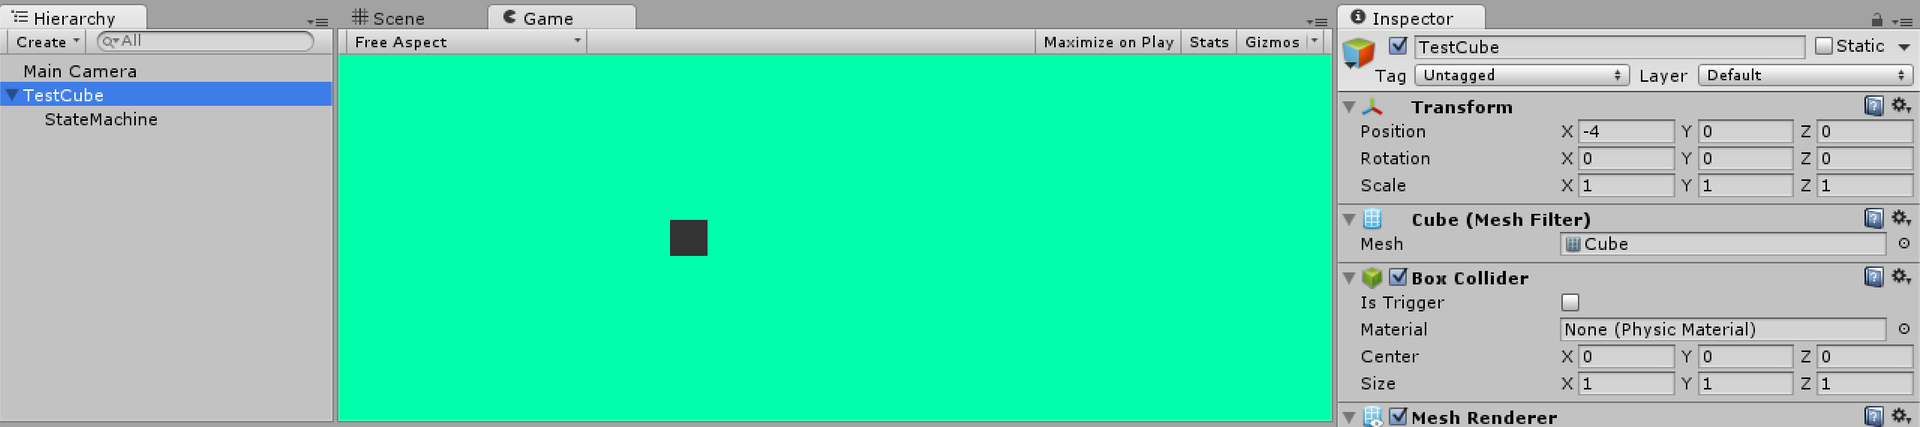
The next step is to create scripts. We will need 4 scripts, this is a timer transition class:
Timertransition
and 3 more classes for states. The base class for motion states, moving an object using the Translate method of the Transform component: using UnityEngine; using System.Collections; /// . public class TimerTransition : Transition { /// . Inspector'. [SerializeField, Tooltip("Time in seconds.")] float time; /// "". /// NeedTransit. void OnEnable() { NeedTransit = false; StartCoroutine("Timer"); } /// , . /// NeedTransit true. IEnumerator Timer() { yield return new WaitForSeconds(time); NeedTransit = true; } /// "". /// . void OnDisable() { StopCoroutine("Timer"); } } TranslateState
and classes of specific states inherited from it: using UnityEngine; /// Transform Translate. public class TranslateState : State { /// Transform, Inspector'. [SerializeField] Transform transformToMove; /// . Inspector'. [SerializeField, Tooltip("Speed in units per second.")] Vector3 speed; /// Transform. void Update () { var step = speed * Time.deltaTime; transformToMove.Translate(step.x, step.y, step.z); } } MoveRight
/// . /// , /// "". public class MoveRight : TranslateState { } Moveleft
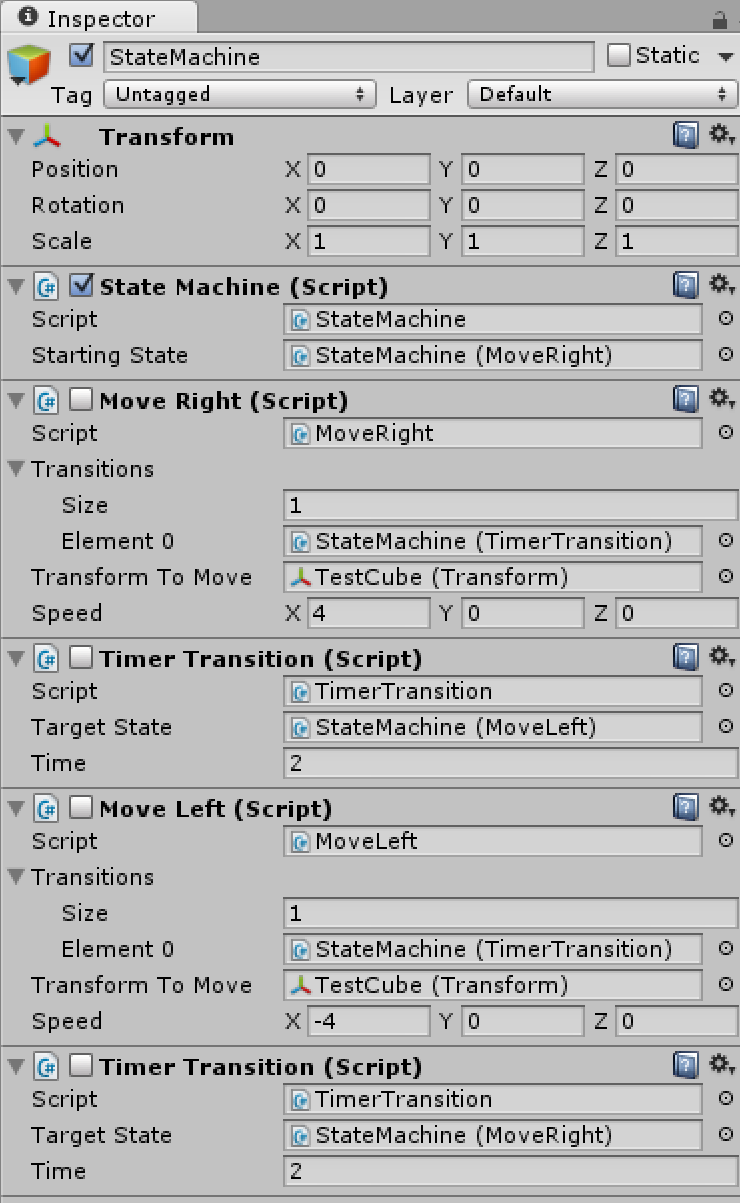
/// . /// , /// "". public class MoveLeft : TranslateState { } Now that all the necessary classes are ready, you need to assemble a state machine from the components. To do this, select in Hierarchy our object with the name StateMachine and hang all components on it as in the picture:
Picture
Do not forget to "turn off" the state and transition components, but not the state machine itself.Fill our components as follows:
Ready state machine
Fields for states and transitions can be filled by dragging the corresponding components. Do not forget to set the StartingState state machine and add transitions to the Transitions state list!Now you can run the scene. If done correctly, the cube will move left and right across the screen. If you select the StateMachine object in the Hierarchy, then in the inspector you can monitor the change of states in real time.
Conclusion
In conclusion, I want to note that, although this implementation of the state machine is not without flaws, it is quite suitable for use in small projects. For larger projects, in my opinion, dragging the components in the inspector itself can be a rather unpleasant job.
Constructive criticism is welcome.
Source: https://habr.com/ru/post/242977/
All Articles