Meteor. Developing a TODO List
In this lesson, I don’t want to discuss why the meteor is a web killer, especially since I don’t think so, but I have a certain sympathy for this framework. Therefore, I want to show where to start when developing an application on it, what packages are there and in general what this meteor is.
Just want to say that I do not have much experience in developing web applications. I have been doing this for only about two years, and have only been familiar with a meteor for a couple of months.
I also want to warn you that the lesson turned out to be quite voluminous, but the code in it was written several times less than the text. I just want to share my experience on how to use a meteor when creating a simple example, and to focus on various points that I thought were important. Therefore, the lesson will use many third-party packages that facilitate the development process.
')
And one more warning: in this lesson the following technologies will be used to write the example directly:
Video demonstrating the application received during the lesson
And who is still interested, welcome under cat.
First install nodejs and mongodb .
The next step is to install a meteor. It does not lie in the npm repository, so you don’t need to hurry and command
This conclusion means that everything went well, and our hello world can be checked in the browser.
Now, after checking the performance of the new project, the files that are in the root of the project can be deleted - they are not particularly interesting to us. You can also notice that the
If you have the same result as mine, then the minimal environment for developing a project meteor is ready, but if something went wrong, check the
Now you can finish with the formalities and proceed to the development of our sheet sheet. For convenience, I recommend opening a new tab of the console, since restarting our meteor application will no longer be required, but we will use the framework framework for installing packages.
Packages are installed by the command
As I wrote above, the application will be developed on
In the course of development, we will add a few more popular packages, and I will try to describe the purpose of each. By the way,
Maybe something will not be useful to us, but in any case, the meteor has no restrictions on the naming of folders and files, so you can think of any structure that is convenient for you. The main thing to remember about some of the nuances:
For example, consider how our project will be loaded in the browser: first of all, files from the
You can also use the following constructs to regulate the runtime in shared files:
And we can use the
To do this, install the package
Next, create the file
You can open the browser and make sure that after adding the file the page has the specified header.
Before we begin to impose, I propose to carry out a basic setting of client routing, and a little later we will analyze this moment in more detail. For routing, you can use a popular solution that has all the functionality we need. Install the
After installation in the
Obviously, here we set the basic template for our application, it will be called
In short, the process of working templates looks like this (as far as I understood from the documentation).
I practically translated this paragraph from the official description of the library, so please do not throw stones at me if you do not agree with something. I myself have come across these technologies (except for
But we in our project do not explicitly use either
All patterns in a meteor are described in the
It seems to have figured out what templates are in a meteor, it's time to impose a page frame, it will consist of a cap and a basement.
Here we need to understand that this
When changing styles, by the way, you do not need to refresh the page in the browser, it is enough to save the file, and they will immediately be applied, this is a handy tool out of the box for designers of the meteor.
You can also use this library for server routing. For example, I, on a real project, needed it to authorize users, since the main project was made on
Let's create basic routers to see how this library works and what functionality it has, using an example, and later we will hang the main functionality on them.
To begin with, let's set links to our pages.
We create controllers in the folder of client routers, as long as they are just stubs
Two parameters need to be passed to the
You can open the browser and make sure that our routing works by clicking on the links in the header. And it works without refreshing the page.
Here you can see what happened in the end, and here you can see the project code in the current state.
We will not go deep into the mechanisms, but simply use ready-made solutions that will allow us to create users via login / password or
Install the following packages:
The
Modifying our cap
And we get the following result
After configuration, we can verify that the authorization tokens are stored in the database.
We will configure our system of users, since I want to configure email address verification, I need to configure
And we will configure the accounts, so that the meteor requests confirmation of the email address.
In our application, it will not be possible to connect several services to one account, as this requires fine-tuning. Perhaps soon the meteor will work this moment, but so far there is a ready, more or less normal solution
There is also detailed documentation on the accounts , we just put the packages and see the magic, but under the hood it doesn’t happen much harder.
The next step we will deal with the user page, but before crossing the need to consider how some things are implemented in a meteor.
Collection in the meteorite can be compared with collections of Mongu, in fact they are the same with them and work, and they also have the methods
It’s not very pleasant to work with bare data, I would like to add business logic to collection objects, this can be done with the function of
Install the package, and write the methods for updating user data. Also, when creating a user, we added a calculated field with the user's avatar hash in the Gravatar service.- add a method that can return a link to an image with some parameters. We will also add methods for checking the user registration service and methods for returning various public information.
It seems to have figured out what a collection is in a meteor, it should be mentioned that it is undesirable to store states in the model, since all data in the collection is reactive, if the record in the database changes, then saved somewhere in memory, the model object will lose its relevance, and subsequent work with it can lead us to the use of obsolete data, later on with examples we consider how to work with models.
I created three user posts in db
And when I try to get data in the browser, I did not find any records without authentication and one (own) otherwise.
In this application, we will not hide users from everyone, just hide private information, such as authentication tokens.
Since we removed the package
We publish a collection of users.
This code will provide access to users for everyone, you only need to subscribe, I immediately thought about giving users the ability to download data by page, if you do not specify the issue limit, all user records will be immediately downloaded, when subscribing to this publication, not very good for obvious reasons, the same thing happens when used
We also limited the visibility of the paged data, nothing but information from the field
The second parameter passed to the method
I have repeatedly noted that to obtain data and to track changes in them, you first need to subscribe to publications, in general everything that happens with the data in the meteor application can be easily monitored and monitored, and if you simply create a prototype where this is not your key moments, you can always use the package
We will use for subscriptions
Let's also create a template in the form of a button, with a click on which the method will be called
Here we are already setting some logic for the component. As you can see, all templates are added to the global namespace
To handle template events, you need to describe them in the method
Now we are ready to create a page with a list of all users and look at an example of how to manage subscriptions in
The method
In
We have subscribed to the publication, but still it may not be clear why clicks on the button from the template
And try to change the value using the call

Thanks to this mechanism, it
Another small example that can be performed in the browser console:
I explained how subscriptions can be used with an example
Let's finish the list of users and make sure that all this works in practice.

As a result, pagination works for us, and since all data is reactive, new users of the system will be added to the page automatically, without any reloads, because we have subscribed to the collection, which means that any changes to the data in the database on the server will immediately be displayed on user page. You can try to register a new user in a new tab, or change the values directly in the database using the utility
And to make sure that this approach works optimally, you can see the browser logs. I set the number of users per page equal to one. DDP protocol is quite simple and easy to read, so I will not go into details. In the logs, you can simply see that all unnecessary subscriptions were unsubscribed, and users downloaded only three times, one for each update of the subscription.
For this, the first thing for an authorized user, instead of the home page, is to show the current user page, modify the controller a little.
And also create a controller in which you can view the profile of any user.
For the convenience of finding users either by ID or by login, I created additional methods in the collection: one returns a cursor, the second is data.
We try to get the data for the user page, but they are not published, we fix it.
Almost everything is ready, create a template and look at the result. When creating the template, I decided to create a component that, depending on the access rights, will give the opportunity to edit the model field.
To interpolate variables in rows in a template, you can use the baleen design:
It seems to me that the layout of meteor templates is
In general, everything is ready, open the authentication form in the header, enter the system, and instead of the title “Home” your profile will immediately appear on the page, without any reloads.
If something is not clear to you up to the present moment, then I advise you to get acquainted with the current state of the project in the repository , I tried to comment everything on the files in the files, it is also possible to look through the above, maybe not completely consistently, but I tried to pay attention to all the key moments, and of course you can clone the project at this stage and touch it with your hands. Then I'm going to touch on a few more topics related to server code: how to create your own collections, how to protect data in collections from unwanted editing, tell you a little about using RPC and using libraries
Add
And create a new collection
First of all, when creating the collection, we defined the schema; this will allow us to validate the data and automatically calculate some fields. You can read more about validation on the aldeed: simple-schema package page , there is quite rich functionality, and when installing an additional package
We create a new collection in the database by calling
Using the method
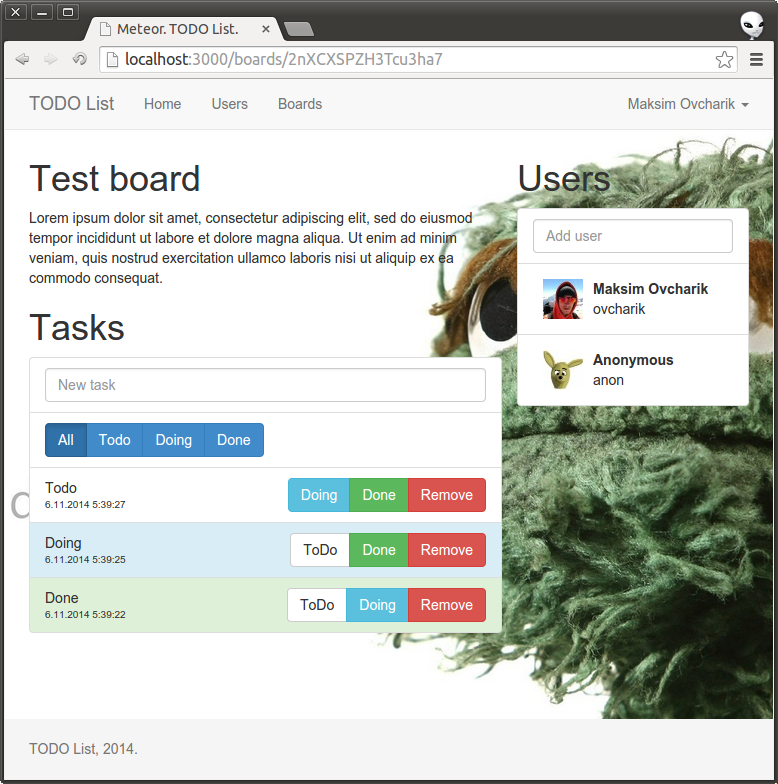
When displaying a board card, I want to immediately display the data about the board creator. But if we subscribe only to the boards, then this data will not be transferred to the client. However, publications in meteor make it possible to subscribe to any data, even automatically calculated, such as collection counters and others.
Since Monga does not know how to make requests through several collections and produce already processed data, as it happens in relational databases, we will have to get information about the board makers with one more request, and it’s more convenient to work within the data models.
First of all, depending on the request, we get the required boards from the base, after that we need another request to get users. Methods
With the help of connection logs via web sockets or with the help of this utility, you can make sure that this approach will work optimally. And here it is important to understand that in our case, changes in the user’s collection will not be synchronized with the client, but that was what was intended. By the way, for a simple join you can simply return an array of cursors as a result of a subscription.
To display user boards, I added new subscriptions to routers and wrapped up the necessary templates, but we already reviewed all these points above, if you are interested in all the changes, you can see them here . But in the end we have to get the following, though the boards will have to be created through the console to check the performance.
For image processing, I used to use ImageMagick , and for the node there are corresponding packages that provide an interface to this library. To allow the meteor to use the
All packages
You
To load and process the image, create a server method that can be called from the client.
In the method
If an exception is thrown in the method, it will be passed to the user on the client, by the first parameter of the callback. And the data returned by the method will come to the client with the second parameter of the callback.
So that you can use exceptions and return functions with asynchronous programming style, in the server part of the meteor there is a method that wraps asynchronous functions into synchronous, via the fibers library . If in short, thanks to this library, the calls of wrapped functions will not occupy the execution queue, so that you can write synchronous code on the server and do not worry about the wrong sequence of code execution. By method
In meteor for server routing there is a standard webapp package , but we have already installed a much more convenient solution in the form
Here the main route to transfer the property
Objects
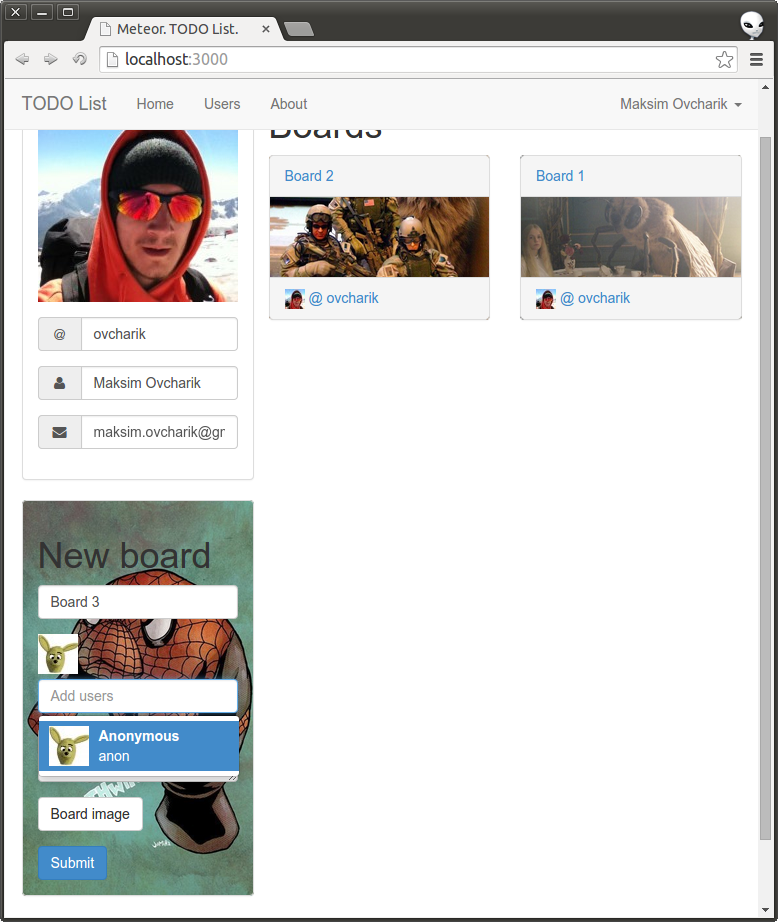
To use, let's create a form for adding a new board.
Here for loading and image processing we perform the remote method through
In principle, this is all that I wanted to highlight in this lesson, but for completeness, I will complete the functionality of the cards in the boards, there will not be used something that is not in this lesson. Changes are available as usual in the repository .
Just want to say that I do not have much experience in developing web applications. I have been doing this for only about two years, and have only been familiar with a meteor for a couple of months.
I also want to warn you that the lesson turned out to be quite voluminous, but the code in it was written several times less than the text. I just want to share my experience on how to use a meteor when creating a simple example, and to focus on various points that I thought were important. Therefore, the lesson will use many third-party packages that facilitate the development process.
')
And one more warning: in this lesson the following technologies will be used to write the example directly:
- jade - html preprocessor;
- less - css preprocessor;
- coffeescript is a programming language compiled into javascript.
Video demonstrating the application received during the lesson
And who is still interested, welcome under cat.
Meteor installation
The meteor itself is based onnodejs and mongodb , also the meteor does not have Windows support, and if you are going to touch a meteor you need to get a Linux or MacOS operating system.First install nodejs and mongodb .
The next step is to install a meteor. It does not lie in the npm repository, so you don’t need to hurry and command
npm install -g meteor , in this case just download the old version, you need to run it in the console to properly install: $ curl https://install.meteor.com/ | sh Project creation
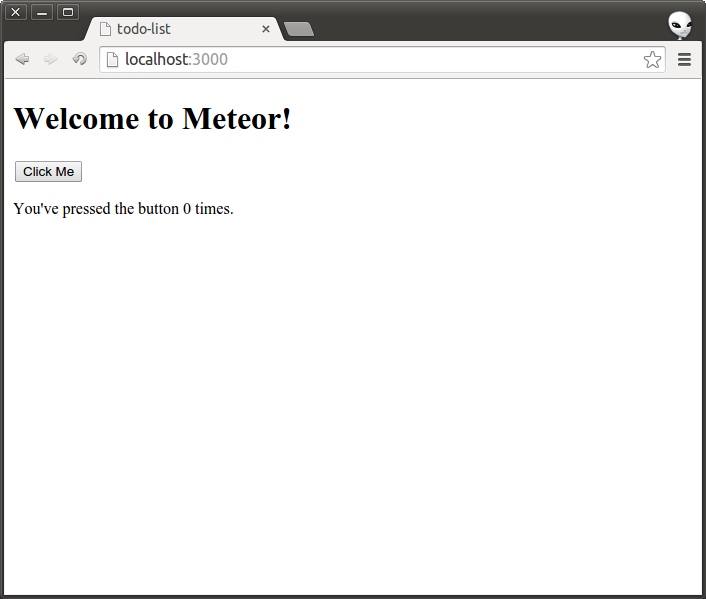
After installing the meteor, you can immediately command $ meteor create 'todo-list' todo-list: created. To run your new app: cd todo-list meteor $ cd todo-list $ meteor [[[[[ ~/dev/meteor-getting-started/todo-list ]]]]] => Started proxy. => Started MongoDB. => Started your app. => App running at: http://localhost:3000/ This conclusion means that everything went well, and our hello world can be checked in the browser.
Now, after checking the performance of the new project, the files that are in the root of the project can be deleted - they are not particularly interesting to us. You can also notice that the
.meteor directory was created, various service information about the project is stored there, and even automatically generated .gitignore . By the way, for manual package management, you can change the packages file, but console utilities are also quite convenient.If you have the same result as mine, then the minimal environment for developing a project meteor is ready, but if something went wrong, check the
nodejs , mongodb and meteor installation, for example, I have the following configuration on my computer now: $ node -v v0.10.33 $ mongod --version db version v2.4.12 $ meteor --version Meteor 1.0 Now you can finish with the formalities and proceed to the development of our sheet sheet. For convenience, I recommend opening a new tab of the console, since restarting our meteor application will no longer be required, but we will use the framework framework for installing packages.
Packages
Here again, I don’t want to discuss why my pack manager is used in meteor and why they like to ride like that, this has nothing to do with the lesson.Packages are installed by the command
$ meteor add <package-name> As I wrote above, the application will be developed on
less , jade and coffeescript , which means it's time to install them. All the packages used in the lesson and a bunch of others can be found on the Atmosphere website. Actually package names:less,coffeescriptis official packages, so they do not contain the name of the author;mquandalle:jade- but this is not an official package, so the name consists of two components, but it is well made, and I have not had any problems with its use.
sourcemap support is built into the packages of less and coffeescript , so the sourcemap process in the browser will be simple, the sourcemap supported by the meteor itself: it provides the necessary api to connect this functionality, so we don’t have to customize something.In the course of development, we will add a few more popular packages, and I will try to describe the purpose of each. By the way,
jquery and underscore already included in the meteor, like many other packages, the full list can be found in the ./.meteor/versions file in the created project.Application structure
Now, in my opinion, it's time to figure out how a meteor connects files to a project, and what ways of regulating this exist. Here we will not need to write configuration files for thegrant or gulp to compile the templates, styles and scripts, the meteor has already taken care of this. For scaffolding there is a project for Yeoman, but it is more pleasant for me to create everything manually. In the previous project, I used about the following folder structure: todo-list/ - ├── client - │ ├── components - │ │ , │ ├── config - │ ├── layouts - , │ ├── lib - , │ │ │ ├── routes - │ └── styles - ├── collections - ├── lib - , ├── public - : , robots.txt ├── server - │ ├── methods - , , │ │ │ ├── publications - │ ├── routes - , │ │ http │ └── startup - Maybe something will not be useful to us, but in any case, the meteor has no restrictions on the naming of folders and files, so you can think of any structure that is convenient for you. The main thing to remember about some of the nuances:
- all files from the
publicfolder in the project root will be available to users via links from the browser and will not automatically connect to the project; - all files from the
serverfolder are in the root; only the server part of the application is available; - all files from the
clientfolder are in the root; only the client part of the application is available; - everything else that is in the root is available in any environment;
- Files in the project are connected automatically, according to the following rules:
- the download starts from the subdirectories, and the first directory is always processed with the name
lib, then all * folders and files are loaded in alphabetical order; - files starting with
main.loaded last.
For example, consider how our project will be loaded in the browser: first of all, files from the
lib directory in the project root will be loaded, the client folder will be further processed, files from lib will be loaded first, and then in alphabetical order: components -> config - > ... -> styles . And after the files from the collections folder. Files from the public and server folders will not be loaded into the browser, but, for example, the scripts stored in the public folder can be connected via the script tag, as we used to do in other projects, but the developers of the framework do not recommend this approach.You can also use the following constructs to regulate the runtime in shared files:
if Meteor.isClient # , if Meteor.isServer # , And we can use the
Meteor.startup(<func>) method to control the execution time of scripts, in the browser this is an analogue of the $ function from the jQuery library, and on the server, the code in this function will be executed immediately after loading all the scripts in the order of loading these files. Learn more about these variables and methods .Basic Application Template
For the layout, I will use Bootstrap, but I know that he has become boring to everyone, but the layout designer is none of me, and I am less familiar with the bootstrap.To do this, install the package
mizzao:bootstrap-3 - it is the most popular among others, and I think when using it we should have no problems.Next, create the file
head.jade in the client/layouts head.jade . This will be the only file in our application that does not have a template format, in short, just create a page header, and later we will analyze what templates are. //- client/layouts/head.jade head meta(charset='utf-8') meta(name='viewport', content='width=device-width, initial-scale=1') meta(name='description', content='') meta(name='author', content='') title Meteor. TODO List. You can open the browser and make sure that after adding the file the page has the specified header.
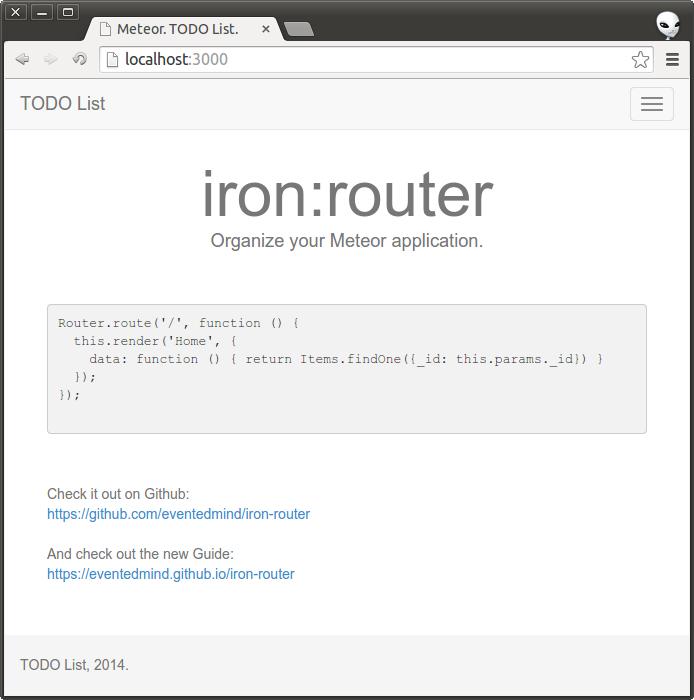
Before we begin to impose, I propose to carry out a basic setting of client routing, and a little later we will analyze this moment in more detail. For routing, you can use a popular solution that has all the functionality we need. Install the
iron:router package ( repository ).After installation in the
client/config directory, create a file router.coffee , with the following content: # client/config/router.coffee Router.configure layoutTemplate: "application" Obviously, here we set the basic template for our application, it will be called
application . Therefore, in the layouts folder, create an application.jade file. In this file we describe the template, some entity, which at the stage of assembling the application will turn into javascript code. By the way, the meteor uses their own mustache spacebars template and blaze library.In short, the process of working templates looks like this (as far as I understood from the documentation).
spacebars templates spacebars compiled into a blaze library blaze , which will later work directly with the DOM . In the project description there is a comparison with other popular libraries:- Compared to regular textual template engines, the Blaze works with the house, it will not re-render the entire template to change one attribute, and it has no problems with nested templates;
- compared to
Embertemplates, the Blade renders only changes, there is no need for explicit data-baiting and descriptions of dependencies between the templates; - compared to the
angularandpolymertemplates, the Blaze has a clear and simple syntax, a lower entry threshold and is not positioned at all as a technology of the future, but simply works; - Compared to
Reacthas simple template description syntax and simple data management.
I practically translated this paragraph from the official description of the library, so please do not throw stones at me if you do not agree with something. I myself have come across these technologies (except for
ember ) and, in principle, agree with the authors of the library, from the minuses in the blaze I want to notice a tie on the meteor.But we in our project do not explicitly use either
blaze or spacebars . For jade templates, the compilation process has the following sequence: jade -> spacebars -> blaze .All patterns in a meteor are described in the
template tag, where there should be an attribute with the name of the template. Remember, we specified layoutTemplate: "application" in the settings of the router, here is the application , which is exactly the name of the template.It seems to have figured out what templates are in a meteor, it's time to impose a page frame, it will consist of a cap and a basement.
//- client/layouts/application.jade template(name='application') nav.navbar.navbar-default.navbar-fixed-top .container .navbar-header button.navbar-toggle.collapsed( type='button', data-toggle='collapse', data-target='#navbar', aria-expanded='false', aria-controls='navbar' ) span.sr-only Toggle navigation span.icon-bar span.icon-bar span.icon-bar a.navbar-brand(href='#') TODO List #navbar.collapse.navbar-collapse ul.nav.navbar-nav .container +yield .footer .container p.text-muted TODO List, 2014. Here we need to understand that this
jade is not quite familiar to us, with its mixins, javascript and includas. Jade has to compile into a spacebars template, and this imposes some features. From the jade , we can say we will take only the syntax, the rest we just do not need. In this template, the +yield construction is used, this construction means that the yield template will be rendered instead, it is a iron:router feature, it will automatically substitute the desired template depending on the path, we will deal with routers a little later, and now we can make cosmetic changes to the layout and look at the result. // client/styles/main.less html { position: relative; min-height: 100%; } body { margin-bottom: 60px; & > .container{ padding: 60px 15px 0; } } .footer { position: absolute; bottom: 0; width: 100%; height: 60px; background-color: #f5f5f5; .container .text-muted { margin: 20px 0; } } When changing styles, by the way, you do not need to refresh the page in the browser, it is enough to save the file, and they will immediately be applied, this is a handy tool out of the box for designers of the meteor.
Routing
In the meteor itself, there is no standard routing mechanism, I suggest using theiron:router package, it is well documented , actively supported, has rich functionality and is also the most popular routing solution in the context of a meteor.You can also use this library for server routing. For example, I, on a real project, needed it to authorize users, since the main project was made on
Ruby on Rails , and users do not need to think that they are two different applications and authorize them twice. In general, there are several popular approaches for server routing and creating a REST api for a meteor.Let's create basic routers to see how this library works and what functionality it has, using an example, and later we will hang the main functionality on them.
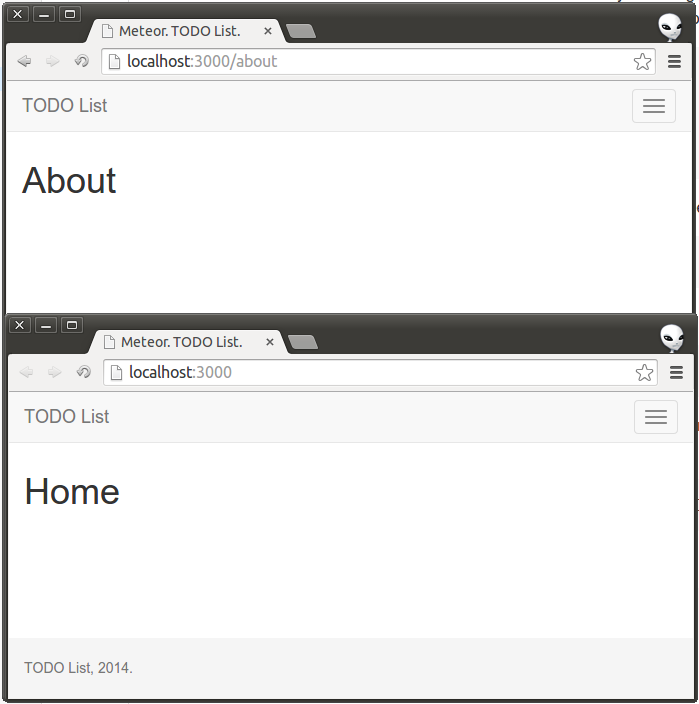
To begin with, let's set links to our pages.
//- client/layouts/application.jade //- ... #navbar.collapse.navbar-collapse ul.nav.navbar-nav li a(href='/') Home li a(href='/about') About We create controllers in the folder of client routers, as long as they are just stubs
# client/routes/home.coffee Router.route '/', name: 'home' class @HomeController extends RouteController action: -> console.log 'Home Controller' super() # client/routes/about.coffee Router.route '/about', name: 'about' class @AboutController extends RouteController action: -> console.log 'About Controller' super() Two parameters need to be passed to the
Router.route function, the first is the path, and the path can be a pattern (for example: /:user/orders/:id/info ), all parameters from the pattern will be available in the controller's object via the params property. The second parameter is an object with options. To make all the logic separate from the simple description of the path and name, you can create controllers, in our case they are simple stubs, here we don’t explicitly specify controller names in the properties, because by default iron:router tries to find a controller named <RouteName>Controller , and of course, our controllers should be accessible globally, we do it in the censcript, binding the variable to the current context, in the usual js, it is enough just to declare the variable not through var .By the way, the meteor is not used, for example,amdto download the code, the files are simply loaded in a certain sequence. Therefore, all interaction between modules described in different files is carried out through global variables. Which, as for me, is quite convenient, and when using coffee, randomly declaring a global variable is quite difficult, and it will be immediately noticeable.
iron:router will also try to automatically render the template with the name of the route (but the templates can be specified explicitly), create them //- client/components/home/home.jade template(name='home') h1 Home //- client/components/about/about.jade template(name='about') h1 About You can open the browser and make sure that our routing works by clicking on the links in the header. And it works without refreshing the page.
In the course of the development of this lesson, I will try to make all changes in the code to the repository, in accordance with the sequence of presentation, so that you can follow the whole process, as in the post some things can be missed. Repository
Here you can see what happened in the end, and here you can see the project code in the current state.
Users and Authentication
Many technical assignments that come to our company, the first task describes the system of users. Since this is a fairly common task, I consider it necessary in our lesson to consider ways to authenticate users, especially the meteor provides standard tools for this.We will not go deep into the mechanisms, but simply use ready-made solutions that will allow us to create users via login / password or
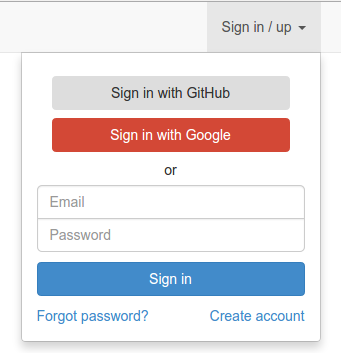
google and github services. I used to set up a bunch of devise and omniauth in rails omniauth pair of generators and a few lines in the config file. So, the meteor is not enough that it provides out of the box, so also the setting up of services is as simple as possible.Install the following packages:
accounts-base- basic package for users of the application on a meteor;accounts-password,accounts-github,accounts-google- we will add support for login / password authentication andgithubandgoogleservices;ian:accounts-ui-bootstrap-3- a package to simplify the integration of accounts into the bootstrap application.
The
ian:accounts-ui-bootstrap-3 package will allow us to add an authentication / registration form to the application in one line, as well as provide an interface to configure third-party services. The project itself , there is a small documentation and screenshots of how the form integration and customization of services look like.Modifying our cap
//- client/layouts/application.jade //- ... #navbar.collapse.navbar-collapse ul.nav.navbar-nav li a(href='/') Home li a(href='/about') About ul.nav.navbar-nav.navbar-right //- //- ian:accounts-ui-bootstrap-3 +loginButtons And we get the following result
After configuration, we can verify that the authorization tokens are stored in the database.
$ meteor mongo MongoDB shell version: 2.4.9 connecting to: 127.0.0.1:3001/meteor meteor:PRIMARY> show collections meteor_accounts_loginServiceConfiguration meteor_oauth_pendingCredentials system.indexes users meteor:PRIMARY> db.meteor_accounts_loginServiceConfiguration.find() { "service" : "github", "clientId" : "<id>", "secret" : "<secret>", "_id" : "AjKrfCXAioLs7aBTN" } { "service" : "google", "clientId" : "<id>", "secret" : "<secret>", "_id" : "HaERjHLYmAAhehskY" } We will configure our system of users, since I want to configure email address verification, I need to configure
smtp , by the way, an email package is used to send email . It is not included in the standard set of meteors, so you must install it manually if you need to work with mail. # server/config/smtp/coffee smtp = username: "meteor-todo-list@yandex.ru" password: "meteor-todo-list1234" server: "smtp.yandex.ru" port: "587" # _(smtp).each (value, key) -> smtp[key] = encodeURIComponent(value) # url smtp url = "smtp://#{smtp.username}:#{smtp.password}@#{smtp.server}:#{smtp.port}" # , process.env.MAIL_URL = url And we will configure the accounts, so that the meteor requests confirmation of the email address.
# server/config/accounts.coffee emailTemplates = from: 'TODO List <meteor-todo-list@yandex.ru>' siteName: 'Meteor. TODO List.' # _.deepExtend Accounts.emailTemplates, emailTemplates # Accounts.config sendVerificationEmail: true # Accounts.onCreateUser (options = {}, user) -> u = UsersCollection._transform(user) options.profile ||= {} # , # options.profile.emailHash = Gravatar.hash(u.getEmail() || "") # , options.service = _(user.services).keys()[0] if user.services # , # _.extend user, options In our application, it will not be possible to connect several services to one account, as this requires fine-tuning. Perhaps soon the meteor will work this moment, but so far there is a ready, more or less normal solution
mondora:connect-with, but it is still raw. You can try to merge accounts yourself, there is nothing complicated in this, and there are many examples and other solutions in the network: one , two , three .There is also detailed documentation on the accounts , we just put the packages and see the magic, but under the hood it doesn’t happen much harder.
You shouldn't kick me hard, for having considered the system of accounts so superficially, I just wanted to show that there is nothing difficult in it. Detailed review will require a separate post. And we in the lesson have created the necessary basic functionality and can continue to go to the final result.
The next step we will deal with the user page, but before crossing the need to consider how some things are implemented in a meteor.
Collections, publications and subscriptions.
When creating the project, automatically two packages have been addedautopublishand insecure, and so now is the time to get rid of them, as they provide the user unlimited access to all the collections in the database, and can be used for prototyping only. Packages are removed by the command. $ meteor remove <package-name> Collections
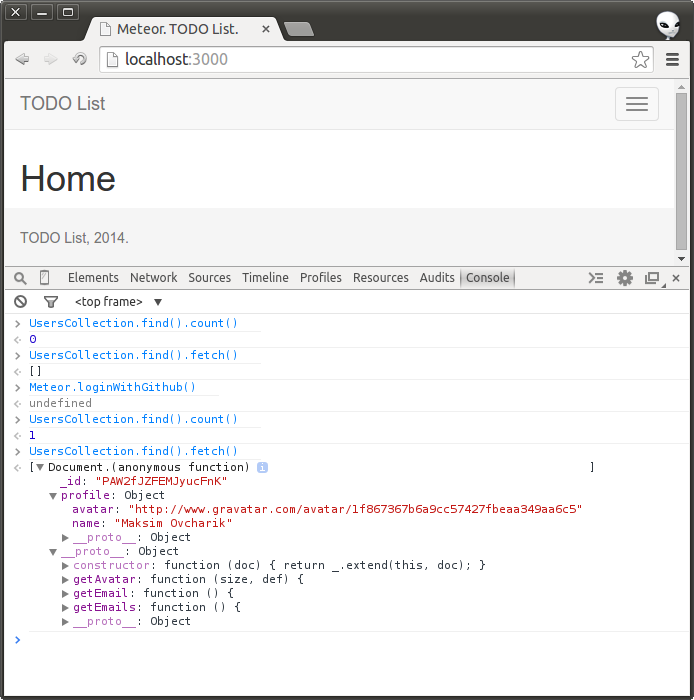
Collection in the meteorite can be compared with collections of Mongu, in fact they are the same with them and work, and they also have the methods
find, insert, update, upsert(the aggregation can be organized on the server using the package zvictor:mongodb-server-aggregation). One of the collections we have already created and access to it can be obtained through Meteor.users, for example, try running in the browser console Meteor.users.findOne(). It is important to note here that all collection data is cached in the browser, and if you execute a million times in a loop on the client Meteor.users.find(options).fetch(), you will not load anything except the browser. This is achieved by using a library minimongothat is smart enough to make a selection depending on the parameters passed to the client.It’s not very pleasant to work with bare data, I would like to add business logic to collection objects, this can be done with the function of
_transformthe collection, into which objects are transferred after receiving them from the server and there they can be processed, however, so as not to delve into these subtleties , you can use a package dburles:collection-helpersthat adds a method to the collection helperswhere you can pass an object from which all data will be inherited.Install the package, and write the methods for updating user data. Also, when creating a user, we added a calculated field with the user's avatar hash in the Gravatar service.- add a method that can return a link to an image with some parameters. We will also add methods for checking the user registration service and methods for returning various public information.
# collections/users.coffee Users = Meteor.users # _.extend Users, # allowFieldsForUpdate: ['profile', 'username'] # Users.helpers # , update: (data) -> Users.update @_id, data # , # set: (data) -> d = {} f = _(Users.allowFieldsForUpdate) for key, value of data when f.include(key) d[key] = value @update $set: d # , # # merge: (data) -> current = @get() @set _.deepExtend(current, data) # , , # get: -> r = {} r[key] = @[key] for key in _(@).keys() r # getEmails: -> p = [@profile?.email] s = _(@services).map (value, key) -> value?.email e = _(@emails).map (value, key) -> value?.address _.compact p.concat(e, s) # getEmail: -> @getEmails()[0] # getUsername : -> @username || @_id getName : -> @profile?.name || "Anonymous" getPublicEmail : -> @profile?.email urlData: -> id: @getUsername() # , # getAvatar: (size) -> size = Number(size) || 200 options = s: size d: 'identicon' r: 'g' hash = "00000000000000000000000000000000" if email = @getPublicEmail() hash = Gravatar.hash(email) else hash = @profile?.emailHash || hash Gravatar.imageUrl hash, options # isFromGithub: -> @service == 'github' isFromGoogle: -> @service == 'google' isFromPassword: -> @service == 'password' # # isEditable: -> @_id == Meteor.userId() # @UsersCollection = Users It seems to have figured out what a collection is in a meteor, it should be mentioned that it is undesirable to store states in the model, since all data in the collection is reactive, if the record in the database changes, then saved somewhere in memory, the model object will lose its relevance, and subsequent work with it can lead us to the use of obsolete data, later on with examples we consider how to work with models.
Publications
I created three user posts in db
$ meteor mongo meteor:PRIMARY> db.users.count() 3 And when I try to get data in the browser, I did not find any records without authentication and one (own) otherwise.
In this application, we will not hide users from everyone, just hide private information, such as authentication tokens.
Since we removed the package
autopublish, now the process of publishing data needs to be done manually, this will allow us to control the data transmitted to the user.We publish a collection of users.
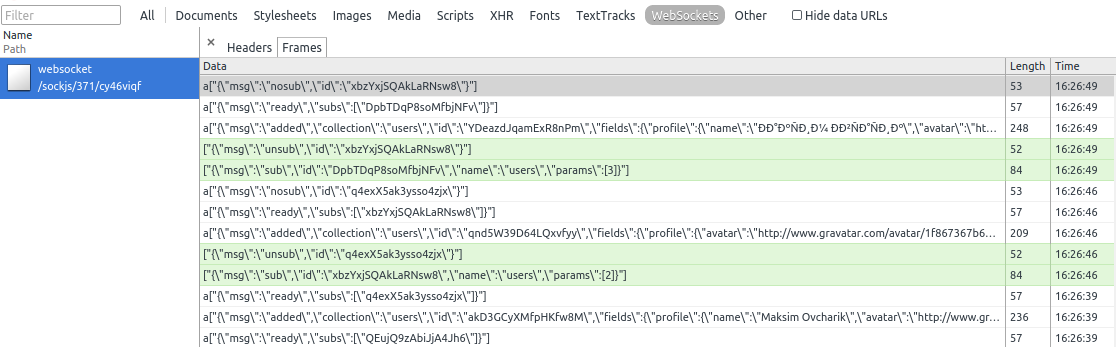
# server/publications/users.coffee Meteor.publish 'users', (limit = 20) -> UsersCollection.find {}, fields: service: 1 username: 1 profile: 1 limit: limit This code will provide access to users for everyone, you only need to subscribe, I immediately thought about giving users the ability to download data by page, if you do not specify the issue limit, all user records will be immediately downloaded, when subscribing to this publication, not very good for obvious reasons, the same thing happens when used
autopublish, only automatically and with all collections.We also limited the visibility of the paged data, nothing but information from the field
profileand user name, subscribers can not see. But for example, we want to provide access to e-mail addresses for the current user; we will create another publication. # server/publications/profile.coffee Meteor.publish 'profile', -> # , # if @userId # UsersCollection.find { _id: @userId }, fields: service: 1 username: 1 profile: 1 emails: 1 else # , @ready() return The second parameter passed to the method
Meteor.publishis a function that should return the collection cursor. This function can take any number of arguments and it runs in the context of an object, in which some methods are available that allow you to notify the user about various changes in data and provide access to some properties of the connection. For example, in the profile publication we use the method ready, in the case when the user is not authorized, it means that the data in the publication is ready, and a callback will be called upon the client when subscribing, but it will not receive any data. Read more about publications.Subscriptions
I have repeatedly noted that to obtain data and to track changes in them, you first need to subscribe to publications, in general everything that happens with the data in the meteor application can be easily monitored and monitored, and if you simply create a prototype where this is not your key moments, you can always use the package
autopublish.We will use for subscriptions
iron:router, and it will control the entire necessary process, since for manual control this process will have to follow many things, and this library solves all the problems. It is desirable to output some data page by page, so before creating a controller for users, we abstract a little and create a class that has the functionality to manage pages and which will inherit from the library controller iron:router. # client/lib/0.pageable_route_controller.coffee varName = (inst, name = null) -> name = name && "_#{name}" || "" "#{inst.constructor.name}#{name}_limit" class @PagableRouteController extends RouteController pageable: true # , perPage: 20 # # limit: (name = null) -> Session.get(varName(@, name)) || @perPage # incLimit: (name = null, inc = null) -> inc ||= @perPage Session.set varName(@, name), (@limit(name) + inc) # resetLimit: (name = null) -> Session.set varName(@, name), null # ? loaded: (name = null) -> true Let's also create a template in the form of a button, with a click on which the method will be called
incLimit, for the current controller, of course, if it supports this functionality. It could be done and endless scrolling, but it's easier. //- client/components/next_page_button/next_page_button.jade template(name='nextPageButton') unless loaded a.btn.btn-primary.btn-lg.NextPageButton(href = '#') | More # client/components/next_page_button/next_page_button.coffee Template.nextPageButton.helpers loaded: -> ctrl = Router.current() if ctrl.pageable ctrl.loaded(@name) else true Template.nextPageButton.events 'click .NextPageButton': (event) -> ctrl = Router.current() if ctrl.pageable ctrl.incLimit(@name, @perPage) Here we are already setting some logic for the component. As you can see, all templates are added to the global namespace
Template. Refer to the template we can through Template.<template-name>. To describe the methods used in the template, you need to use the method helpersto which the object is passed with the methods. In this example, we describe only one method loadedthat checks what the current controller is and gives a result indicating whether all the data has been loaded. In the template itself, we pull this method in the construction unless loaded; also in the template, you can take data from the current context. Template helpers can be compared with the prototype of an object when using them in a template, but there are limitations within the function itself, since each helper is called something like this<helper-func>.apply(context, arguments), that is, we do not have the opportunity to apply to all template helpers, inside a function, which in general can sometimes interfere.To handle template events, you need to describe them in the method
eventsto which the object is transferred, with keys of the following format <event> <selector>. The event is passed to the handler, jQueryand the template in which the event was triggered, since we can handle child events in the parent template, this can sometimes be useful.Now we are ready to create a page with a list of all users and look at an example of how to manage subscriptions in
iron:router. # client/routes/users.coffee Router.route '/users', name: 'users' class @UsersController extends PagableRouteController # perPage: 20 # , , # # # , iron:router # , # subscriptions: -> @subscribe 'users', @limit() # data: -> users: UsersCollection.find() # ? loaded: -> @limit() > UsersCollection.find().count() # , onRun: -> @resetLimit() @next() The method
subscriptionsis subscribed to the publication users. There is still a practically similar method waitOn, only in it the router will wait until all data is unloaded, and after it renders the page, until this point it will display a template that can be set via a property loadingTemplate. The data returned by the method datawill be bound to the template, and we will be able to use it through the current context. UsersCollection.find()returns the cursor, not the data itself, but the Blaze will do all the transformations for us, as if we are already working with ready data. Since we subscribe to a limited amount of data, the call UsersCollection.find().fetch()will return us only the data uploaded to the client, that is, if we, for example, set a limit of 1, thenfindwill work only with the loaded selection (one record), and not all the data in the collection from the database. For example, here we redefine the method loaded, I think its essence is clear, but it should be remembered that it countwill return us the number of local records, which means it will be equal limituntil all the data are unloaded, therefore the condition is strictly greater.In
iron:routerthere are several hooks, for example, it would not be bad for us to reset the loaded limit every time you open a page with users. Otherwise, if we previously unloaded a large amount of data, the page can be rendered for a long time. Therefore, it is convenient to use the hook to reset the data limit.onRun. It is executed once, when the page loads. There is only the moment that when hot replacing the code that the meteor performs, after saving the files with the code, this hook will not be executed, so manually refresh the page when the controller using the hook is debugged (there is no such problem with others). More about hooks and subscriptions .Reactive variables and functions
We have subscribed to the publication, but still it may not be clear why clicks on the button from the template
nextPageButtonwill lead us to load a new piece of data, but all due to manipulations with the object Sessionin PagableRouteController. The data in this object are reactive, and iron:routerwill automatically track changes in them. You can try to type in the browser console Tracker.autorun( function() { console.log( 'autorun test', Session.get('var') ); } ) And try to change the value using the call
Session.set('var', 'value'), the result will not take long.Thanks to this mechanism, it
iron:routerunderstands when a subscription needs to be updated, in the same way the data in the templates are updated automatically. More details about the reactive variables are well described in the official documentation , and in addition to the variables Sessionthere is an opportunity to create reactive objects , with methods setand getfor managing the values that will also be tracked by the tracker and templates. And the tracker is something like a listener, you can create a function that will not contain reactive variables, but will also be tracked by the tracker, for this you need to useTracker.Dependency . In general, this library has other possibilities, but in practice I did not have to use them, perhaps in vain.Another small example that can be performed in the browser console:
var depend = new Tracker.Dependency(); var reactFunc = function() { depend.depend(); return 42; } Tracker.autorun(function() { console.log( reactFunc() ); }); // 42 depend.changed() // 42 depend.changed() // 42 More about subscriptions
I explained how subscriptions can be used with an example
iron:router, but this is not the only mechanism . The main thing to remember is that you need to use subscriptions carefully, otherwise you risk unloading a large amount of data and automatically tracking changes to them where there is no need. iron:routerprovides us with a very simple way to manage subscriptions, it will turn off all unnecessary ones, connect the necessary ones, update the current ones if necessary, like, for example, this happens when we load the next page with us.Let's finish the list of users and make sure that all this works in practice.
//- client/components/users.jade template( name='users' ) h1 Users .row //- , +each users .col-xs-6.col-md-4.col-lg-3 //- //- each , //- +userCard //- +nextPageButton //- client/components/user_avatar/user_avatar.jade //- , template(name='userAvatar') img(src="{{user.getAvatar size}}", alt=user.getUsername, class="{{class}}") //- client/components/user_card.jade //- //- template(name='userCard') .panel.panel-default .panel-body .pull-left +userAvatar user=this size=80 .user-card-info-block ul.fa-ul //- li if isFromGithub i.fa.fa-li.fa-github else if isFromGoogle i.fa.fa-li.fa-google else i.fa.fa-li b= getName //- li i.fa.fa-li @ //- a(href="{{ pathFor route='users_show' data=urlData }}")= getUsername //- , if getPublicEmail li i.fa.fa-li.fa-envelope = getPublicEmail As a result, pagination works for us, and since all data is reactive, new users of the system will be added to the page automatically, without any reloads, because we have subscribed to the collection, which means that any changes to the data in the database on the server will immediately be displayed on user page. You can try to register a new user in a new tab, or change the values directly in the database using the utility
mongo- the changes will be displayed on the page, and you will not have to do anything to do this.And to make sure that this approach works optimally, you can see the browser logs. I set the number of users per page equal to one. DDP protocol is quite simple and easy to read, so I will not go into details. In the logs, you can simply see that all unnecessary subscriptions were unsubscribed, and users downloaded only three times, one for each update of the subscription.
User page and some more about templates
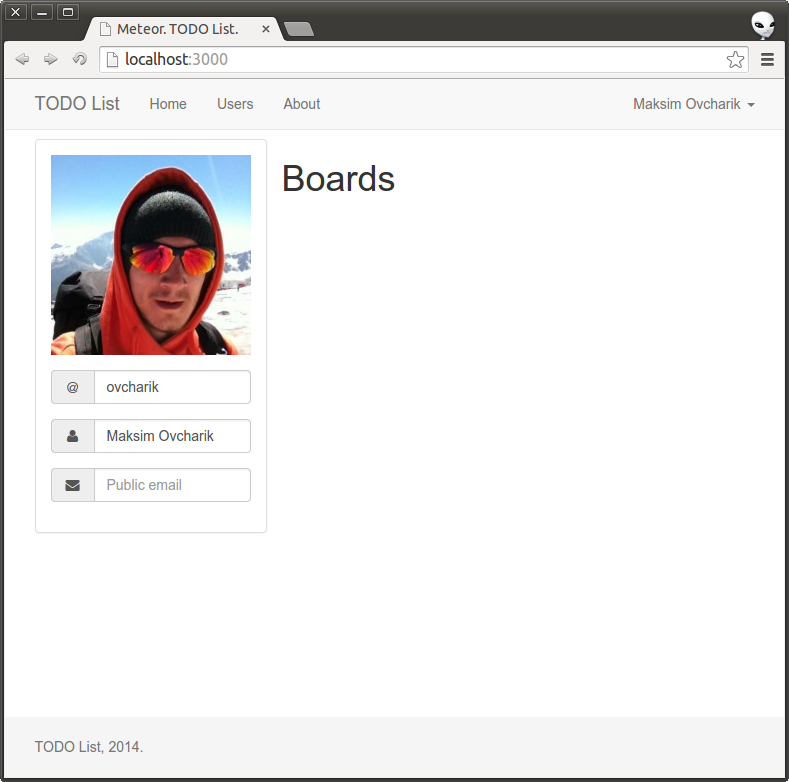
Let's create a user page where there will be an opportunity to change some data and complete this work with users so that you can proceed to creating your own collections.For this, the first thing for an authorized user, instead of the home page, is to show the current user page, modify the controller a little.
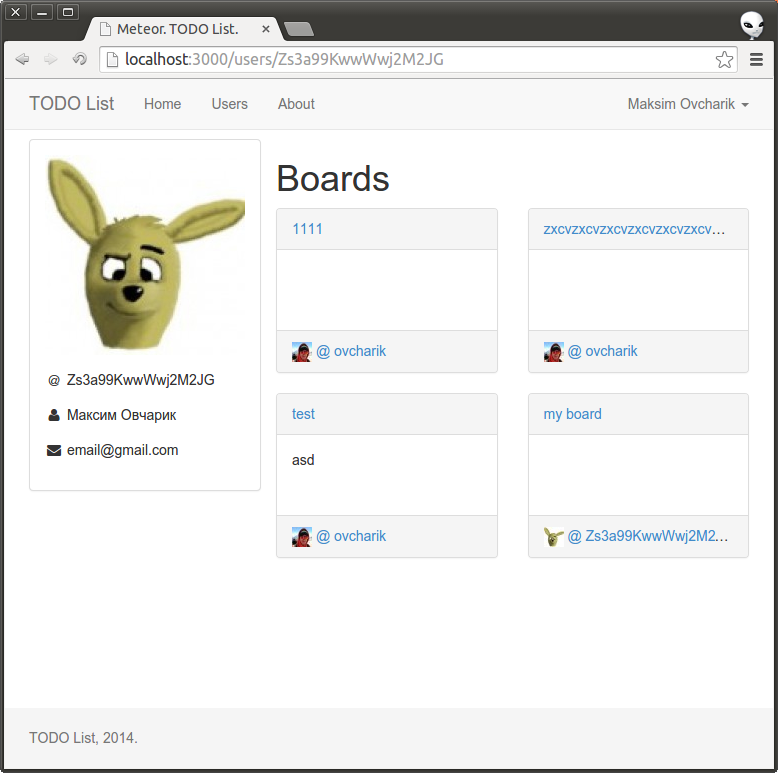
# client/routers/home.coffee Router.route '/', name: 'home' class @HomeController extends PagableRouteController # ? isUserPresent: -> !!Meteor.userId() # # waitOn: -> if @isUserPresent() @subscribe 'profile' # , data: -> if @isUserPresent() { user: UsersCollection.findOne Meteor.userId() } # # action: -> if @isUserPresent() @render 'profile' else @render 'home' And also create a controller in which you can view the profile of any user.
# client/routers/user_show.coffee Router.route '/users/:id', name: 'users_show' class @UsersShowController extends PagableRouteController # template: 'profile' # waitOn: -> @subscribe 'user', @params.id # data: -> user: UsersCollection.findOneUser(@params.id) For the convenience of finding users either by ID or by login, I created additional methods in the collection: one returns a cursor, the second is data.
# collections/users.coffee # ... _.extend Users, # ... findUser: (id, options) -> Users.find { $or: [ { _id: id }, { username: id } ] }, options findOneUser: (id, options) -> Users.findOne { $or: [ { _id: id }, { username: id } ] }, options We try to get the data for the user page, but they are not published, we fix it.
# server/publications/user.coffee Meteor.publish 'user', (id) -> UsersCollection.findUser id, fields: service: 1 username: 1 profile: 1 limit: 1 Almost everything is ready, create a template and look at the result. When creating the template, I decided to create a component that, depending on the access rights, will give the opportunity to edit the model field.
//- client/components/editable_field/editable_field.jade //- //- , //- //- //- this.<key> template(name='editableField') .form-group.EditableFiled if data.isEditable div(class=inputGroupClass) if hasIcon .input-group-addon if icon i.fa.fa-fw(class='fa-{{icon}}') else i.fa.fa-fw=iconSymbol input.Field.form-control(placeholder=placeholder, value=value, name=name) else if defaultValue span.form-control-static if hasIcon if icon i.fa.fa-fw(class='fa-{{icon}}') else i.fa.fa-fw=iconSymbol = defaultValue To interpolate variables in rows in a template, you can use the baleen design:
class='fa-{{icon}}', icon- it is a variable. # client/components/editable_field/editable_field.coffee Template.editableField.helpers value: -> ObjAndPath.valueFromPath @data, @path name: -> ObjAndPath.nameFromPath @scope, @path hasIcon: -> @icon || @iconSymbol inputGroupClass: -> (@icon || @iconSymbol) && 'input-group' || '' Template.editableField.events # , 'change .Field': (event, template) -> data = $(event.target).serializeJSON() $(template.firstNode).trigger 'changed', [data] //- client/components/profile/profile.jade template(name='profile') //- , , //- +with user .profile-left-side .panel.panel-default .panel-body .container-fluid .row.row-bottom //- , //- <>=<>, //- userAvatar +userAvatar user=this size=200 class='profile-left-side-avatar' .row //- +editableField fieldUsername +editableField fieldName +editableField fieldEmail .profile-right-side h1 Boards # client/components/profile/profile.coffee Template.profile.helpers fieldUsername: -> data: @ defaultValue: @getUsername() placeholder: 'Username' scope: 'user' path: 'username' iconSymbol: '@' fieldName: -> data: @ defaultValue: @getName() placeholder: 'Name' scope: 'user' path: 'profile.name' icon: 'user' fieldEmail: -> data: @ defaultValue: @getPublicEmail() placeholder: 'Public email' scope: 'user' path: 'profile.email' icon: 'envelope' Template.profile.events # # 'changed .EditableFiled': (event, template, data) -> user = template.data?.user return unless user data = data.user user.merge data It seems to me that the layout of meteor templates is
jadequite semantic, you don’t need to think about many things and read a lot of documentation - everything is quite obvious. But if you have problems understanding the code above, I advise you to look through the documentation for the mquandalle package : jade and spacebars . It’s just that when I got acquainted with the layout of templates in a meteor, there were no problems, I think that they, in fact, made them very comfortable.In general, everything is ready, open the authentication form in the header, enter the system, and instead of the title “Home” your profile will immediately appear on the page, without any reloads.
If something is not clear to you up to the present moment, then I advise you to get acquainted with the current state of the project in the repository , I tried to comment everything on the files in the files, it is also possible to look through the above, maybe not completely consistently, but I tried to pay attention to all the key moments, and of course you can clone the project at this stage and touch it with your hands. Then I'm going to touch on a few more topics related to server code: how to create your own collections, how to protect data in collections from unwanted editing, tell you a little about using RPC and using libraries
npmon the server.More about collections and subscriptions
Before we start creating our collections, I suggest creating a mechanism that will automatically calculate some fields when inserting / modifying data in the database. To do this, add the package aldeed: collection2 , which includes aldeed: simple-schema . These packages will allow us to easily validate data, add indexes to the collection, and more.Add
aldeed:simple-schemasome new features to the package . # lib/simple_schema.coffee _.extend SimpleSchema, # # build: (objects...) -> result = {} for obj in objects _.extend result, obj return new SimpleSchema result # , # # timestamp: createdAt: type: Date denyUpdate: true autoValue: -> if @isInsert return new Date if @isUpsert return { $setOnInsert: new Date } @unset() updatedAt: type: Date autoValue: -> new Date And create a new collection
# collections/boards.coffee # boardsSchema = SimpleSchema.build SimpleSchema.timestamp, 'name': type: String index: true 'description': type: String optional: true # # 'owner': type: String autoValue: (doc) -> if @isInsert return @userId if @isUpsert return { $setOnInsert: @userId } @unset() # 'users': type: [String] defaultValue: [] 'users.$': type: String regEx: SimpleSchema.RegEx.Id # Boards = new Mongo.Collection 'boards' Boards.attachSchema boardsSchema # Boards.allow # insert: (userId, doc) -> userId && true # update: (userId, doc) -> userId && userId == doc.owner # _.extend Boards, findByUser: (userId = Meteor.userId(), options) -> Boards.find $or: [ { users: userId } { owner: userId } ] , options create: (data, cb) -> Boards.insert data, cb # Boards.helpers update: (data, cb) -> Boards.update @_id, data, cb addUser: (user, cb) -> user = user._id if _.isObject(user) @update $addToSet: users: user , cb removeUser: (user, cb) -> user = user._id if _.isObject(user) @update $pop: users: user , cb updateName: (name, cb) -> @update { $set: {name: name} }, cb updateDescription: (desc, cb) -> @update { $set: {description: desc} }, cb # joins getOwner: -> UsersCollection.findOne @owner getUsers: (options) -> UsersCollection.find $or: [ { _id: @owner } { _id: { $in: @users } } ] , options urlData: -> id: @_id # @BoardsCollection = Boards First of all, when creating the collection, we defined the schema; this will allow us to validate the data and automatically calculate some fields. You can read more about validation on the aldeed: simple-schema package page , there is quite rich functionality, and when installing an additional package
aldeed:autoformfrom the same author, you can generate forms that will immediately notify about errors when creating a record.We create a new collection in the database by calling
Boards = new Mongo.Collection 'boards'if it is not there, or we are connecting to the existing one. In principle, this is all the necessary functionality for creating new collections, there are a couple more options that you can specify when creating.Using the method
allowthe collection, we can control access to change data in the collection. In the current example, we prohibit the creation of new entries in the collection for all unauthorized users, and allow only the creator of the board to change data. These checks will be carried out on the server and you can not worry that some cooler will change this logic on the client. Also at your disposal there is almost a similar method deny, I think its essence is clear. Learn more about allow and deny .When displaying a board card, I want to immediately display the data about the board creator. But if we subscribe only to the boards, then this data will not be transferred to the client. However, publications in meteor make it possible to subscribe to any data, even automatically calculated, such as collection counters and others.
# server/publications/boards.coffee Meteor.publish 'boards', (userId, limit = 20) -> findOptions = limit: limit sort: { createdAt: -1 } if userId # cursor = BoardsCollection.findByUser userId, findOptions else # cursor = BoardsCollection.find {}, findOptions inited = false userFindOptions = fields: service: 1 username: 1 profile: 1 # addUser = (id, fields) => if inited userId = fields.owner @added 'users', userId, UsersCollection.findOne(userId, userFindOptions) # , # handle = cursor.observeChanges added: addUser changed: addUser inited = true # , # userIds = cursor.map (b) -> b.owner UsersCollection.find({_id: { $in: userIds }}, userFindOptions).forEach (u) => @added 'users', u._id, u # , @onStop -> handle.stop() return cursor Since Monga does not know how to make requests through several collections and produce already processed data, as it happens in relational databases, we will have to get information about the board makers with one more request, and it’s more convenient to work within the data models.
First of all, depending on the request, we get the required boards from the base, after that we need another request to get users. Methods
added, changedandremovedin the context of the publication can manage the data transmitted to the client. If we return a collection cursor to a publication, then these methods will be called automatically depending on the state of the collection, which is why we return the cursor, but additionally in the publication itself we subscribe to changes to the data in the board collections, and send user data to the client as necessary.With the help of connection logs via web sockets or with the help of this utility, you can make sure that this approach will work optimally. And here it is important to understand that in our case, changes in the user’s collection will not be synchronized with the client, but that was what was intended. By the way, for a simple join you can simply return an array of cursors as a result of a subscription.
To display user boards, I added new subscriptions to routers and wrapped up the necessary templates, but we already reviewed all these points above, if you are interested in all the changes, you can see them here . But in the end we have to get the following, though the boards will have to be created through the console to check the performance.
You can also use the mrt: reactive-publish package to create reactive publications .
We are finalizing the server
Let's add the ability for boards to set the background image, for this we need to configure the server so that it can receive files, process them, save and give them upon request.NPM
For image processing, I used to use ImageMagick , and for the node there are corresponding packages that provide an interface to this library. To allow the meteor to use the
npmpackages, you need to add meteorhacks:npm, after that, all the necessary packages can be described in the file packages.json. For example, I only need the gm package and mine packages.jsonwill look like this: { "gm": "1.17.0" } All packages
npmconnected through meteorhacks:npmI will turn around in one meteor package, so when you build an application through a command, meteor buildthere will be no problems and all dependencies will be resolved automatically.You
npmneed to connect packages on the server through the command Meteor.npmRequire(<pkg-name>), it works as well as the function requirein the node.RPC and synchronous calls to asynchronous functions
To load and process the image, create a server method that can be called from the client.
# server/lib/meteor.coffee Meteor.getUploadFilePath = (filename) -> "#{process.env.PWD}/.uploads/#{filename}" # server/methods/upload_board_image.coffee # gm = Meteor.npmRequire 'gm' # resizeAndWriteAsync = (buffer, path, w, h, cb) -> gm(buffer) .options({imageMagick: true}) .resize(w, "#{h}^", ">") .gravity('Center') .crop(w, h, 0, 0) .noProfile() .write(path, cb) # resizeAndWrite = Meteor.wrapAsync resizeAndWriteAsync # Meteor.methods uploadBoardImage: (boardId, data) -> board = BoardsCollection.findOne(boardId) if board.owner != @userId throw new Meteor.Error('notAuthorized', 'Not authorized') data = new Buffer data, 'binary' name = Meteor.uuid() # path = Meteor.getUploadFilePath name resizeAndWrite data, "#{path}.jpg", 1920, 1080 resizeAndWrite data, "#{path}_thumb.jpg", 600, 400 # BoardsCollection.update { _id: boardId }, $set: background: url: "/uploads/#{name}.jpg" thumb: "/uploads/#{name}_thumb.jpg" return In the method
uploadBoardImagewe accept the identifier of the board to which the image is added and the string with the binary data of this image.If an exception is thrown in the method, it will be passed to the user on the client, by the first parameter of the callback. And the data returned by the method will come to the client with the second parameter of the callback.
So that you can use exceptions and return functions with asynchronous programming style, in the server part of the meteor there is a method that wraps asynchronous functions into synchronous, via the fibers library . If in short, thanks to this library, the calls of wrapped functions will not occupy the execution queue, so that you can write synchronous code on the server and do not worry about the wrong sequence of code execution. By method
Meteor.wrapAsync(<async-func>)functions which last parameter accept kollbek turn around. In this callback, the first parameter must be an error, and the second is the result, such is the format of the parameters of all standard libraries in the node. If an error occurs, the wrapped function will throw an exception with this error, otherwise the second parameter returned from the function will be returned to the callback.Routing
I understand that for issuing statics from the server it is better to use ready-made and run-in solutions for many reasons, but here I am going to give statics to the node.
In meteor for server routing there is a standard webapp package , but we have already installed a much more convenient solution in the form
iron:router. Similarly, as on the client, create a server route. # server/routes/uploads.coffee fs = Meteor.npmRequire 'fs' Router.route '/uploads/:file', where: 'server' action: -> try filepath = Meteor.getUploadFilePath(@params.file) file = fs.readFileSync(filepath) @response.writeHead 200, { 'Content-Type': 'image/jpg' } @response.end file, 'binary' catch e @response.writeHead 404, { 'Content-Type': 'text/plain' } @response.end '404. Not found.' Here the main route to transfer the property
where: 'server', otherwise it will not work. In action, we are trying to read the specified file from disk, since in this directory there will be only images of the same format, I have simplified this method as much as possible.Objects
requestand responseavailable in the context of the route are class objects from the standard library of the http.IncomingMessage and http.ServerResponse nodes, respectively.Thereiron:routeris also an interface for creating a REST API.
Using RPC
To use, let's create a form for adding a new board.
Here I also created autocompet to add users to the board, it also uses RPC, more details on the implementation can be found in the repository .
//- client/components/new_board_form/new_board_form.jade template(name='newBoardForm') //- .panel.panel-default.new-board-panel(style='{{panelStyle}}') .panel-body h1 New board form(action='#') .form-group input.form-control(type='text',placeholder='Board name',name='board[name]') .form-group textarea.form-control(placeholder='Description',name='board[description]') .form-group //- , , label.btn.btn-default(for='newBoardImage') Board image .hide input#newBoardImage(type='file', accept='image/*') button.btn.btn-primary(type='submit') Submit # client/components/new_board_form/new_board_form.coffee # currentImage = null currentImageUrl = null currentImageDepend = new Tracker.Dependency # resetImage = -> currentImage = null currentImageUrl = null currentImageDepend.changed() # uploadImage = (boardId) -> if currentImage reader = new FileReader reader.onload = (e) -> # Meteor.call 'uploadBoardImage', boardId, e.target.result, (error) -> if error alertify.error error.message else alertify.success 'Image uploaded' reader.readAsBinaryString currentImage # Template.newBoardForm.helpers # , # , panelStyle: -> currentImageDepend.depend() currentImageUrl && "background-image: url(#{currentImageUrl})" || '' # , Template.newBoardForm.rendered = -> resetImage() # Template.newBoardForm.events # , # , , # 'submit form': (event, template) -> event.preventDefault() form = event.target data = $(form).serializeJSON() BoardsCollection.create data.board, (error, id) -> if error alertify.error error.message else form.reset() alertify.success 'Board created' resetUsers() uploadImage(id) resetImage() # # 'change #newBoardImage': (event, template) -> files = event.target.files image = files[0] unless image and image.type.match('image.*') resetImage() return currentImage = image reader = new FileReader reader.onload = (e) => currentImageUrl = e.target.result currentImageDepend.changed() reader.readAsDataURL(image) Here for loading and image processing we perform the remote method through
Meteor.call. As you can see, the remote procedure call on the client is not much different from the usual function call, and all the data passed by the arguments will be uploaded to the server via a web socket. To read user files, I used the File API from the HTML5 specification.The example of downloading images may not be the best, but it demonstrates well the capabilities of the server part of the meteor. If you are writing for production, you can use the ready-made CollectionFS solution .
- The result , the loading of images did not work there, the roofing felts deal with ImageMagick, the roofing felts of the inability to create their own directory for storage
- Repository
In principle, this is all that I wanted to highlight in this lesson, but for completeness, I will complete the functionality of the cards in the boards, there will not be used something that is not in this lesson. Changes are available as usual in the repository .
Links
- Meteor
- Documentation ;
- Tutorial from the developers of the framework;
- Atmosphere - meteor packages
- mquandalle: jade - a package that adds the ability to use jade markup for meteor templates
- iron: router - client and server routing;
- mizzao: bootstrap-3 - Twitter Bootstrap for a meteor;
- ian: accounts-ui-bootstrap-3 - Twitter Bootstrap-based templates for login and registration forms;
- dburles:collection-helpers — ;
- jparker:gravatar — Gravatar ;
- aldeed:collection2 — ;
- sergeyt:typeahead — ;
- meteorhacks:npm —
npm; - CollectionFS — ;
- :
- MeteorHacks — ;
- EventedMind — ;
- Meteorpedia — Wiki;
- ;
- ,
Source: https://habr.com/ru/post/242943/
All Articles