Sync music and gaming events on Unity
An example of a level editor in the game.
If you have ever played a game like Guitar Hero, Osu or Bit Trip Runner, you know how much the simple dependence of the gameplay on the background music plays in the stream. Surprisingly, there are not so many such games. In addition, such synchronization can be useful for creating special effects, but nevertheless almost never occurs, except for the rhythm games mentioned above. So I decided to take advantage of such a simple-minded method in my own game, and also to share my work.
I tried to describe the design, convenient for programming a large number of game events, and working as optimally as possible. Which can be applied in almost any game, perhaps it will be useful to you if you are engaged in their development.
')
So, first you need to define a class event:
[Serializable] public class Game_event { public char key; // public float time; // [NonSerialized]public float finish_time; //, public bool isFinish(){ //, return false; } public void Create(){ // //, (Main.sound_time - time) } public void Destroy(){ // } public Game_event (float time, char key){ this.time = time; this.key = key; } } Next, you need a class inherited from MonoBehaviour, which will contain the main code and, of course, a link to the sound object. In my case, this is the Main class.
public static float sound_time=0; // , public static List<Game_event> game_event = new List<Game_event>(); // void Update () { sound_time = sound.time; //sound - AudioSource, foreach (Game_event e in game_event) { if (sound_time>=e._time && sound_time<e.finish_time && !e.active) { e.active = true; e.finish_time = float.MaxValue; current_event =e; e.Create(); } if (e.active) if (e.isFinish()) // isFinish , , { e.active=false; e.finish_time = sound_time; e.Destroy(); } } } There are several options for creating various events: by enumerating directly in the Game_event code, creating additional classes, or using a scripting language like Lua, which of course is more convenient.
Editor
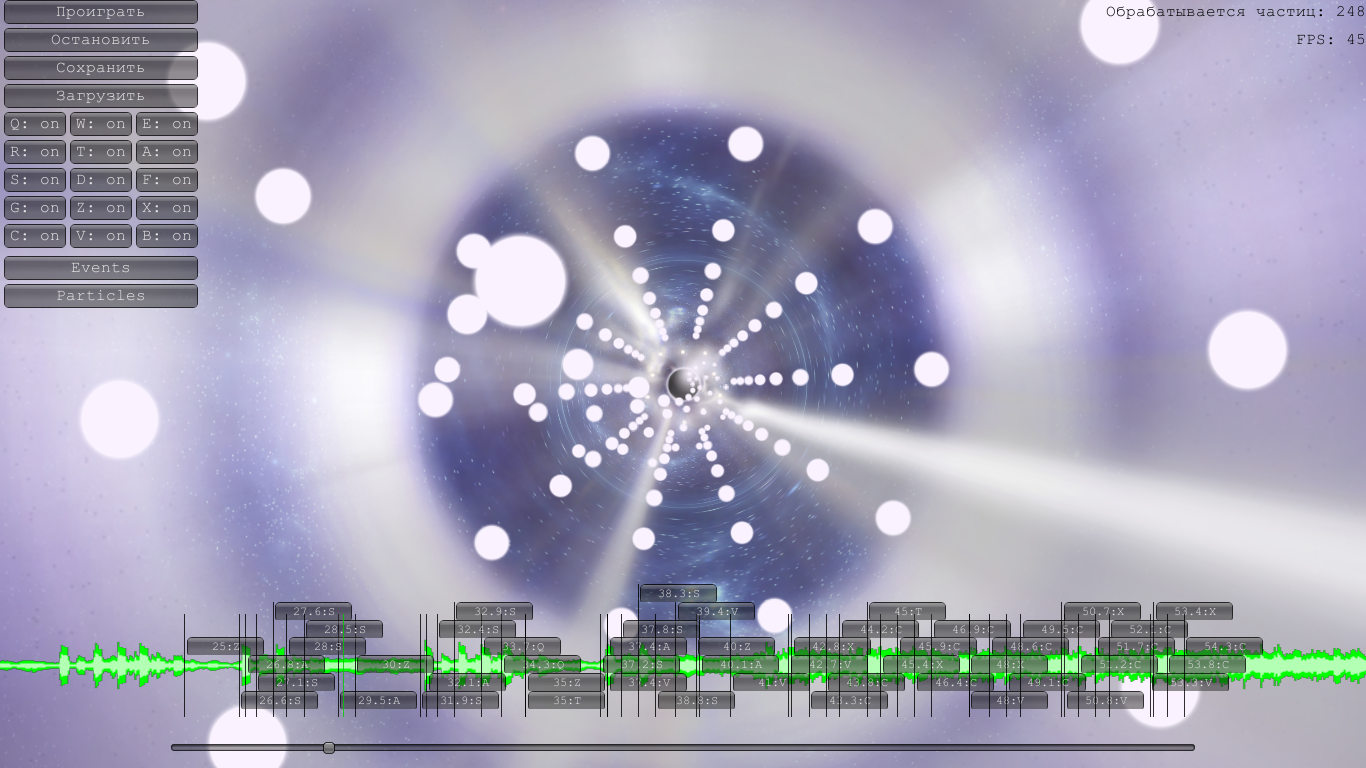
The most convenient way of editing, in my opinion, is the binding of certain events to the keys, then creating the level turns into a “piano game”, where your task is only to press the keys to the rhythm of the music. That is why the corresponding symbols are used as the key.
For implementation, you need to determine the keys available for input:
public static char[] keys_s = { 'Q','W','E','R','T', 'A','S','D','F','G', 'Z','X','C','V','B'}; // void Update () { … Event c_e = Event.current; if (c_e.isKey && c_e.type == EventType.KeyDown) { if (Array.Exists(Main.keys_s, c=>c==c_e.keyCode.ToString()[0])) // , { game_event.Add (new Game_event (sound_time,c_e.keyCode.ToString()[0])); } } } Now at the moment of pressing the key, the corresponding event will be recorded in the list, which will be played synchronously to the sound.
It can be very convenient to adjust events to the sound wave pattern. You can get the texture with its image as follows:
float[] samples = new float[sound.clip.samples * sound.clip.channels]; sound.clip.GetData(samples, 0); // int frequency = sound.clip.frequency; // int scale = 10; // 1 SoundTex = new Texture2D ((int)(sound.clip.length*sound.clip.channels*scale), 200); int height = (int)(SoundTex.height / 2); for (int i=0; i<SoundTex.width; i++) { int c_hi = 0; int c_low = 0; float s_hi = 0; float s_low = 0; // 1px for (int k=0; k<(int)(frequency/scale); k++) { if (samples[k+i*(int)(frequency/scale)]>=0) { c_hi++; s_hi+=samples[k+i*(int)(frequency/scale)]; } else { c_low++; s_low+=samples[k+i*(int)(frequency/scale)]; } } // // , for (int j=0; j<(int)(SoundTex.height); j++) { if (j<(int)((s_hi/c_hi)*height*0.6f+height) && j>(int)((s_low/c_low)*height*0.6f+height)) SoundTex.SetPixel(i,j,new Color(0.7f,1,0.7f)); else if (j<=(int)((s_hi/c_hi)*height+height) && j>=(int)((s_low/c_low)*height+height)) SoundTex.SetPixel(i,j,new Color(0,1,0)); else SoundTex.SetPixel(i,j,new Color(0,0,0,0)); } } SoundTex.Apply (); // // You can see how everything works in action in this video:
Source: https://habr.com/ru/post/242631/
All Articles