Captain America vs VirtualSurfaceImageSource

Introduction
Most of the time, developing under Windows Runtime brings incomparable pleasure. I did nothing at all: I put on controls, added a pinch of MVVM, and then you sit and admire your code. This happens in 99% of cases. In the remaining hundredth part, real dances with a tambourine begin.
In fact, I am exaggerating, I resort to pagan rituals only in absolutely hopeless situations. But WP developers have something to scold MS, starting at least with the poor Silverlight developers, which accounted for all the misfortunes . Well, okay, it's all already gone offtopic.
Cap, where are you?
So, let's mentally transfer to a hypothetical situation. We have an application, let it be a client for kinopoisk.ru under Windows 8.1. And a poster of a Hollywood AAA project with a multi-million dollar budget and superheroes from our favorite comics. The task is to display the poster to the user in perfect quality. By the word “perfect” I mean the correspondence 1 pixel of the image == 1 pixel physical .
')
It would seem a trifle, create an Image and assign its desired Source BitmapImage with a picture to its Source property. That's just the size of the image is alarming - 9300 x 12300. Taking the calculator in hand, I start counting: 9300 * 12300 pixels * 4 B / pix = 436 MB. A rather impressive figure, but in the 21st century you will not be surprised with such things. The average desktop 2010 without problems digesting such amounts of data, so press F5 and enjoy your creation. Everything works fine, at least on my computer, and all right. On this article could finish ...
When the whole doorway got too narrow for us
 Well, then we mentally correct the TK. Let our client kinopoisk.ru be a new-fashioned “Universal Application”, i.e. one application for both Windows and Windows Phone. Well, I didn’t have to edit anything in the code, it was enough just to recompile. Rolling up my sleeves, I run on my Lumia 920 and ... it immediately falls ...
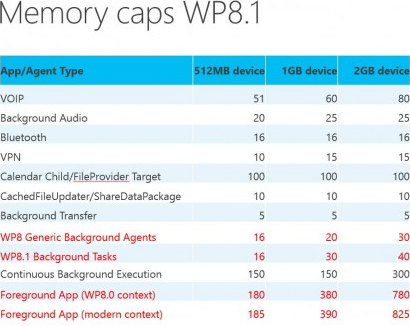
After a little zaguglivaniya, it turned out that on my lumiya (which has on board as much as 1 GB of memory) applications only have 390 MB in which our picture clearly does not fit . Devices with 2 GB - so far not allowable, in my case, a luxury. It is a pity, it is necessary to look for workarounds.
And what should I do now?
You say. In general, there are some variants:
- Shrink the picture to an acceptable size.
- Draw only visible part of the screen.
The first option immediately disappears, we will not sacrifice quality. So go directly to the second. Here we are again waiting for a crossroads:
- Write everything yourself
- VirtualSurfaceImageSource
And then I remembered that a real programmer is primarily a lazy programmer. So let's use the ready-made version, courtesy of Redmond developers. In fact, VirtualSurfaceImageSource has several advantages that could not have been achieved on our own with a bunch of XAML + C #, but we will leave all these goodies for later.
VirtualSurfaceImageSource - the same “silver bullet”
So, here we come to the “nail” of our program today. As I noted earlier, VirtualSurfaceImageSource stores in memory only the visible part of the image. This thing helps a lot if the application needs to display large amounts of data. All of us face such applications all the time: maps (Bing Maps, HERE Maps), PDF Reader (which is in Windows 8.1), and even such cool ones as Internet Explorer, Word and Excel under Windows Phone use similar technology.
The description turned out to be rather simplistic, although in fact the logic of VirtualSurfaceImageSource is much more complicated, and under the hood it performs a lot of calculations and all sorts of different optimizations. We should not worry about these details, all this is boring and uninteresting. What matters is what we see outside.

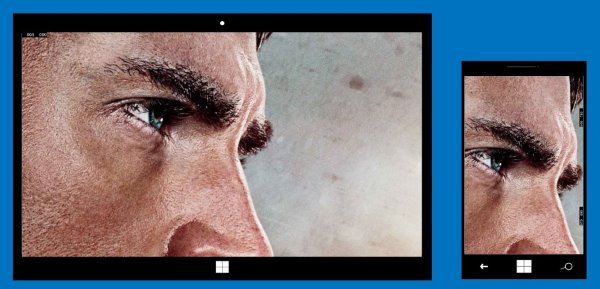
And for us, everything is very simple. VirtualSurfaceImageSource gives instructions on which parts of the image to redraw. The rest of the work he takes on. As indicated in the image above, we draw only the visible part of the image. There is no need to count the offset coordinates, VirtualSurfaceImageSource calculates them for us. Roughly speaking, the sequence of our actions is as follows:
- We get IVirtualSurfaceImageSourceNative
- Subscribe to render using RegisterForUpdatesNeeded
- When you call a callback draw the desired region
Disclaimer!
And yes, I almost forgot to warn you - no C # will be here! Yes, in such cases, you have to go out of your comfort zone. But do not rush to close the tab, the key part of the article is applicable for Win2D. The wrapper over VirtualSurfaceImageSource is already in the roadmap, so it remains to wait quite a bit. Or you can make a pull request with your implementation. I just plan to do this in the near future, so wait for updates!
Everything looks very simple, it remains only to write the code. We will draw using Direct2D , although in my case a banal copying of memory to Surface would be appropriate. In order not to clutter up the solution with a dozen projects that we don’t need, I created the C ++ Blank App (Universal Application). With the advent of C ++ / CX, interaction with C # code is reduced to a minimum of changes, so in this article I will tactfully cover this topic . But if anyone is interested, write in the comments, I will gladly tell you!
Step 0: Preparatory
Once again, in this example I created the C ++ Blank App (Universal Application) . For simplicity, all the code will be in the code-behind of the MainPage page.
Since IVirtualSurfaceImageSourceNative is not a Windows Runtime interface, you will need to include a special header file.
#include <windows.ui.xaml.media.dxinterop.h>
We declare all the fields and methods we need:
public ref class MainPage sealed
{
public :
MainPage ();
void UpdatesNeeded ();
private :
// DirectX methods
void CreateDeviceResources ();
void CreateDeviceIndependentResources ();
void HandleDeviceLost ();
// Creates VirtualSurfaceImageSource
// and set it to Image
void CreateVSIS ();
// Draws the specified region
void RenderRegion ( const RECT & updateRect);
private :
float dpi;
ComPtr < ID2D1Factory1 > d2dFactory;
ComPtr < ID2D1Device > d2dDevice;
ComPtr < ID2D1DeviceContext > d2dDeviceContext;
ComPtr < IDXGIDevice > dxgiDevice;
// Our image
BitmapFrame ^ bitmapFrame;
// Link to this VirtualSurfaceImageSource
VirtualSurfaceImageSource ^ vsis;
// Link to IVirtualSurfaceImageSourceNative
ComPtr < IVirtualSurfaceImageSourceNative > vsisNative;
};
And the designer:
MainPage :: MainPage ()
{
InitializeComponent ();
// Get the current DPI
dpi = DisplayInformation :: GetForCurrentView () -> LogicalDpi;
CreateDeviceIndependentResources ();
CreateDeviceResources ();
CreateVSIS ();
}
Comment here and not much of that, except that someone may confuse ComPtr <T> . This is a regular smart pointer , similar to shared_ptr <T> , only for COM objects.
In the future, I will use such a simple thing, which is very useful when debugging:
namespace DX
{
inline void ThrowIfFailed ( _In_ HRESULT hr )
{
if ( FAILED ( hr ))
{
// Set a breakpoint on this line to catch DX API errors.
throw Platform :: Exception :: CreateException ( hr );
}
}
}
Step 1: Initialization routine
There is nothing interesting here, writing such hands is a non-Guusarian affair. So I dragged off this code from the MS examples with minimal changes. Comments are original.
// Create device independent resources
void MainPage :: CreateDeviceIndependentResources ()
{
D2D1_FACTORY_OPTIONS options;
ZeroMemory (& options, sizeof ( D2D1_FACTORY_OPTIONS ));
#if defined ( _DEBUG )
// If the project is a debug build, enable Direct2D debugging via Direct2D SDK layer.
// Enabling SDK
// resource leaking needs to be fixed during the development cycle.
options.debugLevel = D2D1_DEBUG_LEVEL_INFORMATION ;
#endif
DX :: ThrowIfFailed (
D2D1CreateFactory (
D2D1_FACTORY_TYPE_SINGLE_THREADED ,
__uuidof ( ID2D1Factory1 ),
& options,
& d2dFactory
)
);
}
// These resources depend on hardware.
void MainPage :: CreateDeviceResources ()
{
This flag adds support for a different default channel ordering than the default API.
// It is recommended usage, and is required for compatibility with Direct2D.
UINT creationFlags = D3D11_CREATE_DEVICE_BGRA_SUPPORT ;
// This array will be supported by this feature.
// Note the ordering should be preserved.
D3D_FEATURE_LEVEL featureLevels [] =
{
D3D_FEATURE_LEVEL_11_1 ,
D3D_FEATURE_LEVEL_11_0 ,
D3D_FEATURE_LEVEL_10_1 ,
D3D_FEATURE_LEVEL_10_0 ,
D3D_FEATURE_LEVEL_9_3 ,
D3D_FEATURE_LEVEL_9_2 ,
D3D_FEATURE_LEVEL_9_1
};
// Create the D3D11 API device object, and get a corresponding context.
ComPtr < ID3D11Device > d3dDevice;
ComPtr < ID3D11DeviceContext > d3dContext;
D3D_FEATURE_LEVEL featureLevel;
DX :: ThrowIfFailed (
D3D11CreateDevice (
nullptr , // specify null to use the default adapter
D3D_DRIVER_TYPE_HARDWARE ,
0, // leave as 0 unless software device
creationFlags, // optionally set debug and Direct2D compatibility flags
featureLevels, // list of feature levels this app can support
ARRAYSIZE (featureLevels), // number of entries in above list
D3D11_SDK_VERSION , // always set this to D3D11_SDK_VERSION for Modern style apps
& d3dDevice, // returns the Direct3D device created
& featureLevel, // returns feature level of device created
& d3dContext // returns the device immediate context
)
);
// Obtain the DXGI device of the Direct3D11.1 device.
DX :: ThrowIfFailed (
d3dDevice.As (& dxgiDevice)
);
// Obtain the Direct2D device for 2-D rendering.
DX :: ThrowIfFailed (
d2dFactory-> CreateDevice (dxgiDevice.Get (), & d2dDevice)
);
// And get its corresponding device context object.
DX :: ThrowIfFailed (
d2dDevice-> CreateDeviceContext (
D2D1_DEVICE_CONTEXT_OPTIONS_NONE ,
& d2dDeviceContext
)
);
// Since this device was the surface image source,
// it needs to operate as pixels. Setting pixel unit mode
// ints, as in pixels.
d2dDeviceContext-> SetUnitMode ( D2D1_UNIT_MODE_PIXELS );
// Despite the fact that it is still very important to tell Direct2D
// the logical DPI the application operates on. Direct2D uses the DPI value as a hint to
// optimize internal rendering policy
// symmetric text rendering modes. Not specifying the appropriate DPI in this case will hurt
// application performance.
d2dDeviceContext-> SetDpi (dpi, dpi);
// When an application performs animation or image composition
// to use Direct2D grayscale text rendering mode rather than ClearType. The ClearType technique
// it doesn’t work
// image composition or sub-pixel animation of text. ClearType is still a method of choice when it
// comes with no further composition required.
d2dDeviceContext-> SetTextAntialiasMode ( D2D1_TEXT_ANTIALIAS_MODE_GRAYSCALE );
}
The only thing worth mentioning is SetUnitMode (). According to the commentary, in principle, everything should be clear. But do not forget to change the value to D2D1_UNIT_MODE_DIPS if you draw Direct2D primitives or text. In our case it will only interfere.
Step 2: Create VirtualSurfaceImageSource
This operation is reduced to just 3 actions:
// Create VirtualSurfaceImageSource
// We don’t need transparency, so isOpaque = false
vsis = ref new VirtualSurfaceImageSource (bitmapFrame-> PixelWidth, bitmapFrame-> PixelHeight, false );
// Give VirtualSurfaceImageSource to IVirtualSurfaceImageSourceNative
DX :: ThrowIfFailed (
reinterpret_cast < IInspectable *> (vsis) -> QueryInterface ( IID_PPV_ARGS (& vsisNative))
);
// Install DXGI Device
DX :: ThrowIfFailed (
vsisNative-> SetDevice (dxgiDevice.Get ())
);
Now we need to create a callback object. To do this, we will declare a new class that implements IVirtualSurfaceUpdatesCallbackNative :
class VSISCallback : public RuntimeClass < RuntimeClassFlags < ClassicCom >, IVirtualSurfaceUpdatesCallbackNative >
{
public :
HRESULT RuntimeClassInitialize ( _In_ WeakReference parameter )
{
reference = parameter ;
return S_OK ;
}
IFACEMETHODIMP UpdatesNeeded ()
{
// cast to MainPage ^
MainPage ^ mainPage = reference.Resolve < MainPage > ();
// If mainPage is not deleted yet
if (mainPage! = nullptr )
{
mainPage-> UpdatesNeeded ();
}
return S_OK ;
}
private :
WeakReference reference;
};
This callback will work if necessary to redraw the region. Our implementation calls MainPage :: UpdatesNeeded (), which does all the dirty work. WeakReference is needed to prevent memory leaks, in case we moved to another page, but forgot to unsubscribe our callback.
It remains only to register this callback:
// Create an instance of VSISCallBack
WeakReference parameter ( this );
ComPtr < VSISCallback > callback;
DX :: ThrowIfFailed (
MakeAndInitialize < VSISCallback > (& callback, parameter)
);
// Register callback
DX :: ThrowIfFailed (
vsisNative-> RegisterForUpdatesNeeded (callback.Get ())
);
Step 3: Drawing
For a start, we’ll get all the dirty regions. After that we draw each of them:
void MainPage :: UpdatesNeeded ()
{
// Get the number of regions to be redrawn
DWORD rectCount;
DX :: ThrowIfFailed (
vsisNative-> GetUpdateRectCount (& rectCount)
);
// Get the regions themselves
std :: unique_ptr < RECT []> updateRects ( new RECT [rectCount]);
DX :: ThrowIfFailed (
vsisNative-> GetUpdateRects (updateRects.get (), rectCount)
);
// Draw them
for ( ULONG i = 0; i <rectCount; ++ i)
{
RenderRegion (updateRects [i]);
}
}
Finally, we come to the long-awaited finale of our saga - drawing. But first one little note.

Let the red box be our current region. For this region, invoking IVirtualSurfaceImageSourceNative :: BeginDraw () will give us the desired Surface, and already on it we have to draw the entire area in the red rectangle. At the end of the drawing call IVirtualSurfaceImageSourceNative :: EndDraw ().
What does this mean? That Surface will only display the current region. That is, the origin of this Surface will be in the upper left corner of our region, and we do not need to think about unnecessary transfers. We cannot go beyond this region.
In words it sounds a bit confusing, in practice everything becomes very clear, so let's get started:
void MainPage :: RenderRegion ( const RECT & updateRect )
{
// Surface, where we will draw
ComPtr < IDXGISurface > dxgiSurface;
// Surface Offset
POINT surfaceOffset = {0};
HRESULT hr = vsisNative-> BeginDraw ( updateRect , & dxgiSurface, & surfaceOffset);
if ( SUCCEEDED (hr))
{
// Turn our Surface into a Bitmap, on which we will draw
ComPtr < ID2D1Bitmap1 > targetBitmap;
DX :: ThrowIfFailed (
d2dDeviceContext-> CreateBitmapFromDxgiSurface (
dxgiSurface.Get (),
nullptr ,
& targetBitmap
)
);
d2dDeviceContext-> SetTarget (targetBitmap.Get ());
// Make the transfer to surfaceOffset
auto transform = D2D1 :: Matrix3x2F :: Translation (
static_cast < float > (surfaceOffset.x),
static_cast < float > (surfaceOffset.y)
);
d2dDeviceContext-> SetTransform (transform);
// Draw Bitmap
d2dDeviceContext-> BeginDraw ();
// ********************
// TODO: Drawing Here
// ********************
DX :: ThrowIfFailed (
d2dDeviceContext-> EndDraw ()
);
// Clean up after ourselves
d2dDeviceContext-> SetTarget ( nullptr );
// Finish Draw
DX :: ThrowIfFailed (
vsisNative-> EndDraw ()
);
}
else if ((hr == DXGI_ERROR_DEVICE_REMOVED ) || (hr == DXGI_ERROR_DEVICE_RESET ))
{
// Handle device reset
HandleDeviceLost ();
// Try again to draw updateRect
vsisNative-> Invalidate ( updateRect );
}
else
{
// Unknown error
DX :: ThrowIfFailed (hr);
}
}
Pay attention to the resulting surfaceOffset. All our artworks must be shifted to the surfaceoffset . This was done in order to increase productivity, although we should not worry about such details. The easiest way to shift is the transformation matrix.
In the case of a device reset (due to a driver failure or something else), re-create the device and mark the current region as “dirty” using IVirtualSurfaceImageSourceNative :: Invalidate (). Thus, VirtualSurfaceImageSource will redraw this region later.
1: 0 in favor of Cap
The code for this example is on github.
So, having done a really hard way, I finally launch the application on my lumiya and ... very happy! Alas, the first impression is always deceptive, and this case is no exception. I was very upset, watching the unbearable lags with the swipe. Yes, we have achieved our goal, but at what cost? It’s impossible to lay out such an article in the Windows Store,
The reason for these lags, as always, is trivial - blocking the UI flow. And if in the case of C # applications a bunch of async + await almost always saves, then in our case problems will arise with asynchrony.
Observant readers immediately noticed "Part 1" in the title of this post. And all because I did not cover many things. For example, Trim, because of which this application will not pass certification in the Windows Store. And most importantly - drawing in a separate stream . Thus, we kill two birds with one stone: single-threaded trash in the example code and getting rid of terrible brakes when scrolling.
That's all for today. I wish you exciting coding and more happy users!
Source: https://habr.com/ru/post/242311/
All Articles