Calling to mobile phones from the browser with recording conversations
In today's world of thin clients, the Internet, advanced web interfaces, there are more and more tasks related to the need to make calls from the browser / take calls to the browser. It is damn convenient! An employee sits in front of the monitor, selects a client, presses a call — and while dialing is in progress, looks at his card on the same page, refreshes the latest agreements and outlined steps.
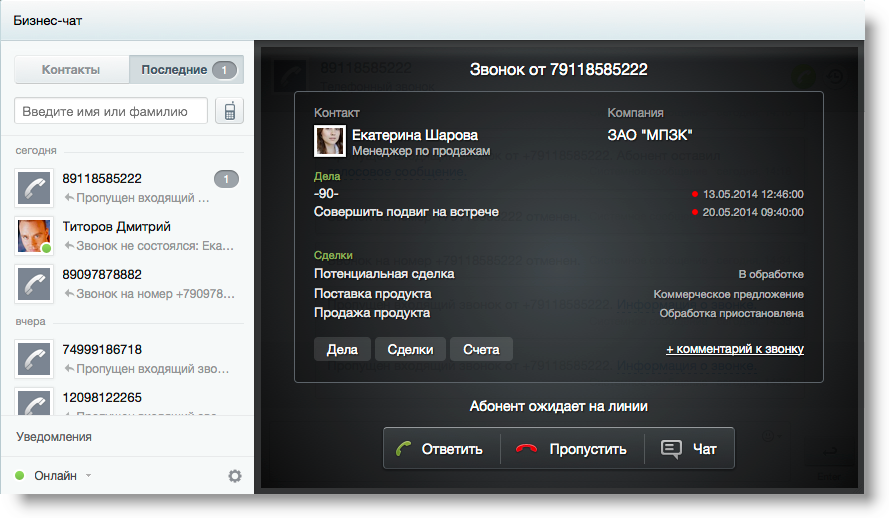
Or another scenario - the incoming call to the company. How great it is when you, as a client, call the faceless 8800 and the girl on the other end of the phone answers you in a pleasant voice - hello, Alexey (substitute_ own_name)! It makes a terrific effect. When instead of “name yourself, your passport number and cat's name, the information is loaded - listen to Mozart's sixth symphony” the operator already picks up the phone, knows your name and sees all the information on you. Service, what to say.
')
But is it possible to implement such a system without plunging into the wilds of the PBX setting - as quickly as possible and with minimal blood? It is also desirable that all conversations are recorded for the purpose of monitoring and training employees. The answer - of course, drove under the cat.
Implementation options
So, today there are several options for solving the described task. The first is, of course, to install the widely known Asterisk in narrow circles or a system based on it, configure everything, then either buy a VoIP-GSM gateway ( they even make USB modems for 800 rubles), or send traffic through one of the many SIP providers , giving access to the PSTN (public telephone networks - including mobile phones). Then write using WebRTC web interface to the dialer. The option is probably the cheapest, but also the most costly in time and effort.
The second way is the use of services that allow not to install Asterisk, which provide a convenient API for calls from the browser and having access to the PSTN. In our Russian market, this is Oktell and VoxImplant . To work with Oktell, you still need to install software on the server and purchase licenses - not my option. It was decided to stop at VoxImplant, a wonderful project by Alexey Ailarov, the founder of Zingaya. This platform will be discussed further.
Looking ahead, I’ll say that the start up page, by pressing the button on which the call goes to the mobile, will succeed in the case of VoxImplant within 10 minutes. Everything is really very simple and no dialplans or similar ip-telephony buzzwords. Let us examine exactly the example of outgoing calls.
VoxImplant - preparing the site
The first thing to do is to register for VoxImplant, it's free + there are $ 5 on the account right away for test calls, it's nice. The system will need to do 3 things - create a user who will call, create a script that describes the call processing logic, and create an application that unites the user (giving him access to calls) and the script.
So, logging into your account, go to the Scripts tab. Scenarios are actually what happens during various events in the system, how calls are handled. For example, you can hang different processing scripts for different incoming numbers, or different scenarios for different outgoing, etc.
In our case, the script will be very simple. Click “Create Script”, specify the name of the callToCustomer script and copy the code in the script input field (this is regular JavaScript using the VoxImplant API - everything is written in the system in the usual JS web developers):
// VoxEngine.forwardCallToPSTN(); 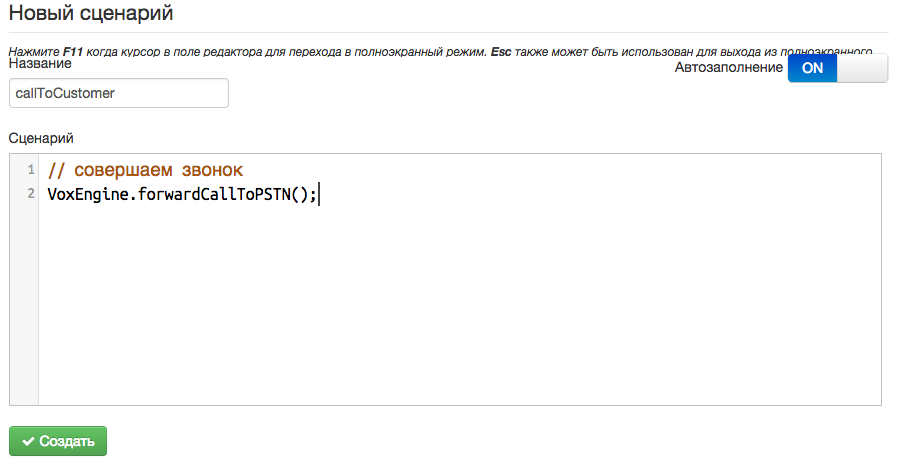
After saving the script, go to the Users tab - you need to create an account of the person who will call. Click “Create user”, enter user name, for example, alexey.goloburdin, password, in my case testPassword, display name and click “Save”.

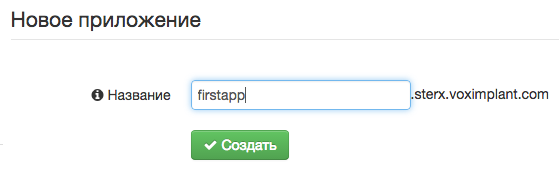
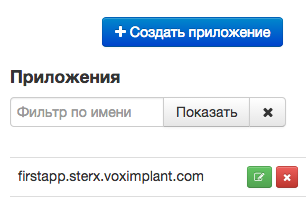
Then go to the Applications tab, where we click, respectively, "Create an application." Enter the name, in my case firstapp and click "Create".
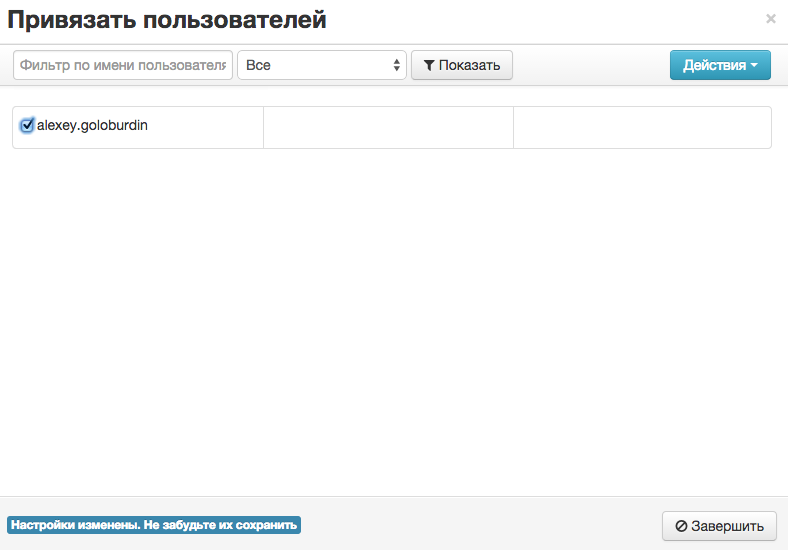
After that, select "Link users" - we bind the newly created user alexey.goloburdin.
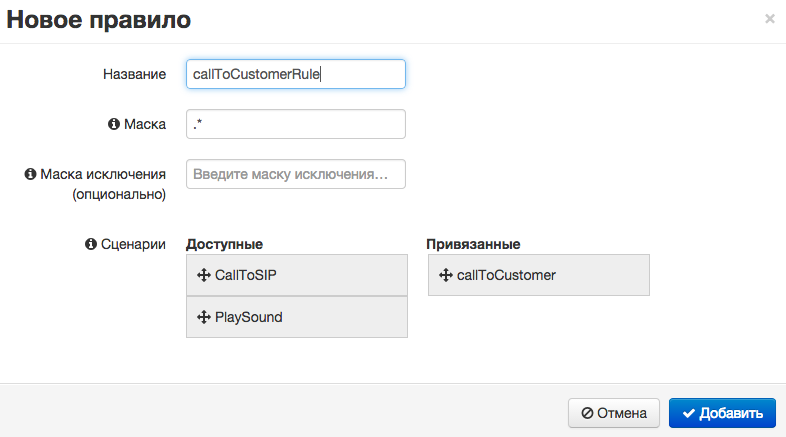
Go to the Rules tab, click “Add Rule”, drag the callToCustomer script created earlier to the Linked section, enter the name callToCustomerRule and click “Add”.
That's all - system setup is complete. We proceed to writing a simple HTML page with a bell button.
Good old HTML / JS
<html> <head> <script type="text/javascript" src="http://cdn.voximplant.com/voximplant.min.js"></script> <script type="text/javascript"> var initialized = false, // SDK loggedIn = false, // connected = false, // VoxImplant voxImplant = VoxImplant.getInstance(); // // SDK voxImplant.addEventListener(VoxImplant.Events.SDKReady, handleSDKReady); // VoxImplant voxImplant.addEventListener(VoxImplant.Events.ConnectionEstablished, handleConnectionEstablished); // VoxImplant voxImplant.addEventListener(VoxImplant.Events.AuthResult, handleAuthResult); // SDK , VoxImplant function handleSDKReady() { initialized = true; voxImplant.connect(); } // VoxImplant , function handleConnectionEstablished() { connected = true; login(); } // function handleAuthResult(e) { if (e.result) { // loggedIn = true; makeCall(); } } // function login(){ // voxImplant.login("alexey.goloburdin@firstapp.sterx.voximplant.com", "testPassword"); } function makeCall(){ var call = voxImplant.call("79636722229"); // } function testCall() { // SDK - if (!initialized) voxImplant.init(); else { // VoxImplant - if (!voxImplant.connected()) voxImplant.connect(); else { // - , - if (!loggedIn) login(); else makeCall(); } } } </script> </head> <body> <a href="javascript:testCall()"> , !</a><br/> </body> </html> The code is quite simple. Download the VoxImplant SDK, establish a connection with the VoxImplant server, then authorize the user and call. Here you should pay attention to the login function - do not forget to specify your username created in the first paragraph of the user before the dog sign (in my case, alexey.goloburdin), your application name (firstapp) and your account name (sterx), as well as your password (testPassword ). In the function makeCall, do not forget to specify your phone number for the test - in the future application there will be the number of the client we are calling. The address of the application can be viewed on the application page in the general list.
We load the created HTML page onto the server, click on the link, allow the use of the microphone (of course, it should be present on the laptop / computer from which you are calling) and after a few seconds we hear the coveted call on the phone.
So, the system works, the calls go, everything is in order. But what about the recording of conversations?
We write conversations
To record conversations, you will need to make changes to the callToCustomer script:
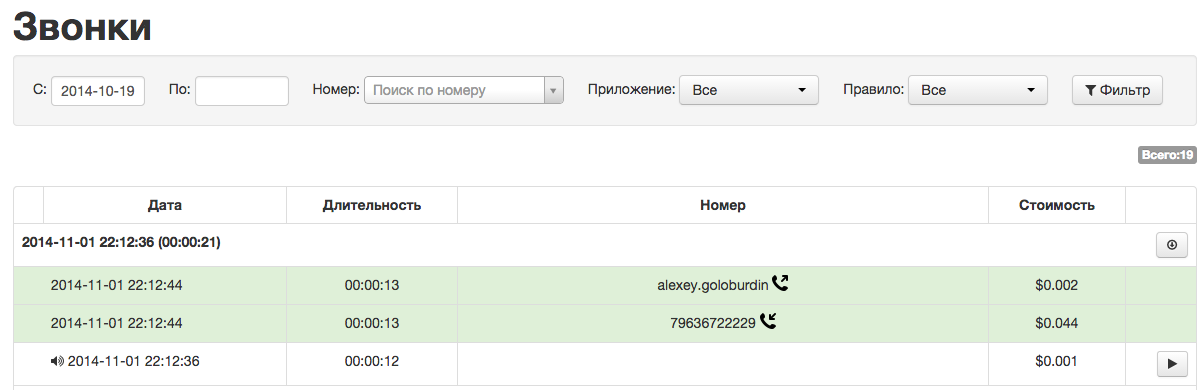
// require(Modules.Recorder); // - VoxEngine.addEventListener(AppEvents.CallAlerting, function (e) { var call = e.call, // recorder = VoxEngine.createRecorder(); // "" // - call.addEventListener(CallEvents.Connected, function (callevent) { call.sendMediaTo(recorder); }); }); // VoxEngine.forwardCallToPSTN(); Now the system not only calls, but also records all calls to MP3 files. You can hear them from the VoxImpant interface from the Calls tab - a corresponding icon has appeared for recorded conversations.
From the interface VoxImplant - well, but I would like to pull from my recording system. To do this, each recorded conversation needs to be assigned its own unique ID - for example, in a real system it can be an internal user id, tagged with a time stamp. In our case, let's just pass the string 'callStamp', for this we fix the function makeCall of our HTML file:
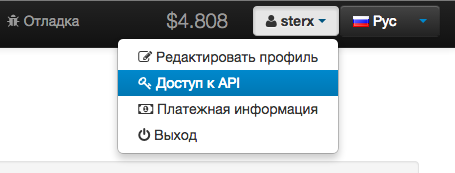
function makeCall(){ var call = voxImplant.call("79636722229", false, 'callStamp'); } The task of obtaining call records is implemented using the HTTP API and its GetCallHistory method, which returns information about the calls made. In general, through the HTTP API, you can create users in VoxImplant and perform other administrative tasks, it is very convenient to integrate with internal systems in the company. To work with the HTTP API, you need to get the key api_key and account_id in the section "Access to the API" in the upper right corner of the VoxImplant interface.
To get a recording of our conversation, labeled callStamp, you need to run this GET request:
api.voximplant.com/platform_api/GetCallHistory/?account_id=########&api_key=############&with_records=true&call_session_history_custom_data=callStamp
The JSON array will come in response, the result [0] [records] [0] [record_url] property contains the URL of the MP3 file for the conversation recording.
So, quickly and beautifully, we taught our web system to call mobile numbers and record all conversations. If the topic turns out to be interesting, in the next article I will talk about receiving incoming calls - but in the meantime, everyone is happy with holidays and excellent communications!
Source: https://habr.com/ru/post/242191/
All Articles