Migration of sites to the cloud with Azure Websites Migration Assistant

Cloud technologies are increasingly penetrating our lives, allowing you to easily and quickly deploy complex technical solutions on the huge computing power in just a few mouse clicks. The main giants of the IT market are constantly improving their services, introducing more and more new opportunities. The advantage of clouds is quite obvious - speed, power, scalability and ease of configuration. This can be a great solution if you are starting a new project or startup.
But what to do if you already have a website that is hosted on your own facilities? This resource works, a database is probably connected to it, various settings in the config have been applied, and so on. In this case, migration to the cloud is a rather troublesome process. Even if you really understand that using a cloud you can win, it’s not a fact that the complexity of transferring all of this environment can outweigh these advantages.
')
For such cases, Microsoft has introduced its new tool - Azure Websites Migration Assistant . This is a small program that can collect the necessary information about a website hosted on IIS (starting with version 6), analyze it, and then automatically transfer all settings, files and, most importantly, even the database directly to the Microsoft Azure cloud.
In this article, I will demonstrate by example that the migration of a site is really easy and takes only a few minutes.
Training
I prepared a website and placed it on my local computer with IIS 8:

By the way, it is worth focusing on the fact that it is the website that is migrating, not the virtual directory. In this case, in addition to the Default Web Site, I have created a site for migrations , which I will transfer. This is a simple ASP.NET site created using a template in Visual Studio 2013. It also has a database, also hosted on the local computer in SQL Server Express, connected to it:
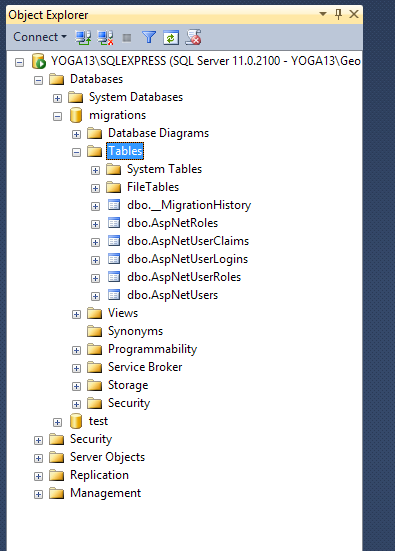
The database structure is simple and contains only information about the user and roles. This database is created automatically with the website. Here is how it looks in the end:

The site has bindings configured so that it opens by default when calling localhost : 80. Of course, this example is not super complicated, but even in such a simple case, the independent migration of all files, settings and databases would take quite a long time (at least a day).
Azure Website Migration Assistant
The first thing to do is download the Azure Website Migration Assistant utility from the official website . It is a simple ClickOnce application made in the style of a step by step wizard.
In the first step, you will be asked to choose where to find the site that you want to migrate:
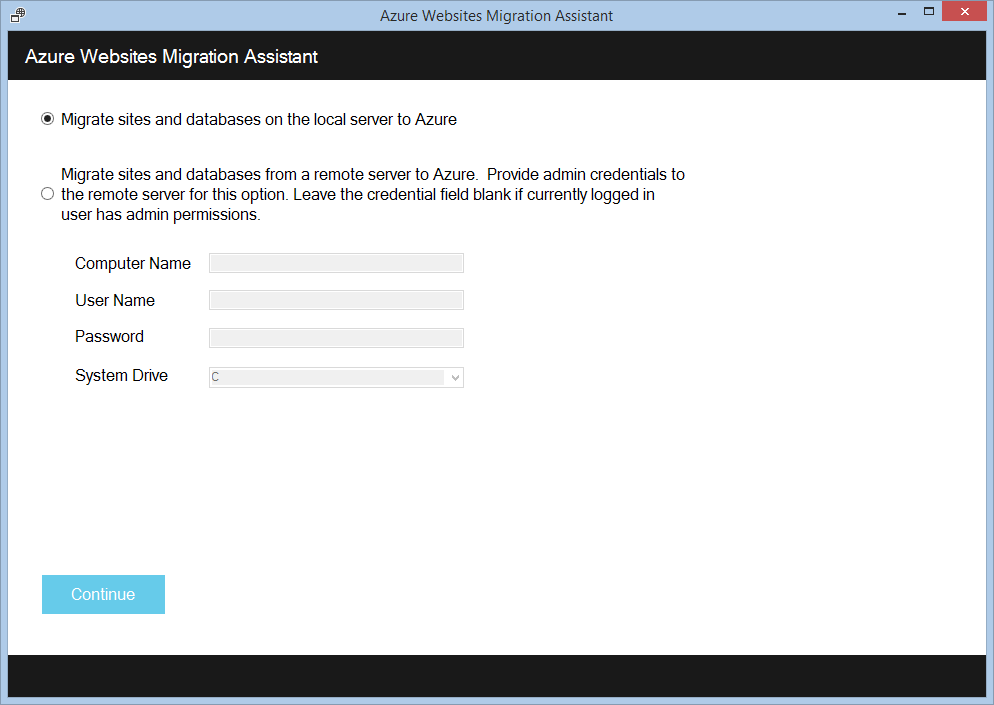
There are two options - a local computer or a remote server. The second one is especially useful if you do not have physical access to the server with your website or installing additional software there for one reason or another is impossible.
In our case, I choose the first option, and the utility offers me to specify which site I will be migrating:
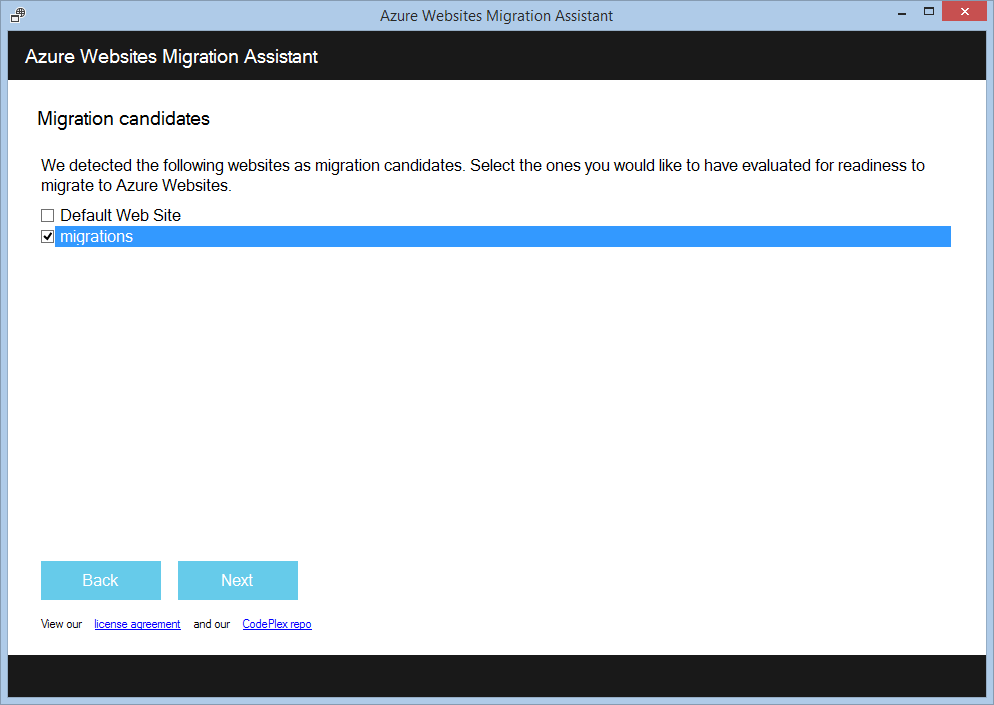
I do not want to transfer the Default Web Site, because there is nothing there, so I choose only the site migrations.
Once you have made your choice and click Next, a brief analysis of your IIS and determination of the key parameters of the website will be made. It looks like this:

This screen lists the main server settings, such as the protocol and port number on which the site is available, the application pool in which the code is running, as well as, note, connections to the database. This setting (and not only it) is taken from the web.config of your site. This means that, firstly, Azure Website Migration Assistant knows that your website is working from the database (and then takes this into account), and secondly, it can transfer any other specific configuration parameters and apply them in the cloud.
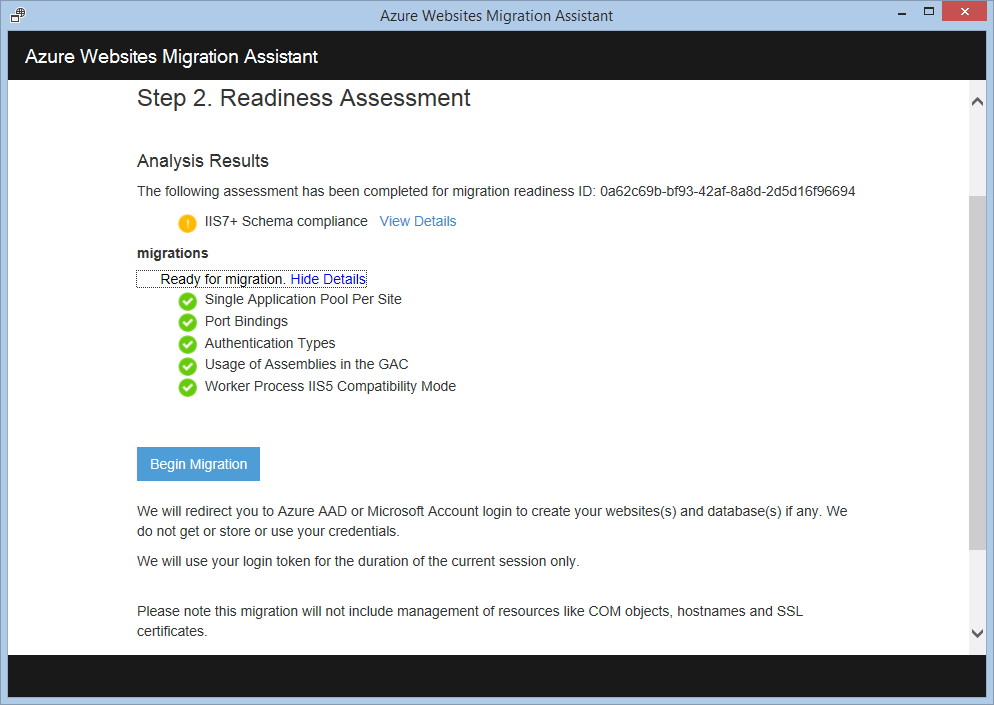
The next step (which is called by the Upload button) will show you a report on the readiness of your site for migration. This report is compiled on a server in the cloud and identifies any potential inconsistencies between your local configuration and what may work in Azure.

At the moment there is a list of known limitations, which are listed in a special section on the official Azure Websites Migration Assistant. In my case, all checks were successful and the migration can be continued:
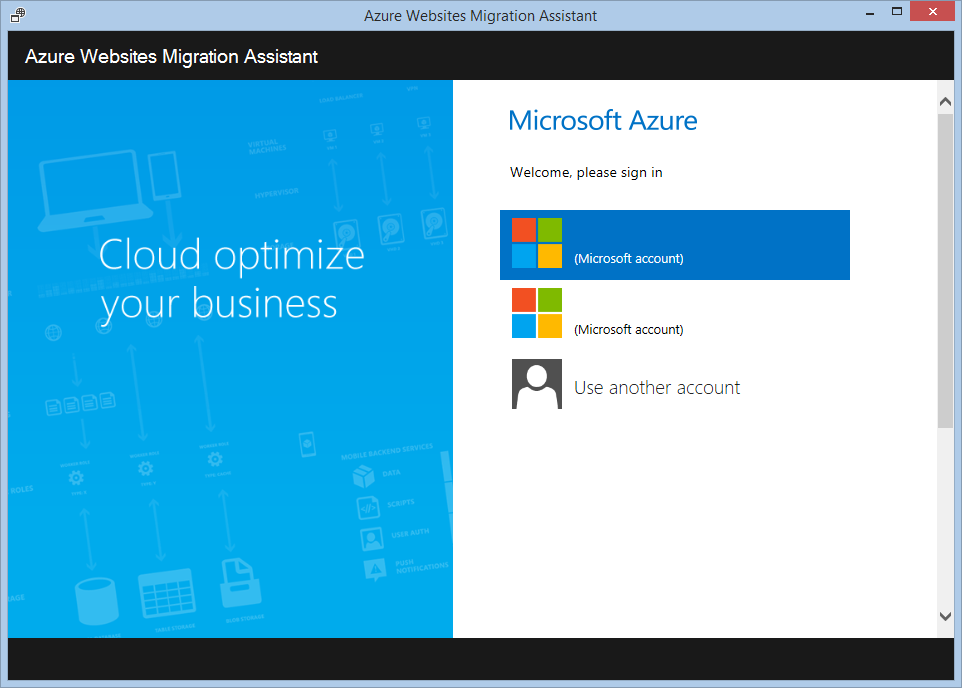
After clicking the Begin Migration button, the most interesting part begins - working with Azure. You will be asked to login under your "cloud" account. I see no reason not to do this :)
After you successfully log in, the utility will be able to get data about your cloud and the resources it contains. In the next step, you can choose in which subscription you want to add a new website, and in which region it should be:

I will choose West Europe as the closest. The Start Migration button will not actually start the migration yet, but send it to the next settings screen:
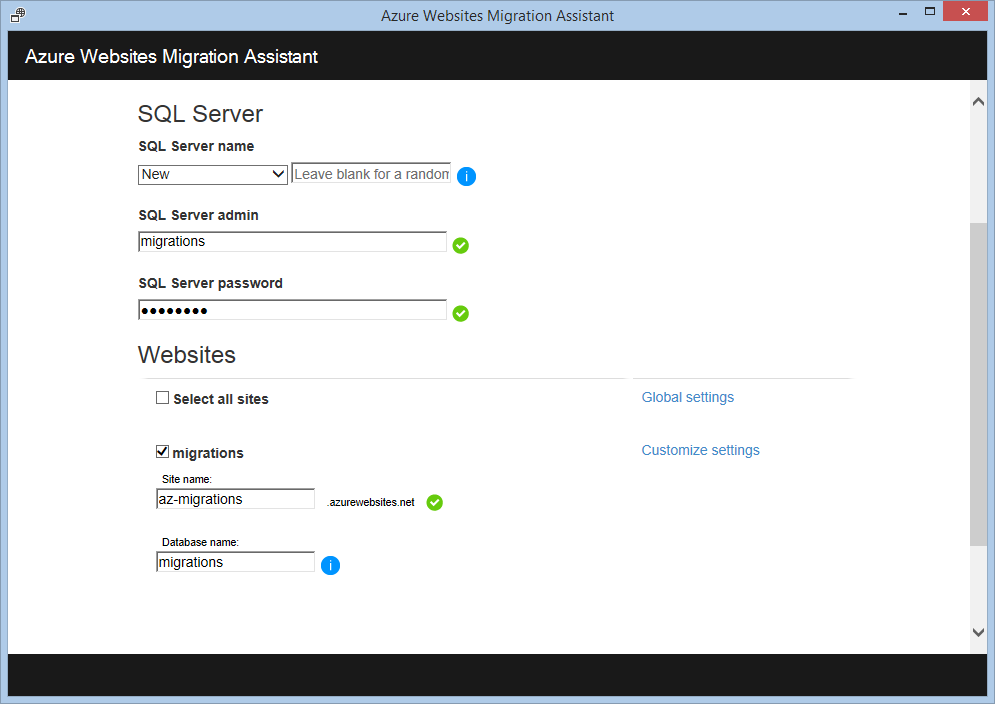
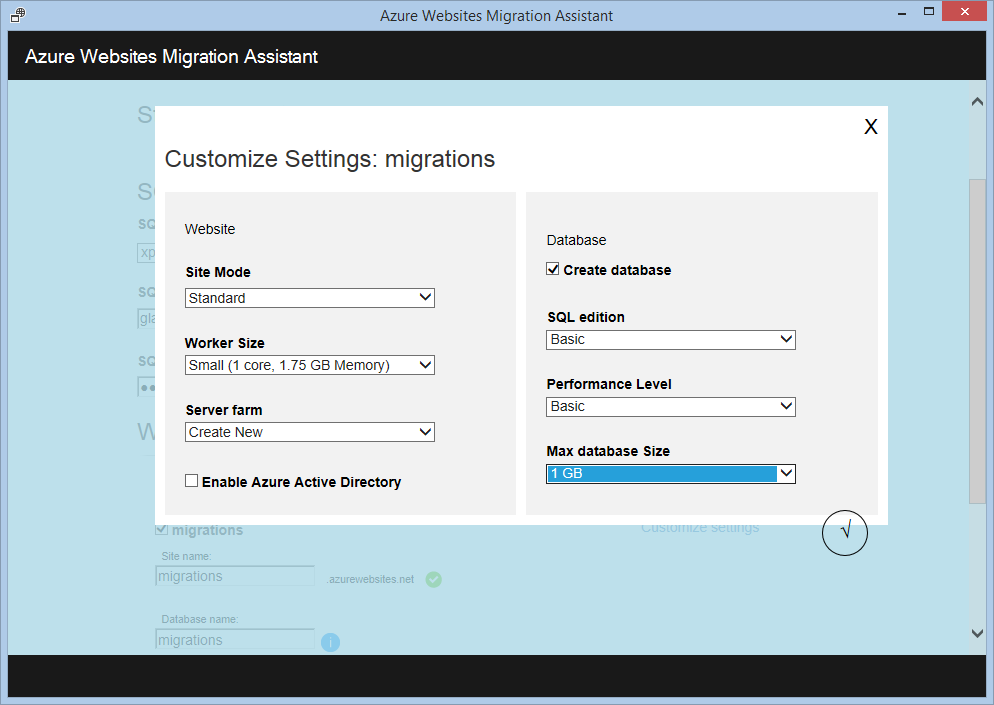
And this is the screen that I think is the coolest in the entire utility. Remember, I said that Azure Websites Migration Assistant reads settings from web.config, including the database connection string? So, this is done for a reason, because on this screen you can create a cloud database in which the schema and data from the local database are then transferred. It is enough to specify the server name and administrator login / password.
The bottom half indicates the parameters of the future site - its name and the name of the database. Also in the Customize settings section, you can configure the power settings of the future site. You can choose from all the options available in the regular Azure management portal :
The next step is the creation of cloud capacity: a website and a database server:

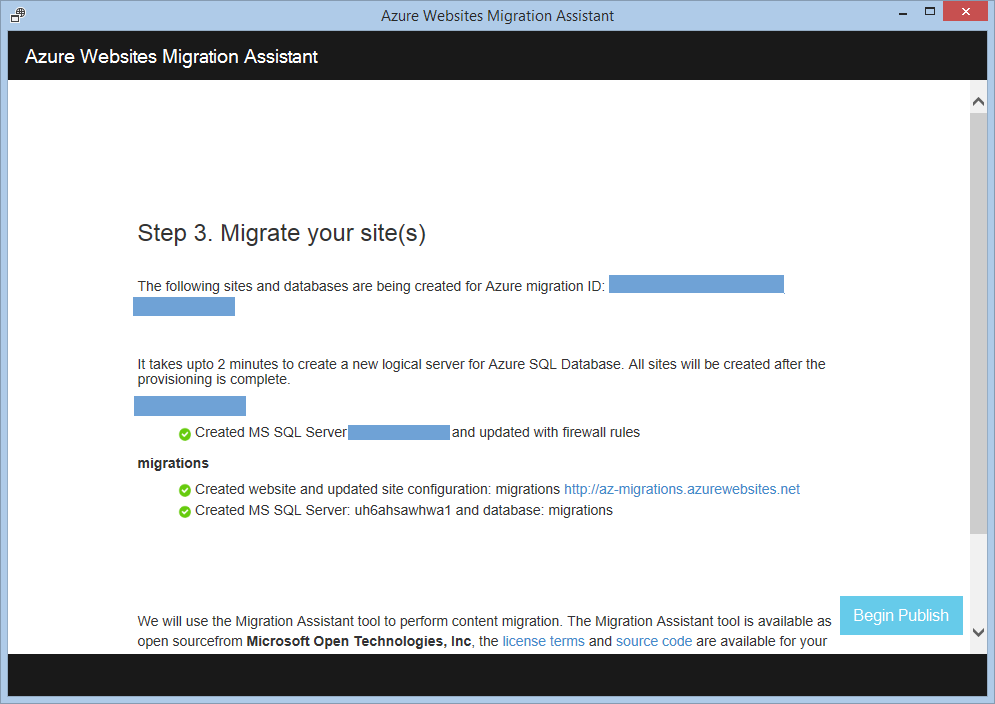
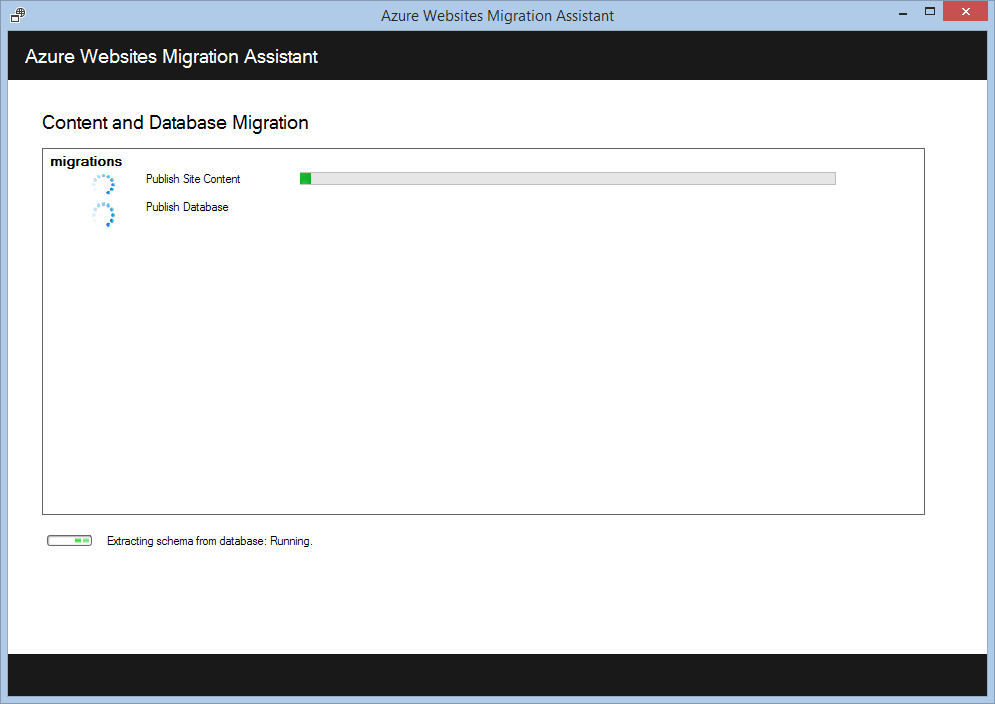
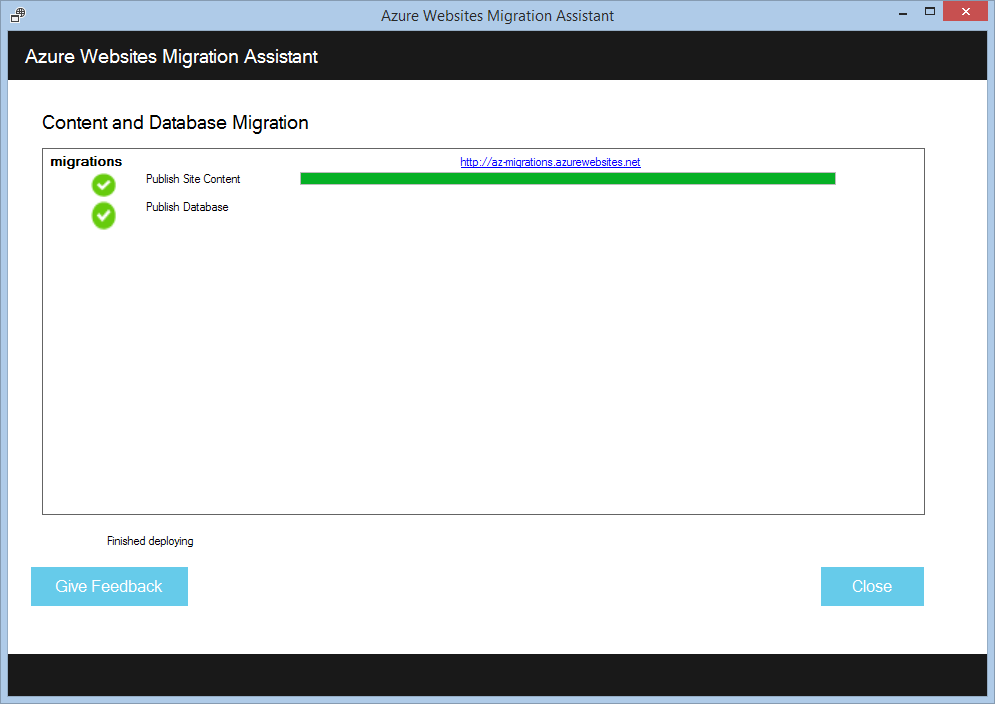
After everything is completed, the last step is to transfer the data. When you click on Begin Publish, all local files of your website will be transferred to the cloud, along with the database structure and data:
Check
To make sure that everything works correctly, just go to the address of the cloud site and compare with the local version:

Pay attention to the URL - this is no longer localhost, but a full-fledged website on the Internet. And also look at the top right of the site, where Hello is written : aaa@aaa.com . Information about the user is taken from the database, and the fact that this user is visible in the cloud site says that both the database schema, its data, and connection parameters - everything was transferred to Azure Websites Migration Assistant without any problems and restored to the cloud in original form.
Additionally, you can check what is happening in the management portal :
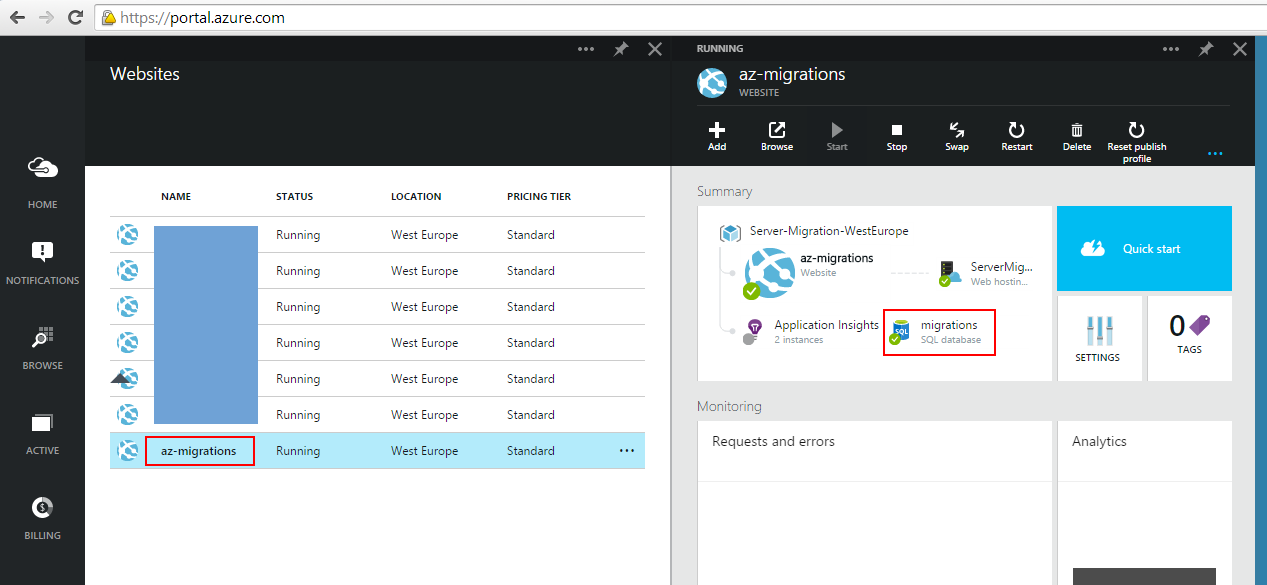
The new site is available and associated with database migrations. Great what else to say!
Not the end
This utility is not the final release, and will continue to evolve. Some limitations are already known:
- only ports 80 and 443 are available (restrictions on Azure itself), so if you are using something else, think about workarounds
- Authentication can only be anonymous or via web forms, and Windows Authentication can be implemented via the Azure Active Directory
- COM components and custom ISAPI filters also do not migrate automatically, you will need to turn them on by hand
- full list here
All code of this utility is laid out in free access on Codeplex . So if you really want, you can modify it yourself. Well, almost all steps of the utility have a link to the feedback form - do not be lazy to write a review to the developers so that they can improve the tool in future releases:

Successful to you migration!
PS And if you do not have Azure, but you want to try, then you can find a free trial
Source: https://habr.com/ru/post/242049/
All Articles