[SetNet & Console Application] First steps. SetNet.Server. Part 1
What is SetNet ? SetNet ( SetNet Server, sns ) - This is a network solution written in C # . With this solution, you can easily create applications with network support or for online games.
In this lesson we will learn how to connect the SetNet library to a console project. In the introduction, we’ll talk about what we need to connect and how the lessons themselves will be compiled.
What we need:
• Visual Studio 2007-2013
• SetNet library
• Shoulder arms
First of all, the lessons will be dealt with all the basic classes that are part of SetNet . The first lesson will deal with the connection SetNet to the project and the first class that we need, SetNet.Server . Let's start.
First Steps or Library Connection
So, it is time to connect the library to the project. This will require a file SetNet.dll , which can be downloaded (link above) and create a project Console Application. After the file is downloaded and the project is created, you need to connect the library.

')
PCM (Right mouse button) on “References” - “Add reference”. After that the “Reference Manager” window opens where we will add the library. Go to the “Browse” tab and click on the “Browse ...” button.
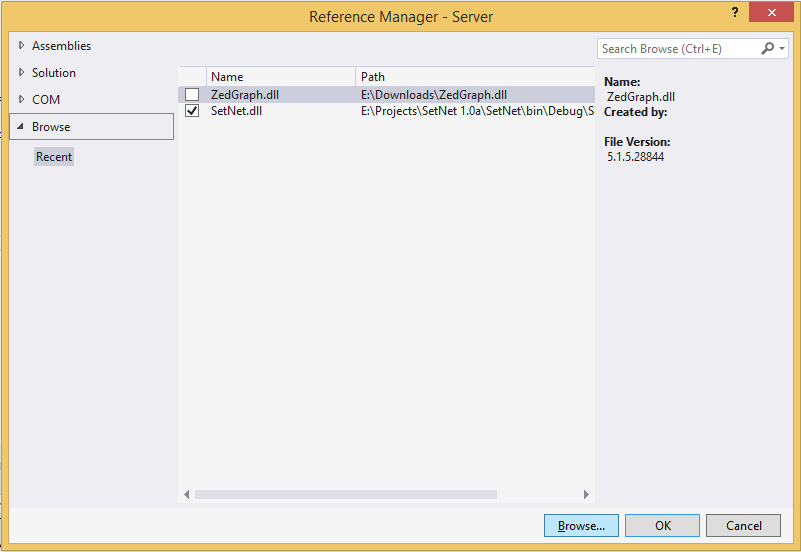
Select the library SetNet.dll . This completes the library connection.
Now we need to write the basis of the server. After completing this lesson, the server can already be started. In this lesson we will look at the main server class, through which the server automatically starts and accepts new clients.
First of all, we will create a new class by the key combination “ Ctrl + Shift + A ” or right click on the project - Add - Class and call it “ ServerClass ”. After these manipulations, we will have a class with the following content:
After that, we need to declare the SetNet namespace. To do this, we write “ using SetNet; And inherit GameServer from SetNet.Server . After that the class will look like this:
Now we just have to implement an abstract class. For this PCM to the class from which we will inherit and choose the “ Implement abstract class ” and several override methods will appear:
It remains only to make the class constructor:
one.
2
This concludes the first introductory lesson. If you have any questions, you can always contact me via e-mail rebegin@list.ru or Skype haker954. Thank.
Introduction
In this lesson we will learn how to connect the SetNet library to a console project. In the introduction, we’ll talk about what we need to connect and how the lessons themselves will be compiled.
What we need:
• Visual Studio 2007-2013
• SetNet library
• Shoulder arms
How lessons will be compiled:
First of all, the lessons will be dealt with all the basic classes that are part of SetNet . The first lesson will deal with the connection SetNet to the project and the first class that we need, SetNet.Server . Let's start.
First Steps or Library Connection
So, it is time to connect the library to the project. This will require a file SetNet.dll , which can be downloaded (link above) and create a project Console Application. After the file is downloaded and the project is created, you need to connect the library.
')
PCM (Right mouse button) on “References” - “Add reference”. After that the “Reference Manager” window opens where we will add the library. Go to the “Browse” tab and click on the “Browse ...” button.
Select the library SetNet.dll . This completes the library connection.
We write server
Now we need to write the basis of the server. After completing this lesson, the server can already be started. In this lesson we will look at the main server class, through which the server automatically starts and accepts new clients.
First of all, we will create a new class by the key combination “ Ctrl + Shift + A ” or right click on the project - Add - Class and call it “ ServerClass ”. After these manipulations, we will have a class with the following content:
using System; using System.Collections.Generic; using System.Linq; using System.Text; using System.Threading.Tasks; namespace Server { public class GameServer { } } After that, we need to declare the SetNet namespace. To do this, we write “ using SetNet; And inherit GameServer from SetNet.Server . After that the class will look like this:
using System; using System.Collections.Generic; using System.Linq; using System.Text; using System.Threading.Tasks; using SetNet; namespace Server { public class GameServer : Server { } } Now we just have to implement an abstract class. For this PCM to the class from which we will inherit and choose the “ Implement abstract class ” and several override methods will appear:
using System; using System.Collections.Generic; using System.Linq; using System.Text; using System.Threading.Tasks; using SetNet; namespace Server { public class GameServer : Server { public override void NewClient(ClientInfo info) { } } } It remains only to make the class constructor:
using System; using System.Collections.Generic; using System.Linq; using System.Text; using System.Threading.Tasks; using SetNet; namespace Server { public class GameServer : Server { public GameServer() : base() { } public override void NewClient(ClientInfo info) { } } } Now we analyze the class itself.
one.
using SetNet; - Namespace.2
public override void NewClient(ClientInfo info) - The method that is called when connecting a new client.This concludes the first introductory lesson. If you have any questions, you can always contact me via e-mail rebegin@list.ru or Skype haker954. Thank.
Source: https://habr.com/ru/post/241949/
All Articles