The course of pixel art 2
This is a translation of the publication "Les Forges Pixel Art Course" .
Part 1: The Right Tools
Part 2: Lines and curves
Part 3: Perspectives
Part 4: Shadow and light
Part 5: Color Palettes
Part 6: Smoothing
Part 7: Textures and Blur
Part 8: The World of Tiles
If you are not an accomplished artist, the best way is to start drawing, do it with a pencil, then draw in ink, then paint. The same applies to pixel art: the first step in the image is to mark the outlines - this step is called a “line art” (Lineart). Line drawing is a very important step to achieve a good result. A few pixels of your image can be a large part of it (as opposed to drawing, where the scale allows more assumptions) so an error of one or two pixels can make your character look distorted. For clarity, line art accuracy is P-E-W-A-S-S-S-E-J for pixel art success.

')
The line drawing consists mainly of lines and curves, and we begin the discussion with straight lines. Those of you who studied in math class know that the line is characterized by its slope. This is the coefficient of "change y", to "change x". In this course we will present this coefficient as y: x. Thus, the ideal diagonal line from the “lower left” to the “upper right” line is 1: 1 straight. Here are some simple rules and their coefficients illustrating this idea.

In pixel art, the lines that use these simple coefficients (0: 1, 1: 2, 1: 1, 2: 1 and 1: 0) are called “perfect lines”. They make your image look good, because the eye can easily follow it. They are not all that you can draw, you can use for example "auxiliary" lines, alternating segments of length 2, with segments of length 1 (to simulate segments with a length of 1.5 - see an example image). The result is much less aesthetic (especially since the image is enlarged 4 times so that you can see what happened) and shows why it is so important to use these types of lines carefully. They are still useful, and you will learn how to decorate in the following sections of this course.
Well, now you know how to draw lines, but you will not get far, only with straight lines. Let me then consider curves that are more complex. Unlike lines, curves can be good or bad.
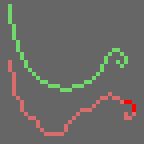
There is only one rule to achieve a smooth curve: the length of the segments will change in a progressive manner, and you should avoid right angles. Well, these are two rules, but in fact, the second is part of the first. For example: in Green you can see a good curve that follows this rule superbly. (From left to right, length 5 4 3 2 2 1 1 1 2 3 3 3 2 1 1 2 2 1 2 1 2 1 1). The red curve on the other hand shamelessly neglects (notice the right angle that appears in the curve). In the end, a good curve drawing technique is to draw a curve with your hand (we get something like a red curve) and then correct it until it follows the “rule”. This ensures that the curve will look like you need. That's all about the curves. In conclusion, I will leave you with a few simple examples of this course. The first is the dragon, with curves illustrating the principles outlined above; the second is the sword, which shows that sometimes more angular lines (look at the tip and the hilt) can also be useful in some cases.


I strongly recommend that you practice your line drawing before you continue reading — you need this to complete the rest of the course (for example, I will use the dragon shown above). If you have problems, you can always use a scanned image.
Part 1: The Right Tools
Part 2: Lines and curves
Part 3: Perspectives
Part 4: Shadow and light
Part 5: Color Palettes
Part 6: Smoothing
Part 7: Textures and Blur
Part 8: The World of Tiles
Part 2: Lines and curves
If you are not an accomplished artist, the best way is to start drawing, do it with a pencil, then draw in ink, then paint. The same applies to pixel art: the first step in the image is to mark the outlines - this step is called a “line art” (Lineart). Line drawing is a very important step to achieve a good result. A few pixels of your image can be a large part of it (as opposed to drawing, where the scale allows more assumptions) so an error of one or two pixels can make your character look distorted. For clarity, line art accuracy is P-E-W-A-S-S-S-E-J for pixel art success.
1. straight
')
The line drawing consists mainly of lines and curves, and we begin the discussion with straight lines. Those of you who studied in math class know that the line is characterized by its slope. This is the coefficient of "change y", to "change x". In this course we will present this coefficient as y: x. Thus, the ideal diagonal line from the “lower left” to the “upper right” line is 1: 1 straight. Here are some simple rules and their coefficients illustrating this idea.
In pixel art, the lines that use these simple coefficients (0: 1, 1: 2, 1: 1, 2: 1 and 1: 0) are called “perfect lines”. They make your image look good, because the eye can easily follow it. They are not all that you can draw, you can use for example "auxiliary" lines, alternating segments of length 2, with segments of length 1 (to simulate segments with a length of 1.5 - see an example image). The result is much less aesthetic (especially since the image is enlarged 4 times so that you can see what happened) and shows why it is so important to use these types of lines carefully. They are still useful, and you will learn how to decorate in the following sections of this course.
2. Curves
Well, now you know how to draw lines, but you will not get far, only with straight lines. Let me then consider curves that are more complex. Unlike lines, curves can be good or bad.
There is only one rule to achieve a smooth curve: the length of the segments will change in a progressive manner, and you should avoid right angles. Well, these are two rules, but in fact, the second is part of the first. For example: in Green you can see a good curve that follows this rule superbly. (From left to right, length 5 4 3 2 2 1 1 1 2 3 3 3 2 1 1 2 2 1 2 1 2 1 1). The red curve on the other hand shamelessly neglects (notice the right angle that appears in the curve). In the end, a good curve drawing technique is to draw a curve with your hand (we get something like a red curve) and then correct it until it follows the “rule”. This ensures that the curve will look like you need. That's all about the curves. In conclusion, I will leave you with a few simple examples of this course. The first is the dragon, with curves illustrating the principles outlined above; the second is the sword, which shows that sometimes more angular lines (look at the tip and the hilt) can also be useful in some cases.
I strongly recommend that you practice your line drawing before you continue reading — you need this to complete the rest of the course (for example, I will use the dragon shown above). If you have problems, you can always use a scanned image.
Source: https://habr.com/ru/post/241764/
All Articles