Cocos2d-x: Using your own C ++ class in Lua
Good day to all.
It so happened that about the use of cocos2d-x Lua in nature there are quite a few informational materials, even taking into account English-language sources. Therefore, in many respects you have to understand yourself, digging into someone else's code and reading (often not very informative) documentation.
In this article I want to at least partially correct this injustice and talk about the extension of the standard functionality available in cocos2d-x Lua with the help of native classes.
')
I faced this task, one might say, face to face after realizing my own poor knowledge of Lua. At the same time, the solution of a part of the game logic was written to write on the good old C ++.
So, who is interested in this process, please under the cat.
As a starting point, we take what your CocosCode IDE is installed and configured. If not, then this is a good article in Russian right here .
Let's start by creating a class that we will connect to Lua.
Here you should pay attention to the fact that our class must be a descendant from Ref, which is caused by the peculiarities of memory management in cocos2d-x.
We place the files with our class in the “myclass” directory, which we create in / framework / cocos2d-x / cocos / (inside the project). If you do not have a framework folder, then in CocosCode you need to do the following:
Right-click on a project -> Cocos Tools -> Add Native Code Support
To do this, in the / frameworks / cocos2d-x / tools / tolua folder, create the following file:
I will not go into the details of the contents of this file, you can read about it here .
Now we need to add the newly created ini file to the Lua wrapper generation script. To do this, open genbindings.py and add the following line before the closing brace:
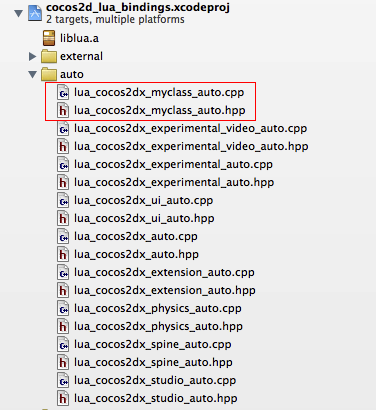
Run genbindings.py. In case of successful completion of all the above manipulations, we should have the following files (in the directory / frameworks / cocos2d-x / cocos / scripting / lua-binding):
Now we have everything we need to connect our class to Lua. This process consists of two similar procedures: one for iOS, the other for Android.
Open the application project. First of all, add the C ++ source to cocos2d_libs:

Now add the generated files to cocos2d_lua_bindings:
Do not forget to also set the path to the header files in cocos2d_lua_bindings -> Build Settings -> User Header Search Paths

Using the opportunity, register our class in AppDelegate.cpp:
This is where our iOS adventure ends.
Here, in essence, everything is similar to the previous section. You need to connect the source of the class to the cocos2d-x project and the generated files to the cocos2dx_lua project. The only difference is that you will have to deal with text files of Android.mk.
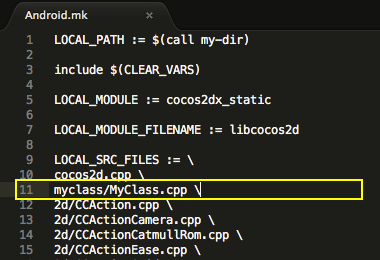
We add files of our class to the coconut project. To do this, we make several additions to the file /frameworks/cocos2d-x/cocos/Android.mk
Here (specify * .cpp files):
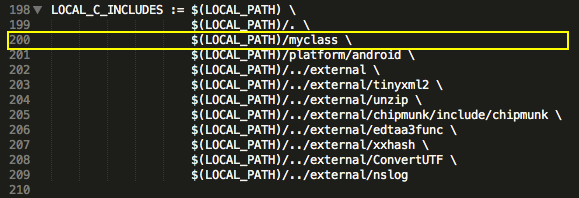
And here (specify the path to the header files):
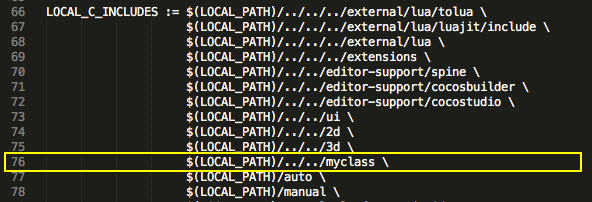
Now it remains to connect the generated files to cocos2d_lua. To do this, edit the file /frameworks/cocos2d-x/cocos/scripting/lua-bindings/Android.mk
Here (specify * .cpp file):

And here it is (specify the path to the header file):
In principle, everything will work if you run a project in XCode or Eclipse. For everything to work in CocosCode IDE, you need to rebuild the runtime environment. To do this, right-click on the project -> Cocos Tools -> Build Custom Runtimes. That's all.
I do not see much point in showing the results in the form of screenshots of a single line in the console. However, the output will be:
Similarly, with the help of the binding-generator-a, you can add your classes to cocos2d-js. It should however be warned that I had to spend a good couple of hours on the normal launch of the generator itself. Fiddling with the mismatch of the various libraries required. If everything is done as it is written, then there should be no problems (instructions for setting up the generator can be found here ).
In my opinion, the “garter” of the engine for scripting languages in some cases can greatly simplify life. I don’t know if she ultimately simplified my life, but I gained an interesting experience.
It so happened that about the use of cocos2d-x Lua in nature there are quite a few informational materials, even taking into account English-language sources. Therefore, in many respects you have to understand yourself, digging into someone else's code and reading (often not very informative) documentation.
In this article I want to at least partially correct this injustice and talk about the extension of the standard functionality available in cocos2d-x Lua with the help of native classes.
')
I faced this task, one might say, face to face after realizing my own poor knowledge of Lua. At the same time, the solution of a part of the game logic was written to write on the good old C ++.
So, who is interested in this process, please under the cat.
As a starting point, we take what your CocosCode IDE is installed and configured. If not, then this is a good article in Russian right here .
1. Create our C ++ class
Let's start by creating a class that we will connect to Lua.
MyClass.hpp
#ifndef MyClass_hpp #define MyClass_hpp #include "cocos2d.h" #include <string> using std::string; namespace cocos2d { class MyClass : public cocos2d::Ref { public: MyClass(); ~MyClass(); bool init(); string myFunction(); CREATE_FUNC(MyClass); }; } //namespace cocos2d #endif Here you should pay attention to the fact that our class must be a descendant from Ref, which is caused by the peculiarities of memory management in cocos2d-x.
MyClass.cpp
#include "MyClass.hpp" using namespace cocos2d; MyClass::MyClass() {} MyClass::~MyClass() {} bool MyClass::init() { return true; } string MyClass::myMethod() { return "Hello, Habrahabr!"; } We place the files with our class in the “myclass” directory, which we create in / framework / cocos2d-x / cocos / (inside the project). If you do not have a framework folder, then in CocosCode you need to do the following:
Right-click on a project -> Cocos Tools -> Add Native Code Support
2. Create a Lua wrapper for our class.
To do this, in the / frameworks / cocos2d-x / tools / tolua folder, create the following file:
cocos2dx_myclass.ini
[cocos2dx_myclass]
# the prefix to be generated functions. You could not use this in your own
# templates
prefix = cocos2dx_myclass
# create a target namespace (in javascript, this would create some code like the equiv. to `ns = ns || {}`)
# all classes will be embedded in that namespace
target_namespace =
android_headers = -I% (androidndkdir) s / platforms / android-14 / arch-arm / usr / include -I% (androidndkdir) s / sources / cxx-stl / gnu-libstdc ++ / 4.7 / libs / armeabi-v7a / include -I% (androidndkdir) s / sources / cxx-stl / gnu-libstdc ++ / 4.7 / include -I% (androidndkdir) s / sources / cxx-stl / gnu-libstdc ++ / 4.8 / libs / armeabi-v7a / include -I % (androidndkdir) s / sources / cxx-stl / gnu-libstdc ++ / 4.8 / include
android_flags = -D_SIZE_T_DEFINED_
clang_headers = -I% (clangllvmdir) s / lib / clang / 3.3 / include
clang_flags = -nostdinc -x c ++ -std = c ++ 11
cocos_headers = -I% (cocosdir) s / cocos -I% (cocosdir) s / myclass -I% (cocosdir) s / cocos / base -I% (cocosdir) s / cocos / platform / android
cocos_flags = -DANDROID
cxxgenerator_headers =
# extra arguments for clang
extra_arguments =% (android_headers) s% (clang_headers) s% (cxxgenerator_headers) s% (cocos_headers) s% (android_flags) s% (clang_flags) s% (cocos_flags) s% (extra_flags) s
# what headers to parse
headers =% (cocosdir) s / cocos / myclass / MyClass.hpp
# classes to produce code for. You can use regular expressions here. When testing the regular
# expression, it will be enclosed in "^ $", like this: "^ Menu * $".
classes = MyClass. *
# what should we skip? in the format ClassName :: [function function]
# ClassName is a regular expression, but it will be used like this: "^ ClassName $" functions are also
# regular expressions, they will not be surrounded by "^ $". If you want to skip a whole class, just
# add a single "*" as functions. See bellow for several examples. A special class name is "*", which
# will apply to all class names. This is a wildcard to skip similar named
# functions from all classes.
skip =
rename_functions =
rename_classes =
for all class names, should we register it in the target VM?
remove_prefix =
# classes for which there will be no "parent" lookup
classes_have_no_parents =
# of them will be found.
base_classes_to_skip =
# classes that create no constructor
# Is a hand-written constructor
abstract_classes =
#Determining the junction object (js object) or the other way around. Supported values are 'yes' or 'no'.
script_control_cpp = no
I will not go into the details of the contents of this file, you can read about it here .
Now we need to add the newly created ini file to the Lua wrapper generation script. To do this, open genbindings.py and add the following line before the closing brace:
cmd_args = {'cocos2dx.ini' : ('cocos2d-x', 'lua_cocos2dx_auto'), \ 'cocos2dx_extension.ini' : ('cocos2dx_extension', 'lua_cocos2dx_extension_auto'), \ 'cocos2dx_ui.ini' : ('cocos2dx_ui', 'lua_cocos2dx_ui_auto'), \ 'cocos2dx_studio.ini' : ('cocos2dx_studio', 'lua_cocos2dx_studio_auto'), \ 'cocos2dx_spine.ini' : ('cocos2dx_spine', 'lua_cocos2dx_spine_auto'), \ 'cocos2dx_physics.ini' : ('cocos2dx_physics', 'lua_cocos2dx_physics_auto'), \ 'cocos2dx_experimental_video.ini' : ('cocos2dx_experimental_video', 'lua_cocos2dx_experimental_video_auto'), \ 'cocos2dx_experimental.ini' : ('cocos2dx_experimental', 'lua_cocos2dx_experimental_auto'), \ 'cocos2dx_controller.ini' : ('cocos2dx_controller', 'lua_cocos2dx_controller_auto'), \ 'cocos2dx_myclass.ini' : ('cocos2dx_myclass', 'lua_cocos2dx_myclass_auto') \ } Run genbindings.py. In case of successful completion of all the above manipulations, we should have the following files (in the directory / frameworks / cocos2d-x / cocos / scripting / lua-binding):
- lua_cocos2dx_myclass_auto.hpp
- lua_cocos2dx_myclass_auto.cpp
- ./api/MyClass.lua
Now we have everything we need to connect our class to Lua. This process consists of two similar procedures: one for iOS, the other for Android.
3.1. Connect files to iOS
Open the application project. First of all, add the C ++ source to cocos2d_libs:
Now add the generated files to cocos2d_lua_bindings:
Do not forget to also set the path to the header files in cocos2d_lua_bindings -> Build Settings -> User Header Search Paths
Using the opportunity, register our class in AppDelegate.cpp:
... #include "ConfigParser.h" // #include "lua_cocos2dx_myclass_auto.hpp" using namespace CocosDenshion; bool AppDelegate::applicationDidFinishLaunching() { ... // set FPS. the default value is 1.0/60 if you don't call this director->setAnimationInterval(1.0 / 60); auto engine = LuaEngine::getInstance(); ScriptEngineManager::getInstance()->setScriptEngine(engine); LuaStack* stack = engine->getLuaStack(); stack->setXXTEAKeyAndSign("2dxLua", strlen("2dxLua"), "XXTEA", strlen("XXTEA")); // register_all_cocos2dx_myclass(stack->getLuaState()); #if (COCOS2D_DEBUG>0) if (startRuntime()) return true; #endif engine->executeScriptFile(ConfigParser::getInstance()->getEntryFile().c_str()); return true; } ... This is where our iOS adventure ends.
3.2. Connect files to Android
Here, in essence, everything is similar to the previous section. You need to connect the source of the class to the cocos2d-x project and the generated files to the cocos2dx_lua project. The only difference is that you will have to deal with text files of Android.mk.
We add files of our class to the coconut project. To do this, we make several additions to the file /frameworks/cocos2d-x/cocos/Android.mk
Here (specify * .cpp files):
And here (specify the path to the header files):
Now it remains to connect the generated files to cocos2d_lua. To do this, edit the file /frameworks/cocos2d-x/cocos/scripting/lua-bindings/Android.mk
Here (specify * .cpp file):
And here it is (specify the path to the header file):
4. Update the runtime environment
In principle, everything will work if you run a project in XCode or Eclipse. For everything to work in CocosCode IDE, you need to rebuild the runtime environment. To do this, right-click on the project -> Cocos Tools -> Build Custom Runtimes. That's all.
5. Run, rejoice
I do not see much point in showing the results in the form of screenshots of a single line in the console. However, the output will be:
[Lua Debug]: Hello, Habrahabr! Similarly, with the help of the binding-generator-a, you can add your classes to cocos2d-js. It should however be warned that I had to spend a good couple of hours on the normal launch of the generator itself. Fiddling with the mismatch of the various libraries required. If everything is done as it is written, then there should be no problems (instructions for setting up the generator can be found here ).
PS
In my opinion, the “garter” of the engine for scripting languages in some cases can greatly simplify life. I don’t know if she ultimately simplified my life, but I gained an interesting experience.
Source: https://habr.com/ru/post/241694/
All Articles