Create a package for Laravel
Hi Habr!
The Laravel framework is quickly gaining popularity and has already gained a large army of fans. In this article, I will describe the development of a simple package for Laravel, as well as the publication of the package we created on packagist.org, in order to add our package to a project in one line in composer.json.
Packages are the main way to add new functionality to Laravel, as the official documentation tells us. We will create a package specifically for Laravel, it will be a simple blog with a list of posts and a page for viewing the article. We do not aim to write an excellent, universal blog with a lot of opportunities for customization, we will only consider all the details of creating a package as an independent extension that will help in the future to avoid duplication of code in our projects, while solving routine tasks.
')
As a result, we get it .
I am developing for MacOS, using IDE PhpStorm, and the site itself will spin on the official Vagrant box - Homestead .
On Habré there were already useful articles on how to configure the Vagrant image, as well as how to install Laravel itself.
As well as the calculated field cut, where the first 120 characters are taken from the text of the record.
In addition to everything, we will create a controller class that will group the page display logic, an additional compiler file, to bind the necessary data to our templates.
Finally, we will create a table migration file with posts, as well as a seed class with a certain amount of initial data.
Let's publish the package styles in the public folder of the application.
So, Laravel is installed, your favorite IDE is open and we can start.
Let's write in the app / config / workbench.php file the name and email parameters, later they will be used in composer.json for your package.
Enter these parameters in the console:
Where vendor is the name of the service provider, package is the name of the package you are creating.
For example, my github login is cherryoff , and the package I create is called nbblog , so I have to execute the command:

Where the resourses flag says that you also need to create Laravel-specific folders: migrations, views, config, etc.
If everything went smoothly, then at the root of the project you will see:

In order for Laravel to automatically load our package when we start the application, we need to add the line to the file app / config / app.php in the providers array:
The service provider's class names follow the [Package] ServiceProvider scheme, but before that the full class namespace is specified
In the src folder we can see the familiar folder structure whose names speak for themselves.
Note that the class of our service provider is stored in the src / Cherryoff / Nbblog / folder, as well as all the auxiliary classes of our package are put there.
Let's look at the NbblogServiceProvider class. The register method will be called as soon as the package has been registered, and the boot method is called each time before processing the request.
Create a routes.php file with two routes in the src folder of our package:
Where, as a controller, we specify the full path to our not yet created controller.
Next, in the controllers folder, create an NbblogController controller with the following contents:
Great, now we have paths and the controller should respond to us with simple messages. But if we follow the link sandbox.local / blog , we will get an exception that the page was not found. The thing is that the application does not know that our package has its own paths, and to fix this, we include the routes.php file at the end of the boot method of the NbblogServiceProvider class:
But even after that, nothing will work and we will catch a mistake:
Class Cherryoff \ Nbblog \ NbblogController does not exist
This is a sign that the composer in our package knows nothing about the newly added controller. To show the composer where to search for the necessary files, add the line “src / controllers” to composer.json (our package !!!) in the classmap section, and then execute
Now, if we go to:
sandbox.local / blog
then we will see the line:
Post list
Hooray! This means that the paths work, and our controller picked up!
Next, create a models folder and a Post.php file in it. The file listing is shown below:
Now you need to add the models folder to the startup section composer.json (you need to add the line " src / controllers " above) of our project and run composer dump-autoload in the same way as we did with the controller.
Read more about the Eloquent models can be read on the office site Laravel
A line in the console will create a migration for our package:
The newly created migration class has appeared in the src / migrations / folder. In his method up we write:
In the down method:
Thus, in the up method, we create a table with the necessary fields for our model, and in the down method we delete it if it exists.
So, it's time to complete our migration:
If you have correctly configured the database connection, then in the console you will see something like:
Now fill the newly created table with the initial data. To do this, in the src folder, create a seeds folder with the NbblogSeeder.php file with the following contents:
Add the seeds folder to the startup section composer.json and run it again
Now load the initial data with the command:
If we did everything right, then everything ended without errors.
Create view templates for our blog by placing them in the src / views folder:
layout.blade.php
list.blade.php
preview.blade.php
post.blade.php
I would like to note that you need to refer to the types of package:
package_name :: path_to_file , in our case:
nbblog :: preview
So, with the templates finished, you can now start filling them with data. To do this, create a file viewComposers.php right in the src folder. (We can create this file anywhere in our package, the main thing is not to forget to connect it).
viewComposers.php
We just tied the variable uri to the template of the list of posts and the template of the post (later, when we get this variable from the settings, it will be more convenient for us to transfer it to views in one place) and together with the template of the list of posts we give all the records at once.
Now you need to connect the created file in the class of our service provider ( src / Cherryoff / Nbblog / NbblogServiceProvider.php ), just as we did with the route.php file.
We change the class of our controller so that it looks something like this:
Everything, now our blog is ready. We can evaluate this at: sandbox.local / blog
The list of entries is displayed, posts are viewed.
But it doesn’t look very good and we would like to fix it. To do this, in the public folder of our package, create a css folder and add the main.css file with the following contents:
Let's publish the external resources of our package with the command:
Perhaps we did not notice this, but the main.css file appeared in the public folder of our application, which is located in the packages / cherryoff / nbblog / css / folder
As you had time to guess, this is how laravel does with all external package resources. This means that this naming convention for external resources will help us access this file from our template.
In the layout.blade.php template before the title tag, insert the line:
This is the path to our file in the public folder of our application.
If we refresh the page, we’ll see the simplest blog we’ve just created.
With styles, he began to look noticeably better.
In the form of homework, you will need to create a settings file with the blog url settings and template names, which will make it possible to change the path to the blog on your website, as well as use your templates for displaying content.
Here you can see the project on github.
Live demo .
Or just add a dependency to your Laravel project's composer.json line: "cherryoff / nbblog": "dev-master"
So, we learned how to create packages for Laravel, saw what the package consists of, now it is not difficult to fork a third-party package and adapt it to fit your needs. We saw how the routing happens in the package, learned how to show the composer where to get the files for autoloading, learned how the migrations and seeds are done as part of the package, and also published our resources in the public folder of our application.
The article turned out a little more than I planned, so a little about what I will tell in the following articles:
If this turns out to be interesting, then we will expand the functionality of our package:
Hope not tired, clean code!
Laravel website ;
Translation of official documentation ;
Introduces the situation ;
Talks about Homestead .
The Laravel framework is quickly gaining popularity and has already gained a large army of fans. In this article, I will describe the development of a simple package for Laravel, as well as the publication of the package we created on packagist.org, in order to add our package to a project in one line in composer.json.
So, what is all this about
Packages are the main way to add new functionality to Laravel, as the official documentation tells us. We will create a package specifically for Laravel, it will be a simple blog with a list of posts and a page for viewing the article. We do not aim to write an excellent, universal blog with a lot of opportunities for customization, we will only consider all the details of creating a package as an independent extension that will help in the future to avoid duplication of code in our projects, while solving routine tasks.
')
As a result, we get it .

What we learn
- How to create a package that extends the functionality of the project;
- Let's get acquainted with the basic structure inside the package;
- We will understand how to add your own routes;
- We learn where to store templates;
- Let us show composer what classes we need to add to autoload;
- Let's create migrations and fill the tables with initial data;
- Let's make available external resources (css, js files) of the package.
Required Tools
I am developing for MacOS, using IDE PhpStorm, and the site itself will spin on the official Vagrant box - Homestead .
On Habré there were already useful articles on how to configure the Vagrant image, as well as how to install Laravel itself.
What will ultimately represent our package?
It will have two routes:
- Page with a list of posts;
- Separate post page.
Several templates:
- The overall layout of the blog;
- Page with a list of entries;
- A brief view of the entry in the list of posts;
- Full view of the record.
One Post model with fields:
- Post title
- Unique link post
- Entry text
- Time of creation
- Update time
As well as the calculated field cut, where the first 120 characters are taken from the text of the record.
In addition to everything, we will create a controller class that will group the page display logic, an additional compiler file, to bind the necessary data to our templates.
Finally, we will create a table migration file with posts, as well as a seed class with a certain amount of initial data.
Let's publish the package styles in the public folder of the application.
Getting Started
So, Laravel is installed, your favorite IDE is open and we can start.
Let's write in the app / config / workbench.php file the name and email parameters, later they will be used in composer.json for your package.
Enter these parameters in the console:
php artisan workbench vendor/package --resources Where vendor is the name of the service provider, package is the name of the package you are creating.
For example, my github login is cherryoff , and the package I create is called nbblog , so I have to execute the command:
php artisan workbench --resources cherryoff/nbblog Where the resourses flag says that you also need to create Laravel-specific folders: migrations, views, config, etc.
If everything went smoothly, then at the root of the project you will see:
In order for Laravel to automatically load our package when we start the application, we need to add the line to the file app / config / app.php in the providers array:
'Cherryoff\Nbblog\NbblogServiceProvider', The service provider's class names follow the [Package] ServiceProvider scheme, but before that the full class namespace is specified
Package structure
In the src folder we can see the familiar folder structure whose names speak for themselves.
Note that the class of our service provider is stored in the src / Cherryoff / Nbblog / folder, as well as all the auxiliary classes of our package are put there.
Let's look at the NbblogServiceProvider class. The register method will be called as soon as the package has been registered, and the boot method is called each time before processing the request.
Focus on creating a blog
Create a routes.php file with two routes in the src folder of our package:
Route::get('/blog/', array( 'as' => 'posts_list', 'uses' => 'Cherryoff\Nbblog\NbblogController@showList' )); Route::get('/blog/{link}', array( 'as' => 'post', 'uses' => 'Cherryoff\Nbblog\NbblogController@showPost' ))->where('link', '[A-Za-z-_]+'); Where, as a controller, we specify the full path to our not yet created controller.
Next, in the controllers folder, create an NbblogController controller with the following contents:
<?php namespace Cherryoff\Nbblog; use Illuminate\Support\Facades\App; use Illuminate\Support\Facades\Config; use Illuminate\Routing\Controller; use Illuminate\Support\Facades\Redirect; use Illuminate\Support\Facades\Response; use Illuminate\Support\Facades\Request; use Illuminate\Support\Facades\View; use Illuminate\Support\Facades\Input; use Illuminate\Support\Facades\File; use Illuminate\Support\Facades\Session; use Illuminate\Support\Facades\URL; class NbblogController extends Controller { public function showList() { return 'Posts list'; } public function showPost($link) { return 'Get post:'.$link; } } Great, now we have paths and the controller should respond to us with simple messages. But if we follow the link sandbox.local / blog , we will get an exception that the page was not found. The thing is that the application does not know that our package has its own paths, and to fix this, we include the routes.php file at the end of the boot method of the NbblogServiceProvider class:
include __DIR__.'/../../routes.php'; But even after that, nothing will work and we will catch a mistake:
Class Cherryoff \ Nbblog \ NbblogController does not exist
This is a sign that the composer in our package knows nothing about the newly added controller. To show the composer where to search for the necessary files, add the line “src / controllers” to composer.json (our package !!!) in the classmap section, and then execute
composer dump-autoload Now, if we go to:
sandbox.local / blog
then we will see the line:
Post list
Hooray! This means that the paths work, and our controller picked up!
Next, create a models folder and a Post.php file in it. The file listing is shown below:
<?php namespace Cherryoff\Nbblog; use Illuminate\Database\Eloquent\Model; use Illuminate\Support\Str; use Illuminate\Support\Facades\Config; /** * */ class Post extends Model { protected $table = 'posts'; // protected $appends = array('cut'); // protected $fillable = array('header', 'link', 'article'); // public static $rules = array( 'header' => 'required|max:256', 'link' => 'required|between:2,32|unique', 'article' => 'required' ); public function getCutAttribute(){ return Str::limit($this->attributes['article'], 120); } } Now you need to add the models folder to the startup section composer.json (you need to add the line " src / controllers " above) of our project and run composer dump-autoload in the same way as we did with the controller.
Read more about the Eloquent models can be read on the office site Laravel
A line in the console will create a migration for our package:
php artisan migrate:make create_nbblog_posts_table --bench="cherryoff/nbblog" The newly created migration class has appeared in the src / migrations / folder. In his method up we write:
Schema::create('posts', function (Blueprint $table) { $table->increments('id'); $table->string('link', 32); $table->string('header', 256); $table->text('article'); $table->timestamps(); $table->softDeletes(); }); In the down method:
Schema::dropIfExists('posts'); Thus, in the up method, we create a table with the necessary fields for our model, and in the down method we delete it if it exists.
So, it's time to complete our migration:
php artisan migrate --bench="cherryoff/nbblog" If you have correctly configured the database connection, then in the console you will see something like:
Migration table created successfully. Migrated: 2014_10_23_115450_create_nbblog_posts_table Now fill the newly created table with the initial data. To do this, in the src folder, create a seeds folder with the NbblogSeeder.php file with the following contents:
NbblogSeeder.php
<?php namespace Cherryoff\Nbblog; use Illuminate\Database\Seeder; class NbblogSeeder extends Seeder { public function run() { $posts = [ [ 'header'=>'Header post number one', 'link'=>'one', 'article'=>' In condimentum facilisis porta. Sed nec diam eu diam mattis viverra. Nulla fringilla, orci ac euismod semper, magna diam porttitor mauris, quis sollicitudin sapien justo in libero. Vestibulum mollis mauris enim. Morbi euismod magna ac lorem rutrum elementum. Donec viverra auctor lobortis. Pellentesque eu est a nulla placerat dignissim. Morbi a enim in magna semper bibendum. Etiam scelerisque, nunc ac egestas consequat, odio nibh euismod nulla, eget auctor orci nibh vel nisi. Aliquam erat volutpat. Mauris vel neque sit amet nunc gravida congue sed sit amet purus. Quisque lacus quam, egestas ac tincidunt a, lacinia vel velit. Aenean facilisis nulla vitae urna tincidunt congue sed ut dui. Morbi malesuada nulla nec purus convallis consequat. Vivamus id mollis quam. Morbi ac commodo nulla. In condimentum orci id nisl volutpat bibendum. Quisque commodo hendrerit lorem quis egestas. Maecenas quis tortor arcu. Vivamus rutrum nunc non neque consectetur quis placerat neque lobortis. Nam vestibulum, arcu sodales feugiat consectetur, nisl orci bibendum elit, eu euismod magna sapien ut nibh. Donec semper quam scelerisque tortor dictum gravida. In hac habitasse platea dictumst. Nam pulvinar, odio sed rhoncus suscipit, sem diam ultrices mauris, eu consequat purus metus eu velit. Proin metus odio, aliquam eget molestie nec, gravida ut sapien. Phasellus quis est sed turpis sollicitudin venenatis sed eu odio. Praesent eget neque eu eros interdum malesuada non vel leo. Sed fringilla porta ligula egestas tincidunt. Nullam risus magna, ornare vitae varius eget, scelerisque. ', ], [ 'header'=>'Very important news', 'link'=>'news', 'article'=>' Donec congue lacinia dui, a porttitor lectus condimentum laoreet. Nunc eu ullamcorper orci. Quisque eget odio ac lectus vestibulum faucibus eget in metus. In pellentesque faucibus vestibulum. Nulla at nulla justo, eget luctus tortor. Nulla facilisi. Duis aliquet egestas purus in blandit. Curabitur vulputate, ligula lacinia scelerisque tempor, lacus lacus ornare ante, ac egestas est urna sit amet arcu. Class aptent taciti sociosqu ad litora torquent per conubia nostra, per inceptos himenaeos. Sed molestie augue sit amet leo consequat posuere. Vestibulum ante ipsum primis in faucibus orci luctus et ultrices posuere cubilia Curae; Proin vel ante a orci tempus eleifend ut et magna. Lorem ipsum dolor sit amet, consectetur adipiscing elit. Vivamus luctus urna sed urna ultricies ac tempor dui sagittis. In condimentum facilisis porta. Sed nec diam eu diam mattis viverra. Nulla fringilla, orci ac euismod semper, magna diam porttitor mauris, quis sollicitudin sapien. ', ], ]; foreach ($posts as $post){ Post::create($post); } } } Add the seeds folder to the startup section composer.json and run it again
composer dump-autoload Now load the initial data with the command:
php artisan db:seed --class="\Cherryoff\Nbblog\NbblogSeeder" If we did everything right, then everything ended without errors.
Create view templates for our blog by placing them in the src / views folder:
layout.blade.php
<!DOCTYPE html> <html> <head> <link href='http://fonts.googleapis.com/css?family=Lora&subset=latin,cyrillic' rel='stylesheet' type='text/css'> <title> @yield('title') </title> </head> <body> <div class="content"> <header> <h1>My simple blog</h1> <small>Just blog package for Laravel</small> </header> <nav> <ul> <li><a href="/">Main page</a></li> <li><a href="/blog/">Blog</a></li> </ul> </nav> @yield('content') </div> </body> </html> list.blade.php
@section('title') List @stop @section('content') <small>Number of posts in the blog: {{$count}}</small> <ul class="posts-list"> @forelse($posts as $post) @include('nbblog::preview') @empty <li><h3>No records</h3></li> @endforelse </ul> @stop preview.blade.php
<li> <span><small>{{$post->created_at}}</small></span> <h2><a href="/blog/{{$post->link}}">{{$post->header}}</a></h2> <p>{{$post->cut}}</p> </li> post.blade.php
@section('title') {{$header}} @stop @section('content') <div class="post-block"> <span><small>{{$created_at}}</small></span> <h2>{{$header}}</h2> <p> {{$article}} </p> </div> @stop I would like to note that you need to refer to the types of package:
package_name :: path_to_file , in our case:
nbblog :: preview
So, with the templates finished, you can now start filling them with data. To do this, create a file viewComposers.php right in the src folder. (We can create this file anywhere in our package, the main thing is not to forget to connect it).
viewComposers.php
<?php /** * */ View::composer(array('nbblog::list', 'nbblog::post'), function($view){ $view->with('uri', 'blog'); }); View::composer('nbblog::list', function ($view) { $view->with('count', \Cherryoff\Nbblog\Post::count())->with('posts', \Cherryoff\Nbblog\Post::all()); }); We just tied the variable uri to the template of the list of posts and the template of the post (later, when we get this variable from the settings, it will be more convenient for us to transfer it to views in one place) and together with the template of the list of posts we give all the records at once.
Now you need to connect the created file in the class of our service provider ( src / Cherryoff / Nbblog / NbblogServiceProvider.php ), just as we did with the route.php file.
/** * viewComposers */ include __DIR__.'/../../viewComposers.php'; We change the class of our controller so that it looks something like this:
class NbblogController extends Controller { public function __construct(){ $this->layout = View::make('nbblog::layout'); } public function showList() { $this->layout->content = View::make('nbblog::list'); } public function showPost($link) { $post = Post::where('link', '=', $link)->firstOrFail(); $this->layout->content = View::make('nbblog::post', $post); } } Everything, now our blog is ready. We can evaluate this at: sandbox.local / blog
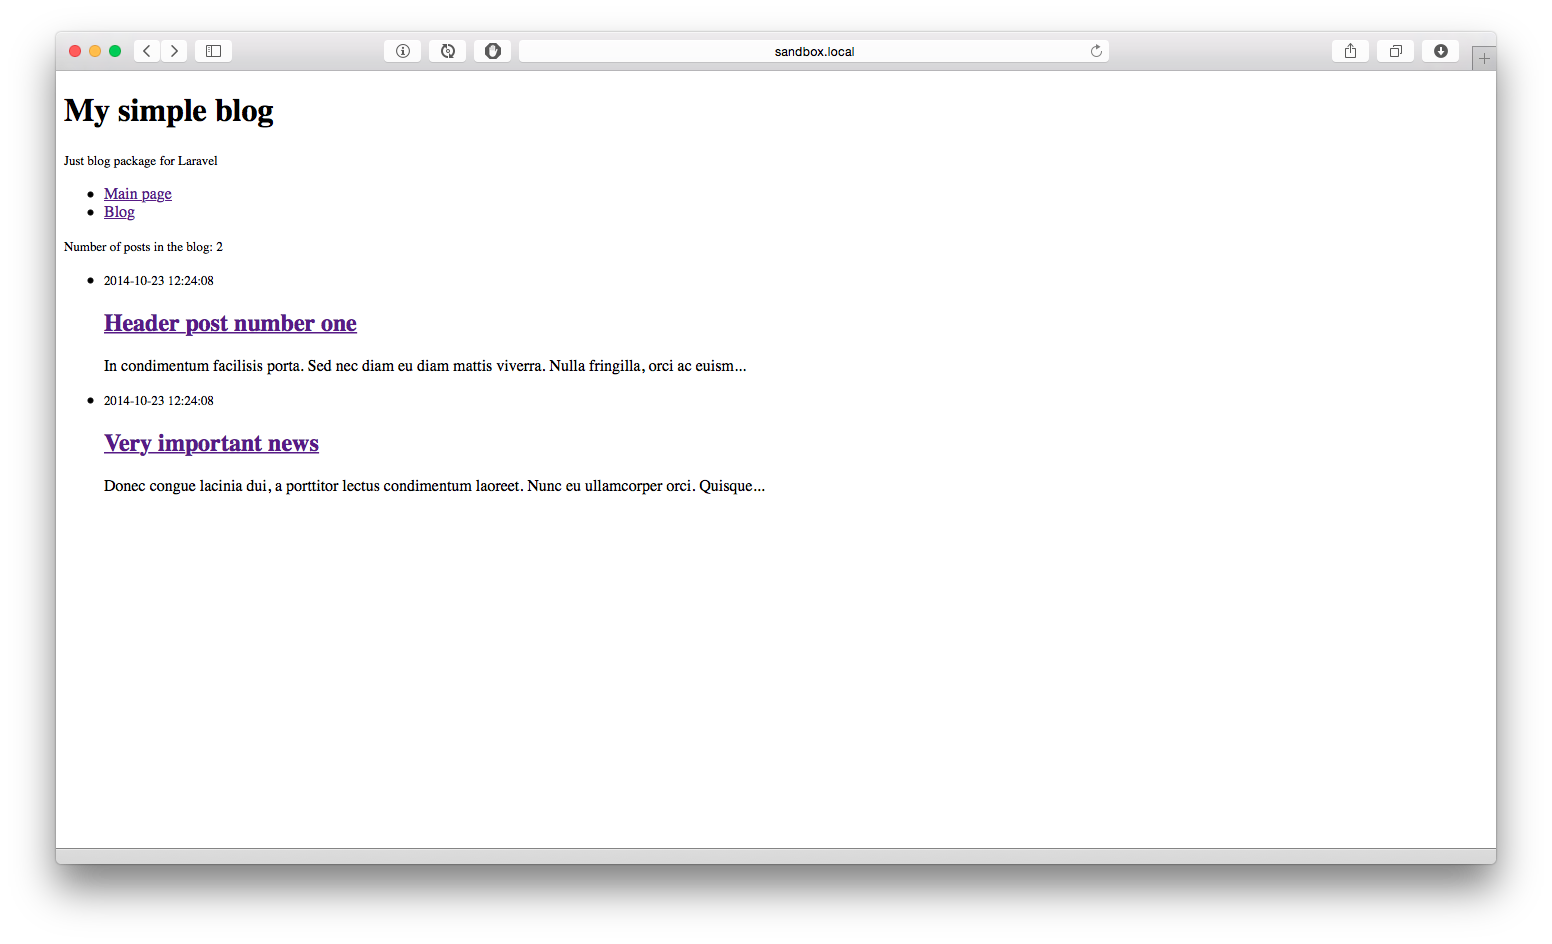
The list of entries is displayed, posts are viewed.

But it doesn’t look very good and we would like to fix it. To do this, in the public folder of our package, create a css folder and add the main.css file with the following contents:
main.css
html, body { font-family: 'Lora', "Times New Roman", serif; padding: 0; color: #383840; background-color: #F2F2F2; } a { color: #676673; } a:hover { color: #383840; } span, small { color: #B8B8BF; } .content { width: 600px; margin: 0 auto; } header { text-align: center; } header h1 { margin-bottom: 5px; } nav { width: auto; margin: 0 auto; text-align: center; } nav ul { padding: 0; margin-top: 10px; margin-bottom: 20px; } nav li { list-style: none; display: inline-block; padding: 10px 5px; margin: 0 20px; } .posts-list { padding: 0; } .posts-list li { list-style: none; border-bottom: 1px dotted #B8B8BF; padding-bottom: 10px; margin-top: 20px; margin-bottom: 60px; } .posts-list li > span, .post-block > span { width: 100%; text-align: center; display: inline-block; border-bottom: 1px dotted #B8B8BF; height: 10px; } .posts-list li > span small, .post-block > span small { background-color: #F2F2F2; padding: 10px; } .posts-list h2 { text-align: center; } .posts-list a { text-decoration: none; padding: 10px 20px; } Let's publish the external resources of our package with the command:
php artisan asset:publish --bench="cherryoff/nbblog" Perhaps we did not notice this, but the main.css file appeared in the public folder of our application, which is located in the packages / cherryoff / nbblog / css / folder
As you had time to guess, this is how laravel does with all external package resources. This means that this naming convention for external resources will help us access this file from our template.
In the layout.blade.php template before the title tag, insert the line:
{{ HTML::style('/packages/cherryoff/nbblog/css/main.css') }} This is the path to our file in the public folder of our application.
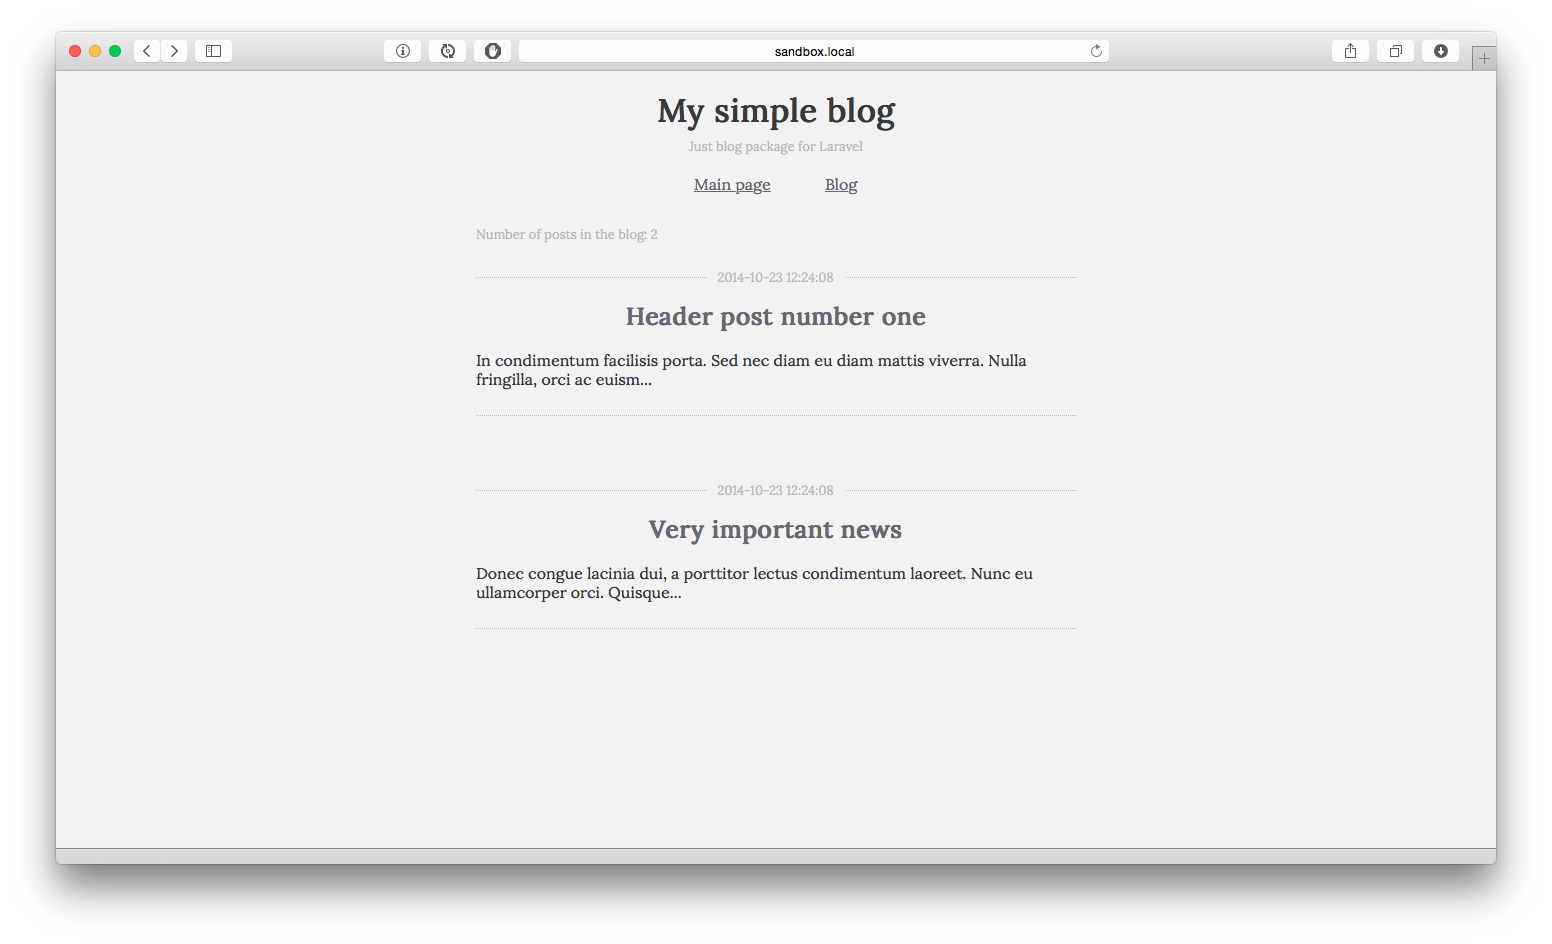
If we refresh the page, we’ll see the simplest blog we’ve just created.
With styles, he began to look noticeably better.
In the form of homework, you will need to create a settings file with the blog url settings and template names, which will make it possible to change the path to the blog on your website, as well as use your templates for displaying content.
Here you can see the project on github.
Live demo .
Or just add a dependency to your Laravel project's composer.json line: "cherryoff / nbblog": "dev-master"
Total
So, we learned how to create packages for Laravel, saw what the package consists of, now it is not difficult to fork a third-party package and adapt it to fit your needs. We saw how the routing happens in the package, learned how to show the composer where to get the files for autoloading, learned how the migrations and seeds are done as part of the package, and also published our resources in the public folder of our application.
The article turned out a little more than I planned, so a little about what I will tell in the following articles:
- I will show how to make the package settings and provide the ability to change them to the user without touching the package files themselves;
- Let's deploy the git repository in the package folder;
- And write the whole thing on Github;
- If you wish, we will publish the newly created package in packagist;
- Enable auto update package packagist when updating to github;
- Let's roll our package on pure Laravel.
If this turns out to be interesting, then we will expand the functionality of our package:
- Add tags to posts;
- Add an interface to add / edit / delete posts;
- Let's make our package more customizable.
Hope not tired, clean code!
References used in writing this article.
Laravel website ;
Translation of official documentation ;
Introduces the situation ;
Talks about Homestead .
Source: https://habr.com/ru/post/241423/
All Articles