Building a mirrored volume on Windows Server 2008 r2
Understanding Disk Mirroring (RAID 1)
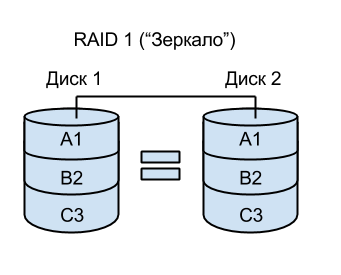
When using a mirrored raid array, two identical volumes are located on two different physical disks. Any data recorded in the mirrored volume is actually recorded on both disks, so that in case of failure of one of the disks, the data are available on the second. Unlike a stripe, when I / O speeds increase due to the distribution of one logical volume across multiple physical disks and parallel block write / read, mirroring reduces performance due to the fact that all transactions write data to each disk in the array.
Create a mirror (RAID 1) using “Disk Management”
To create a mirrored disk array, the disks must be converted from normal to dynamic. In this section we analyze the possibility of creating a “mirror” of two identical hard disks in Windows 2008.
To do this, run "Disk Management". This can be done from the command line by executing the compmgmt.msc command or from the “Start” menu by selecting Storage -> Disk Management.
In our example, the system contains 3 disks, numbered 0, 1 and 2, respectively. Disk 0 is a system disk, disks 1 and 2 will be used to create a “mirror”.
In Disk Management, right-click on an unlabeled area in the graphic display of the first disk used for the mirrored volume. Select "New Mirrored Volume ..." to launch the New Mirror Volume Wizard. Clicking "Next" on the welcome screen will take you to the disk selection window. As mentioned earlier, the mirror array should consist of two disks. In the "Selected" column, the wizard will display only the currently selected disk. More than one disk is required to continue. To add a disk to a mirrored volume, select the second disk from the available disks in the left column and click “Add”:

')
After selecting the drives, click Next to create and assign a drive letter or mount point to the volume. The “Next” button will bring up the “Format Volume” window, where you can select the file system type and the possibility of compression. To display a summary of the operation being performed, click Next. To confirm the operation, click "Finish"; the volumes will be formatted and a mirrored volume will be created, ready to use.
If you use only two disks, you can get the following picture:
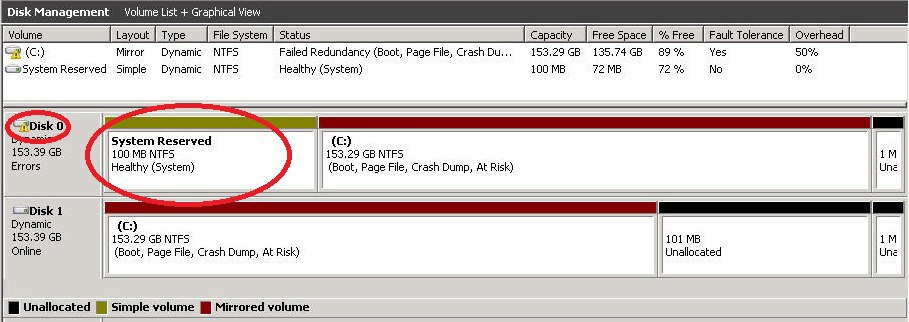
And to get rid of the reserved area, which is present on only one disk, we will perform the following actions:
Run the command with administrative privileges
bcdboot c: \ windows / sc:
This command creates a system partition. More information on using bcdboot is on the Microsoft technical site .
After receiving the message “Boot files successfully created.”, Go to disk management and mark section C: as active. After that, reboot and delete this volume using Disk Management.
Creating a mirror (RAID 1) array on the command line
You can also create a mirrored volume from the command line using the diskpart application. It can be run from an open command window or from the Start menu by typing “diskpart” in the line. The DISKPART> prompt appears and shows that diskpart is up and ready to go.
First of all, we will find out which disks are connected to the server. This information can be found using the “list disk” command:
 DISKPART> list disk

   Disk ### Status Size Free Dyn Gpt
   -------- ---------- ------- ------- --- ---
   Disk 0 Online 30 GB 0 B
   Disk 1 Online 8 GB 8189 MB
   Disk 2 Online 8 GB 8189 MB
As an example, let's merge disks 1 and 2 into a mirrored volume. To do this, we first create a simple volume on the first disk and add a second disk for mirroring.
The first volume is created using the “create volume” command and the “disk =” parameter. The size of the volume can be set by the additional parameter “size =”. Without this parameter, diskpart will create a volume the size of all available disk space. For example:
DISKPART> create volume simple disk = 1
The first volume has been created and now we are adding disk 2 as a mirror volume. To do this, a simple command is executed:
add disk = 2
To check the new configuration, use the “list volume” command:
 DISKPART> list volume

   Volume ### Ltr Label Fs Type Size Status Info
   ---------- --- ----------- ----- ---------- ------- ---- ----- --------
   Volume 0 C NTFS Partition 30 GB Healthy System
 * Volume 1 RAW Mirror 8189 MB Healthy
As you can see, the new volume is displayed as "Volume 1" with the type "Mirror". “RAW” is specified as a file system because the file system has not yet been formatted. This can be done using the same diskpart application:
 DISKPART> select volume 1
 DISKPART> format fs = ntfs label = "Mirrored Volume"

   100 percent completed

 DiskPart successfully formatted the volume.
After formatting, assign a literal value or mount point to it:
Assign a letter value:
 DISKPART> assign letter = E:

 Diskpart successfully assigned drive letter or mount point.
Assign mount point:
 DISKPART> assign mount = \ MIRROR

 Diskpart successfully assigned drive letter or mount point.
After successful completion of all operations, the new mirrored volume is ready for use.
Adding a mirrored volume to an existing one
You can create a mirrored raid array by adding a volume to an existing one using disk management or diskpart from the command line. When adding a mirror to an existing volume, Windows creates a second volume of the same size and type of file system on the second disk and copies (this process is also called synchronization) data into the mirror.
To mirror an existing volume in disk management, right-click on the volume and select “Add Mirror” to open the Add Mirror dialog:
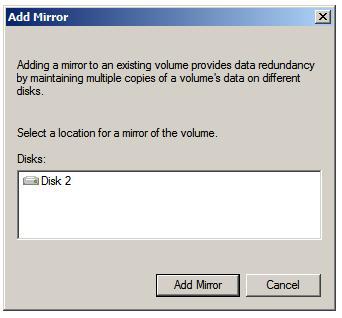
The window above displays the disks available for mirroring. Select the desired drive and click "Next." A warning may appear if additional actions are required (for example, converting a regular disk to a dynamic disk). Click "Yes." The synchronization process will start and the execution status will be displayed graphically.
To do the same from the command line, start diskpart and check for the required volumes with the command:
 DISKPART> list volume

   Volume ### Ltr Label Fs Type Size Status Info
   ---------- --- ----------- ----- ---------- ------- ---- ----- --------
   Volume 0 C NTFS Partition 30 GB Healthy System
   Volume 1 E My Volume NTFS Partition 8189 MB Healthy
Let us consider the possibility of mirroring the volume "Volume 1". The disk where the mirroring will be configured can be seen with the “list disk” command:
 DISKPART> list disk

   Disk ### Status Size Free Dyn Gpt
   -------- ---------- ------- ------- --- ---
   Disk 0 Online 30 GB 0 B
 * Disk 1 Online 8 GB 0 B
   Disk 2 Online 8 GB 8189 MB
Above it was clear that Volume 1 has a size of 8GB. Thus, for its mirroring you need a disk of at least 8GB. Note that if the disks are not dynamic, they will need to be converted by the commands:
 select disk 1
 convert dynamic
 select disk 2
 convert dynamic
Next, select the desired volume on disk 1:
 DISKPART> select disk 1
 DISKPART> select volume 2

 Volume 2 is the selected volume.
And finally, we mirror them with the “add =” command, specifying the disk number used for this (in our case it is disk 2):
 DISKPART> add disk = 2

 Diskpart succeeded in adding a mirror to the volume.
After that, Windows Server 2008 will start synchronization, the time of which depends on the size of the mirrored volume. During synchronization, in the volume list, mirrored (with the Mirror type) will have the “Rebuild” status. After the end - Healthy.
Disassembling and removing the mirror disk array
Windows Server 2008 includes the functions of disassembling a mirrored raid array (two separate and independent volumes are created containing identical data) and “mirror” deletions (in this case, all data on the “mirror” is deleted).
To disassemble a disk array using Disk Management, right-click on one of the volumes and select “Break Mirrored Volume” in the menu that appears.
From the command line, in the diskpart application, use a “break” command indicating one of the two disks of the mirrored raid array:
DISKPART> break disk = 2
To remove a mirror from the array, delete all synchronized data, right-click on the mirrored volume in Disk Management and select "Remove Mirror". Alternatively, you can use the “break” command in the diskpart with the NOKEEP parameter:
DISKPART> break nokeep disk = 2
Recovery mirror raid array
If one of the disks of the raid array fails, even in this case there is good news - in contrast to the “strap”, all the data relevant at the time of the accident remained on the second disk. In this case, it is important to replace the failed disk and rebuild the mirror before the second disk stops working.
Right-click on the damaged volume and select "Remove Mirror". Next, connect a new disk of sufficient size to create a mirror. Right-click on the work volume from the current mirror and select “Add Mirror” in the menu that appears, select the new disk and click “Add Mirror”. Windows will rebuild a mirrored raid array using a new disk. As mentioned earlier, the time for reassembly and synchronization of data depends on the performance of the disks and their size.
Source: https://habr.com/ru/post/241333/
All Articles