Multiboot, UEFI, NTFS or almost a recipe for happiness
Post written based on the publication "Life-giving flash drive . "
Good day, Habr. Quite recently, reading Habr, I came across an article, A revitalizing flash drive , which described how to create a multiboot flash drive with a set of useful utilities, various systems, etc. And everything would be fine, but here and there the dog is buried - pay attention to this comment thread , which discusses the performance of multiboot in systems with UEFI. Thus, I beganmy own investigation to look for a universal way to solve this problem.
I didn’t have to go far, since the days of insane popularity of the Windows XP Zver Edition build, its developers used a toolkit called RMPrepUSB to write the build to a USB drive. The assembly is gone from the memory of people, but the utility package project itself continues to evolve and grow stronger. Well, the very basis - the project Easy2Boot . Studying their website, I found a universal way to create a multi-boot flash drive, which can contain any distribution kit, LiveCD or floppy images that you just want to add. So, let's start creating such a wonderful flash drive.
Go to the site and download the latest archive with Install_RMPrepUSB_Full in the title. Unpack and install.
Warning: for fans of portability - you can open the installer in 7-zip (for example) and unpack it into a folder without installation.
Next, go to the Easy2Boot website and download the archive with the E2B itself, unpack it into any folder on your PC.
')
Go to the folder with E2B and run the file _ISO \ docs \ Make_E2B_USB_Drive.cmd .
Attention: if you did not install, but unpacked RMPrepUSB, then at the first stage you will be asked to specify the path in the RMPrepUSB folder.
We will be asked to indicate the number of the drive from the list, ask if we really want to format the drive and ask to choose a file system.
And here attention! Choose FAT32 - we load into UEFI without problems, but there is no support for files> 4 GB, and vice versa - NTFS without UEFI, but with support for large files. If your images weigh less than 4 GB each, feel free to choose FAT32. With NTFS it is a bit more difficult, namely - the flash drive in UEFI will not boot, but if you load it on a regular BIOS, and then select an image for UEFI (see below), then Easy2Boot will overwrite the MBR flash drive and it will load into UEFI, provided that in that image there is its support (the presence of files efi \ bootia32.efi and efi \ boot \ bootx64.efi )
We go on a complex path - we write N (that is, we format it in NTFS), a confirmation window will come out, click OK and wait. After formatting, E2B files will be copied and “Press any key” appears on a green background.
Go to the drive, see the files and the _ISO folder. I will briefly describe the structure (details are on the site ):
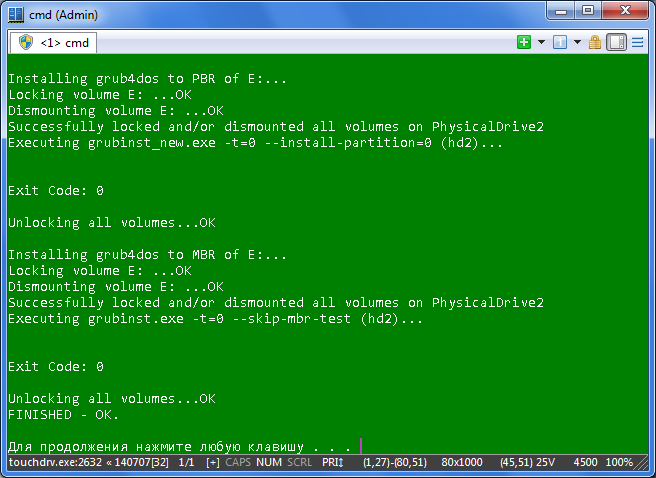
Next, run RMPrepUSB, select the drive in the list and press Ctrl + F2, agree and wait a couple of seconds. Program pohamanit with files and you can boot from a flash drive.
Oh, yes. That is why we are here and gathered. To prepare the image for downloading to UEFI, download the archive , unpack it. Install the ImDisk file \ imdiskinst.exe from the folder, and then drag the image file to the MakePartImage_AutoRun_FAT32.cmd script in the main folder. This script converts the image into the .imgPTN format, when mounted, which E2B will rewrite the MBR and mount the image as a FAT32 partition. You can read more here .
A working example - I threw different images on the drive, the structure is as follows:
Boot into the BIOS, select the desired UEFI image, switch the UEFI back and get a USB flash drive with one partition containing the files of this image. Accordingly, if this image supports booting into UEFI, it will appear in the list of devices from which you can boot.
Attention! If you downloaded from images prepared for UEFI, you will notice that the next time you boot from the drive, there will be a boot menu from that image. And where are all those that we sketched on a flash drive? Yes, and the files on the flash drive are not those ... There are two options - from the bootloader select the top item EASY2BOOT or in the OS run the script e2b \ RestoreE2B (run as admin) .cmd from the flash drive.
There were no minuses here, too - you have to switch to the BIOS in order to connect the desired image. But the functionality of this set of utilities closes all imaginable and unimaginable needs in a multi-boot flash drive.
Foreword
Good day, Habr. Quite recently, reading Habr, I came across an article, A revitalizing flash drive , which described how to create a multiboot flash drive with a set of useful utilities, various systems, etc. And everything would be fine, but here and there the dog is buried - pay attention to this comment thread , which discusses the performance of multiboot in systems with UEFI. Thus, I began
I didn’t have to go far, since the days of insane popularity of the Windows XP Zver Edition build, its developers used a toolkit called RMPrepUSB to write the build to a USB drive. The assembly is gone from the memory of people, but the utility package project itself continues to evolve and grow stronger. Well, the very basis - the project Easy2Boot . Studying their website, I found a universal way to create a multi-boot flash drive, which can contain any distribution kit, LiveCD or floppy images that you just want to add. So, let's start creating such a wonderful flash drive.
Getting started
Go to the site and download the latest archive with Install_RMPrepUSB_Full in the title. Unpack and install.
Warning: for fans of portability - you can open the installer in 7-zip (for example) and unpack it into a folder without installation.
Next, go to the Easy2Boot website and download the archive with the E2B itself, unpack it into any folder on your PC.
')
Preparing a flash drive
Go to the folder with E2B and run the file _ISO \ docs \ Make_E2B_USB_Drive.cmd .
Attention: if you did not install, but unpacked RMPrepUSB, then at the first stage you will be asked to specify the path in the RMPrepUSB folder.
We will be asked to indicate the number of the drive from the list, ask if we really want to format the drive and ask to choose a file system.
And here attention! Choose FAT32 - we load into UEFI without problems, but there is no support for files> 4 GB, and vice versa - NTFS without UEFI, but with support for large files. If your images weigh less than 4 GB each, feel free to choose FAT32. With NTFS it is a bit more difficult, namely - the flash drive in UEFI will not boot, but if you load it on a regular BIOS, and then select an image for UEFI (see below), then Easy2Boot will overwrite the MBR flash drive and it will load into UEFI, provided that in that image there is its support (the presence of files efi \ bootia32.efi and efi \ boot \ bootx64.efi )
We go on a complex path - we write N (that is, we format it in NTFS), a confirmation window will come out, click OK and wait. After formatting, E2B files will be copied and “Press any key” appears on a green background.
Screenshots
Folder structure or where to put images?
Go to the drive, see the files and the _ISO folder. I will briefly describe the structure (details are on the site ):
- ANTIVIRUS - we cast images of antivirus LIveCD (Kaspersky, Dr.Web and others like them)
- AUTO - we throw any image into a subfolder with the desired name (for example, along the path Ubuntu \ My_Ubuntu_Distro.iso)
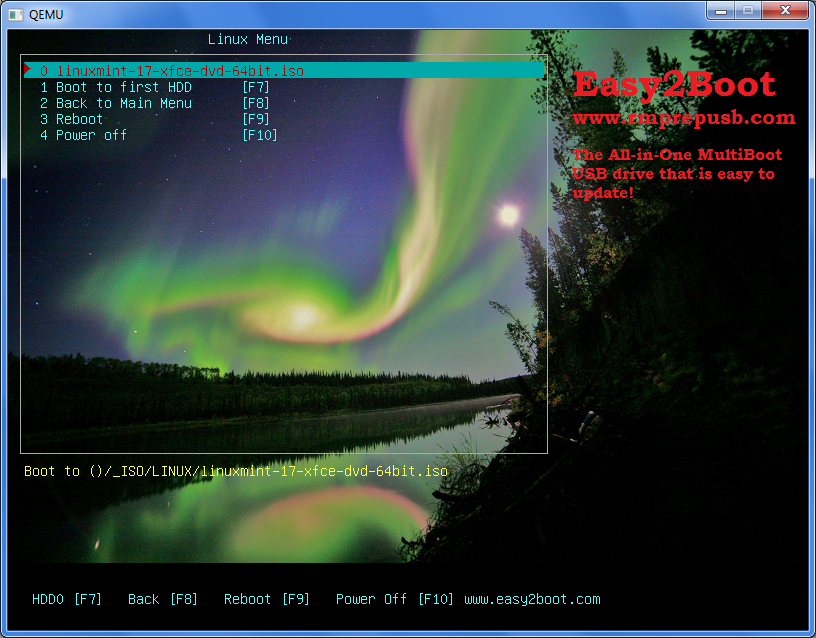
- LINUX - accordingly, we upload any Lunk image to this folder.
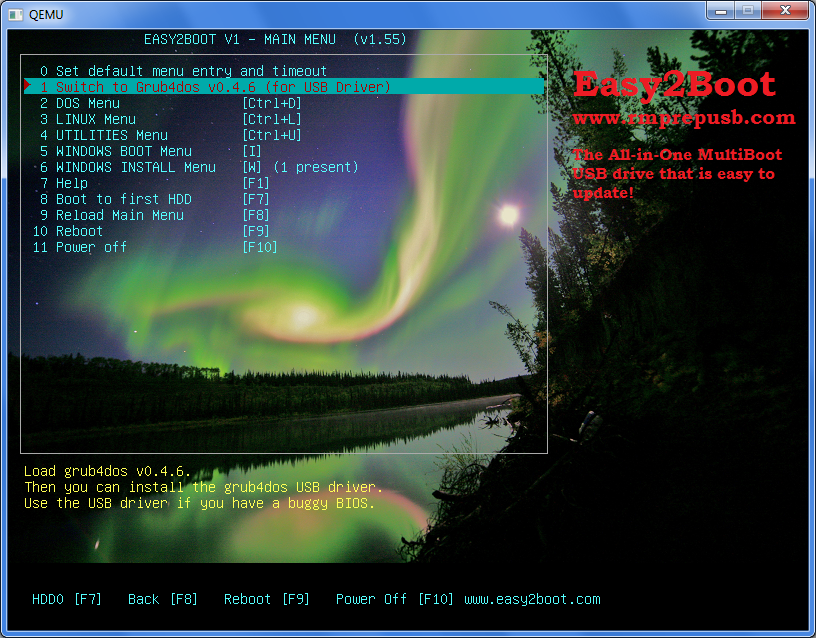
- MAINMENU - we drop the image into this folder and it will appear in the main menu of Grub4DOS when it is loaded (not in the submenu, more on that later)
- UTILITIES - we throw images of diskettes here
- UTILITIES_MEMTEST - the same, but, alas, I can not say more precisely
- WIN - here we will add images prepared for upload to UEFI. More on that later
- WINDOWS - by the structure of subfolders, it is easy to understand that for each Windows family you need to put an image in the corresponding subfolder.
Next, run RMPrepUSB, select the drive in the list and press Ctrl + F2, agree and wait a couple of seconds. Program pohamanit with files and you can boot from a flash drive.
Wait, what about UEFI?
Oh, yes. That is why we are here and gathered. To prepare the image for downloading to UEFI, download the archive , unpack it. Install the ImDisk file \ imdiskinst.exe from the folder, and then drag the image file to the MakePartImage_AutoRun_FAT32.cmd script in the main folder. This script converts the image into the .imgPTN format, when mounted, which E2B will rewrite the MBR and mount the image as a FAT32 partition. You can read more here .
How does all this look?
A working example - I threw different images on the drive, the structure is as follows:
- _ISO \ LINUX \ linuxmint-17-xfce-dvd-64bit.iso
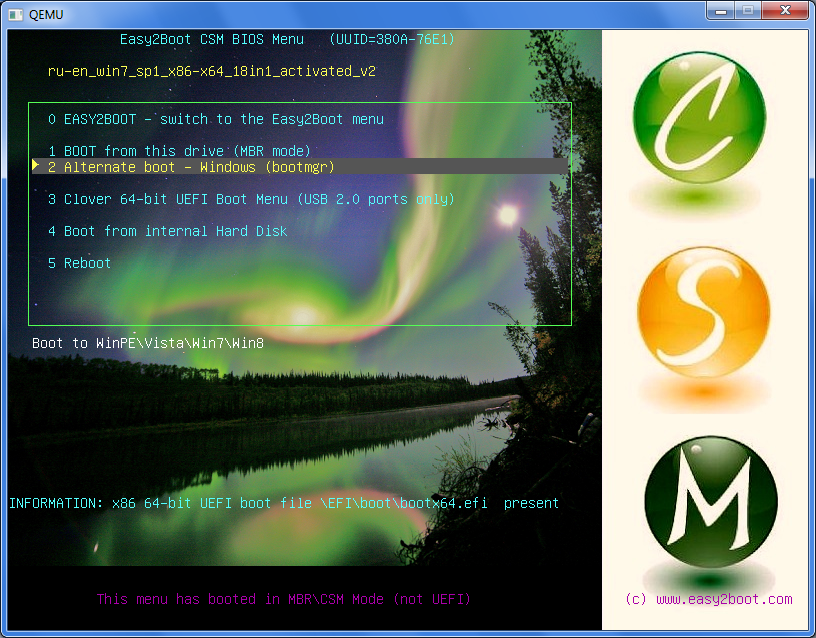
- _ISO \ WIN \ ru-en_win7_sp1_x86-x64_18in1_activated_v2.imgPTN
- _ISO \ WIN \ Boot_USB_Sergei_Strelec_2014_v.6.9.imgPTN
- _ISO \ WIN \ ru_windows_8_1_pro_vl_x86_dvd_LITE_3.iso
Screenshots
Main menu flash drive
Linux submenu
Submenu with ordinary ISO images of Windows

Submenu with images for UEFI

When downloading an image for UEFI, we will be asked if we really want to rewrite the table with a section of flash drives? Hit Enter

And this is how the bootloader of any image looks like for UEFI. Instructions for returning to the main menu below.
Linux submenu
Submenu with ordinary ISO images of Windows
Submenu with images for UEFI
When downloading an image for UEFI, we will be asked if we really want to rewrite the table with a section of flash drives? Hit Enter
And this is how the bootloader of any image looks like for UEFI. Instructions for returning to the main menu below.
Boot into the BIOS, select the desired UEFI image, switch the UEFI back and get a USB flash drive with one partition containing the files of this image. Accordingly, if this image supports booting into UEFI, it will appear in the list of devices from which you can boot.
Attention! If you downloaded from images prepared for UEFI, you will notice that the next time you boot from the drive, there will be a boot menu from that image. And where are all those that we sketched on a flash drive? Yes, and the files on the flash drive are not those ... There are two options - from the bootloader select the top item EASY2BOOT or in the OS run the script e2b \ RestoreE2B (run as admin) .cmd from the flash drive.
In the dry residue
There were no minuses here, too - you have to switch to the BIOS in order to connect the desired image. But the functionality of this set of utilities closes all imaginable and unimaginable needs in a multi-boot flash drive.
Information from the developer site
- www.easy2boot.com/faq-/how-e2b-works
- www.easy2boot.com/make-an-easy2boot-usb-drive
- www.easy2boot.com/add-payload-files
- www.easy2boot.com/add-payload-files/makepartimage
- www.easy2boot.com/add-payload-files/adding-uefi-images
- www.easy2boot.com/add-payload-files/adding-windows-install-isos-without-needing-a-helper-flash-drive
Source: https://habr.com/ru/post/240793/
All Articles