Enter password or hijackers
I do not know about you, but during the day I often have to move away from the workplace and block the poppy. In order not to make a few clicks with the mouse, I “hung up” locking the keys “shift + cmd + l”, but when I came to the workplace, I again had to enter a password (which is not so simple due to my paranoia). And so, having been mistaken in a hurry once again when entering it, I thought to automate the lock / unlock process. Since all the doors of our office open up on the map, I decided to hang it on the RFID tag (I still hang around my neck all the time) and this function. So, the task in words looked like this: having logged in once at the beginning of the working day to be able to lock / unlock the poppy by the RFID tag, with all the functions checking the validity of the tag, etc. should occur on the poppy side.
The beginning is already half the battle, and the stand on the basis of the Arduino UNO has just been released.
In the process of work, I decided to add functionality: reading the tag will occur only when the yellow button is pressed in the photo above (I don’t know why such complications appear, again, the paranoia affects). So, the overall process should look like this:
')
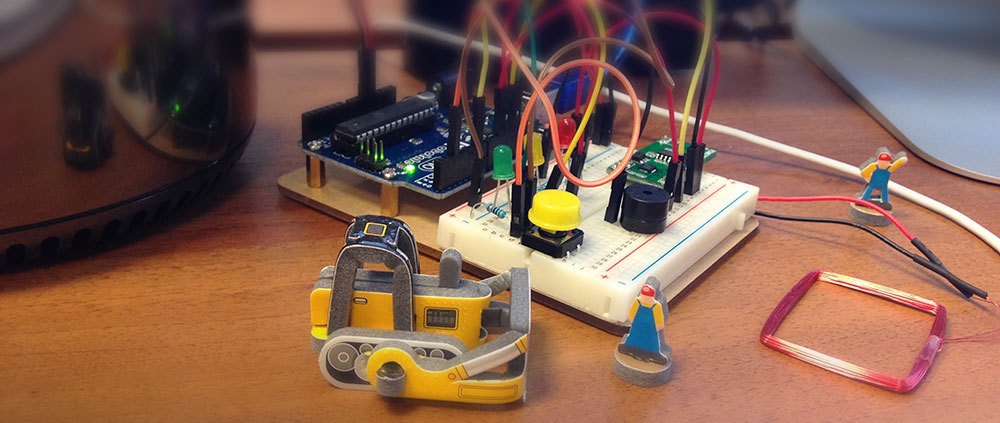
- The functional part will be all on the side of the poppy, and the Arduino will only transmit the tag code and “flashing LEDs”;
- We press the button - the yellow readiness LED lights up;
- If you attach an incorrect label - the red LED lights up;
- We attach the correct label - the green LED lights up and the poppy is locked / unlocked.
By purchasing the 125 kHz RFID module, I assembled a prototype device on a breadboard.
Sketch and code for Arduino
#include <SoftwareSerial.h> // "" int buttonPin = 2; int ledGreenPin = 13; int ledYellowPin = 12; int ledRedPin = 11; // RFID SoftwareSerial RFID(6, 7); String inputString = ""; int rfidData; String rfidNumber = ""; String rfidNumberLast = ""; boolean startPressButton = false; void setup() { Serial.begin(115200); RFID.begin(9600); pinMode(buttonPin, INPUT); pinMode(ledGreenPin, OUTPUT); pinMode(ledYellowPin, OUTPUT); pinMode(ledRedPin, OUTPUT); digitalWrite(ledGreenPin, LOW); digitalWrite(ledYellowPin, LOW); digitalWrite(ledRedPin, LOW); } void loop() { listenButton(); } /* . - RFID */ void listenButton() { if (digitalRead(buttonPin) == HIGH) { if (!startPressButton) { startPressButton = true; clearRFID(); } digitalWrite(ledYellowPin, HIGH); listenRFID(); } else { startPressButton = false; digitalWrite(ledYellowPin, LOW); } } /* RFID. - */ void listenRFID() { if (RFID.available()) { delay(100); rfidNumber = ""; for (int i = 0; i < 14; i++) { rfidData = RFID.read(); if (rfidData < 16) rfidNumber += '0'; rfidNumber += rfidData; } RFID.flush(); sendRDIFNumber(); } } /* */ void sendRDIFNumber() { if (rfidNumber != "" and rfidNumberLast != rfidNumber) { Serial.print("S"); Serial.print(rfidNumber); Serial.print("E"); rfidNumberLast = rfidNumber; rfidNumber = ""; } } /* Arduino */ void serialEvent() { while (Serial.available()) { char inChar = (char)Serial.read(); inputString += inChar; if (inputString == "M1F") { Serial.flush(); inputString = ""; logInOutProcess(); } if (inputString == "M0F") { Serial.flush(); inputString = ""; logInOutFail(); } } } /* - */ void logInOutProcess() { clearRFID(); digitalWrite(ledGreenPin, HIGH); digitalWrite(ledYellowPin, LOW); digitalWrite(ledRedPin, LOW); delay(1000); digitalWrite(ledGreenPin, LOW); digitalWrite(ledYellowPin, LOW); digitalWrite(ledRedPin, LOW); } /* - */ void logInOutFail() { clearRFID(); digitalWrite(ledGreenPin, LOW); digitalWrite(ledYellowPin, LOW); digitalWrite(ledRedPin, HIGH); delay(1000); digitalWrite(ledGreenPin, LOW); digitalWrite(ledYellowPin, LOW); digitalWrite(ledRedPin, LOW); } /* RFID- */ void clearRFID() { RFID.flush(); rfidNumberLast = ""; rfidNumber = ""; } The most interesting thing, in my opinion, is not on the side of Adruino, but on the side of the poppy. So, Node.js will communicate with the booth with the SerialPort module. But first I would like to resolve the issue of storing the unlock password (I really didn’t want to keep it open in the body of the script, although FileVault is enabled by default). To do this, I decided to use the standard OS X key keeper, Keychain Access.
How to add a password to the key keeper?
Call Keychain Access (Spotlight Search to help you)

Add a new password ...

In the field Account Name we register an adequate name - later we will access it from the script
Do not forget to access the key:

Confirm key access for console security program
Add a new password ...
In the field Account Name we register an adequate name - later we will access it from the script
Do not forget to access the key:
security find-generic-password -ga my password
Confirm key access for console security program
Well, you can proceed to the script on Node.js. To do this, create a folder on the desktop “RFIDUnLock”, the script itself will be referred to as “rfid.js”:
var inputString = ""; var serialport = require('serialport'); var SerialPort = serialport.SerialPort; var sp = new SerialPort('/dev/tty.usbmodem20331', { // "" "Tools/Serial Port" Arduino baudrate: 115200 }); var exec = require('child_process').exec; sp.on('open', function() { /* */ sp.on('data', function(data) { inputString += data.toString("utf8"); /* "" */ var cardCode = inputString.match(/S([0-9]+)E/i); if (cardCode && cardCode[1] != 'undefined') { checkCardNumber(cardCode[1]); inputString = ''; } }); }); function checkCardNumber(cardCode) { sp.flush(function() { /* , ... */ if (cardCode == '0211111111111111111111111103') { /* ... Arduino " " */ sp.write('M1F'); /* : " "? */ exec('ps aux | grep -c ScreenSaverEngine.app | grep -v grep', function (error, stdout, stderr) { /* - Kaychain "" */ if (parseInt(stdout) > 2) { exec("security 2>&1 >/dev/null find-generic-password -ga mypassword | ruby -e 'print $1 if STDIN.gets =~ /^password: \"(.*)\"$/'", function (error, stdout, stderr) { if (error !== null) return; var appleScript = 'osascript -e \'tell application "System Events"\' -e \'key code 56\' -e \'delay 0.5\' -e \'keystroke "' + stdout + '"\' -e \'key code 36\' -e \'end tell\''; exec(appleScript); }); /* ... " " - */ } else { exec('open -a /System/Library/Frameworks/ScreenSaver.framework/Versions/Current/Resources/ScreenSaverEngine.app'); } }); /* - Arduino " " */ } else { sp.write('M0F'); } }); } Next, save the call code of the Node.js script as a program (using the Script Editor ):
do shell script "/usr/local/bin/node ~/Desktop/RFIDUnLock/rfid.js" More if you can ...
Call the Script Editor (Spotlight Search to help you)

Register the code ...

We export ...

Save as Application
You can also add a key informing you that the program is running in background mode. To do this, in the “info.plist” file (available when viewing the contents of the program folder: ctrl + click on the file and selecting “Show Package Contents”), you need to add before the closing tags "</ dict> </ plist>":
Register the code ...
We export ...
Save as Application
You can also add a key informing you that the program is running in background mode. To do this, in the “info.plist” file (available when viewing the contents of the program folder: ctrl + click on the file and selecting “Show Package Contents”), you need to add before the closing tags "</ dict> </ plist>":
<key>LSBackgroundOnly</key> </true> ... And add the launch of our program when the system boots
PS: After playing with the prototype for a couple of days, I decided that he “has the right to live” - it remains to solder him into the case, using the smaller brother Arduino Nano.
NB: In the 21st century there will be many wills containing passwords.
Source: https://habr.com/ru/post/240647/
All Articles