Creating Today Extension for iOS 8
With the release of iOS 8 , Apple introduced a new concept called App Extensions , through which you can share the functionality of your application with other applications, and from the OS itself.
One of these types of extensions are Today Extensions , also known as Widgets . They provide you with the ability to display information in the Notification Center, which is a great way to provide the most up-to-date information that the user is interested in.
In this article, you will write an application based on the Today Extension extension , which will present the current market value of a Bitcoin based on the US dollar.
')
It has never been so easy and so fast to provide the necessary information to your users. Let's start!
Bitcoin / Bitcoin
For those who are not yet familiar with Bitcoin , this is a digital cryptocurrency, which is still in its infancy. In addition to using it for peer-to-peer exchanges and purchases, Bitcoin allows the user to exchange them for other cryptocurrencies such as Dogecoin and Litecoin or for US dollars or Euros.
Since it is a relatively new currency, its market value fluctuates by the minute; there were both huge peaks and downs for the entire period of its existence. Thus, this is an ideal candidate for Today Extension, as investors or buyers will want to know the stock price to the nearest second!
Crypticker
As you are writing an extension, you need a ready application to get started; well, it's time to get to know Crypticker.
Crypticker is a simple application that displays the current Bitcoin price, the difference between yesterday and the current price, as well as a chart of price history. The schedule includes a 30 day history; swiping your finger along the schedule, you will see the exact price for a specific day.
The extension will contain all these functions, but you cannot see the price for a specific day by swiping your finger along the chart. There are some connections to Today Extensions, especially when it comes to using gestures and multitasking. The gesture is often activated by swiping between Today Extensions and the Notification Center, so you do not need to have a great user experience to perform it.
Let's get to work
You need to download the Crypticker startup project to get started. The project contains Crypticker applications, as written above. In this article we will not focus on the development of the application itself, so you will be pleasantly surprised by the brevity of this article. In the end, you will write an extension, but not the whole application.
Compile and run the application. Please note that you will need an Internet connection to see the price in real time using the web service.
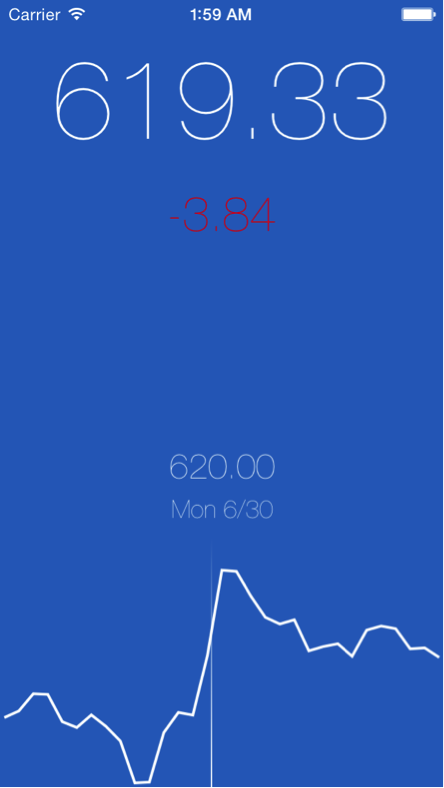
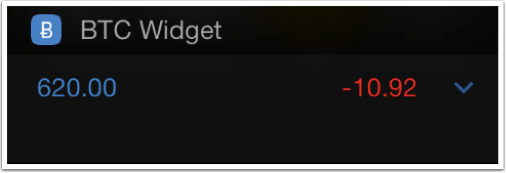
The application looks like a screenshot; The data displayed will, of course, depend on how things are going on in the Bitcoin market. Touching the chart near the bottom, a line will appear and display the price for the corresponding day.
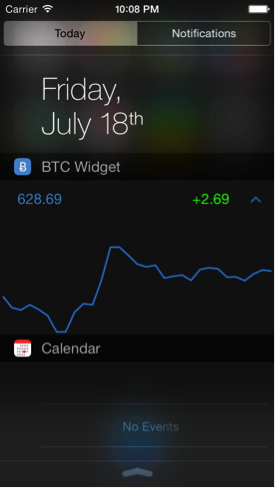
For those who do not yet know BTC, this is an abbreviated form for Bitcoin ; just like USD stands for US dollar. Today Extension will present a smaller version of the Crypticker main view.
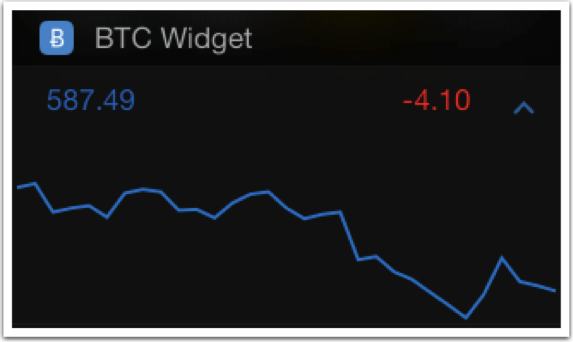
Theoretically, the Crypticker application has the ability to show pricing for several cryptocurrencies, but our extension is intended only for BTC . Therefore, it is called BTC Widget .
Note: Extensions, by their nature, have only one simple functioning goal. If you want to display information for other crypto-currencies, such as Dogecoin, then it is best to create another widget and with it an application or develop your UI accordingly, for example, like the Stocks widget.
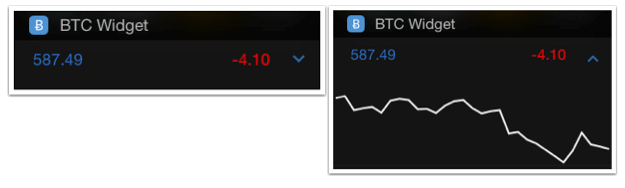
By the end of the article, your Today Extension will look something like this:
Adding Target Today Extension
Extensions are created as a separate binary file received from their host application. Thus, you will need to add target Today Extension to the Crypticker project.
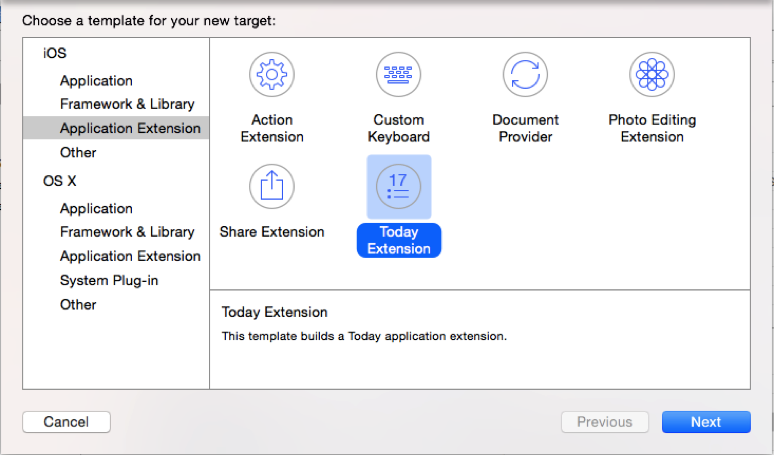
In Xcode in Project Navigato, select the Crypticker project and add a new target, Editor \ Add Target ... Then select iOS \ Application Extension \ Today Extension . And click the Next button.
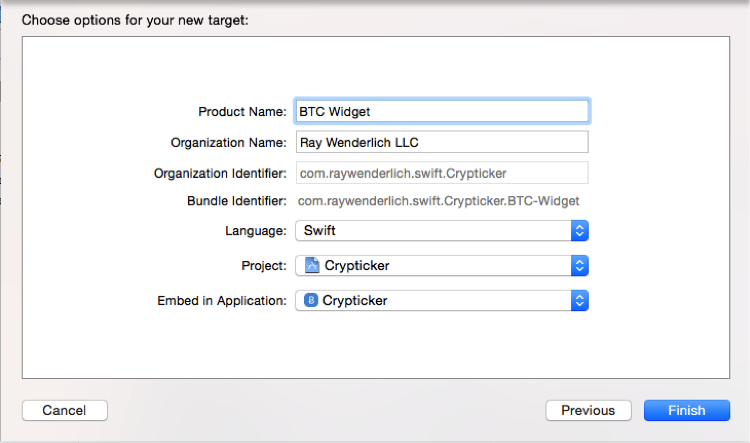
In the Product Name, type BTC Widget , and make sure that the programming language is Swift , and that the Embed in Application project is Crypticker . And click Finish .
When requesting, you need to activate the BTC Widget scheme. Because the text indicates that another scheme will be created for you to run in Xcode .
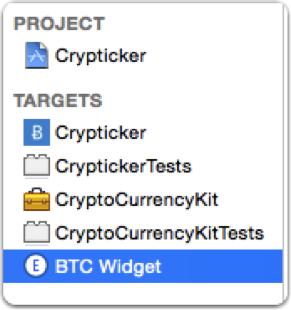
Congratulations! Now BTC Widget will appear in your targets list.
Make sure you select BTC Widget , then the “General” tab, and then click the + button, which is located under the Linked Frameworks and Libraries line . As shown in the picture:
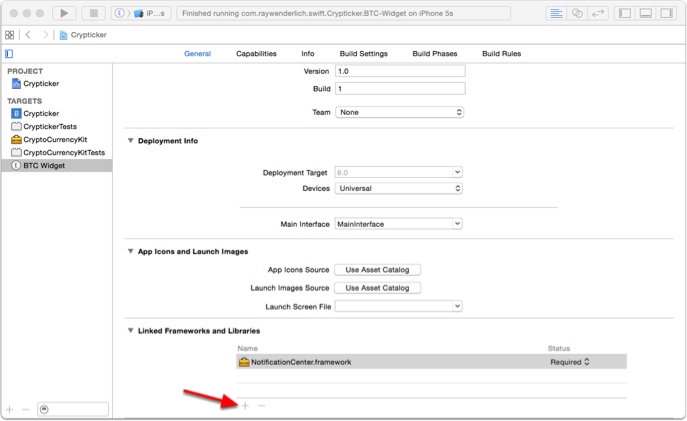
Select CryptoCurrencyKit.framework and click Add .
CryptoCurrencyKit is a custom framework that is used by the Crypticke application to get prices and currencies from the network. Fortunately for you, the incredibly kind and thoughtful developer Crypticker has applied modular design to the code, turning it into a framework so that several targets can use it.
In order to exchange data between the host application and its extensions, you must use a custom framework. If you do not do this, you will need to duplicate the code many times, and break an important rule of software engineering: DRY - or, Do not repeat. I will repeat it again: "Do not repeat . "
From this point on, you can start implementing the extension.
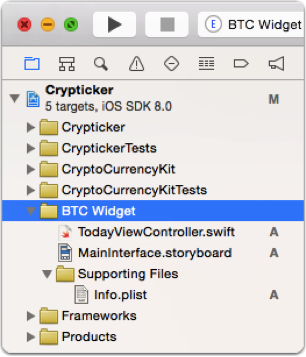
Please note that you now have a group in the Project navigator , named after your new targeta, BTC Widget . This is where the Today Extension code is by default.
Expand the group and you will see the view controller, storyboard, and Info.plist file. Its target configuration also instructs it to load its interface from the MainInterface.storyboard , which contains one view controller with a class assigned to TodayViewController.swift .
You will notice that some files that should be in the Today Extension template are missing; for example, as a delegate application. Remember that extensions work inside another host application in such a way that they do not go through the traditional application lifecycle.
In fact, the life cycle of an extension is mapped to the TodayViewController life cycle.
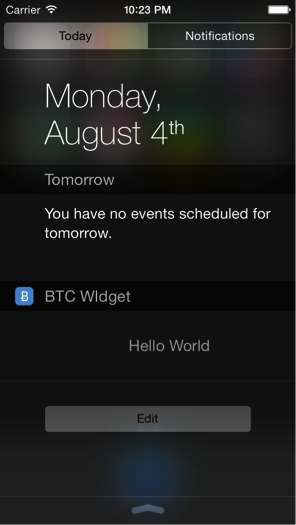
Open the MainInterface.storyboard and you will see a dark bright background with the light inscription "Hello World" . Today Extensions have high-definition images with a light background and light or bright color text that harmonizes perfectly with the dark, blurred background of the Notification Center / Notification Center.
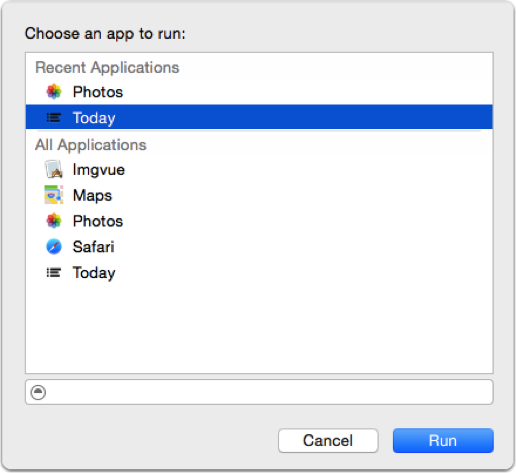
Make sure that target BTC Widget is selected on the Xcode toolbar, compiled and running. As a result, a window will appear asking for permission to launch the application. Xcode will ask you which host application you want to run. Select Today . This indicates that IOS will open the Notification Center on the Today panel, which in turn launches your widget. The notification center is actually the application host for Today Extensions .
It also allows Xcode to use its debugger while the widget is running.
Here is your widget. Cool, right? Although this is a super-addicting thing, a little more work is needed on the widget. It's time to do something interesting!
Note: You may notice a lot of errors associated with the use of Auto Layout, which are displayed in the console when the widget starts. This is a template issue in Xcode , and we hope Apple will solve it in the future. Although, you do not worry, since you will already have your own interface and the ability to use Auto Layout .
We create the interface
Open the MainInterface.storyboard and delete the Label . Add a view with a size of 150 points in height and 320 points in width set for it in the Size Inspector . Move a Button, two Labels and a View from the Object Library to the view controllers.
Note: There is a class called JBLineChartDotView that Xcode can offer when typing, making sure that you choose JBLineChartView .
Your View and Document Outline should look something like this:
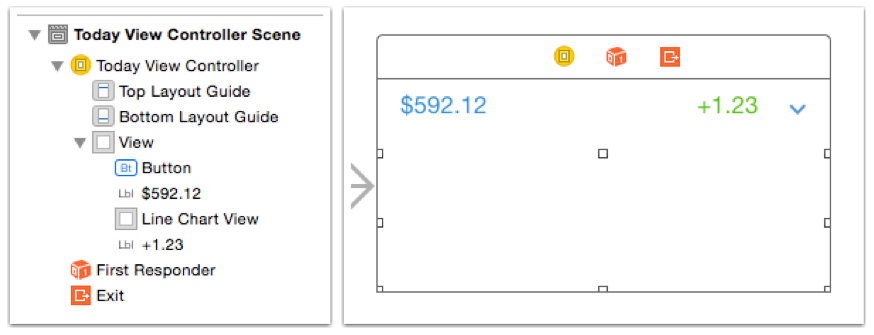
Note: View presented in white for visibility purposes in this article. Your view will actually have a dark gray background that simulates how your view will appear in the Notification Center.
Do not worry about the order in which it is all located, as soon you will add Auto Layout to properly determine the location.
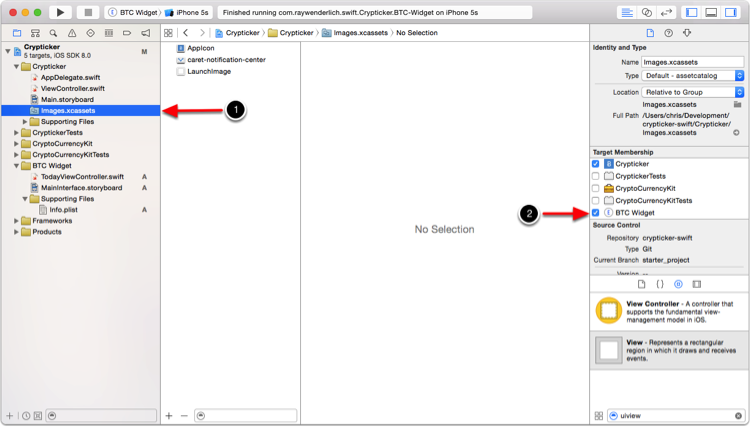
Now expand the Crypticker group in Project Navigator and select Images.xcassets. In the File Inspector , add the subject directory to the extension's target by checking the box to the left of BTC Widget .
This forces Xcode to include the graphic resources directory from target Crypticker in your target Widget ; this is where the caret-notification-center image you used for your button is located. If you have the same graphic resources between your container application and the widget, then it is a good idea to use a special directory that contains only resources that can be shared. This will reduce the excessive increase in size in your final set of extensions, not including images that are not used.
Go back to MainInterface.storyboard and open the Assistant Editor . And make sure TodayViewController.swift is the active file. Add the following code to the top of the file:
This you have done importing the CryptoCurrencyKit framework.
Then, you need to update the class declaration, which should look like this:
This will cause TodayViewController to become a subclass of CurrencyDataViewController , and ensure that it conforms to the NCWidgetProviding protocol.
CurrencyDataViewController is included in CryptoCurrencyKit and is also used as the main view in Crypticker. Since the widget and the application will show this information through the UIViewController , it makes sense to put the reusable components in the superclass, then subclass them, since the requirements set vary.
NCWidgetProviding is a protocol that is specifically designed for widgets. There are two methods of obtaining it that you will implement.
Hold Ctrl and move from the button to our class, just below the class declarations. In the dialog box that appears, make sure that Connection is selected as Outlet , Type is selected as UIButton , and enter toggleLineChartButton in the Name field. Click Connect .
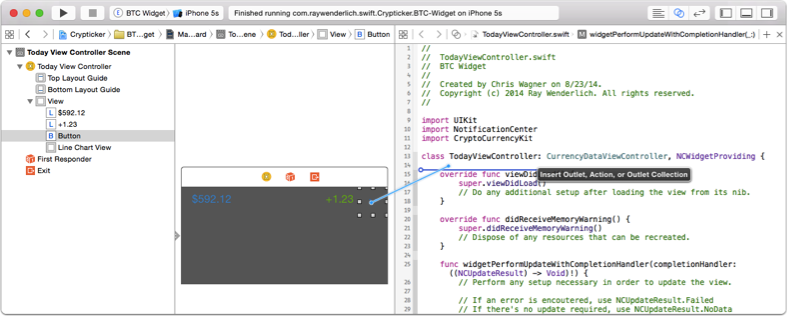
Then hold down the ctrl and move from the button to the bottom of the class this time. In the dialog box that appears, change Connection to Action , set Type to UIButton, and type toggleLineChart in the Name box . Click on Connect

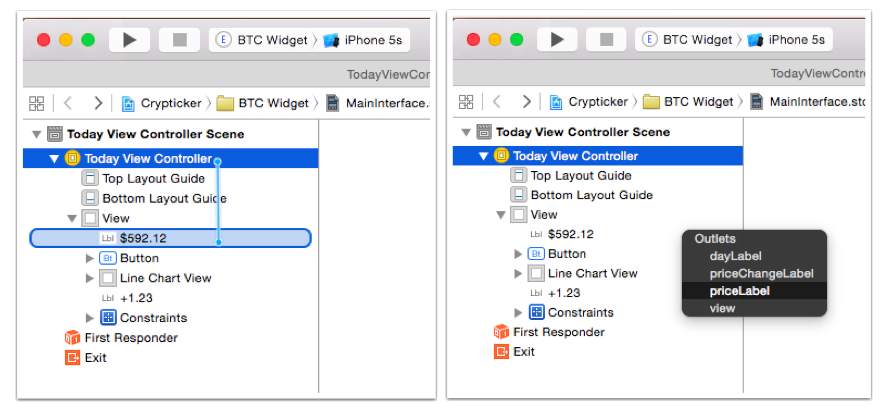
TodayViewController subclasses CurrencyDataViewController , which has outlets for price lable, leble price changes and line chart display. Now you need to connect them. In the Document Outline , hold down the ctrl and drag from T oday View Controller to the price label (with the text set to $ 592.12). Select priceLabel from the popup to create a connection. Repeat all this for another lable by selecting priceChangeLabe from the popup. Finally, do the same for Line Chart View by selecting lineChartView from the popup window ...
Auto Layout
In order for your widget to be responsive, you need to establish an Auto Layout connection. New connections released with iOS 8 are the concept of Adaptive Layou t. The general idea is that a view designed with a single layout can work on different screen sizes. A representation is considered adaptive when it can adapt to unknown future metric values of the device.
One of the links you add should show and hide the chart, and help determine the overall height of the widget. The notification center will be based on the entered data to display your widget of the appropriate height.
Select Lable $ 592.12, and then select Editor \ Size to Fit Content . If the Size to Fit Content option is disabled in the menu, deselect Lable, then select it again and try again; sometimes Xcode may work intermittently. Next, using the Pin button at the bottom of the storyboard workspace, set the Top and Leading priority to 8 and 16, respectively. Make sure Constrain to margins is selected.

Select Lable +1.23 and select Editor \ Size to Fit Content again. Then, using the Pin button, select the Top and Trailing relationship, and in the properties set the value to 8.

Select Button, and using the Pin button set the priority for Top and Trailing to 0, and for Bottom to 8. Width and Height to 44. Make sure Constrain to margins is off.
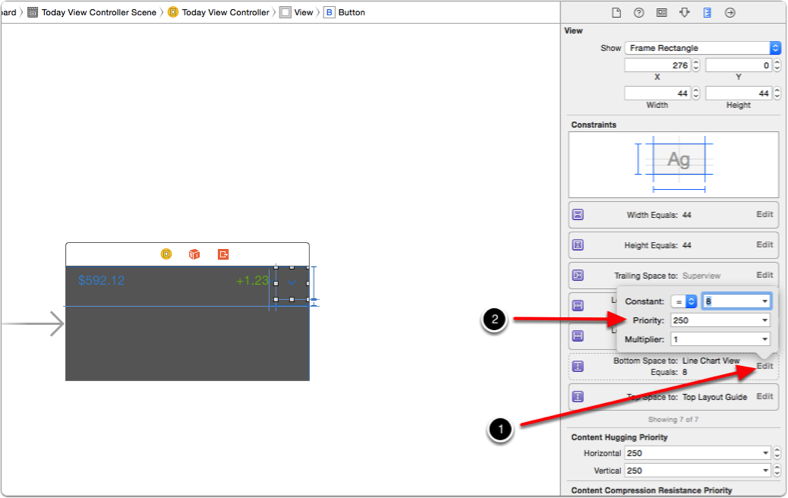
You need to lower the priority of the lower anchor for the button. Select the button and then open the Size Inspector. Find Bottom Space to: link in the list of links, click on the Edit button and change its Priority to 250.
By lowering the priority, you allow the Auto Layout system to change this binding, if it deems it necessary. 250 is an arbitrary value, which turns out to be less than 1000, it is this priority that is set on all bindings by default. This binding should change as soon as the widget is in a minimized state. Having different levels of priorities in the bindings, you tell the system which links need to be changed first or last when a conflict occurs.
Finally, select Line Chart View . Using the Pin button, select Leading, Trailing and Bottom and in the properties set the value to 0, and the height to 98.
From the Document Outline, select the View Controllers view , and then Editor \ Resolve Auto Layout Issues \ All Views \ Update Frames . This will eliminate any Auto Layout warnings in workspaces by updating frames to match the correct bindings. If Update Frames is selected, then you have done everything as it should, and there is no need to start the application.
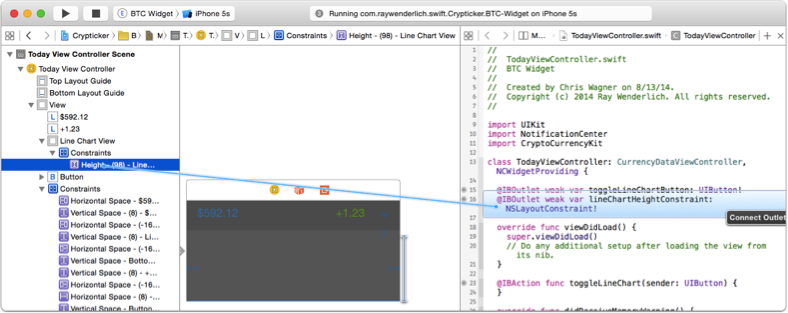
Since all your bindings are in place, the last step is to create an output for snapping the height of the line chart view. Find the Line Chart View in the Document Outline and click on the triangle to expand.
Then click on the triangle for Constraints to find the necessary peg for the height. Select it, and then move ctrl + drag to the Assistant Editor , placing it just below another outlet. In the pop-up window, make sure Connection is selected as Outlet , and enter lineChartHeightConstraint for Name . Click Connect .
Implementing TodayViewController.swift
Now the interface is in its place and what was needed is configured, open the TodayViewController.swift file by selecting it in Standard Editor.
You will notice that you are working with the standard UIViewController subclass. Comfortable, isn't it? Although later you will come across the new method widgetPerformUpdateWithCompletionHandler from the NCWidgetProviding protocol. You will learn more about him by the end of this article.
This view controller is responsible for displaying the current price, the difference in price, for pressing the button and showing the price history on the line chart.
Define a property at the top of TodayViewController that you will use to track if the line chart is displayed or not:
Now replace the viewDidLoad () method with the following implementation:
This method performs the following actions:
Stay in TodayViewController , and add the following method:
The fetchPrices method is defined in CurrencyDataViewController , and is an asynchronous call that accepts block terminations. The method makes a request to the web service mentioned at the beginning of the article to get information about the price of Bitcoin .
The method updates both Lable and Line Chart. Update methods are also defined in the superclass. They simply accept the values obtained by the fetchPrices method and format them appropriately for display on the screen.
Thanks to the construction of the widget, you also need to implement widgetMarginInsetsForProposedMarginInsets to provide custom field tabs. Add the following code to TodayViewController :
By default, widgets have a large field, which is set in many Apple widgets by default. If you want to fill the entire width of the Notification Center, then you need to implement this method and return UIEdgeInsetsZero , which defines the value 0 for all parties.
Now it's time to see what happened. Select the scheme BTC Widget. Compile and run the extension. Select Today as the app to launch when prompted.
Cool, isn't it ?! Your widget now displays real-time Bitcoin prices right in the Notification Center. But you probably noticed one problem; The button does not work, and you do not see the diagram.
Then you need to implement the toggleLineChart method for the button that you added so that it expands the widget view and presents the diagram. As the name of the method suggests, this button will act as a switch; it will also minimize the view to hide the chart.
Replace the empty toggleLineChart method with the following code:
This method controls the constant value of the Line Chart View snap height to resize the window. It also applies an expansion transform to the button, thus accurately reflecting the visibility of the chart.
After the binding is updated, it is necessary to reload the diagrams so that they are redrawn on the new layout.
You can do this in the viewDidLayoutSubviews method by adding it to TodayViewController :
Make sure that the BTC Widget scheme is selected, compile and run the application. Then select Today as the app to launch when prompted.
On the left, you will see the widget appear when the diagram is hidden. On the right, you will see how it is displayed when we "opened" the widget. Wow, really!
Quick change the color of the line, and you will have one widget. Add the following to TodayViewController :
Make sure the schema that is still selected is correct. Compile and run the application. Select Today as the app to launch when prompted.
Your last requirement that your widget should support is to update its view when it is not displayed, allowing the system to create a snapshot. The system does this periodically to help your widget meet current requirements.
Replace the existing implementation of the widgetPerformUpdateWithCompletionHandler method with the following code:
This method performs the following actions:
And so, we have completed creating your Today Extension ! You can download the final project here .
And what's next?
The Center for Notifications in iOS 8 is your own personal playground! Widgets have been available in some other mobile operating systems for years, and now Apple has finally given you the opportunity to create them.
As an enterprising developer, you may want to take another look at existing applications and think about how you can update them with widgets. Go ahead and invent new ideas for the application that will take advantage of the widgets.
If you want to learn more about creating other types of extensions IOS 8 App Extensions, read our book iOS 8 by Tutorials, where you can learn about Photo Extensions , Share Extensions , Action Extensions and much more!
We can't wait to see what you come up with and hope that your Today Extensions will be in the top of our Notification Centers soon!
One of these types of extensions are Today Extensions , also known as Widgets . They provide you with the ability to display information in the Notification Center, which is a great way to provide the most up-to-date information that the user is interested in.
In this article, you will write an application based on the Today Extension extension , which will present the current market value of a Bitcoin based on the US dollar.
')
It has never been so easy and so fast to provide the necessary information to your users. Let's start!
Bitcoin / Bitcoin
For those who are not yet familiar with Bitcoin , this is a digital cryptocurrency, which is still in its infancy. In addition to using it for peer-to-peer exchanges and purchases, Bitcoin allows the user to exchange them for other cryptocurrencies such as Dogecoin and Litecoin or for US dollars or Euros.
Since it is a relatively new currency, its market value fluctuates by the minute; there were both huge peaks and downs for the entire period of its existence. Thus, this is an ideal candidate for Today Extension, as investors or buyers will want to know the stock price to the nearest second!
Crypticker
As you are writing an extension, you need a ready application to get started; well, it's time to get to know Crypticker.
Crypticker is a simple application that displays the current Bitcoin price, the difference between yesterday and the current price, as well as a chart of price history. The schedule includes a 30 day history; swiping your finger along the schedule, you will see the exact price for a specific day.
The extension will contain all these functions, but you cannot see the price for a specific day by swiping your finger along the chart. There are some connections to Today Extensions, especially when it comes to using gestures and multitasking. The gesture is often activated by swiping between Today Extensions and the Notification Center, so you do not need to have a great user experience to perform it.
Let's get to work
You need to download the Crypticker startup project to get started. The project contains Crypticker applications, as written above. In this article we will not focus on the development of the application itself, so you will be pleasantly surprised by the brevity of this article. In the end, you will write an extension, but not the whole application.
Compile and run the application. Please note that you will need an Internet connection to see the price in real time using the web service.
The application looks like a screenshot; The data displayed will, of course, depend on how things are going on in the Bitcoin market. Touching the chart near the bottom, a line will appear and display the price for the corresponding day.
For those who do not yet know BTC, this is an abbreviated form for Bitcoin ; just like USD stands for US dollar. Today Extension will present a smaller version of the Crypticker main view.
Theoretically, the Crypticker application has the ability to show pricing for several cryptocurrencies, but our extension is intended only for BTC . Therefore, it is called BTC Widget .
Note: Extensions, by their nature, have only one simple functioning goal. If you want to display information for other crypto-currencies, such as Dogecoin, then it is best to create another widget and with it an application or develop your UI accordingly, for example, like the Stocks widget.
By the end of the article, your Today Extension will look something like this:
Adding Target Today Extension
Extensions are created as a separate binary file received from their host application. Thus, you will need to add target Today Extension to the Crypticker project.
In Xcode in Project Navigato, select the Crypticker project and add a new target, Editor \ Add Target ... Then select iOS \ Application Extension \ Today Extension . And click the Next button.
In the Product Name, type BTC Widget , and make sure that the programming language is Swift , and that the Embed in Application project is Crypticker . And click Finish .
When requesting, you need to activate the BTC Widget scheme. Because the text indicates that another scheme will be created for you to run in Xcode .
Congratulations! Now BTC Widget will appear in your targets list.
Make sure you select BTC Widget , then the “General” tab, and then click the + button, which is located under the Linked Frameworks and Libraries line . As shown in the picture:
Select CryptoCurrencyKit.framework and click Add .
CryptoCurrencyKit is a custom framework that is used by the Crypticke application to get prices and currencies from the network. Fortunately for you, the incredibly kind and thoughtful developer Crypticker has applied modular design to the code, turning it into a framework so that several targets can use it.
In order to exchange data between the host application and its extensions, you must use a custom framework. If you do not do this, you will need to duplicate the code many times, and break an important rule of software engineering: DRY - or, Do not repeat. I will repeat it again: "Do not repeat . "
From this point on, you can start implementing the extension.
Please note that you now have a group in the Project navigator , named after your new targeta, BTC Widget . This is where the Today Extension code is by default.
Expand the group and you will see the view controller, storyboard, and Info.plist file. Its target configuration also instructs it to load its interface from the MainInterface.storyboard , which contains one view controller with a class assigned to TodayViewController.swift .
You will notice that some files that should be in the Today Extension template are missing; for example, as a delegate application. Remember that extensions work inside another host application in such a way that they do not go through the traditional application lifecycle.
In fact, the life cycle of an extension is mapped to the TodayViewController life cycle.
Open the MainInterface.storyboard and you will see a dark bright background with the light inscription "Hello World" . Today Extensions have high-definition images with a light background and light or bright color text that harmonizes perfectly with the dark, blurred background of the Notification Center / Notification Center.
Make sure that target BTC Widget is selected on the Xcode toolbar, compiled and running. As a result, a window will appear asking for permission to launch the application. Xcode will ask you which host application you want to run. Select Today . This indicates that IOS will open the Notification Center on the Today panel, which in turn launches your widget. The notification center is actually the application host for Today Extensions .
It also allows Xcode to use its debugger while the widget is running.
Here is your widget. Cool, right? Although this is a super-addicting thing, a little more work is needed on the widget. It's time to do something interesting!
Note: You may notice a lot of errors associated with the use of Auto Layout, which are displayed in the console when the widget starts. This is a template issue in Xcode , and we hope Apple will solve it in the future. Although, you do not worry, since you will already have your own interface and the ability to use Auto Layout .
We create the interface
Open the MainInterface.storyboard and delete the Label . Add a view with a size of 150 points in height and 320 points in width set for it in the Size Inspector . Move a Button, two Labels and a View from the Object Library to the view controllers.
- Place one of the lables in the upper left corner, and in the Attributes Inspector set the Text to $ 592.12 and Color to Red: 66, Green: 145 and Blue: 211. It will show the current market price.
- Place another Lable to the right of the one you just installed, but leave the field to the right of the button. In Attributes Inspector set Text to +1.23 and Color to Red: 133, Green: 191 and Blue: 37. This will show the difference between yesterday's price and the current price.
- Move the button to the top right view, and in the Attributes Inspector, set the Image to the caret-notification-center and delete the Title.
- Finally, place an empty view below the two lables and buttons, drag it so that the bottom and side edges touch the view's content and set the Height to 98. In the Attributes Inspector, set the Background as Clear Color, and in the Identity Inspector set the Class - JBLineChartView .
Note: There is a class called JBLineChartDotView that Xcode can offer when typing, making sure that you choose JBLineChartView .
Your View and Document Outline should look something like this:
Note: View presented in white for visibility purposes in this article. Your view will actually have a dark gray background that simulates how your view will appear in the Notification Center.
Do not worry about the order in which it is all located, as soon you will add Auto Layout to properly determine the location.
Now expand the Crypticker group in Project Navigator and select Images.xcassets. In the File Inspector , add the subject directory to the extension's target by checking the box to the left of BTC Widget .
This forces Xcode to include the graphic resources directory from target Crypticker in your target Widget ; this is where the caret-notification-center image you used for your button is located. If you have the same graphic resources between your container application and the widget, then it is a good idea to use a special directory that contains only resources that can be shared. This will reduce the excessive increase in size in your final set of extensions, not including images that are not used.
Go back to MainInterface.storyboard and open the Assistant Editor . And make sure TodayViewController.swift is the active file. Add the following code to the top of the file:
import CryptoCurrencyKit This you have done importing the CryptoCurrencyKit framework.
Then, you need to update the class declaration, which should look like this:
class TodayViewController: CurrencyDataViewController, NCWidgetProviding { This will cause TodayViewController to become a subclass of CurrencyDataViewController , and ensure that it conforms to the NCWidgetProviding protocol.
CurrencyDataViewController is included in CryptoCurrencyKit and is also used as the main view in Crypticker. Since the widget and the application will show this information through the UIViewController , it makes sense to put the reusable components in the superclass, then subclass them, since the requirements set vary.
NCWidgetProviding is a protocol that is specifically designed for widgets. There are two methods of obtaining it that you will implement.
Hold Ctrl and move from the button to our class, just below the class declarations. In the dialog box that appears, make sure that Connection is selected as Outlet , Type is selected as UIButton , and enter toggleLineChartButton in the Name field. Click Connect .
Then hold down the ctrl and move from the button to the bottom of the class this time. In the dialog box that appears, change Connection to Action , set Type to UIButton, and type toggleLineChart in the Name box . Click on Connect
TodayViewController subclasses CurrencyDataViewController , which has outlets for price lable, leble price changes and line chart display. Now you need to connect them. In the Document Outline , hold down the ctrl and drag from T oday View Controller to the price label (with the text set to $ 592.12). Select priceLabel from the popup to create a connection. Repeat all this for another lable by selecting priceChangeLabe from the popup. Finally, do the same for Line Chart View by selecting lineChartView from the popup window ...
Auto Layout
In order for your widget to be responsive, you need to establish an Auto Layout connection. New connections released with iOS 8 are the concept of Adaptive Layou t. The general idea is that a view designed with a single layout can work on different screen sizes. A representation is considered adaptive when it can adapt to unknown future metric values of the device.
One of the links you add should show and hide the chart, and help determine the overall height of the widget. The notification center will be based on the entered data to display your widget of the appropriate height.
Select Lable $ 592.12, and then select Editor \ Size to Fit Content . If the Size to Fit Content option is disabled in the menu, deselect Lable, then select it again and try again; sometimes Xcode may work intermittently. Next, using the Pin button at the bottom of the storyboard workspace, set the Top and Leading priority to 8 and 16, respectively. Make sure Constrain to margins is selected.
Select Lable +1.23 and select Editor \ Size to Fit Content again. Then, using the Pin button, select the Top and Trailing relationship, and in the properties set the value to 8.
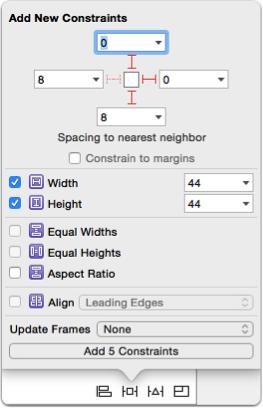
Select Button, and using the Pin button set the priority for Top and Trailing to 0, and for Bottom to 8. Width and Height to 44. Make sure Constrain to margins is off.
You need to lower the priority of the lower anchor for the button. Select the button and then open the Size Inspector. Find Bottom Space to: link in the list of links, click on the Edit button and change its Priority to 250.
By lowering the priority, you allow the Auto Layout system to change this binding, if it deems it necessary. 250 is an arbitrary value, which turns out to be less than 1000, it is this priority that is set on all bindings by default. This binding should change as soon as the widget is in a minimized state. Having different levels of priorities in the bindings, you tell the system which links need to be changed first or last when a conflict occurs.
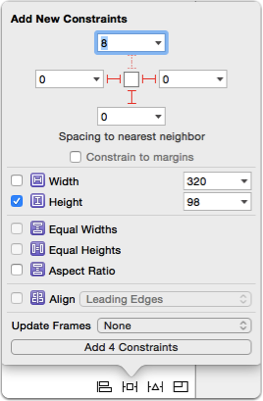
Finally, select Line Chart View . Using the Pin button, select Leading, Trailing and Bottom and in the properties set the value to 0, and the height to 98.
From the Document Outline, select the View Controllers view , and then Editor \ Resolve Auto Layout Issues \ All Views \ Update Frames . This will eliminate any Auto Layout warnings in workspaces by updating frames to match the correct bindings. If Update Frames is selected, then you have done everything as it should, and there is no need to start the application.
Since all your bindings are in place, the last step is to create an output for snapping the height of the line chart view. Find the Line Chart View in the Document Outline and click on the triangle to expand.
Then click on the triangle for Constraints to find the necessary peg for the height. Select it, and then move ctrl + drag to the Assistant Editor , placing it just below another outlet. In the pop-up window, make sure Connection is selected as Outlet , and enter lineChartHeightConstraint for Name . Click Connect .
Implementing TodayViewController.swift
Now the interface is in its place and what was needed is configured, open the TodayViewController.swift file by selecting it in Standard Editor.
You will notice that you are working with the standard UIViewController subclass. Comfortable, isn't it? Although later you will come across the new method widgetPerformUpdateWithCompletionHandler from the NCWidgetProviding protocol. You will learn more about him by the end of this article.
This view controller is responsible for displaying the current price, the difference in price, for pressing the button and showing the price history on the line chart.
Define a property at the top of TodayViewController that you will use to track if the line chart is displayed or not:
var lineChartIsVisible = false Now replace the viewDidLoad () method with the following implementation:
override func viewDidLoad() { super.viewDidLoad() lineChartHeightConstraint.constant = 0 lineChartView.delegate = self; lineChartView.dataSource = self; priceLabel.text = "--" priceChangeLabel.text = "--" } This method performs the following actions:
- Sets the height for the line chart “height constraints” to 0, so that it is the default.
- Sets self as a data source and a delegate for a line chart view.
- Sets some placeholder text on two Lables.
Stay in TodayViewController , and add the following method:
override func viewDidAppear(animated: Bool) { super.viewDidAppear(animated) fetchPrices { error in if error == nil { self.updatePriceLabel() self.updatePriceChangeLabel() self.updatePriceHistoryLineChart() } } } The fetchPrices method is defined in CurrencyDataViewController , and is an asynchronous call that accepts block terminations. The method makes a request to the web service mentioned at the beginning of the article to get information about the price of Bitcoin .
The method updates both Lable and Line Chart. Update methods are also defined in the superclass. They simply accept the values obtained by the fetchPrices method and format them appropriately for display on the screen.
Thanks to the construction of the widget, you also need to implement widgetMarginInsetsForProposedMarginInsets to provide custom field tabs. Add the following code to TodayViewController :
func widgetMarginInsetsForProposedMarginInsets (defaultMarginInsets: UIEdgeInsets) -> (UIEdgeInsets) { return UIEdgeInsetsZero } By default, widgets have a large field, which is set in many Apple widgets by default. If you want to fill the entire width of the Notification Center, then you need to implement this method and return UIEdgeInsetsZero , which defines the value 0 for all parties.
Now it's time to see what happened. Select the scheme BTC Widget. Compile and run the extension. Select Today as the app to launch when prompted.
- If the Notification Center does not appear, swipe down from the top of the screen to activate it.
- If the widget does not appear in the Notification Center, you need to add it via the Edit menu. At the bottom of the Today content view, you can see the Edit button. Click the button to expand the menu of all Today Extensions extensions that are installed on the system. Here you can enable, disable and reorder them as you wish. Enable BTC Widget if you have not already done so.
Cool, isn't it ?! Your widget now displays real-time Bitcoin prices right in the Notification Center. But you probably noticed one problem; The button does not work, and you do not see the diagram.
Then you need to implement the toggleLineChart method for the button that you added so that it expands the widget view and presents the diagram. As the name of the method suggests, this button will act as a switch; it will also minimize the view to hide the chart.
Replace the empty toggleLineChart method with the following code:
@IBAction func toggleLineChart(sender: UIButton) { if lineChartIsVisible { lineChartHeightConstraint.constant = 0 let transform = CGAffineTransformMakeRotation(0) toggleLineChartButton.transform = transform lineChartIsVisible = false } else { lineChartHeightConstraint.constant = 98 let transform = CGAffineTransformMakeRotation(CGFloat(180.0 * M_PI/180.0)) toggleLineChartButton.transform = transform lineChartIsVisible = true } } This method controls the constant value of the Line Chart View snap height to resize the window. It also applies an expansion transform to the button, thus accurately reflecting the visibility of the chart.
After the binding is updated, it is necessary to reload the diagrams so that they are redrawn on the new layout.
You can do this in the viewDidLayoutSubviews method by adding it to TodayViewController :
override func viewDidLayoutSubviews() { super.viewDidLayoutSubviews() updatePriceHistoryLineChart() } Make sure that the BTC Widget scheme is selected, compile and run the application. Then select Today as the app to launch when prompted.
On the left, you will see the widget appear when the diagram is hidden. On the right, you will see how it is displayed when we "opened" the widget. Wow, really!
Quick change the color of the line, and you will have one widget. Add the following to TodayViewController :
override func lineChartView(lineChartView: JBLineChartView!, colorForLineAtLineIndex lineIndex: UInt) -> UIColor! { return UIColor(red: 0.17, green: 0.49, blue: 0.82, alpha: 1.0) } Make sure the schema that is still selected is correct. Compile and run the application. Select Today as the app to launch when prompted.
Your last requirement that your widget should support is to update its view when it is not displayed, allowing the system to create a snapshot. The system does this periodically to help your widget meet current requirements.
Replace the existing implementation of the widgetPerformUpdateWithCompletionHandler method with the following code:
func widgetPerformUpdateWithCompletionHandler(completionHandler: ((NCUpdateResult) -> Void)!) { fetchPrices { error in if error == nil { self.updatePriceLabel() self.updatePriceChangeLabel() self.updatePriceHistoryLineChart() completionHandler(.NewData) } else { completionHandler(.NoData) } } } This method performs the following actions:
- It retrieves the current price data from the web service, calling fetchPrices .
- If there are no errors, the interface is constantly updated.
- Finally, and in accordance with the requirements of the NCWidgetProviding protocol, the function calls the completion unit supplied with the system with .ND Data enumeration.
- In case of an error, the completion block is called using the .Failed enumeration . This informs the system that new data is not available, and an existing snapshot should be used.
And so, we have completed creating your Today Extension ! You can download the final project here .
And what's next?
The Center for Notifications in iOS 8 is your own personal playground! Widgets have been available in some other mobile operating systems for years, and now Apple has finally given you the opportunity to create them.
As an enterprising developer, you may want to take another look at existing applications and think about how you can update them with widgets. Go ahead and invent new ideas for the application that will take advantage of the widgets.
If you want to learn more about creating other types of extensions IOS 8 App Extensions, read our book iOS 8 by Tutorials, where you can learn about Photo Extensions , Share Extensions , Action Extensions and much more!
We can't wait to see what you come up with and hope that your Today Extensions will be in the top of our Notification Centers soon!
Source: https://habr.com/ru/post/240475/
All Articles