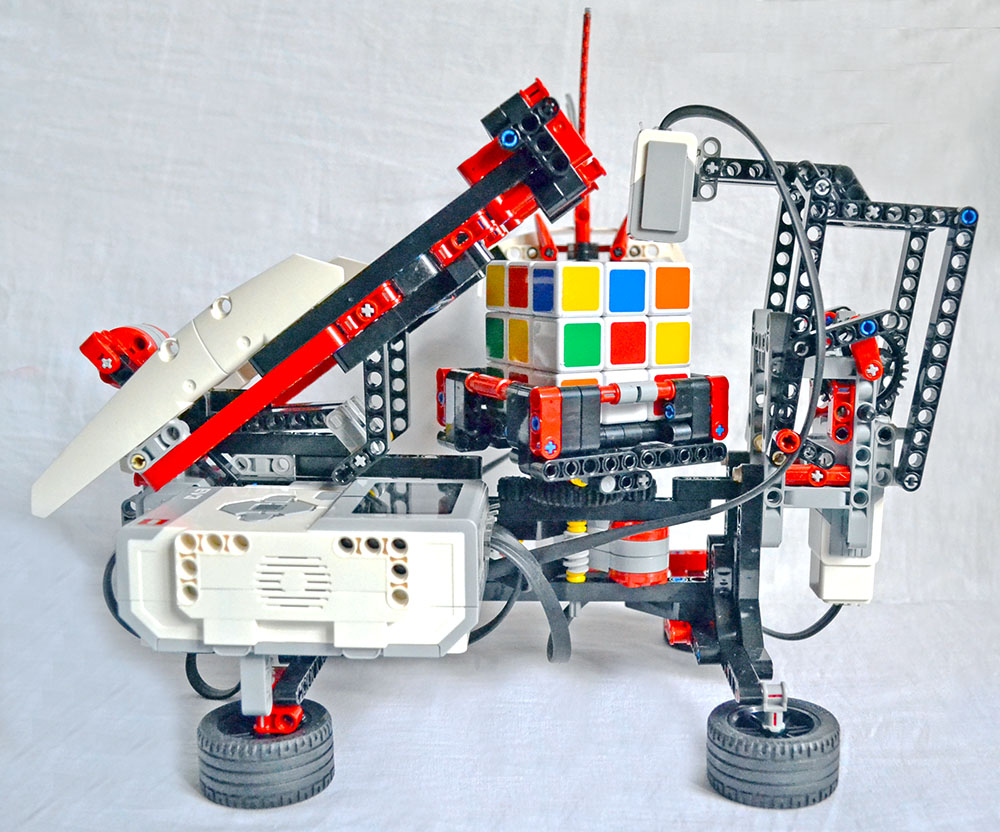
MindCub3r in Russian - we make a robot that can assemble a Rubik's Cube (article updated)
I recently acquired the LEGO MINDSTORMS EV3 kit (31313) and was surprised to find that there are quite a few interesting materials and instructions for assembling and configuring robots from this kit in the Russian-speaking segment of the Internet. I decided that I need to fix this thing.
This manual is a free translation of materials from the official site of the MindCub3r project and is supplemented by the experience of self-assembling this robot, which can assemble a Rubik's cube in less than 2 minutes.
You can read more about LEGO MINDSTORMS EV3 on this site .
This is what we should have in the end:
')
MindCub3r can be built from one set of Lego Mindstorms EV3 (31313, Home Edition).
You will also need assembly instructions and software developed by the authors of the project.
IMPORTANT MESSAGE!!!
Literally the day before yesterday, the author of the project announced in his FB that he had corrected the software for his robot, and now it works with the “regular” firmware of the “brick” 1.06 . On the main page of the project, this information has also appeared, the archive MindCub3r-v1p1a.zip , containing, among other things, an updated version of the program, is already available for download. Loading and installing a block for a color sensor is still needed.
Further text of the article corrected with the latest changes on the project site!
Instructions for assembling MindCub3r look or download here .
The firmware (at the time of writing the article EV3-Firmware-V1.06H.bin) for the brick is downloaded from the official website of LEGO MINDSTORMS here .
Archive MindCub3r-v1p1a.zip with project files (MindCuber-v1p1.ev3, autorun.rtf and mc3solver-v1p1.rtf) download here .
We also need firmware for the color sensor, which we take here . The fact is that the standard settings of this sensor do not correctly determine the color in RGB mode.
After you have assembled the robot and downloaded everything you need onto your computer, you can proceed to setup.
If you have not yet updated the firmware of the “brick”, first of all, install the new version of the software for the Mindstorms EV3 main unit:
1. Launch the LEGO MINDSTORMS EV3 software;
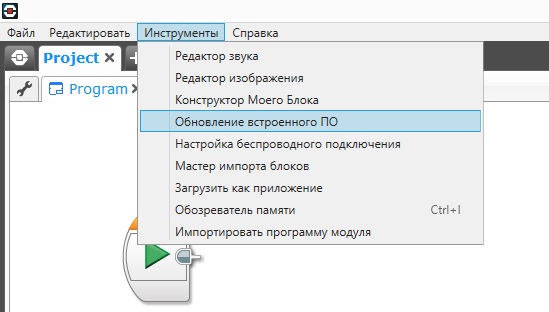
2. Select Tools - Firmware Update ;
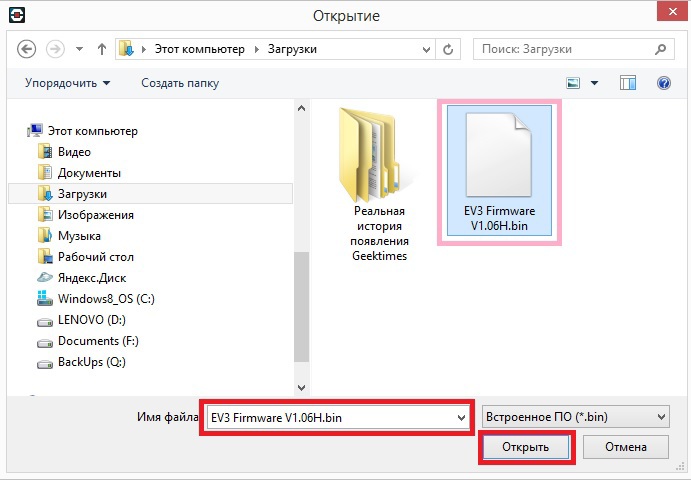
3. In the dialog box that appears, click "View" , find the previously downloaded EV3-Firmware-V1.06H.bin file and click "Open" ;
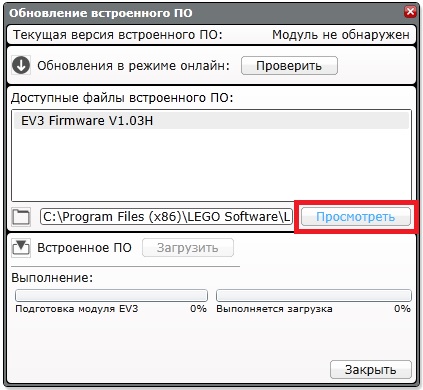
4. In the dialog box in the table “Available firmware files” select EV3-Firmware-V1.06H and click “Download” . We are waiting for the end of the download;

5. Reboot the main unit (turn it off and on again).
Next, install the firmware for the color sensor:
1. In LEGO MINDSTORMS EV3 software, open a new empty project;
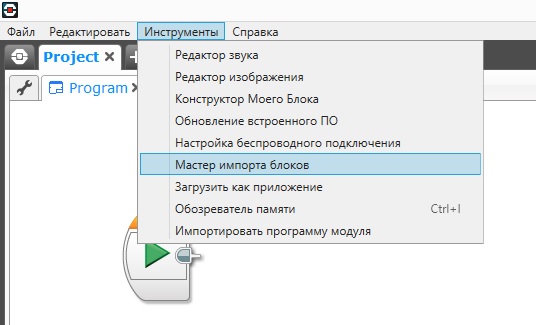
2. Select Tools - Block Import Wizard ;
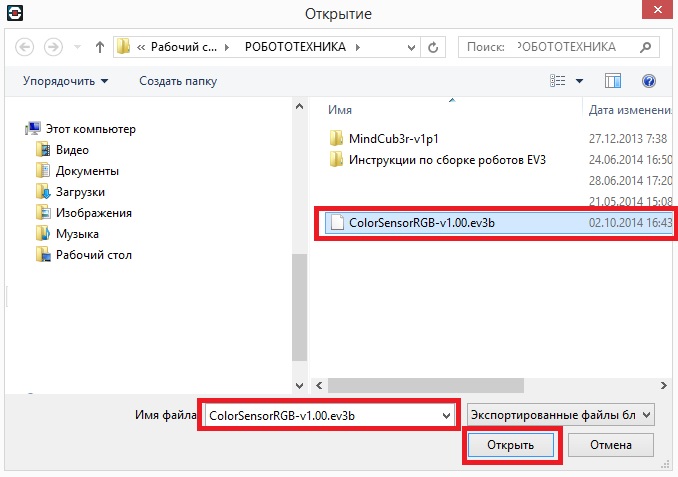
3. In the dialog box that appears, click "View" , find the previously downloaded file ColorSensorRGB-v1.00.ev3b and click "Open" ;

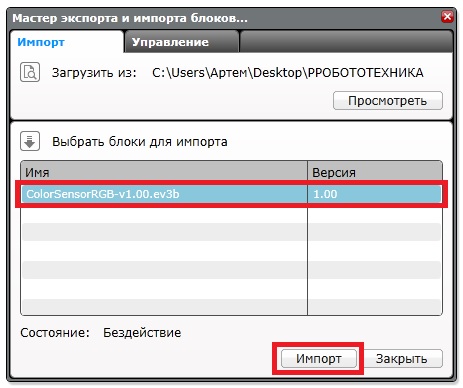
4. In the dialog box in the table “Select blocks for import”, select ColorSensorRGB-v1.00.ev3b and click “Import” .
5. To complete the installation, close the dialog box and exit the LEGO MINDSTORMS EV3 software.
Now the most crucial moment is downloading the robot program to the brick:
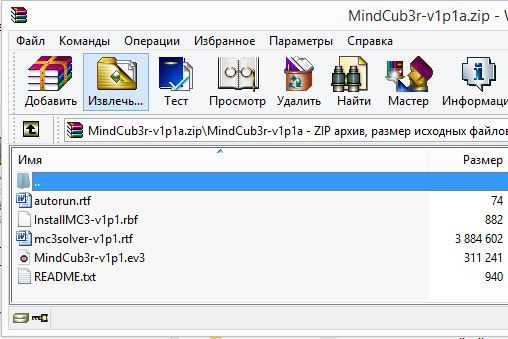
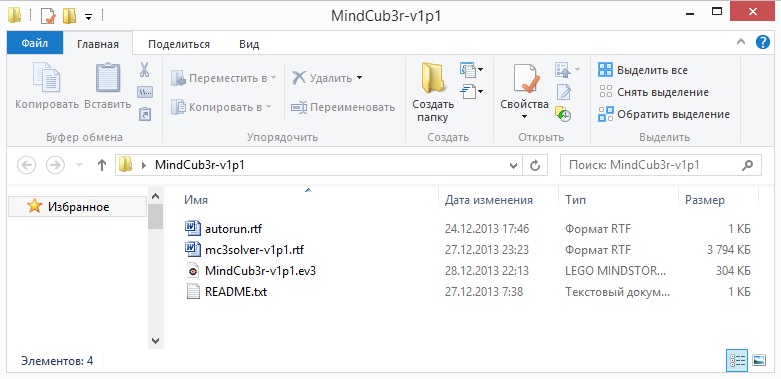
1. Unpack the preloaded archive MindCub3r-v1p1a.zip ;
2. Launch the LEGO MINDSTORMS EV3 software;
3. Select File - Open project , look for the MindCub3r-v1p1.ev3 file, unpacked from the MindCub3r-v1p1.zip archive and click “Open”;
4. After the project is opened, we load it into the “brick”. We load , but DO NOT LAUNCH !!!

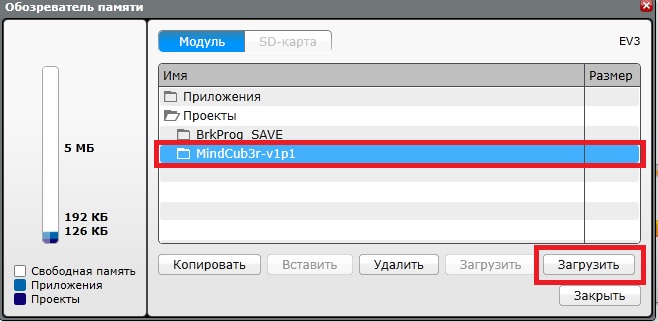
5. Go to Tools - Memory Browser (Ctrl + I) ;

6. Select (select) in the “Module” or “SD-card” tab the project folder “MindCub3r-v1p1” ;
7. Click "Download" ;
8. Find the file mc3solver-v1p1.rtf , unpacked from the archive MindCub3r-v1p1a.zip and click "Open" ;
9. Once again, click "Download" , after making sure that the project folder "MindCub3r-v1p1" is still highlighted;
10. Find the InstallMC3-v1p1.rbf file , unpacked from the MindCub3r-v1p1a.zip archive and click "Open" ;
Note: the file mc3solver-v1p1.rtf has a text extension .rtf. Please do not attempt to open this file with a text editor.
11. Close the dialog box, exit the program and restart the module.
The last step is to install the MC3 Solver application on the main module:
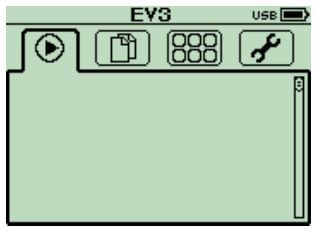
1. Turn on the unit:
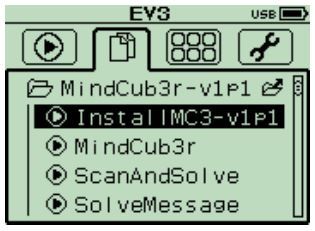
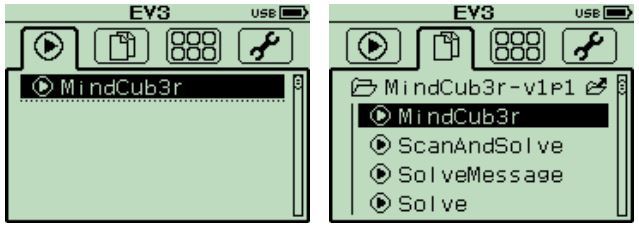
2. Find the MindCub3r-v1p1 project folder in the second tab (in the block memory or on the SD card):

3. Select the InstallMC3-v1p1 file and click on the central button of the module for installation:
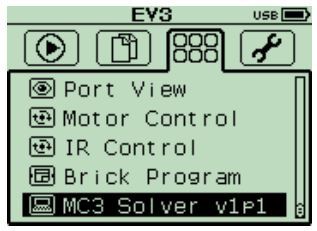
4. In the third tab, we check the presence of the installed MC3 Solver v1p1 application :
5. Reboot the block.
6. In the third tab of the block, launch the application “MC3 Solver v1p1” to start the work of the program mc3solver-v1p1.rtf:
Everything! MindCub3r is ready to use!
7. Run the program in the first or in the second tab of the block:
After starting the program, the robot will ask you to insert a die ("Insert cube") and start scanning it with a color sensor.
After scanning, the robot will briefly reflect and begin assembly.
Successful solution of the problem is marked by a joyful rotation of the cube.
Here, in fact, the process of the robot:
The above is an ideal scenario, but in practice everything is a bit worse - the sensor may not correctly detect colors - the robot can spend 3 (three) scanning cycles before it generates an error (Scan error). After that, you need to remove the cube and re-insert it into the robot. The reason for this may be either a low battery of the module or an “incorrect” die.
I sometimes had 3-5 repetitions (3 scan cycles and one withdrawal) before the robot started to assemble, but the result is definitely worth it.
If you have any questions, ask them in the comments to the article, I will be happy to answer them.
This manual is a free translation of materials from the official site of the MindCub3r project and is supplemented by the experience of self-assembling this robot, which can assemble a Rubik's cube in less than 2 minutes.
You can read more about LEGO MINDSTORMS EV3 on this site .
This is what we should have in the end:
')
MindCub3r can be built from one set of Lego Mindstorms EV3 (31313, Home Edition).
You will also need assembly instructions and software developed by the authors of the project.
IMPORTANT MESSAGE!!!
Literally the day before yesterday, the author of the project announced in his FB that he had corrected the software for his robot, and now it works with the “regular” firmware of the “brick” 1.06 . On the main page of the project, this information has also appeared, the archive MindCub3r-v1p1a.zip , containing, among other things, an updated version of the program, is already available for download. Loading and installing a block for a color sensor is still needed.
Further text of the article corrected with the latest changes on the project site!
Instructions for assembling MindCub3r look or download here .
The firmware (at the time of writing the article EV3-Firmware-V1.06H.bin) for the brick is downloaded from the official website of LEGO MINDSTORMS here .
Archive MindCub3r-v1p1a.zip with project files (MindCuber-v1p1.ev3, autorun.rtf and mc3solver-v1p1.rtf) download here .
We also need firmware for the color sensor, which we take here . The fact is that the standard settings of this sensor do not correctly determine the color in RGB mode.
After you have assembled the robot and downloaded everything you need onto your computer, you can proceed to setup.
If you have not yet updated the firmware of the “brick”, first of all, install the new version of the software for the Mindstorms EV3 main unit:
1. Launch the LEGO MINDSTORMS EV3 software;
2. Select Tools - Firmware Update ;
3. In the dialog box that appears, click "View" , find the previously downloaded EV3-Firmware-V1.06H.bin file and click "Open" ;
4. In the dialog box in the table “Available firmware files” select EV3-Firmware-V1.06H and click “Download” . We are waiting for the end of the download;
5. Reboot the main unit (turn it off and on again).
Next, install the firmware for the color sensor:
1. In LEGO MINDSTORMS EV3 software, open a new empty project;
2. Select Tools - Block Import Wizard ;
3. In the dialog box that appears, click "View" , find the previously downloaded file ColorSensorRGB-v1.00.ev3b and click "Open" ;
4. In the dialog box in the table “Select blocks for import”, select ColorSensorRGB-v1.00.ev3b and click “Import” .
5. To complete the installation, close the dialog box and exit the LEGO MINDSTORMS EV3 software.
Now the most crucial moment is downloading the robot program to the brick:
1. Unpack the preloaded archive MindCub3r-v1p1a.zip ;
2. Launch the LEGO MINDSTORMS EV3 software;
3. Select File - Open project , look for the MindCub3r-v1p1.ev3 file, unpacked from the MindCub3r-v1p1.zip archive and click “Open”;
4. After the project is opened, we load it into the “brick”. We load , but DO NOT LAUNCH !!!
5. Go to Tools - Memory Browser (Ctrl + I) ;
6. Select (select) in the “Module” or “SD-card” tab the project folder “MindCub3r-v1p1” ;
7. Click "Download" ;
8. Find the file mc3solver-v1p1.rtf , unpacked from the archive MindCub3r-v1p1a.zip and click "Open" ;
9. Once again, click "Download" , after making sure that the project folder "MindCub3r-v1p1" is still highlighted;
10. Find the InstallMC3-v1p1.rbf file , unpacked from the MindCub3r-v1p1a.zip archive and click "Open" ;
Note: the file mc3solver-v1p1.rtf has a text extension .rtf. Please do not attempt to open this file with a text editor.
11. Close the dialog box, exit the program and restart the module.
The last step is to install the MC3 Solver application on the main module:
1. Turn on the unit:
2. Find the MindCub3r-v1p1 project folder in the second tab (in the block memory or on the SD card):
3. Select the InstallMC3-v1p1 file and click on the central button of the module for installation:
4. In the third tab, we check the presence of the installed MC3 Solver v1p1 application :
5. Reboot the block.
6. In the third tab of the block, launch the application “MC3 Solver v1p1” to start the work of the program mc3solver-v1p1.rtf:
Everything! MindCub3r is ready to use!
7. Run the program in the first or in the second tab of the block:
After starting the program, the robot will ask you to insert a die ("Insert cube") and start scanning it with a color sensor.
After scanning, the robot will briefly reflect and begin assembly.
Successful solution of the problem is marked by a joyful rotation of the cube.
Here, in fact, the process of the robot:
The above is an ideal scenario, but in practice everything is a bit worse - the sensor may not correctly detect colors - the robot can spend 3 (three) scanning cycles before it generates an error (Scan error). After that, you need to remove the cube and re-insert it into the robot. The reason for this may be either a low battery of the module or an “incorrect” die.
I sometimes had 3-5 repetitions (3 scan cycles and one withdrawal) before the robot started to assemble, but the result is definitely worth it.
If you have any questions, ask them in the comments to the article, I will be happy to answer them.
Source: https://habr.com/ru/post/240469/
All Articles