Vivifying USB Flash Drive
At the moment, the network has a whole bunch of different instructions for creating a working sysadmin flash drive, but, unfortunately, many of them are outdated and simply do not fit the current tasks.
I am not going to describe the installation process for GRUB4DOS, since this has not changed and the network is full of instructions. Just say that GRUB4DOS just needs to be installed on a USB flash drive. Also, I am NOT going to upload system images here (everything is on torrents), but, nevertheless, I’ll post a full menu of LST files with a folder structure. Also note that all ISO images need to be defragmented .
For testing flash drives, I use PLOP Boot Manager and virtual machines, for me this is the most convenient option, although there is QEMU and MobaLiveUSB.
')
What can our flash drive:
1. Installing Windows XP / 7/8
2. Installing Linux Mint / Kubuntu / Ubuntu
3. Live Slax, Live XPe, SliTaz 4.0
4. Acronis Suite
5. ERD Commander 5.0-8.0
6. Kaspersky Rescue Disk 10
7. Victoria HDD
8. HDD Regenerator
9. MHDD 4.6
10. PC Check 6.05
11. SystemRescueCD
12. Active Boot Disk Suite 8
13. Active Password Changer
14. MemTest
15. Hiren's Boot USB
To install Windows systems from an image, you need to use a script that will create an OS image adapted for installation from a USB flash drive. The link has the script itself and instructions for using it.
As a result, we get several images of Windows that interest us, which will run from a flash drive.
Please note that I use Windows 8 Smokie build, which has a slightly different structure, so I just unpacked the image to the root of the flash drive and run the installation using “chainloader / bootmgr”. If you are using an MSDN image, then for simplicity it is better to use a script.
Everything is very simple here. Just pull the initrd.lz and vmlinuz files from the image (from the x64 image we do this separately) and drop them into the / Boot / Linux / Distro / x86 and x64 folder. By .lst file, located below, you can understand what and where to copy.
Simply download the latest versions of SliTaz and Slax, and then decompose them according to the menu structure. Slax needs to be unpacked into the root of the flash drive (/ slax), SliTaz is just a way, do not forget to defragment, with PloPLinux is the same as with SliTaz.
You can use regular ISO images of Acronis, or you can download such a thing as Acronis BootDVD Grub4Dos Edition and copy the files according to the LST structure.
Download ERD Commander with one ISO image, defragment it and launch it from menu.lst.
We unpack to the root of the flash drive, instead of XXXX we write UUID flash drives.

Runs from an ISO image.
Sometimes it is useful. Run from ISO image. UPD. The program may damage , use at your own risk.
Run from ISO image as above.
Download the latest version and unpack the root of the stick. We start.
The rest is trivially launched either from a floppy or ISO image.
Download the image from the HBCD site and unpack it to the root (/ HBCD).
As a result, we have a selection of the most necessary programs that will help restore the computer.
Archive with folder structure
File menu.lst, which should be replaced in the root of the stick.
1. ADWCleaner - remove adware;
2. AVZ - "sniper" for viruses;
3. CCleaner, Defraggler - cleaning and defragmentation;
4. InfraRecorder is a very high quality analogue of Nero Burning Rom;
5. KMPlayer - player;
6. Unchecky - uncheck during installation;
7.DriverPack Solution - many drivers; Snappy Driver Installer - full driver pack, more convenient than DRPSolution
8. SysinternalsSuite is a replaceable thing, utility for all occasions;
9. ATF-Cleaner - quick cleaning system, does not require installation;
10. Dr.Web CureIT - treatment;
11. TeamViewer - remote;
12. Updates for Dr.Web, Kaspersky, MSE, AVG and Avast;
13. LibreOffice - office suite.
It seems to me that these are the very things that should populate your working flash drive. I would like to hear your options for filling a life-giving flash drive.
I am not going to describe the installation process for GRUB4DOS, since this has not changed and the network is full of instructions. Just say that GRUB4DOS just needs to be installed on a USB flash drive. Also, I am NOT going to upload system images here (everything is on torrents), but, nevertheless, I’ll post a full menu of LST files with a folder structure. Also note that all ISO images need to be defragmented .
For testing flash drives, I use PLOP Boot Manager and virtual machines, for me this is the most convenient option, although there is QEMU and MobaLiveUSB.
')
What can our flash drive:
1. Installing Windows XP / 7/8
2. Installing Linux Mint / Kubuntu / Ubuntu
3. Live Slax, Live XPe, SliTaz 4.0
4. Acronis Suite
5. ERD Commander 5.0-8.0
6. Kaspersky Rescue Disk 10
7. Victoria HDD
8. HDD Regenerator
9. MHDD 4.6
10. PC Check 6.05
11. SystemRescueCD
12. Active Boot Disk Suite 8
13. Active Password Changer
14. MemTest
15. Hiren's Boot USB
Bootable flash drive
Installing Windows from a flash drive
To install Windows systems from an image, you need to use a script that will create an OS image adapted for installation from a USB flash drive. The link has the script itself and instructions for using it.
As a result, we get several images of Windows that interest us, which will run from a flash drive.
/Boot/menus/windows.lst
title Windows XP SP3 Russian - Step 1 map --mem (md)+4 (9) map /Boot/Windows/xp_ru.iso (0xff) map (hd0) (hd1) map (hd1) (hd0) map --rehook write (9) [FiraDisk]\nStartOptions=cdrom,vmem=find:/Boot/Windows/xp_ru.iso;\n\0 chainloader (0xff)/I386/SETUPLDR.BIN title Windows XP SP3 Russian - Step 2 map --mem (md)+4 (9) map (hd0) (hd1) map (hd1) (hd0) map --rehook write (9) [FiraDisk]\nStartOptions=cdrom,vmem=find:/Boot/Windows/xp_ru.iso;\n\0 chainloader (hd0)+1 title Windows XP SP3 English - Step 1 map --mem (md)+4 (9) map /Boot/Windows/xp_eng.iso (0xff) map (hd0) (hd1) map (hd1) (hd0) map --rehook write (9) [FiraDisk]\nStartOptions=cdrom,vmem=find:/Boot/Windows/xp_eng.iso;\n\0 chainloader (0xff)/I386/SETUPLDR.BIN title Windows XP SP3 English - Step 2 map --mem (md)+4 (9) map (hd0) (hd1) map (hd1) (hd0) map --rehook write (9) [FiraDisk]\nStartOptions=cdrom,vmem=find:/Boot/Windows/xp_eng.iso;\n\0 chainloader (hd0)+1 title Windows XP x64 English+Russian - Step 1 map --mem (md)+4 (9) map /Boot/Windows/xp_x64.iso (0xff) map (hd0) (hd1) map (hd1) (hd0) map --rehook write (9) [FiraDisk]\nStartOptions=cdrom,vmem=find:/Boot/Windows/xp_x64.iso;\n\0 chainloader (0xff)/I386/SETUPLDR.BIN title Windows XP SP3 x64 English+Russian - Step 2 map --mem (md)+4 (9) map (hd0) (hd1) map (hd1) (hd0) map --rehook write (9) [FiraDisk]\nStartOptions=cdrom,vmem=find:/Boot/Windows/xp_x64.iso;\n\0 chainloader (hd0)+1 title Windows 7 SP1 map --mem (md)+4 (9) map /Boot/Windows/7.iso (0xff) map (hd0) (hd1) map (hd1) (hd0) map --rehook write (9) [FiraDisk]\nStartOptions=cdrom,vmem=find:/Boot/Windows/7.iso;\n\0 chainloader (0xff) title Windows 8 SP1 + Microsoft Office 2013 chainloader /bootmgr title Windows XP for Legacy PCs map --mem (md)+4 (9) map /Boot/Windows/xp_flp.iso (0xff) map (hd0) (hd1) map (hd1) (hd0) map --rehook write (9) [FiraDisk]\nStartOptions=cdrom,vmem=find:/Boot/Windows/xp_flp.iso;\n\0 chainloader (0xff)/I386/SETUPLDR.BIN title Windows 7 Thin PC map --mem (md)+4 (9) map /Boot/Windows/7_thin.iso (0xff) map (hd0) (hd1) map (hd1) (hd0) map --rehook write (9) [FiraDisk]\nStartOptions=cdrom,vmem=find:/Boot/Windows/7_thin.iso;\n\0 chainloader (0xff) title << Back to main menu configfile /menu.lst Please note that I use Windows 8 Smokie build, which has a slightly different structure, so I just unpacked the image to the root of the flash drive and run the installation using “chainloader / bootmgr”. If you are using an MSDN image, then for simplicity it is better to use a script.
Ubunt like systems
Everything is very simple here. Just pull the initrd.lz and vmlinuz files from the image (from the x64 image we do this separately) and drop them into the / Boot / Linux / Distro / x86 and x64 folder. By .lst file, located below, you can understand what and where to copy.
/Boot/menus/linux.lst
title Linux Mint 17 Cinnamon X86 kernel /Boot/Linux/Mint/x86/vmlinuz iso-scan/filename=/Boot/Linux/Mint/linuxmint-17-cinnamon-dvd-32bit.iso boot=casper initrd=/Boot/Linux/Mint/x86/initrd.lz locale=en_US quiet splash -- initrd /Boot/Linux/Mint/x86/initrd.lz title Linux Mint 17 Cinnamon X64 kernel /Boot/Linux/Mint/x64/vmlinuz iso-scan/filename=/Boot/Linux/Mint/linuxmint-17-cinnamon-dvd-64bit.iso boot=casper initrd=/Boot/Linux/Mint/x64/initrd.lz locale=en_US quiet splash -- initrd /Boot/Linux/Mint/x64/initrd.lz title Linux Mint 17 Mate X86 kernel /Boot/Linux/Mint/x86/vmlinuz iso-scan/filename=/Boot/Linux/Mint/linuxmint-17-mate-dvd-32bit.iso boot=casper initrd=/Boot/Linux/Mint/x86/initrd.lz locale=en_US quiet splash -- initrd /Boot/Linux/Mint/x86/initrd.lz title Linux Mint 17 Mate X64 kernel /Boot/Linux/Mint/x64/vmlinuz iso-scan/filename=/Boot/Linux/Mint/linuxmint-17-mate-dvd-64bit.iso boot=casper initrd=/Boot/Linux/Mint/x64/initrd.lz locale=en_US quiet splash -- initrd /Boot/Linux/Mint/x64/initrd.lz title Linux Mint 16 KDE X86 kernel /Boot/Linux/Mint/x86/vmlinuz iso-scan/filename=/Boot/Linux/Mint/linuxmint-16-kde-dvd-32bit.iso boot=casper initrd=/Boot/Linux/Mint/x86/initrd.lz locale=en_US quiet splash -- initrd /Boot/Linux/Mint/x86/initrd.lz title Linux Mint 16 KDE X64 kernel /Boot/Linux/Mint/x64/vmlinuz iso-scan/filename=/Boot/Linux/Mint/linuxmint-16-kde-dvd-64bit.iso boot=casper initrd=/Boot/Linux/Mint/x64/initrd.lz locale=en_US quiet splash -- initrd /Boot/Linux/Mint/x64/initrd.lz title Linux Mint 16 XFCE X86 kernel /Boot/Linux/Mint/x86/vmlinuz iso-scan/filename=/Boot/Linux/Mint/linuxmint-16-xfce-dvd-32bit.iso boot=casper initrd=/Boot/Linux/Mint/x86/initrd.lz locale=en_US quiet splash -- initrd /Boot/Linux/Mint/x86/initrd.lz title Linux Mint 16 XFCE X64 kernel /Boot/Linux/Mint/x64/vmlinuz iso-scan/filename=/Boot/Linux/Mint/linuxmint-16-xfce-dvd-64bit.iso boot=casper initrd=/Boot/Linux/Mint/x64/initrd.lz locale=en_US quiet splash -- initrd /Boot/Linux/Mint/x64/initrd.lz title Kubuntu Linux 14.04 x86 kernel /Boot/Linux/Kubuntu/x86/vmlinuz iso-scan/filename=/Boot/Linux/Kubuntu/kubuntu-14.04-desktop-i386.iso boot=casper initrd=/Boot/Linux/Kubuntu/x86/initrd.lz locale=en_US quiet splash -- initrd /Boot/Linux/Kubuntu/x86/initrd.lz title Kubuntu Linux 14.04 x64 kernel /Boot/Linux/Kubuntu/x64/vmlinuz iso-scan/filename=/Boot/Linux/Kubuntu/kubuntu-14.04-desktop-amd64.iso boot=casper initrd=/Boot/Linux/Kubuntu/x64/initrd.lz locale=en_US quiet splash -- initrd /Boot/Linux/Kubuntu/x64/initrd.lz title << Back to main menu configfile /menu.lst Live
Simply download the latest versions of SliTaz and Slax, and then decompose them according to the menu structure. Slax needs to be unpacked into the root of the flash drive (/ slax), SliTaz is just a way, do not forget to defragment, with PloPLinux is the same as with SliTaz.
/Boot/menus/live_usb.lst
title Slax Graphics mode (KDE) kernel /slax/boot/vmlinuz ramdisk_size=6666 root=/dev/ram0 rw autoexec=xconf;telinit~4 changes=/slax/ initrd /slax/boot/initrfs.img title Slax Always Fresh kernel /slax/boot/vmlinuz ramdisk_size=6666 root=/dev/ram0 rw autoexec=xconf;telinit~4 initrd /slax/boot/initrfs.img title Slax Copy To RAM kernel /slax/boot/vmlinuz ramdisk_size=6666 root=/dev/ram0 rw copy2ram autoexec=xconf;telinit~4 initrd /slax/boot/initrfs.img title Slax Graphics VESA mode kernel /slax/boot/vmlinuz ramdisk_size=6666 root=/dev/ram0 rw autoexec=telinit~4 changes=/slax/ initrd /slax/boot/initrfs.img title Slax Text mode kernel /slax/boot/vmlinuz ramdisk_size=6666 root=/dev/ram0 rw changes=/slax/ initrd /slax/boot/initrfs.img title Slax as PXE server kernel /slax/boot/vmlinuz ramdisk_size=6666 root=/dev/ram0 rw autoexec=/boot/pxelinux.cfg/start;/boot/pxelinux.cfg/web/start;xconf;telinit~4 initrd /slax/boot/initrfs.img title SliTaz 4.0 map /Boot/Live/slitaz-4.0.iso (0xff) || map --mem /Boot/Live/slitaz-4.0.iso (0xff) map --hook root (0xff) chainloader (0xff) title PloP Linux 4.2.2 map /Boot/Live/ploplinux-4.2.2-X.iso (0xff) map --hook root (0xff) chainloader (0xff) title << Back to main menu configfile /menu.lst Acronis Suite
You can use regular ISO images of Acronis, or you can download such a thing as Acronis BootDVD Grub4Dos Edition and copy the files according to the LST structure.
/Boot/Acronis/menu.lst
title Acronis Disk Director Server 10.0.2169 Full version find --set-root /Boot/Acronis/ADDS10/DAT3.DAT kernel /Boot/Acronis/ADDS10/DAT3.DAT vga=788 ramdisk_size=28672 acpi=off quiet initrd /Boot/Acronis/ADDS10/DAT2.DAT title Acronis Disk Director Advanced 11.0.12077 find --set-root /Boot/Acronis/ADDA11/DAT3.DAT kernel /Boot/Acronis/ADDA11/DAT3.DAT vga=788 ramdisk_size=28672 acpi=off quiet initrd /Boot/Acronis/ADDA11/DAT2.DAT title Acronis Disk Director Home Update 2 11.0.2343 find --set-root /Boot/Acronis/ADDH11/DAT4.DAT kernel /Boot/Acronis/ADDH11/DAT4.DAT vga=788 ramdisk_size=28672 acpi=off quiet initrd /Boot/Acronis/ADDH11/DAT3.DAT title Acronis Snap Deploy Server 3.0.3470 with UR Master Image Creator find --set-root /Boot/Acronis/ASDS3/66A6188E kernel /Boot/Acronis/ASDS3/66A6188E vga=788 ramdisk_size=28672 acpi=off quiet initrd /Boot/Acronis/ASDS3/720018DC title Acronis Snap Deploy Server 3.0.3470 with UR Standalone deployment find --set-root /Boot/Acronis/ASDS3/3FE01872 kernel /Boot/Acronis/ASDS3/3FE01872 vga=788 ramdisk_size=28672 acpi=off quiet initrd /Boot/Acronis/ASDS3/98FE18F8 title Acronis Snap Deploy Server 4.0.540 with UR Master Image Creator find --set-root /Boot/Acronis/ASDS4/DAT5.DAT kernel /Boot/Acronis/ASDS4/DAT5.DAT vga=788 ramdisk_size=28672 acpi=off quiet initrd /Boot/Acronis/ASDS4/DAT4.DAT title Acronis Snap Deploy Server 4.0.540 with UR Standalone deployment find --set-root /Boot/Acronis/ASDS4/DAT3.DAT kernel /Boot/Acronis/ASDS4/DAT3.DAT vga=788 ramdisk_size=28672 acpi=off quiet initrd /Boot/Acronis/ASDS4/DAT2.DAT title Acronis True Image Home 2011 Plus Pack 14.0.6942 find --set-root /Boot/Acronis/ATIH2011PP/DAT3.DAT kernel /Boot/Acronis/ATIH2011PP/DAT3.DAT vga=788 ramdisk_size=28672 acpi=off quiet initrd /Boot/Acronis/ATIH2011PP/DAT2.DAT title Acronis True Image Home 2012 Plus Pack 15.0.7133 find --set-root /Boot/Acronis/ATIH2012PP/DAT3.DAT kernel /Boot/Acronis/ATIH2012PP/DAT3.DAT vga=788 ramdisk_size=28672 acpi=off quiet initrd /Boot/Acronis/ATIH2012PP/DAT2.DAT title Acronis True Image Home 2013 Plus Pack 16.0.6514 find --set-root /Boot/Acronis/ATIH2013PP/DAT3.DAT kernel /Boot/Acronis/ATIH2013PP/DAT3.DAT vga=788 ramdisk_size=28672 acpi=off quiet initrd /Boot/Acronis/ATIH2013PP/DAT2.DAT title Acronis Backup & Recovery 10.0.13762 with UR find --set-root /Boot/Acronis/ABR10UR/DAT3.DAT kernel /Boot/Acronis/ABR10UR/DAT3.DAT vga=788 ramdisk_size=28672 acpi=off quiet initrd /Boot/Acronis/ABR10UR/DAT2.DAT title Acronis Backup & Recovery 11.5.32308 with UR (32-bit) find --set-root /Boot/Acronis/ABR11UR/DAT3.DAT kernel /Boot/Acronis/ABR11UR/DAT3.DAT vga=788 ramdisk_size=28672 acpi=off quiet initrd /Boot/Acronis/ABR11UR/DAT2.DAT title Acronis Backup & Recovery 11.5.32308 with UR (64-bit, with UEFI support) find --set-root /Boot/Acronis/ABR11UR/DAT5.DAT kernel /Boot/Acronis/ABR11UR/DAT5.DAT vga=788 ramdisk_size=28672 acpi=off quiet initrd /Boot/Acronis/ABR11UR/DAT4.DAT title Acronis vmProtect 8.0.8184 find --set-root /Boot/Acronis/AvmP8/DAT3.DAT kernel /Boot/Acronis/AvmP8/DAT3.DAT vga=788 ramdisk_size=28672 acpi=off quiet initrd /Boot/Acronis/AvmP8/DAT2.DAT title << Back to main menu configfile /menu.lst ERD
Download ERD Commander with one ISO image, defragment it and launch it from menu.lst.
title ERD Commander >> find --set-root /Boot/ERD/MSDaRT.iso map /Boot/ERD/MSDaRT.iso (0xFF) map --hook root (0xFF) chainloader (0xFF) Kaspersky Rescue Disk
We unpack to the root of the flash drive, instead of XXXX we write UUID flash drives.
title Kaspersky Rescue Disk 10 uuid () > nul set UUID=XXXX echo %UUID% kernel /rescue/boot/rescue root=live:UUID=%UUID% rootfstype=auto vga=791 init=/init kav_lang=en udev liveimg splash quiet doscsi nomodeset initrd /rescue/boot/rescue.igz Victoria HDD
Runs from an ISO image.
title Victoria HDD find --set-root /Boot/Other/vcr35r.iso map /Boot/Other/vcr35r.iso (0xff) || map --mem /Boot/Other/vcr35r.iso (0xff) map --hook chainloader (0xff) HDD Regenerator
title HDD Regenerator find --set-root /Boot/Other/hddreg2011.iso map /Boot/Other/hddreg2011.iso (0xff) || map --mem /Boot/Other/hddreg2011.iso (0xff) map --hook chainloader (0xff) MHDD, PC Check, Active Boot Disk Suite
Run from ISO image as above.
SystemRescueCD
Download the latest version and unpack the root of the stick. We start.
title SystemRescueCD kernel /sysrcd/rescue32 scandelay=1 setkmap=us subdir=/sysrcd dostartx initrd /sysrcd/initram.igz Other small programs
The rest is trivially launched either from a floppy or ISO image.
title Active Password Changer map /Boot/Other/active.ima (fd0) map --hook chainloader (fd0)+1 rootnoverify (fd0) map --floppies=1 title MemTest find --set-root /Boot/Other/mt420.iso map /Boot/Other/mt420.iso (0xff) || map --mem /Boot/Other/mt420.iso (0xff) map --hook chainloader (0xff) title Windows Password Changer map /Boot/Other/ntpw.iso (hd32) map --hook root (hd32) chainloader (hd32) Hiren's Boot USB
Download the image from the HBCD site and unpack it to the root (/ HBCD).
Total
As a result, we have a selection of the most necessary programs that will help restore the computer.
Archive with folder structure
File menu.lst, which should be replaced in the root of the stick.
/menu.lst
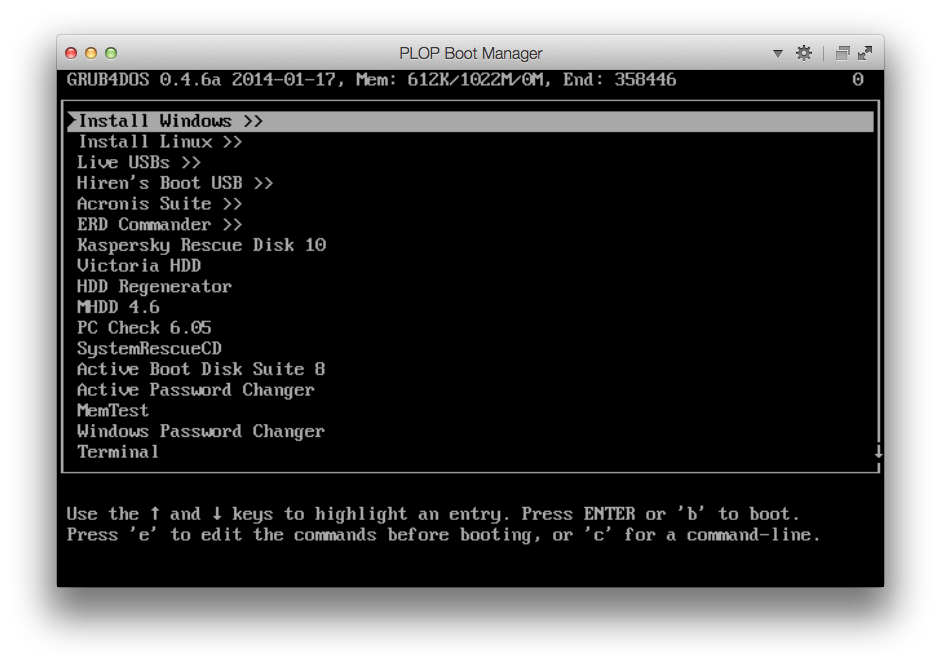
title Install Windows >> configfile /Boot/menus/windows.lst title Install Linux >> configfile /Boot/menus/linux.lst title Live USBs >> configfile /Boot/menus/live_usb.lst title Hiren's Boot USB >> configfile /HBCD/menu.lst title Acronis Suite >> configfile /Boot/Acronis/menu.lst title ERD Commander >> find --set-root /Boot/ERD/MSDaRT.iso map /Boot/ERD/MSDaRT.iso (0xFF) map --hook root (0xFF) chainloader (0xFF) title Kaspersky Rescue Disk 10 uuid () > nul set UUID=625CEC715CEC4181 echo %UUID% kernel /rescue/boot/rescue root=live:UUID=%UUID% rootfstype=auto vga=791 init=/init kav_lang=en udev liveimg splash quiet doscsi nomodeset initrd /rescue/boot/rescue.igz title Victoria HDD find --set-root /Boot/Other/vcr35r.iso map /Boot/Other/vcr35r.iso (0xff) || map --mem /Boot/Other/vcr35r.iso (0xff) map --hook chainloader (0xff) title HDD Regenerator find --set-root /Boot/Other/hddreg2011.iso map /Boot/Other/hddreg2011.iso (0xff) || map --mem /Boot/Other/hddreg2011.iso (0xff) map --hook chainloader (0xff) title MHDD 4.6 find --set-root /Boot/Other/mhdd.iso map /Boot/Other/mhdd.iso (hd32) map --hook root (hd32) chainloader (hd32) title PC Check 6.05 find --set-root /Boot/Other/pccheck.iso map /Boot/Other/pccheck.iso (hd32) map --hook root (hd32) chainloader (hd32) title SystemRescueCD kernel /sysrcd/rescue32 scandelay=1 setkmap=us subdir=/sysrcd dostartx initrd /sysrcd/initram.igz title Active Boot Disk Suite 8 find --set-root /Boot/Other/active.iso map /Boot/Other/active.iso (hd32) map --hook root (hd32) chainloader (hd32) title Active Password Changer map /Boot/Other/active.ima (fd0) map --hook chainloader (fd0)+1 rootnoverify (fd0) map --floppies=1 title MemTest find --set-root /Boot/Other/mt420.iso map /Boot/Other/mt420.iso (0xff) || map --mem /Boot/Other/mt420.iso (0xff) map --hook chainloader (0xff) title Windows Password Changer map /Boot/Other/ntpw.iso (hd32) map --hook root (hd32) chainloader (hd32) title Terminal commandline title Reboot reboot title Halt halt Necessary software
1. ADWCleaner - remove adware;
2. AVZ - "sniper" for viruses;
3. CCleaner, Defraggler - cleaning and defragmentation;
4. InfraRecorder is a very high quality analogue of Nero Burning Rom;
5. KMPlayer - player;
6. Unchecky - uncheck during installation;
7.
8. SysinternalsSuite is a replaceable thing, utility for all occasions;
9. ATF-Cleaner - quick cleaning system, does not require installation;
10. Dr.Web CureIT - treatment;
11. TeamViewer - remote;
12. Updates for Dr.Web, Kaspersky, MSE, AVG and Avast;
13. LibreOffice - office suite.
It seems to me that these are the very things that should populate your working flash drive. I would like to hear your options for filling a life-giving flash drive.
Source: https://habr.com/ru/post/240443/
All Articles