Introducing Laravel 5 simple blog with local development on VirtualBox + Vagrant
 In light of the release of a new version of Laravel 5.0, I decided to write an article on the innovations in this framework. Due to the fact that in Russia Laravel is still of low popularity, and this is even evident from the number of articles on Habré, developers often have to collect information bit by bit, especially not knowing English.
Immediately make a reservation that before the official release (
In the course of the article, we will consider setting up a project in Vagrant, setting up phpStorm 8, and actually developing a simple application using Laravel 5. Not for a long time
I don’t intend to talk a lot about Vagrant, since I’ve already described a lot about both Habré and the web, so I’ll just describe:
')
- download and install VirtualBox ;
- next put Vagrant .
Well, now let's go, next come the goodies. We will not collect boxing ourselves, we will take the official virtualka from the Laravel developers. As a result, we will get a pretty seriously
vagrant box add laravel/homesteadDepending on the connection speed, it will take you about 5 minutes to download the virtual machine, it weighs about 780 MB. Through git we clone the Homestead repository, we will need to configure the virtual machine and the project.
git clone github.com/laravel/homestead.git HomesteadAfter that, in your home domain you will have a folder Homestead, in which you will need to edit the file Homestead.yaml. It shows the path to the public keys, the local domain (by default, homestead.app), as well as the path to the project folder. In order for HHVM to work, you need to add hhvm: true to the sites node. Generate an SSH key, type in the term variable, and then press Enter.
ssh-keygen -t rsa -C "your@email.com"And the final touch before the start is to add our local domain to the / etc / hosts file.
127.0.0.1 blog.appNow in the terminal, go to the folder with the project and just enter vagrant up and we will start the server, use vagrant halt to stop. Now our site is available at blog.app : 8000, the port configuration, which is set when the virtual machine starts, can be changed in the scripts / homestead.rb file, but I do not recommend doing this unless absolutely necessary.
You may also need to connect via ssh to our virtual machine, there is nothing easier to write:
vagrant sshWhile we have a directory with the site (/ home / vagrant / Code / Laravel / public) is empty and we need to install Laravel and run the project. But before we do this, let's configure phpStorm 8. Since the official support for the Blade template engine appeared in it, the choice fell on it. After starting the program, select File → New Project from Existing files ... and create a new project by specifying the root folder / home / username / Code / Laravel

In the next step, you will be prompted to specify the project name and website address, the website, specify blog.app : 8000 / Click next and then finish.
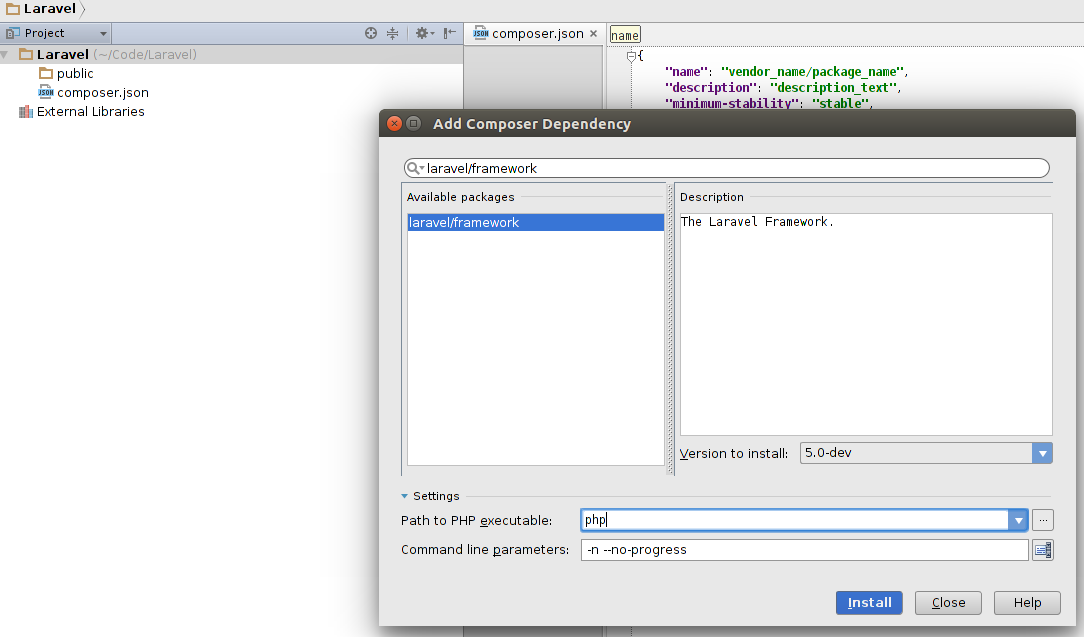
Now go to Tools → Composer -> Init Composer in the window that appears, specify the interceptor (php) and the path to the file with composer.phar. How to install Composer read here . At the root of the project, we will have a file composer.json, with default settings. Open Tools → Composer → Add dependency again and search for the laravel / framework in the left column, click on the found and select 5.0-dev in the right column, click Install
But for some reason Composer cannot find the specified version when I think it will be stable, everything will be ok, since 4.2.11 rises without problems, in a clean project. In the meantime, let's go in a roundabout way, in the console:
composer create-project laravel/laravel Laravel dev-develop --prefer-distand install manually from the console. We wait a bit and now we are all ready for work, check by opening the address blog.app : 8000 / in the browser, the famous Laravel logo should appear.
If not, look in the log, most likely there will be errors, today there was an error due to the lack of the .env environment configuration file in the root of the project and due to the absence of the ./storage/meta folder, you may have others, your own. In the .env file:
APP_ENV=local
APP_KEY=sdsdfZsdf65FDdsd
DB_USERNAME=root
DB_PASSWORD=derev
It seems to have figured out the errors, I want to say a few words about the directory structure. The structure is not something that would have changed a lot, but still:
- views and languages are placed in a separate folder in the root of resources
- config, storage and database are in the root of the application
- but in the app folder there were, so to speak, pleasant changes, now the providers and console commands are here, in the same folders. Http folder, everything is connected directly with the application: Controllers - respectively, it is clear that there are controllers, Requests - classes for processing forms (earlier this was defined in the $ rules model variable), now we have a more powerful tool for processing forms, Middleware - these are route filters, as well as form handlers, implemented as classes.
I want to say a little more about the Middlevare folder. Just a month ago, this folder was called Filters, and now I’m looking to rename it. This is why you should not use this version of the framework in combat conditions, and although you want it so much, then so many goodies appeared.
The cool thing is still the namespace and it's cool that in Laravel 5 this miracle of modern programming is supported. In order for your classes to load without problems, it is enough just to specify the namespace App \ Folder \ Name at the beginning.
On this about innovations, so far, the rest in the course of the article.
To begin, configure the application. Open the file config / app.php
… 'debug' => true, 'url' => 'http://blog.app:8000', 'timezone' => 'UTC', 'locale' => 'ru', ... Edit the file config / database.php. Here we need to specify that, by default, use mysql and connection parameters, it will also not be bad to specify the table prefix in the database, I specified l5_ :
… 'locale' => 'ru', ... 'mysql' => [ 'driver' => 'mysql', 'host' => 'localhost', 'database' => 'l5', 'username' => 'root', 'password' => 'derev', 'charset' => 'utf8', 'collation' => 'utf8_unicode_ci', 'prefix' => 'l5_', ], ... ] … config / session.php, we’ll point out where we’ll store the sessions, I prefer to store them in the database (especially since the mechanism for recording sessions to the database in laravel is already present and we don’t need to invent our bicycles) and we’ll point out:
... 'driver' => 'database', … 'table' => 'sessions', … Regarding the configuration, I would like to note that since we have the local environment indicated, it is necessary to pay attention to the config / local folder and look at the configuration files there.
It is also necessary to create a migration and upload it, for this in the terminal:
php artisan session:table
php artisan migrate:install
This will create a table of migrations, and a table for the sessions. At the time of writing this article in this artisan command there is a glitch, which every time tries to create a table in the database and an error pops up. For this, keep in mind that I created the tables manually.
The migration file is no different from the 4th version of the framework.
I think this is worth rounding up, as it turned out a lot of bukaf in this article. The rest will publish in the second part.
Source: https://habr.com/ru/post/240003/
All Articles