Shader for the beetle
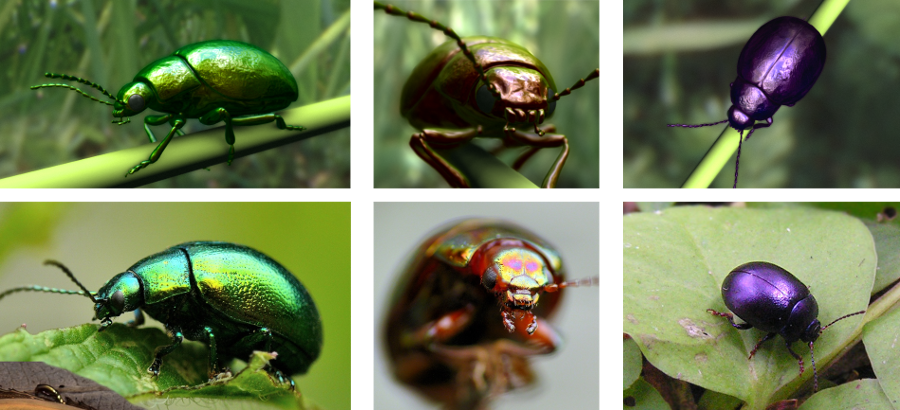
below are photos of real bugs, above is my implementation
Continuation of the previous article, this time we are writing a shader.
Irisation
So what is the peculiarity of the shell of such a beetle? If you look at it from different angles - it will change its color. Like a cd. This color is most conveniently presented in the HSV color model, and specifically we are interested in the Hue parameter or the color tone, which varies in this range:

If we take the angle between the vector of gaze direction and the normal to the surface of the shell, we get a number that can be used as a parameter of Hue in the above model. With additional adjustment for the range you can achieve the desired result. The same range can be adjusted through the texture, I wrote about this displacement map in the previous article. Approximate algorithm:
- For the current fragment, we determine the direction vector of the eyeDir eye.
- Calculate the scalar product between the vector of the direction of gaze and the normal to the surface angle = dot (normal, eyeDir)
- An additional step to enhance realism is to square the resulting angle angle = pow (angle, 2.0)
- Use the angle to determine the tone, choose the color range hue = angle * hueRange + hueAverage, where hueRange is the range, hueAverage is the offset
- Additionally, we calculate the offset for the current fragment from the corresponding texture: hue- = shift
- Select the remaining two parameters of the HSV color model and convert it to RGB: color = hsv2rgb (hue, saturation, value)
As a result, we obtain a pure color, which can later be supplemented with reflection, shading and other effects.
Part of the shader with this algorithm may look like this:
// : http://lolengine.net/blog/2013/07/27/rgb-to-hsv-in-glsl vec3 hsv2rgb(float h, float s, float v) { vec4 k = vec4(1.0, 2.0/3.0, 1.0/3.0, 3.0); vec3 p = abs(fract(vec3(h)+k.xyz)*6.0-k.www); return v*mix(k.xxx, clamp(pk.xxx, 0.0, 1.0), s); } const float iridescenceOpacity = 0.6; const float hsvSaturation = 0.7; const float hsvValue = 0.8; const float addIridescenceValue = 0.2; void main() { ... float hue = (1.0-pow(dot(normal, eyeDir), 2.0))*hueRange+hueAverage; hue -= (1.0-dataTex.a)*addIridescenceValue; vec3 diffuse = hsv2rgb(hue, hsvSaturation, hsvValue)*iridescenceOpacity; ... } This is where the part with the definition of the iridescent part of the color ends. The rest of the color is calculated as standard based on ao maps, reflections and lightness. As you can see, the algorithm is simple and can be applied to almost any surface and material.
Although there is one caveat - the bug in the photo reflects the surroundings on the shell blurry. I use a cubemap in the shader for reflections, so that the reflection is blurry, you can blur the cubemap or reduce its resolution, or how I did it to use a low mip level. Since in GLSL 1.1 you cannot access a specific mip from the vertex shader, you need to set it using the glTexParameteri function GL_TEXTURE_BASE_LEVEL parameter:
glTexParameteri(GL_TEXTURE_CUBE_MAP, GL_TEXTURE_BASE_LEVEL, 6); I used the sixth mip level, but it all depends on the initial resolution of the texture and the degree of blur required. Honestly, this is not a very good way to blur, since stripes in the form of a sharp color transition border are formed on the faces of a cubmap, but this is not noticeable on a beetle with a pronounced relief surface.By the way, as an option, you can still use spherical harmonics.

sharp border
')
Alternatively, instead of converting a color model, you can take a one-dimensional texture and sample it, using the calculated angle between the observer and the normal as the texture coordinate. Thus changing the texture can change the color of the beetle.
Full shader
Vertex:
Fragment:
#version 110 uniform mat4 matrixProj; // uniform mat4 matrixView; // attribute vec3 vertex; attribute vec3 normal; attribute vec3 tangent; attribute vec2 texCoord; varying vec2 vTexCoord; varying mat3 vTbn; // varying float zPos; // z- void main() { vec4 pos = matrixProj*matrixView*vec4(vertex, 1.0); gl_Position = pos; vTexCoord = texCoord; zPos = pos.z; vec3 bitangent = cross(normal, tangent); // vTbn = mat3(tangent, bitangent, normal); // ... } Fragment:
#version 110 uniform sampler2D texture; // uniform samplerCube envMap; // uniform vec3 light; // uniform float bright; // uniform float focalDistance; // uniform float focalRange; // uniform vec3 eyeDir; // uniform float hueAverage; // , uniform float hueRange; // varying vec2 vTexCoord; varying mat3 vTbn; varying float zPos; const float shadowOpacity = 0.7; // const float envBright = 1.0; // const float envLighting = -0.6;// const float iridescenceOpacity = 0.6;// const float hsvSaturation = 0.7; // const float hsvValue = 0.8;// const float addIridescenceValue = 0.2;// vec3 hsv2rgb(float h, float s, float v) { vec4 k = vec4(1.0, 2.0/3.0, 1.0/3.0, 3.0); vec3 p = abs(fract(vec3(h)+k.xyz)*6.0-k.www); return v*mix(k.xxx, clamp(pk.xxx, 0.0, 1.0), s); } void main() { vec4 dataTex = texture2D(texture, vTexCoord); vec3 normal = normalize(vTbn*(vec3(dataTex.rg, 1.0)*2.0-1.0));// float lighting = clamp(dot(normal, light), 0.0, 1.0);// float hue = (1.0-pow(dot(normal, eyeDir), 2.0))*hueRange+hueAverage;// hue -= (1.0-dataTex.a)*addIridescenceValue;// vec3 diffuse = hsv2rgb(hue, hsvSaturation, hsvValue)*iridescenceOpacity;// RGB vec3 env = textureCube(envMap, reflect(-eyeDir, normal)).rgb;// diffuse += env*bright*envBright+envLighting;// float shadow = lighting*dataTex.b*shadowOpacity+1.0-shadowOpacity;// gl_FragColor.rgb = shadow*diffuse;// gl_FragColor.a = clamp((focalDistance+zPos)/focalRange, -1.0, 1.0);// } About GUI

I was interested to try this method:
This texture is taken:

It is quite small, enough 16x16 pixels. Any rectangular gui element has such a grid:

At this grid, the texture coordinates are set in such a way that using the texture above, this black and white sprite is obtained:

And now the main thing - each pixel of this sprite is the texture coordinate for a one-dimensional texture, which is the theme of the interface element. Something like the distance field. For example, for the screenshot above, the following stripes were used:


Each strip has three rows of pixels - for the background, the pressed button and the released one.
All textures should be used with bilinear interpolation. Thus, using two very small textures you can achieve almost vectorial quality of interface elements, on any DPI. True design is obtained in all directions symmetrical, it is impossible, for example, to make falling shadows.
Pixel shader for rendering this kind of interface
#version 110 uniform sampler2D guiMap; // - uniform sampler2D themeMap; // uniform float themeNum;// (v- ) varying vec2 vTexCoord; void main() { float a = texture2D(guiMap, vTexCoord).r; // gl_FragColor = texture2D(themeMap, vec2(a, themeNum)); // } Video
I added a bit of noise to the blur to emit the effect of film grain. You can also notice the lack of such a blur effect - a small halo around the sharp borders.
The screencast unfortunately turned out without vertical synchronization, despite the fact that it was turned on.
Problem
System Kubuntu 12.04, vertical synchronization is enabled in the standard settings. You can additionally enable synchronization via nvidia xserver settings. On the monitor, no gaps are observed in the applications, nor are they observed during the screencast, but if you look at the received record, it is clear that there are gaps. Video recorded via avconv:
With the parameter vsync was played in every way. No matter what settings I set, but with a high load, even with synchronization on, in all settings there are gaps. There is a suspicion that the joint in the wood of Nvidia. If someone came across this and found a solution to the problem - please let us know. I apologize for the poor-quality video.
avconv -f x11grab -s 1280x720 -i :0.0+2240,185 -c:v libx264 -r 30 -vsync 2 -b 4000k -threads 8 -y 1.mp4With the parameter vsync was played in every way. No matter what settings I set, but with a high load, even with synchronization on, in all settings there are gaps. There is a suspicion that the joint in the wood of Nvidia. If someone came across this and found a solution to the problem - please let us know. I apologize for the poor-quality video.
Sources
Wrote in C ++ using Qt version 4.7. * Or 4.8. *, Tested on Kubuntu 12.04 and 14.04, Mac 10.8, intel hd 4000 video cards, GeForce gtx560, Radeon HD 6750M.
Sources: github.com/Torvald3d/Beetle
Beetle Model (obj): github.com/Torvald3d/Beetle/tree/master/obj
Creative Commons license, but the project has HDR maps from this site with all the ensuing consequences, as well as the shader code fxaa.frag, which was taken from here .
Links
- lolengine.net/blog/2013/07/27/rgb-to-hsv-in-glsl - converting the color of the HSV model into RGB
- mew.cx/glsl_quickref.pdf - GLSL 1.1 Quick Reference Guide
Source: https://habr.com/ru/post/239661/
All Articles