How we made an application framework on AngularJS and Django

In the spring, we had the idea to make a simple service for cloud server backup . Since at that time the work on the project was carried out mainly in the evenings and on weekends, to speed up the process, it was decided to use only those technologies in which we have experience. For the backend part, Django was chosen, and the implementation of the client part was assumed to be a SPA based on AngularJS. The idea was as follows: to make a product with minimal functionality, and then gradually add new features. To do this, it was necessary to make a fairly flexible and scalable system. Having a little thought over, we started.
Routing
And the first question that arose was related to the routing in the client part. We needed a reliable and simple system that would support nested templates and allow us to uniquely match a specific URL to a specific template. After a brief search, we chose the ui-router .
')
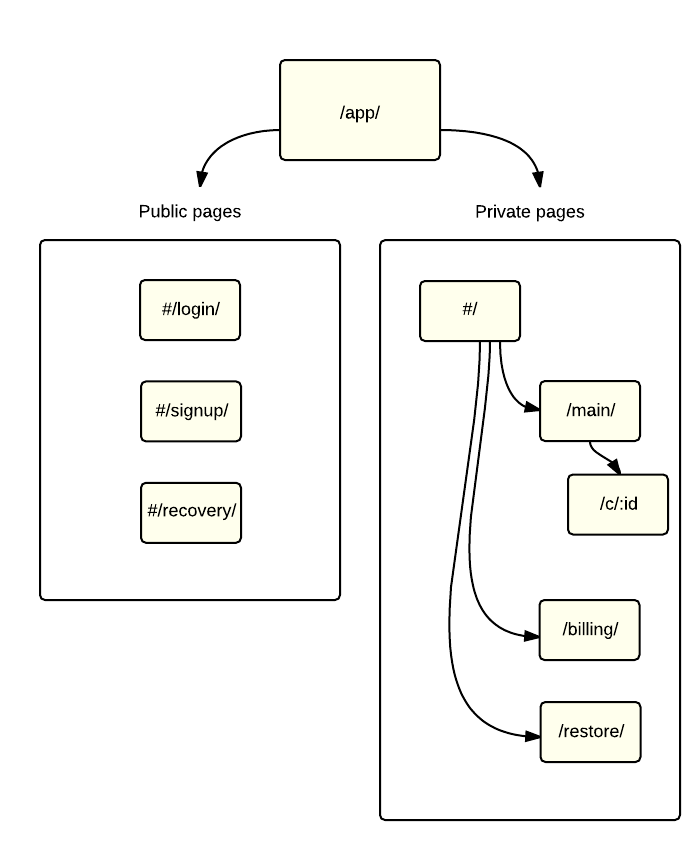
The following scheme was approved:
Landing is shown along the way
/ user, which is not related to the application. When switching to /app/ server, the app.html file is app.html , which contains the entire head, all the scripts at the end of the body, and a single div with a modest ui-view attribute. It is in this div that the entire application is loaded. Depending on whether the user is logged in or not, they are shown different fillings of this div 'a.I will not run ahead, and consider the case for an authenticated user. So, in this case, if there is no hash in the URL after
/app/ , then the next layer is loaded inside: index.html . This file contains the static part of the application, which surrounds the entire workspace: heder, footer and sidebar. In index.html is also a div with the ui-view attribute, into which another application level will be loaded, specifically, various screens (in our case it is: main screen, detailed server screen, billing screen, backup restore screen and others) .
Consider how all this is described using ui-router:
app.config(['$stateProvider', '$urlRouterProvider', function ($stateProvider, $urlRouterProvider) { $stateProvider .state('index', { url: '/', templateUrl: '/static/views/index.html' }) .state('index.main', { url: '^/main', templateUrl: '/static/views/pages/main.html' }) .state('index.client', { url: '^/main/c/:id', templateUrl: '/static/views/pages/client.html' }) .state('index.billing', { url: '^/billing', templateUrl: '/static/views/pages/billing.html' }) .state('index.restore', { url: '^/restore', templateUrl: '/static/views/pages/restore.html' }); $urlRouterProvider.otherwise('/main'); // , /main }]) Public and private pages
It is time to think about the distinction of user access rights to certain pages. If the user is not logged in, then only public pages can be shown to him, and when trying to access a private page, he is forced to redirect to the login screen. Similarly, in the opposite direction: if the user has already logged in, he will not be able to see the login, registration and password recovery pages.
So, let's add data on public pages to the router configuration:
$stateProvider .state('login', { url: '/login', templateUrl: '/static/views/login.html' }) .state('signup', { url: '/signup', templateUrl: '/static/views/signup.html' }) .state('recovery', { url: '/recovery', templateUrl: '/static/views/recovery.html' }); In the module responsible for authorization, a factory was created that determines whether the user is logged in:
AuthModule.factory('Auth', ['$cookieStore', function ($cookieStore) { var currentUser = $cookieStore.get('login') || 0, publicStates = ['login', 'signup', 'recovery']; return { authorize: function(state) { return (this.isLoggedIn() && (publicStates.indexOf(state) < 0)) || (!this.isLoggedIn() && (publicStates.indexOf(state) >= 0)) }, isLoggedIn: function() { return !!currentUser; } } }]) The
isLoggedIn method returns true if the user is logged in, or false otherwise. The authorize method determines for the current state whether the user has the right to be in it.The use of these methods is carried out in the
$stateChangeStart event handler, which occurs when the state changes start: $rootScope.$on("$stateChangeStart", function (event, toState, toParams, fromState, fromParams) { // if (!Auth.authorize(toState.name)) { // event.preventDefault(); // ( /app/ - ) if (fromState.url === '^') { if (Auth.isLoggedIn()) { $state.go('index.main'); } else { $state.go('auth'); } } } }); Authentication
The client-side authentication procedure is implemented using a function in the
Auth factory: login: function (user, success, error) { $http.post('/login/', user) .success(function () { currentUser = 1; success(); }) .error(error); } This function is called in the controller. The arguments are the
username , password and callbacks: Auth.login({ username: $scope.login.username, password: $scope.login.password }, function () { $state.go('index.main'); }, function () { $scope.login.error = true; }); On the server using standard django-sessions stores information about the user (his id). To do this, use the standard methods
django.contrib.auth . from django.contrib.auth import authenticate, login def login_service(request): data = json.loads(request.body) user = authenticate(username=data['username'], password=data['password']) if user is not None: login(request, user) return HttpResponse(status=200) else: return HttpResponse('Login error', status=401) During each http request, the server checks whether the user is logged in and sets the corresponding value in the 'Set-Cookie' header. This value is checked in the client part using
$cookieStore.get('login') .Link between server and client models
In order to accelerate the development and increase the flexibility of the application, it was decided to use middleware between Django and AngularJS. The choice fell on django-angular .
Its main advantages:
- provides the ability to perform basic CRUD operations;
- allows you to tightly link django-forms and angular-controllers;
- gives functionality for calling methods in django directly from an angular controller.
More information about installation and configuration can be found in the documentation .
Total
As a result, we have an extensible and flexible application in which the modules are minimally dependent on each other. The code for all modules is stored in separate files, and adding new ones leaves others intact. In addition, django-angular functionality significantly speeds up development.
This second article from the series is about how we did the cloud backup server bitcalm.com service .
First article: Developing your own Django billing system
Source: https://habr.com/ru/post/239479/
All Articles