Manage household appliances ("smart home") via chat bot on Raspberry Pi
 In this project, we launch our iOS, Android or Web application, and also write (or rather, add a little) a chat bot on python that manages sockets through a radio module connected to Raspberry Pi.
As a result, we can manage home appliances and receive statuses from them remotely and with other users through a general chat.
Interesting?
')
What for?
The question “why do you need it?” Is not always urgent for projects from the “smart home” series and all the Internet of Things, there is often a lot of time and money spent on automating something that in practice is more convenient to switch in the old way with a regular wall switch: -) But at the same time you get a lot of pleasure and useful experience in the process and then you rejoice in the proper operation of the mechanism that you made yourself.
But besides the above-mentioned pleasures, it seems to me that managing the home and communicating devices through chat, specifically the XMPP protocol, has the right to life for the following reasons:
- Human language - it's quite easy to make chat bot communicate with you in human language, which is quite convenient, especially for less technical family members. It also allows you to connect voice control in perspective.
- Universal remote access - you can connect to the XMPP chat server from anywhere and from any Jabber compatible IM client. People are comfortable, and how to connect the device described in this article.
- Convenient control for the whole family - connect home to a single group chat, where the bots are responsible for the house or appliances in the house. You can discuss your family issues and manage your home at the same time. Everyone can see who gave what commands to the instruments, you can see their (bots) answers and reports, view the previous history, etc. It's comfortable.
- A system of independent distributed agents . Each device or set of sensors that have representation (in fact, the user) in the chat, respectively, are independent agents and can communicate with other devices and be managed by them or you directly. A single server is optional. You can raise your chat bot for each important device or sensor, as well as set up the main bot with AI elements, such a “butler” or “majordomo” who will manage all the devices, and they will communicate in the chat available to you and other family members you understand the language, so that you can always track what happened or intervene in the process.
Props
For this mini-project, we need the following components:
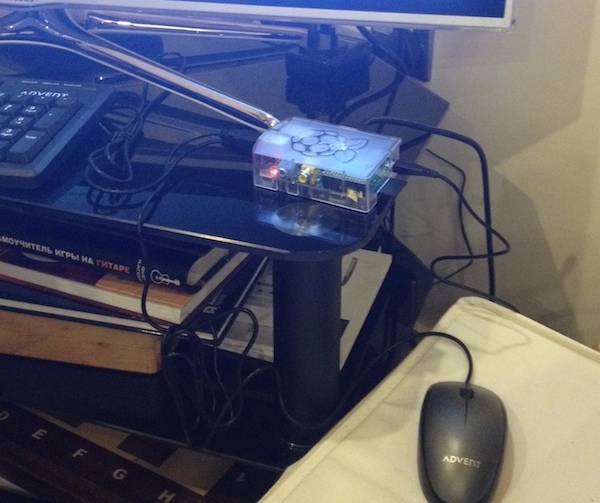
1. Raspberri P.
I have a model B, I ordered literally the day before the announcement of the B + release, but in principle, any model is suitable here, the main thing is to see that the GPIO pins are compatible with the control module that you choose. About this below.
Well and so, the main requirement is to start the chat bot on python.

2. Accessories to your Pi.
WiFi module, simple USB keyboard and mouse, SD memory card with the Raspbian distribution, power supply, optional plastic case.
This is the standard for “raspberry”, but because I bought it for the first time, specifically for this project, I did not know that WiFi and SD card are not included in the standard kit, and I had to order it, so keep in mind. You also need a monitor or TV with an HDMI cable to set up.
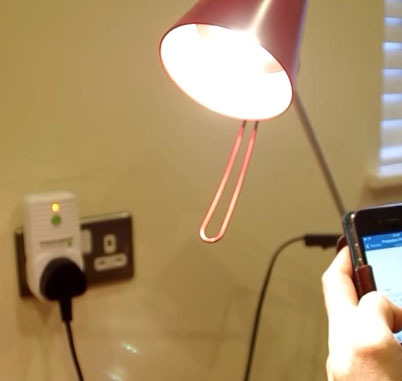
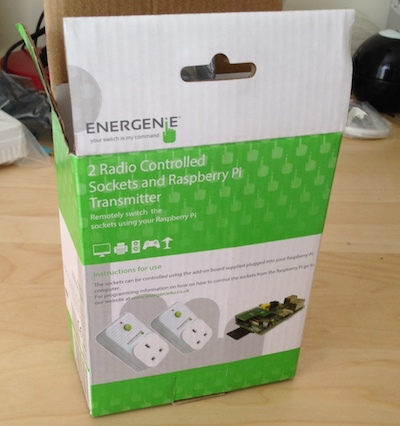
3. Control module (RF transmitter) and sockets or other devices with a receiver (RF receiver).
Here you need to say that I went on a fast or lazy way, and ordered a ready-made RF module for Pi and a set of radio-controlled sockets from Energenie . Included is a ready-made RF transmitter that plugs into your raspberry on the GPIO. To whom this path is not to their liking, there are alternatives, in the internet a lot of guides on how to pick up a code to existing radio-controlled devices and control them through a simple cheap Chinese RF transmitter. Alternatively, you can control devices via Pi directly by direct wired connection with GPIO, as well as via WiFi and other channels.
Here is a photo of my Energenie kit:

4. Chat client.
This tutorial uses Q-municate , this is an open source messenger from our platform QuickBlox, which can be downloaded from github and scored for iOS, Android or run the Web version on the desktop and other platforms. The advantage of using Q-municate is that you can customize the interface for yourself and make your own application, for example, only for your family.
But it is absolutely not necessary. You can use any Jabber / XMPP compatible client, for example Adium.
So, let's begin.
Install distributions / dependencies for Raspbian
Log in to the raspberry and put the following things under the root:
apt-get install python-dev pip install sleekxmpp pip install dnspython pip install pyasn1 pyasn1-modules apt-get install python-rpi.gpio We actually need sleekxmpp, this is the basic project for the chat bot, and the rest solves issues with different dependencies for this project. Well, plus python-rpi.gpio allows you to control the GPIO pins of the raspberry from our python script.
We connect and check the radio control module
If you use a different module, not from Energenie, then you will have to explore this part yourself.
When using the same ready-made Pi-mote module, everything is simple and well described in the official manufacturer's instructions: energenie4u.co.uk/res/pdfs/ENER314%20UM.pdf
Personally, I spent an inadmissibly long time trying to determine if my set of radio-controlled outlets works, measuring voltage on a raspberry, trying unofficial scripts, etc., because the Energenie sockets for some reason did not want to be controlled by a script, as described by the manufacturer and multiple blogs. It did not immediately come to look at the manual again and read this time carefully, and there it says in English and white that you need to start the sockets first in the training mode. Is logical. In my defense, I can only say that the project was done early in the morning on weekends, while the family was sleeping, apparently it was not enough sleep :-)
So, we train. According to the instructions, run the script
sudo python ENER002.py we insert sockets into sockets) and if the lights on them do not blink, then we switch to learning mode by pressing the off button for 5 seconds. The lights blink, press “Enter” on the keyboard to give a signal from the script and see the fast blinking of the light, this means that the training was successful. Repeat the same with the rest of the outlets. One Pi-mote module can supply 4 different codes, i.e. You can manage 4 different sets of Energenie outlets, while no one bothers to use one code for several outlets at the same time.
Raise chat server
We need an XMPP / Jabber compatible chat server with the ability to create a MUC (group chat or chat room) in it to connect our chat bot and human users to it.
In principle, on Pi you can raise your chat server, for example, here http://box.matto.nl/raspberryjabberd.html describes the installation of ejabberd on Raspberri Pi.
In this article, we again follow the path of least resistance and use a ready-made free chat server from QuickBlox . You just need to create an account to get your own chat server and web admin to it.
The steps below describe the registration and at the same time creating a user for our chat bot and MUC rooms for communication.
1. We register on http://quickblox.com/signup/ or log in via GitHub / Google
2. Create an application in the admin panel.
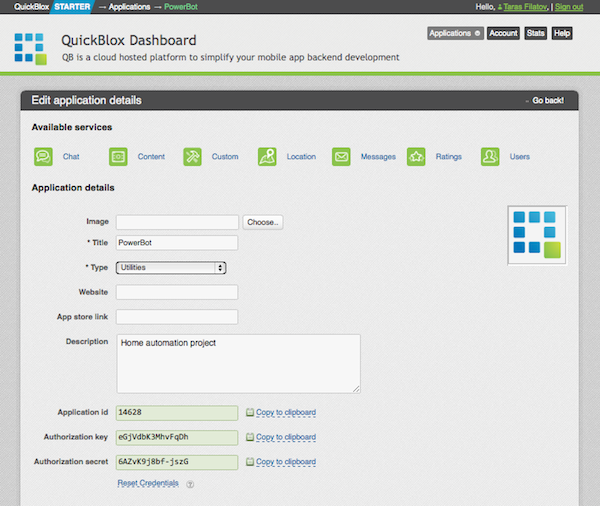
3. Create a user for our chat bot (Users -> Add new user)

4. Create a MUC room for communication (Chat -> New dialog)
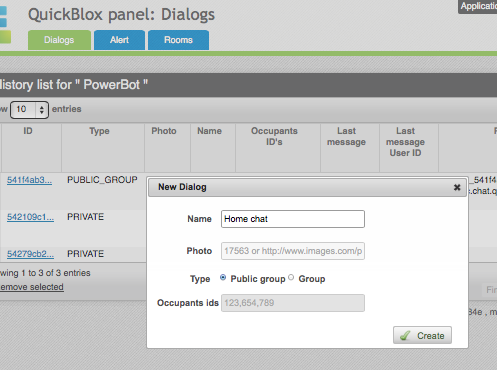
Everything, your own XMPP chat server is ready to receive citizens and bots, 24 hours a day, without lunch breaks.
We write and set up chat bot
We have already installed the library SleekXMPP, which implements the XMPPshny chat bot on python.
The project site has a good example for MUC chat bot: http://sleekxmpp.com/getting_started/muc.html
source can be found here: https://github.com/fritzy/SleekXMPP/blob/develop/examples/muc.py
Next we need to take and modify it to fit our needs.
If you also use Energenie for managed outlets and QuickBlox for the chat server, then you can take my ready-made script here: https://github.com/QuickBlox/sample-powerbot-python-rpi .
You will only need to change the credentials at the beginning of the script, writing there your application and user keys (the one we created above).
Below we will go through in more detail on the changes that have been made, but briefly what has been done (I apologize in advance for the level of the python code - not a programmer for a long time and certainly not a programmer - I will be grateful for any improvements and pull requests):
1. Added auto-join by invitation to other chat rooms.
2. Fixed compatibility with QuickBlox and Q-municate (trivia such as the format of the name of the chat rooms, etc.)
3. Added the actual command parsing for controlling the instruments - in our case, these are “lamp on”, “lamp off”, “all on” and “all off” - and the call of the switch_on / switch_off functions from the python module of energenie, which already gives commands to radio transmitter board via GPIO.
Who works directly with GPIO, look in energenie.py how work with GPIO is implemented.
Auto-join to other chat rooms
An optional feature, but personally I didn’t have enough of it, for example, when you have this bot-butler in your messenger as a friend and you can create new chats and invite it there. Without it will work, but then the bot will be tied to the chat, in which you launched it.
How to implement auto-join - parsing stanzas of incoming XML messages, since we will surely receive a message that such a MUC chat was created, if this user was invited there.
In our case, we use the QuickBlox platform and a specific Q-municate application, where the invitation to a new group chat looks like this:
RECV: <message to="1265350-7232@chat.quickblox.com" from="1234040-7232@chat.quickblox.com/098CA696-A60A-480D-B744-BE7DFC4FE6D3" id="1404538064.385079" type="chat"><body>Taras Filatov created new chat</body><extraParams><_id>53b78c0c535c12798d005055</_id><occupants_ids>1234040,1258466,1265350</occupants_ids><type>2</type><date_sent>1404538064</date_sent><name>Yanus Poluektovich, Sergey Fedunets</name><xmpp_room_jid>7232_53b78c0c535c12798d005055@muc.chat.quickblox.com</xmpp_room_jid><notification_type>1</notification_type></extraParams></message> We track the phrase “created new chat” in XMPP stations, and if it occurs, then parsim from there xmpp_room_jid, this will be the id of the newly created room.
Then we run the process with the same script.
Keep in mind that for this to work, you need to make the script executable:
chmod +x powerbot.py The implementation code is presented below:
if msg['mucnick'] != self.nick and "Create new chat" in msg['body']: from bs4 import BeautifulSoup y = BeautifulSoup(str(msg)) roomToJoin = y.xmpp_room_jid.string print ("Got an invite to join room") botId = subprocess.Popen([selfPath + " -d -j " + qbChatLogin + " -r " + str(roomToJoin) + " -n " + qbChatNick + " -p " + qbUserPass], shell=True) print "spawned new bot ID=" print botId self.send_message(mto=msg['from'].bare, mbody="Thank you for your kind invitation, joining your new room now!", mtype='groupchat') Welcome + instructions
We define the code word, in this case “powerbot”, and issue in reply a greeting and a hint on how to use / communicate with our bot.
The check “if msg ['from']! = Self.nick” is needed so that the bot does not respond to messages from itself.
# # Reply to help request (any message containing "powerbot" in it) # if msg['mucnick'] != self.nick and "powerbot" in msg['body']: reply_test_message = self.make_message(mto=msg['from'].bare, mbody="Powerbot is greeting you, %s! Usage: [powerbot] lamp [on|off] to control socket 1, [powerbot] all [on:off] to control all sockets. Example: 'lamp on' switched socket 1 on." % msg['mucnick'], mtype='groupchat') self.copy_dialog_id(msg, reply_test_message) reply_test_message.send() print "Sent help text: " + str(reply_test_message) Turn on / off the lamp and other devices
We monitor the “lamp on” command (turn on the lamp), if the command is received, then turn on the switch_on socket (lampSocket) and report on its implementation.
# # Handle "lamp on" command # if msg['mucnick'] != self.nick and "lamp on" in msg['body']: switch_on(lampSocket) confirmation_message = self.make_message(mto=msg['from'].bare, mbody="Lamp has been switched on, %s." % msg['mucnick'], mtype='groupchat') self.copy_dialog_id(msg, confirmation_message) confirmation_message.send() print "Lamp switched on, sent confirmation: " + str(confirmation_message) “Lamp off”, “all on” and “all off” are implemented in the same way (the latter are responsible for turning on or off all controllable outlets).
Start chat bot
From bash on raspberry we execute a simple command:
sudo python powerbot.py -d -r < MUC > Sudo need to access gpio. If you used QuickBlox, then as the MUC of the room, simply copy the JID address from the Chat Dialogs label.
As a result, the screen will display the authentication and XMPP status logs with the server:

That's it, the bot is ready and waiting for your instructions in the chat room.
By the way, you might have noticed that the reaction functions to commands are duplicated simultaneously in
def message(self, msg): and
def muc_message(self, msg): The first block processes private messages 1: 1, and the second one - group ones.
That is, you can control the bot in private chat, although in my opinion it is less interesting.
We collect chat client for iOS (options: Android, Web)
As I wrote above, you can communicate with the bot through any Jabber / XMPP compatible chat client.
We are not looking for easy ways, so we are building our application - a client to control the bot, and at the same time to communicate with family and friends.
Your own messenger with a bot and group chats :-)
However, as you will see, here we are also following a fast and lazy path and we take a ready-made open-source project of our own development,
which is called q-municate.
1. Draw a project for the corresponding platform from the game:
iOS: bitbucket.org/quickblox/qmunicate-ios
Android: github.com/QuickBlox/q-municate-android
Web: github.com/QuickBlox/q-municate-web
2. Open the IDE.
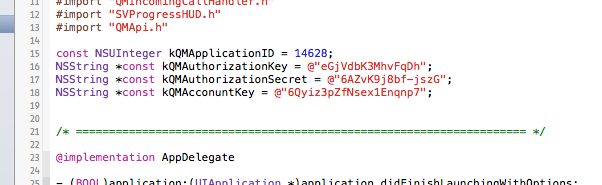
3. The rule is creditors - we change standard constants with application keys to QuickBlox copied from the admin panel. In iOS, this changes in AppDelegate.m, in Android in Consts.java.
4. Compile, build on the device.
Optionally customize the interface and stuff, here is a more detailed manual .
5. PROFIT !!!
Demonstration
Screenshots:

I named my Q-municate build proudly “Q-Power”

find a bot in friends or group chat

communicate with the bot
Video lamp control via chat:
Thank you for your attention, I hope it will come in handy, and even better if this “proof of concept” encourages someone to realize the idea to the end, and the microwave suddenly talks to the toaster, and the wife will give commands to all of them through your homemade Siri :-)
Successes!
Source: https://habr.com/ru/post/238907/
All Articles