Media Center with IPTV from laptop and monitor
The idea to make a home multimedia system visited for quite some time. The prerequisite for creation was getting rid of a large system unit and installing a laptop with a connected monitor on the workplace. The first implementation option, which did not start, is a media server from an unused Android smartphone. This idea was buried in hardware limitations (weak Wi-Fi module, small amount of internal memory, slow read / write files via OTG) and software (lack of a stable running “server” software for Android). After there was a reorganization of the workplace and the monitor was nowhere to put. Then it was possible and stop, take the monitor to the dacha, connect the TV hanging above the computer to the VGA port, and the window with the movie running on the computer should be moved to the public display, but the monitor 20 ", format 16: 9, with a resolution of 1600x900 is preferable than a TV 15 ", 4: 3, with a resolution of 1024x768. Having replaced the TV with a monitor, one could have stopped, but after all, the TV was controlled by a remote control and was used by households who had a computer with “Oh, and what is this?”.
If the idea is interesting, welcome under cat.
Note:
Initially, the project involved the use of an old netbook from which to remove the display. Fortunately, there was not enough memory for the multimedia device, only 160 GB, and the laptop has a 500 GB hard drive. It was possible to change the hard drives in places, but it seemed not the best idea.
For convenience, in addition, it was necessary to purchase an infrared receiver with a remote control for the PC. According to numerous reviews and reviews, I turned my attention to the Microsoft MCE Remote. Buy this in Russia, even in Moscow, was not such a simple task. They were not sold anywhere, and where they once were, there was a price tag close to 3,000 rubles. On eBay, the necessary models were found, from 700 rubles for the IR receiver and remote control, but it would take about a month to wait. In the very first online flea market of TV advertising, in Moscow, the only option was found from Lenovo, suspiciously resembling the Philips SRM5100 / 10 model, due to the lack of a choice of operating modes. What is interesting, the same remote control (without a choice of operating modes) is equipped with ASUS EeeBox PC , but for ASUS it uses three AAA batteries, instead of two. The price was quite affordable, 300 rubles. I managed to pick it up on time, grabbing it in front of the person who asked to send from Moscow to St. Petersburg by mail (if you read this, a person is from St. Petersburg, then please excuse me). My location turned out to be more profitable, the journey from home to seller took 20 minutes. As a surprise, I saw two remotes, one of which turned out to be unused.
')

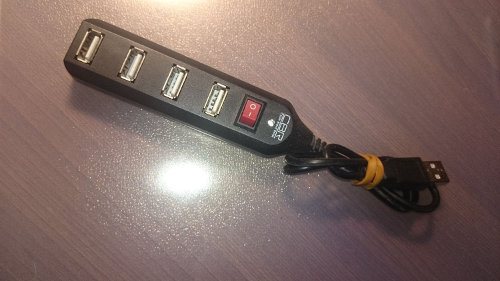
Finishing the hardware, you can add a cool USB hub, because in a laptop there are only 3 USB ports, one of which is USB 3.0, used to connect flash drives, and you need to connect a printer, scanner, IR receiver and mouse.
Full list of hardware used:
- Notebook ASUS K46CM ;
- Monitor ASUS VE208N ;
- IR receiver Lenovo eHome OVU430006 / 01;
- Remote Control Lenovo MCE Remote RC1974511/00;
- USB hub CBR CH 165 ;
- Mouse Logitech M185;
- D-Link DIR-615 Router.
Software implementation
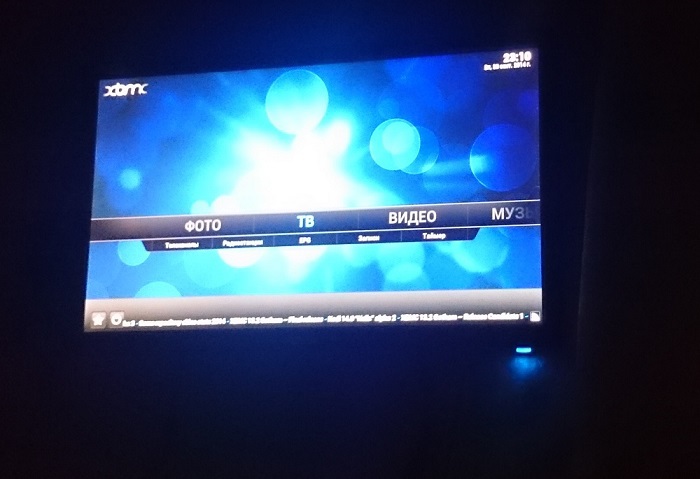
The operating system installed on the laptop is Windows 8.1 with WMC, which suggests using Windows Media Center as a shell, but WMC is not omnivorous; also seemed overloaded interface. Without thinking for a long time, I chose XBMC , because the name had been heard before and had tried to install it, but then did not figure out how to use the media center.
XBMC distributed free of charge, has open source, cross-platform.
We make the installation XBMC. After installation, the remote control is immediately supported, but the launch is performed on the main laptop screen. The standard interface language is English. We make the initial setting.
To change the language go:
System> Appearance> International> LanguageTo output to the second monitor:
System> System> Video Output> Display Mode> select Full Screen # 2Immediately become visible shortcomings of the standard remote control:
- If the XBMC window is out of focus, then XBMC control is not possible;
- If the XBMC window is out of focus, control is transferred to Windows;
- You cannot start XBMC from the remote;
- Insufficient control settings, for example, cannot bring up the context menu;
- It is impossible to customize the buttons of the remote to trigger an event in the player.
The point of sending to the search was the article “How to make“ two in one ”from home computer - home theater + personal computer” , in which MediaPortal is used, which contains the standard Require focus setting. To solve the problem of transferring control to Windows, the author manually rules the registry.
In the process, it was found how it is possible to assign the launch of the application to the green button of the console with the Windows icon without third-party programs. The bottom line is that we set up a quick launch of the program for a shortcut key, and add the code for this shortcut key to the green button. Read more about the topic “Reassigning MSRemote buttons and starting XBMC from the“ GREEN ”button” to XBMC Russia.
Another search led to two articles, how can you completely (without a blinking diode) turn off the monitor programmatically. Articles on Habré, for different OS:
This method is not compatible with all monitors. In my case, it also did not work.
As a result, it was possible to organize the on / off of the monitor using standard Windows tools. It is enough to switch the operating modes of the two displays “Advanced” and “Computer screen only”. To switch through the command line, the DisplaySwitch.exe utility is used, with the / extend or / internal startup keys, for the Advanced and Computer Screen Only modes, respectively.
%windir%\System32\DisplaySwitch.exe /extend %windir%\System32\DisplaySwitch.exe /internal At this stage it is still not clear how you can:
- Control XBMC when the window is out of focus;
- Self adjust the buttons of the remote;
- How to switch display modes with the remote.
On the Internet, the IR Server Suite and EventGhost programs were most often offered to configure the computer's control from the remote control. After installing the IR Server Suite, it turned out that it was too overloaded, so I chose EventGhost, because of its simplicity. EventGhost has run out of support for Windows Vista, but it also worked fine on Windows 8.1. The main thing is to run this program only on behalf of the administrator, since the application was last updated back in 2009, then automatic launch on behalf of the administrator is not provided in it. Lets go through the setup to manage XBMC.
Main EventGhost window:
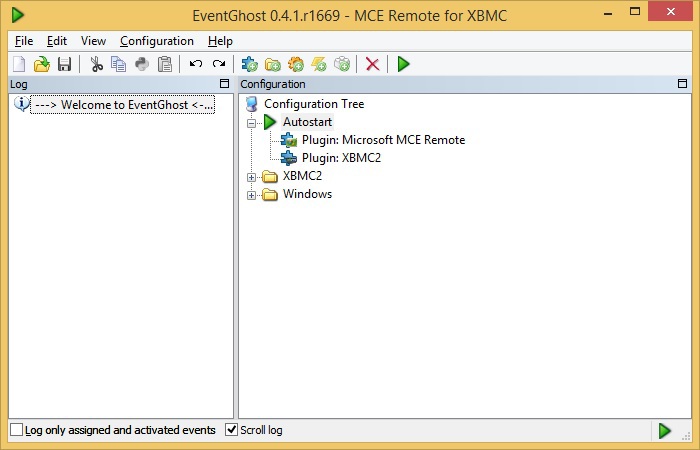
To create a new work method, you need to create a new configuration:
File> NewAdd a plugin to support MCE Remote:
Configuration> Add Plugin ...> from the Remote Receiver folder, select Microsoft MCE RemoteThere is also a version of Vista / Win7, which runs this plugin as a Windows service, but I didn’t work with it.
In the plug-in settings, check the Disable HID service for this remote (recommended) checkbox, which from HKEY_LOCAL_MACHINE \ SYSTEM \ CurrentControlSet \ Services \ HidIr \ Remotes \ 745a17a0-74d3-11d0-b6fe-00a0c90f57da deletes the CodeSetNum X keys, where X is an integer

The configuration must be saved:
File> SaveThe created configuration will be used until you specify another one.
To apply the changes in the registry, restart the computer. Windows remote control now doesn’t work.
The interesting thing is that you can wake the computer from sleep mode by pressing the On / Off button on the remote control. In theory, you can implement turning on the computer with the remote control. Google: Turn on the computer with the remote control .
We start EventGhost on behalf of the administrator. Add a plugin to manage XBMC.
Configuration> Add Plugin ...> from the Program Control folder, select XBMC2

From the settings of the plugin, it is clear that by intercepting the signal from the buttons of the remote, EventGhost sends a command to XBMC. Therefore, let's go into the XBMC settings.
System> Settings> Services> Remote Management> put a dot on the item Allow programs on this system to manage XBMCNext, we finish setting up the XBCM2 plugin and in our EventGhost window, we create a folder with the same name as the plugin. The folder and subfolders list the control commands that can be sent to XBMC. I set up the / XBMC2 / Buttons / Remote / folder. It contains macros for buttons that can be on the remote. To assign a remote control button to run a macro, you need an event.
 drag on macro
  . Event dragged from the program log, and it appears in the log after pressing the remote control button, or even when something happens in the system. Thus, click the buttons and assign them to the desired event.
It remains to find the following:
- Launch XBMC from the remote;
- Switching display modes from the remote.
Switching display modes, which in the end will look like turning the monitor on / off, is the most logical setting for the On / Off button on the remote. It can also be associated with the launch / close XBMC, since XBMC will not need to be displayed on the main display of the laptop.
To automate the switching of screen modes, we will create two * .bat files in advance:
Computer.bat:
taskkill /im XBMC.exe %windir%\System32\DisplaySwitch.exe /internal To switch to the computer where we first complete the XBMC.exe process so that XBMC does not jump to the embedded display.
Media.bat:
%windir%\System32\DisplaySwitch.exe /extend To switch to advanced mode.
Create your own macro:
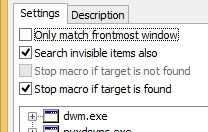
Configuration> Add Macro ...> Window> Find a window> select XBMC
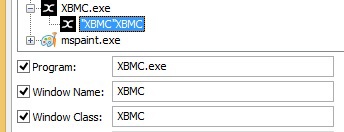
This event will be a test of whether we are open in the XBMC system. For the macro to be included in the Find a windows setting, there should be a tick at the top of the Stop macro if target is found (if we have the XBMC window running, we don’t need to turn it on again).
The standard tool from EventGhost, called Start Application, does not have the ability to run * .bat files, so you need to add the execution of the Python script to the created macro. Select the macro we created and continue on:
Configuration> Add Action ...> EventGhost> Python ScriptThe contents of the script for turning on the monitor and running XBMC are as follows:
import os import time os.system('C:\Media.bat') time.sleep(2) os.startfile(r'C:\Program Files (x86)\XBMC\XBMC.exe') Those. we run the * .bat file, wait 2 seconds for the display mode to switch, so that XBMC starts on the second screen and launch XBMC.exe
In the image and likeness of the past macro, we create a new one, to turn off the external monitor and XBMC
In Find a window, you need to tick the Stop macro if target is not found, and Python Script to turn off:
import os os.system("C:\Computer.bat") You need to move the event to both macros.
 appearing when pressing the on / off button of the remote control.
Using command line scripts carries a slight flaw, while the script is running, the cmd window blinks. This can be avoided by writing a program that executes the script code on its own behalf.
As a result, we should get something like this view of the EventGhost window:

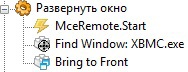
When using the created EventGhost functionality, there was a problem that XBMC starts out of focus and the taskbar is always on top of the media center.

In this regard, I made the window move forward all others using the familiar function Find a window, with the tick Stop macro if target is not found. I hung up on this green “Start” button, on the remote control, together with the transition to the main menu, while controlling XBMC. I will not give the creation of a macro in detail, I attach a screenshot:
On the colored buttons on the remote, in the bottom row, I hung the following events:

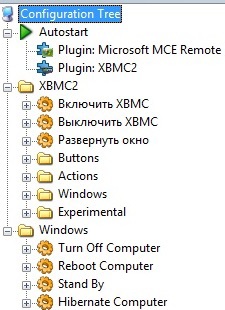
The result is the final EventGhost configuration:
Keep:
File> SaveTo configure the system, it remains only to automate the launch of EventGhost at system startup. The only earned solution was to enable the built-in Administrator account and run the cmd script from autoload.
Win + R:
lusrmgr.msc Users> right-click on Administrator> remove the check mark from the item Disable account
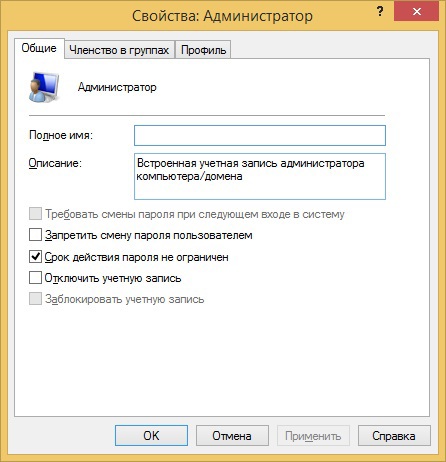
Go to the Administrator account, set a strong password . We leave from the account.
With any text editor that can save in DOS-866 encoding, create a * .bat file with the following content:
runas /savecred /user: "C:\Program Files (x86)\EventGhost\EventGhost.exe -h" Ie, to start, with saving the password, on behalf of the administrator, the program EventGhost, with the key -h (launch in tray). Be sure to save in DOS-866, if you did not change the encoding on the command line.
Turn off EventGhost, run the resulting script, enter the password.
Put the script to autoload:
Win + R:
shell:Startup The path C: \ Users \% user% \ AppData \ Roaming \ Microsoft \ Windows \ Start Menu \ Programs \ Startup opens , to which we will move the resulting script. When logged in by the user% user%, EventGhost automatically runs, with full rights. When using other startup methods, full access was not transferred, including through the Task Scheduler.
Now turning on the computer will greet us with a blinking command line window that will notify you when EventGhost starts up.
In terms of autoloading, the IR Server Suite would be better, since it runs as a Windows service, but I didn’t really like to deal with its settings when EventGhost started working for me.
For a more complete remote control from the remote control, you need to make some Windows settings in the power settings:
- % power scheme%> Require a password upon waking> No;
- USB Settings> USB Port Temporary Disable Option> Forbidden;
- Power buttons and lid> Lid closing action> No action required;
- Power Buttons and Cover> Power Button Action> Sleep.
We reboot the computer (with a button from the remote, of course), we check the operation of everything that we have set up and customize XBMC to your liking. For example, I turned on full support for UPnP so that you can access your home media library from your smartphone or, conversely, launch a media file from a smartphone in XBMC.
System> Services> UPnP> put dots in front of each menu item
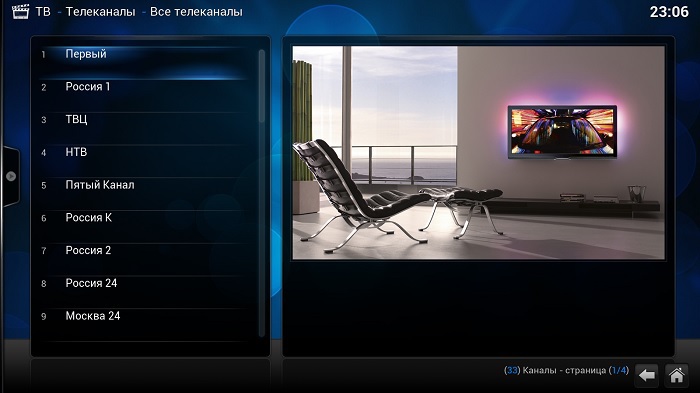
Add the promised IPTV.
First, download the PVR IPTV Simple plugin for XBMC. A page on GitHub , download (Google documents) .
Install the add-on in XBMC:
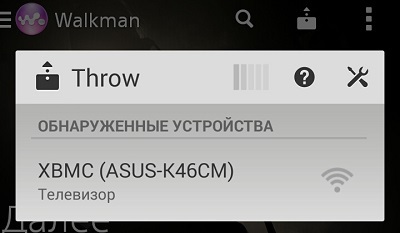
System> Add-ons> Install from ZIP file> select the path to the downloaded * .zip fileTurn on the TV:
System> TV> General> put a dot on the On.Follow the installation instructions:
System> TV> General> Clear PVR DatabaseConfigure IPTV channels:
System> Add-ons> Included Add-ons> PVR IPTV Simple Client> ConfigureSpecify the path to the * .m3u file. If you have a reliable online TV provider, then you can specify the path to * .epg, which is a TV program, then you will add additional convenient functionality.
The format of the required * .m3u is as follows:
#EXTM3U tvg-shift=3 #EXTINF:-1 tvg-id="id1" tvg-name="Channel_1" tvg-logo="logo1" group-title="Group 1",Channel 1 http://STREAMURL #EXTINF:-1 tvg-id="id2" tvg-name="Channel_2" tvg-logo="logo2" group-title="Group 2",Channel 2 udp://STREAMURL ... Although my plugin ate it like this:
#EXTM3U #EXTINF:0,Europa Plus TV rtmp://europaplus.cdnvideo.ru/europaplus-live/mp4:eptv_main.sdp ... The main thing is to save the * .m3u file in UTF-8 encoding in order to correctly display the Russian names of TV channels.
We assign any convenient remote button to open TV channels, in EventGhost (XBMC2> Buttons> Remote> Live TV) and by clicking on it a list of available TV channels will open.
Unfortunately, it was not possible to configure the stream recording, which, apparently, is not supported by the plugin, because the recording button is not active, unlike the other buttons.

Full list of software used:
- Windows 8.1 operating system;
- EventGhost event handler ;
- Media Center XBMC ;
- Plugin for XBMC IPTV Simple ;
- Text editor to change * .m3u files.
In this article, I tried to describe in detail how without special knowledge, using the enikey method, you can create a sufficiently powerful IPTV media system from a desktop PC, with a simple remote control, without losing the functionality of a computer.
Source: https://habr.com/ru/post/238801/
All Articles