HTML minimization in Web Essentials 2013: What has changed over the year?

Almost a year has passed since the publication of the previous article and the example of minimizing the HTML fragment given in it is no longer relevant (the Web Essentials> Minify selection command is no longer available in the context menu when editing HTML files). Serious changes in this functionality occurred in December last year, when version 1.5 was released, but at that moment I did not have time to write an article about it. Since during this time no one has described this functionality in Russian (there is an article by David Paquette “Minifying your HTML” in English), I will try to catch up.
In version 1.5, two very useful commands were added to the context menu for HTML files:
- Minify HTML file (s)
- Create HTML bundle file
In their principle of operation, these commands are very similar to the commands of the same name for JavaScript and CSS files.
In this article, we will look at the latest stable version of Web Essentials 2013 (version 2.3), which supports WebMarkupMin 0.8.21 .
Minimize HTML files
It is very easy to minimize HTML files using Web Essentials 2013: in the Solution Explorer, select one or more HTML files (while holding the CTRL key), then right-click and select the Web Essentials> Minify HTML file command in the pop-up menu that appears (s ) (Fig. 1).
')

Figure 1. Minimizing the HTML file shell.html.
If the minimization was successful, then the minimized version -
shell.html will appear in the Solution Explorer under the shell.html file, and in the status bar of Visual Studio you will see how much we managed to save by minimizing (Fig. 2).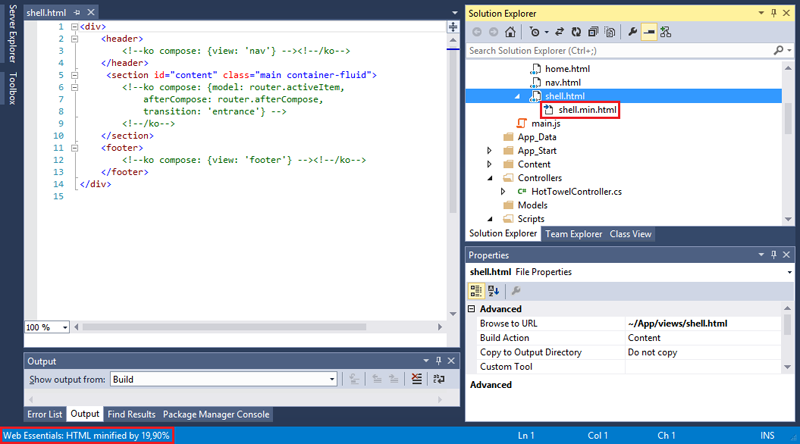
Fig. 2. The result of minimizing the HTML file shell.html.
If errors occur during the minimization, an error message will be displayed on the screen.
Unlike
.min.css and .min.js files, the created .min.html files by default will not be regenerated each time the original file is saved, but this behavior can be changed in the settings. To go to the HTML minimization settings, select Tools> Options> Web Essentials> HTML from the menu, and then go to the Minification category (Figure 3).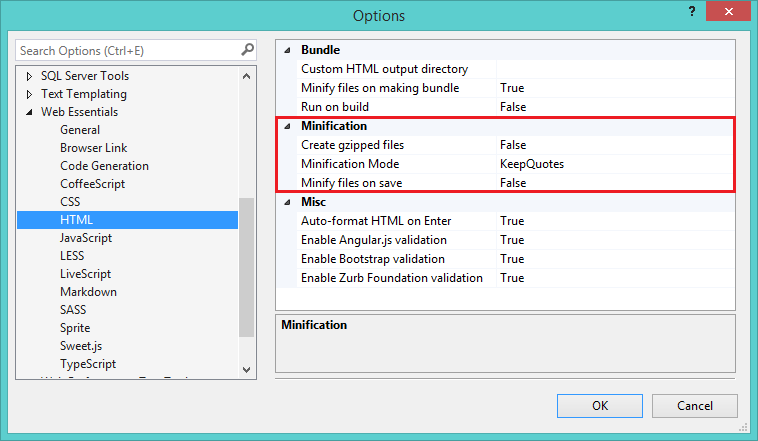
Fig. 3. HTML minimization settings.
Consider in detail all the properties of the category Minification :
| Property | Data type | Default value | Description |
|---|---|---|---|
| Create gzipped files | Boolean | false | If the value of this property is true , then during minimization, in addition to the .min.html file, a .min.html.gzip file ( .min.html file compressed with GZip) will also be created. You can read about the advantages of sharing HTML minimization and GZip compression in Mads Christensen ’s article “Effects of GZipping vs. minifying HTML files . |
Minification Mode | Enumeration | KeepQuotes | The mode for removing quotes in HTML attributes. It can take the following values:
|
| Minify files on save | Boolean | false | If the value of this property is true , then the created .min.html files will be regenerated each time the source file is saved. |
Creating HTML bundles
To create an HTML bundle, select several HTML files in Solution Explorer , then right-click and select the Web Essentials> Create HTML bundle file command in the context menu that appears (Figure 4).

Fig. 4. Create HTML bundle.
In the Save As dialog box that opens, specify the name of the bundle and click the Save button (Figure 5).
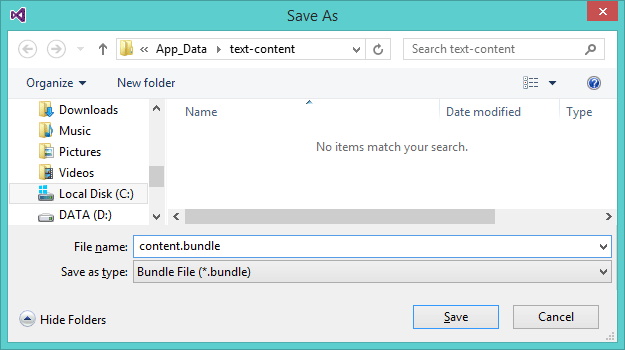
Fig. 5. Dialog box Save As.
As a result, 3 files will be created:
content.html.bundle (an XML file with bundle settings), content.html (the result of combining the contents of the source files) and content.min.html (minimized content.html ) (Fig. 6).In case the creation of GZip files is enabled in the settings, then the 4th file will be generated - content.min.html.gzip .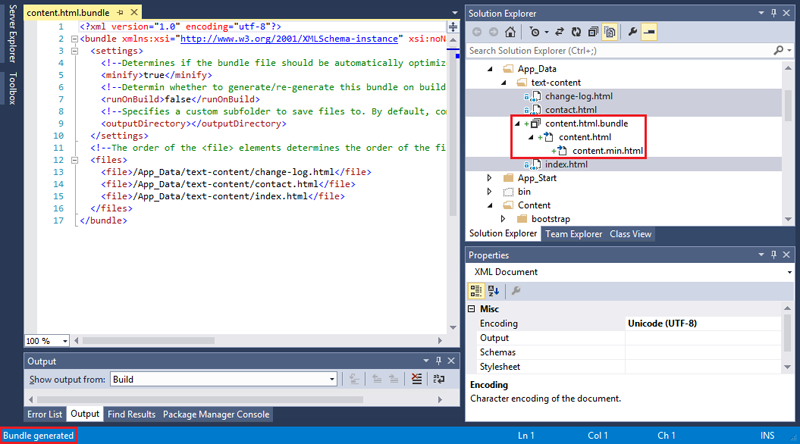
Fig. 6. The result of creating an HTML bundle.
I also want to note that Web Essentials, when combining HTML files, does not create named containers of the form:
<div id="___" style="display: none;">…</div> . In our example, the content.html file was created by change-log.html concatenating the contents of the change-log.html , contact.html and index.html .The HTML bundle settings are in the same window as the HTML minimization settings (Fig. 7).
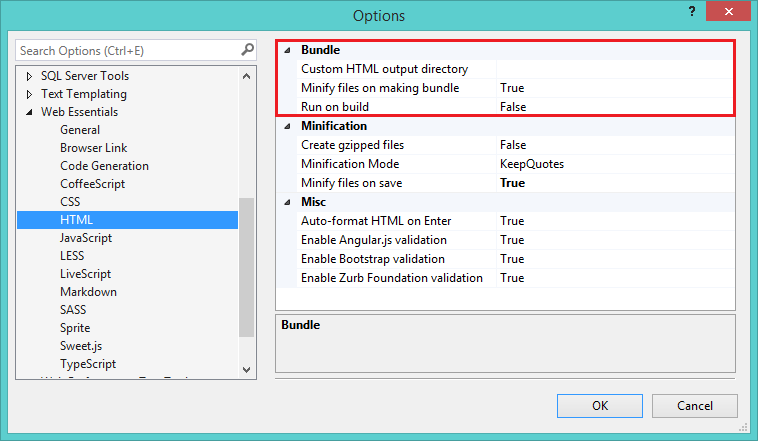
Fig. 7. Settings HTML-bundles.
Consider in detail all the properties of the category Bundle :
| Property | Data type | Default value | Description |
|---|---|---|---|
| Custom HTML output directory | Line | Empty line | Specifies the path to the directory where the generated HTML files will be saved (the bundle settings file does not move there). It is allowed to specify both relative paths (for example, ../../Content/html-bundles ) and absolute (for example, C:\html-bundles ). |
| Minify files on making bundle | Boolean | true | Enables / disables HTML minimization of the bundle. |
| Run on build | Boolean | false | If the value of this property is true , then at the time of building the project, the HTML files will be re-generated. This option is useful in cases where the HTML files in the bundle can be edited outside of Visual Studio. |
.html.bundle extension):Listing 1. Bundle settings from content.html.bundle.
<?xml version="1.0" encoding="utf-8"?> <bundle xmlns:xsi="http://www.w3.org/2001/XMLSchema-instance" xsi:noNamespaceSchemaLocation="http://vswebessentials.com/schemas/v1/bundle.xsd"> <settings> <!--Determines if the bundle file should be automatically optimized after creation/update.--> <minify>true</minify> <!--Determin whether to generate/re-generate this bundle on building the solution.--> <runOnBuild>false</runOnBuild> <!--Specifies a custom subfolder to save files to. By default, compiled output will be placed in the same folder and nested under the original file.--> <outputDirectory></outputDirectory> </settings> <!--The order of the <file> elements determines the order of the files in the bundle.--> <files> <file>/App_Data/text-content/change-log.html</file> <file>/App_Data/text-content/contact.html</file> <file>/App_Data/text-content/index.html</file> </files> </bundle> It is immediately apparent from the code that the
outputDirectory , minify and runOnBuild allow you to override the settings made earlier. In addition, in the files element, you can change the order of files in the bundle, which was impossible to do through the Visual Studio interface.Links
- The official site of the VS-extensions Web Essentials
- David Puckett 's article “Minifying your HTML”
- Article Mads Christensen «Effects of GZipping vs. minifying HTML files »
- WebMarkupMin project page on CodePlex
- My article "HTML minimization in Web Essentials 2013"
- My article "WebMarkupMin HTML Minifier - modern HTML minimizer for the .NET platform"
Source: https://habr.com/ru/post/238741/
All Articles