Cloudify and its use in OpenStack. First step
General
In this article I want to talk about the Cloudify orchestration and automation system and give an example of installing it inside the OpenStack cloud, the current version of IceHouse and the subsequent reversal of the test application.
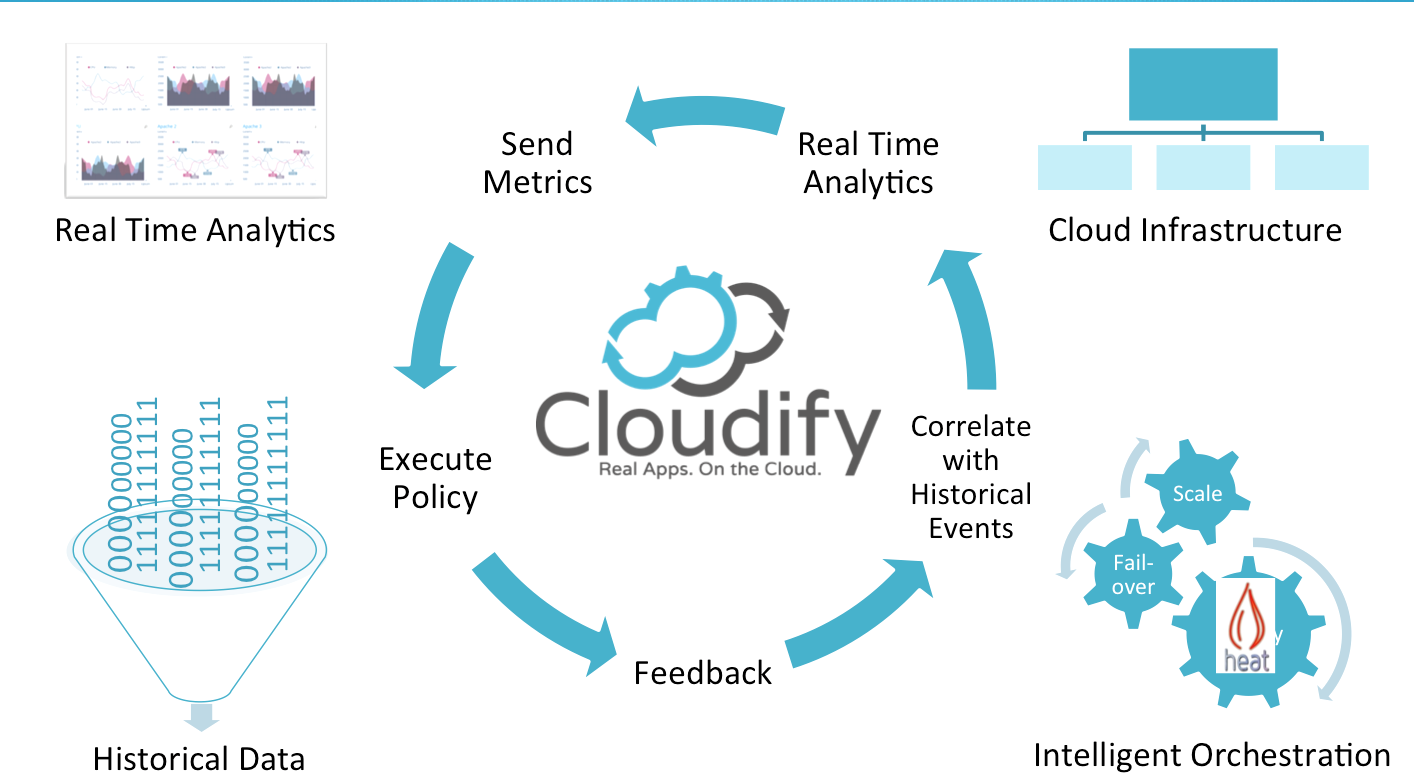
Cloudify is a system that allows you to achieve a smooth transition to the cloud and easy automation of even the most complex applications throughout their life cycle in it. Organize the creation of the entire cloud infrastructure necessary for your application, starting with computing resources, up to networks and data storage devices. Cloudify can deploy applications to the cloud (Amazon EC2, OpenStack, VMWare Vsphere, or even on pure hardware), display progress and scale if necessary. Thanks to the support of various platforms, it is possible to choose a cloud service provider with the same frontend. To monitor, manage, and scale applications within Cloudify, regardless of the stack, topology, and platform where they are deployed.

')
This is given in its description, you can add that plugins are supported that allow you to work with Bash, Chef, OpenStack, Puppet, Windows and Linux agent installer.
The current version is 3.0, is being developed 3.1. One of the tangible drawbacks - in version 3.0, the advanced functionality was removed, which was in 2.7, and offered it for money by subscription.
Cloudify includes a management node, a gateway, through which applications can be accessed. Cloduify controls are also possible via GUI, CLI and the extensive REST API.
Available packages are provided for Debian or Ubuntu, Centos \ RedHat can also be installed from github or pypi python. The version of the used python 2.7.
Installation
My node, where OpenStack is deployed, was managed by RedHat. Accordingly, the steps were as follows.
Install python 2.7.
In my opinion the easiest way is to take ready packages from the repository: mirror.yandex.ru/centos/6/SCL/x86_64/python27
Python is placed in /opt/rh/python27/root/usr/bin/python2.7

Install pip:
wget bootstrap.pypa.io/get-pip.py
/opt/rh/python27/root/usr/bin/python2.7 /var/repo-python/get-pip.py
In principle, you can install from github, but it seems to me that using PyPi is easier and faster.
Install clodify:
/opt/rh/python27/root/usr/bin/pip install cloudify
/opt/rh/python27/root/usr/bin/pip install cloudify-openstack
/opt/rh/python27/root/usr/bin/pip install cloudify-openstack-provider
Do not forget to specify the full path for python 2.7, or you can make a symbolic link:
ln -s /opt/rh/python27/root/usr/bin/python2.7 /usr/bin/python2.7
ln -s /opt/rh/python27/root/usr/bin/pip /usr/bin/pip2.7
ln -s /opt/rh/python27/root/usr/bin/cfy /usr/bin/cfy
To run commands faster.
The next step is to start the management node of the cloudify itself inside openstack. To do this, in the directory we have chosen (for example, ~ / cloudify / init1) execute the command
cfy init openstackWe will have two files in this directory,
.cloudify cloudify-config.yaml .plugin.yaml is the config we need to edit in order to run the next bootstrap.
An example of a working configuration file:
keystone: username: admin password: ADMIN_PASSWORD tenant_name: admin auth_url: http://controller:5000/v2.0 networking: neutron_url: http://controller:9696 int_network: create_if_missing: true name: cloudify-admin-network subnet: create_if_missing: true name: cloudify-admin-network-subnet ip_version: 4 cidr: 10.67.79.0/24 dns_nameservers: ['8.8.8.8'] ext_network: name: Ext-Net compute: management_server: user_on_management: root userhome_on_management: /root instance: image: 883293298-fn32u98-fnf83-fkdfs flavor: 102 management_keypair: create_if_missing: false name: default_keypair private_key_path: ~/.ssh/default_keypair.pem Only those lines that are required in editing are displayed.
Automatically Cloudify will be deployed only on Ubuntu \ Debian, I chose Ubuntu, and version 14.04 is not suitable. During bootstrap'a, will swear at her. Therefore, the choice was set to version 12.04, which is officially supported. Perhaps in version 3.1 this will be fixed.
You must first prepare an image, namely, install three packages into it: java, unzip and github.
The very image of Ubuntu can either be done by yourself, for example, in VirtualBox, and then spoil it in glance, I will omit this step, since no difficulty should arise. Or you can download from here: cloud-images.ubuntu.com/releases/12.04.2/release-20120424/ubuntu-12.04-server-cloudimg-amd64-disk1.img
Log only by keys.
Unzip and github set simply: apt-get install unzip github. Java is somewhat more difficult, download the jre-7u67-linux-x64.gz archive or with a different version. Unpack it into / opt / java / 64 or another one selected and put it into the system:
update-alternatives --install "/usr/bin/java" "java" "/opt/java/64/jre1.7.0_67/bin/java" 1
After that we consider that our image is ready, we make it a snapshot and we start the management node from the image we created again.
Now in the cloudify-config.yaml config we register our image id. Go to the directory in which you made the cfy init openstack and execute the command:
cfy bootstrapSample output on successful execution:
cfy bootstrap prefix for all resources: '' bootstrapping using cloudify_openstack validating provider resources and configuration schema validated successfully validating networking resources... validating compute resources... resources validated successfully provider validations completed successfully provisioning resources for management server... attaching IP 10.10.10.227 to the instance provisioning complete ensuring connectivity with the management server... connected with the management server successfully bootstrapping the management server... uploading keystone and neutron and files to manager [10.10.10.227] put: /root/.ssh/cloudify-agents-kp.pem -> /root/.ssh/cloudify-agents-kp.pem [10.10.10.227] put: /tmp/tmpel_Iyv/keystone_config.json -> /root/keystone_config.json [10.10.10.227] put: /tmp/tmpel_Iyv/neutron_config.json -> /root/neutron_config.json initializing manager on the machine at 10.10.10.227 downloading cloudify-components package... downloading cloudify-core package... downloading cloudify-ui... unpacking cloudify-core packages... installing cloudify on 10.10.10.227... [10.10.10.227] out: [10.10.10.227] out: Installing cloudify-components version 3.0.0... [10.10.10.227] out: [10.10.10.227] out: (by the way, you may tail /var/log/cloudify-bootstrap.log for the full installation log) [10.10.10.227] out: NOTE: this should take approx 5 minutes on an average machine... [10.10.10.227] out: [10.10.10.227] out: checking whether the system meets the minimum installation requirements... [10.10.10.227] out: the system meets the requirements necessary for Cloudify's installation [10.10.10.227] out: [10.10.10.227] out: checking whether openjdk-7-jdk is installed...openjdk-7-jdk is not installed, installing... [10.10.10.227] out: checking whether openjdk-7-jdk is installed...Status: install ok installed [10.10.10.227] out: checking whether curl is installed...Status: install ok installed [10.10.10.227] out: curl is already installed, skipping... [10.10.10.227] out: checking whether logstash is installed...logstash is not installed, installing... [10.10.10.227] out: checking whether logstash is installed...Status: install ok installed [10.10.10.227] out: checking whether elasticsearch is installed...elasticsearch is not installed, installing... [10.10.10.227] out: checking whether elasticsearch is installed...Status: install ok installed [10.10.10.227] out: checking whether kibana3 is installed...kibana3 is not installed, installing... [10.10.10.227] out: checking whether kibana3 is installed...Status: install ok installed [10.10.10.227] out: checking whether riemann is installed...riemann is not installed, installing... [10.10.10.227] out: checking whether riemann is installed...Status: install ok installed [10.10.10.227] out: checking whether rabbitmq-server is installed...rabbitmq-server is not installed, installing... [10.10.10.227] out: checking whether rabbitmq-server is installed...Status: install ok installed [10.10.10.227] out: checking whether nginx is installed...nginx is not installed, installing... [10.10.10.227] out: checking whether virtualenv is installed...virtualenv is not installed, installing... [10.10.10.227] out: checking whether virtualenv is installed...Status: install ok installed [10.10.10.227] out: checking whether make is installed...make is not installed, installing... [10.10.10.227] out: checking whether make is installed...Status: install ok installed [10.10.10.227] out: checking whether nodejs is installed...nodejs is not installed, installing... [10.10.10.227] out: checking whether nodejs is installed...Status: install ok installed [10.10.10.227] out: [10.10.10.227] out: performing post installation tests... [10.10.10.227] out: post installation tests completed successfully. [10.10.10.227] out: [10.10.10.227] out: cloudify-components 3.0.0 installation completed successfully! [10.10.10.227] out: [10.10.10.227] out: [10.10.10.227] out: [10.10.10.227] out: Installing cloudify-core version 3.0.0... [10.10.10.227] out: [10.10.10.227] out: checking whether celery and the management plugins are installed...celery is not installed, installing... [10.10.10.227] out: checking whether celery is installed...Status: install ok installed [10.10.10.227] out: checking whether manager is installed...manager is not installed, installing... [10.10.10.227] out: checking whether manager is installed...Status: install ok installed [10.10.10.227] out: [10.10.10.227] out: performing post installation tests... [10.10.10.227] out: post installation tests completed successfully. [10.10.10.227] out: [10.10.10.227] out: cloudify-core 3.0.0 installation completed successfully! [10.10.10.227] out: [10.10.10.227] out: installing cloudify-ui... cloudify-ui installation successful. deploying cloudify agents cloudify agents installation successful. bootstrapping complete management server is up at 10.10.10.227 (is now set as the default management server) After that you can go to http 10.10.10.227.
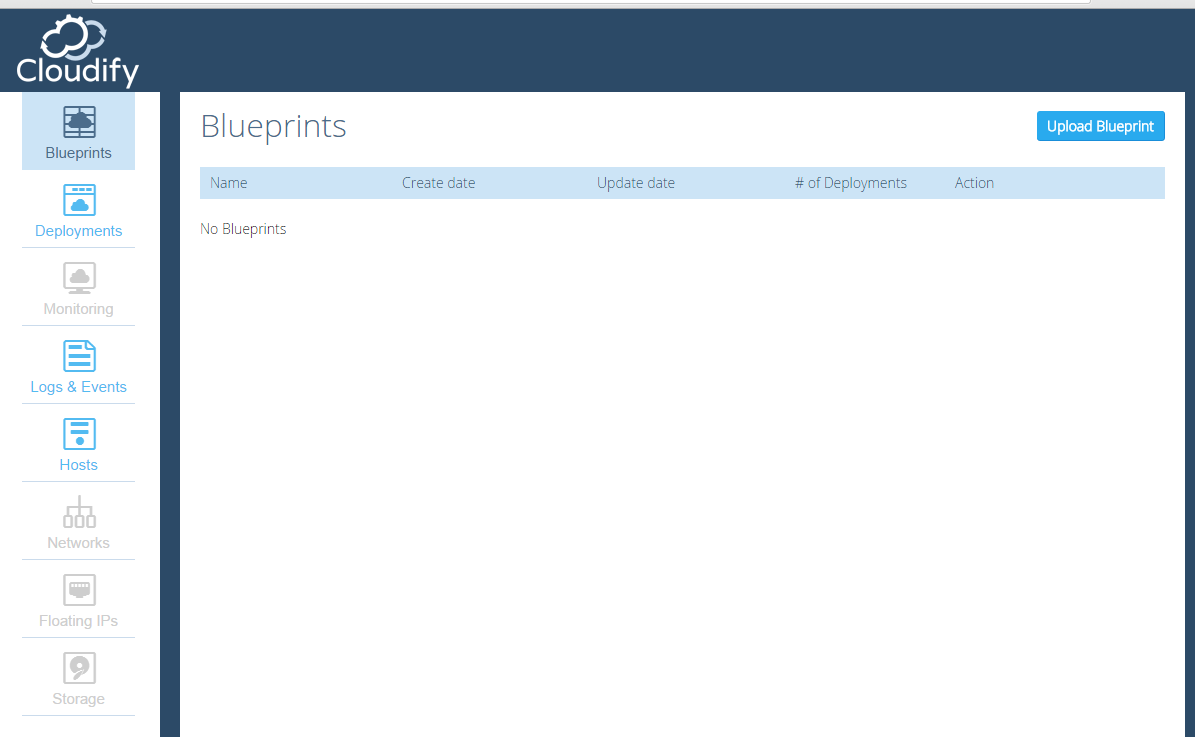
Compared to version 2.7, the interface is very poor in the free version and allows you to download a blueprint, create deployments and run it, watching the logs and receiving information from the hosts:
For example, the screen from version 2.7:

Application Installation
An example of the recipes themselves:
imports: - http://www.getcloudify.org/spec/bash-plugin/1.0/plugin.yaml - http://www.getcloudify.org/spec/openstack-plugin/1.0/plugin.yaml plugins: nodecellar_config_plugin: derived_from: cloudify.plugins.agent_plugin properties: folder: nodecellar-config-plugin types: vm_host: derived_from: cloudify.openstack.server properties: - cloudify_agent: user: ubuntu - server: ### if defined, will serve as the hostname for the started instance, ### otherwise, the node_id will be used #name: no_name ### HOST_NAME"" image: 75d47d10-fef8-473b-9dd1-fe2f7649cb41 ### IMAGE_NAME flavor: 101 ### FLAVOR_NAME security_groups: ['node_cellar_security_group'] mongo_database: derived_from: cloudify.types.bash.db_server properties: - role - port nodejs_server: derived_from: cloudify.types.bash.app_server nodejs_app: derived_from: cloudify.types.bash.app_module properties: - app_name - startup_script - git_url - git_branch - base_port - num_instances - env_file_path relationships: nodecellar_connected_to_mongo: derived_from: cloudify.relationships.connected_to source_interfaces: cloudify.interfaces.relationship_lifecycle: - postconfigure: nodecellar_config_plugin.tasks.get_mongo_host_and_port blueprint: name: nodecellar nodes: - name: node_cellar_security_group type: cloudify.openstack.security_group properties: security_group: name: node_cellar_security_group rules: - remote_ip_prefix: 0.0.0.0/0 port: 8080 - remote_ip_prefix: 0.0.0.0/0 port: 27017 - remote_ip_prefix: 0.0.0.0/0 port: 28017 - name: floatingip type: cloudify.openstack.floatingip properties: floatingip: floating_network_name: Ext-Net - name: mongod_vm type: vm_host instances: deploy: 1 relationships: - target: node_cellar_security_group type: cloudify.relationships.depends_on - name: nodejs_vm type: vm_host instances: deploy: 1 relationships: - target: floatingip type: cloudify.openstack.server_connected_to_floating_ip - target: node_cellar_security_group type: cloudify.relationships.depends_on - name: mongod type: mongo_database properties: role: mongod port: 27017 scripts: create: mongo-scripts/install-mongo.sh start: mongo-scripts/start-mongo.sh stop: mongo-scripts/stop-mongo.sh relationships: - target: mongod_vm type: cloudify.relationships.contained_in - name: nodejs type: nodejs_server properties: scripts: create: nodejs-scripts/install-nodejs.sh relationships: - type: cloudify.relationships.contained_in target: nodejs_vm - name: nodecellar_app type: nodejs_app properties: app_name: nodecellar startup_script: server.js git_url: https://github.com/cloudify-cosmo/nodecellar.git git_branch: master base_port: 8080 num_instances: 1 env_file_path: /tmp/mongo_host_and_port.sh scripts: create: nodejs-scripts/install-app.sh start: nodejs-scripts/start-app.sh stop: nodejs-scripts/stop-app.sh relationships: - type: cloudify.relationships.contained_in target: nodejs - type: nodecellar_connected_to_mongo target: mongod Next, we can perform a test deployment of the application.
Download the drawings from the book and select the version for ours:
cd ~/simple/blueprints
git clone github.com/cloudify-cosmo/cloudify-nodecellar-singlehost.git
cd cloudify-nodecellar-singlehost/
git checkout tags/3.0
cd ~/simple
Load the drawings:
cfy blueprints upload -b nodecellar1 blueprints/cloudify-nodecellar-singlehost/blueprint.yamlCreate Deployment:
cfy deployments create -b nodecellar1 -d nodecellar1And run the installation:
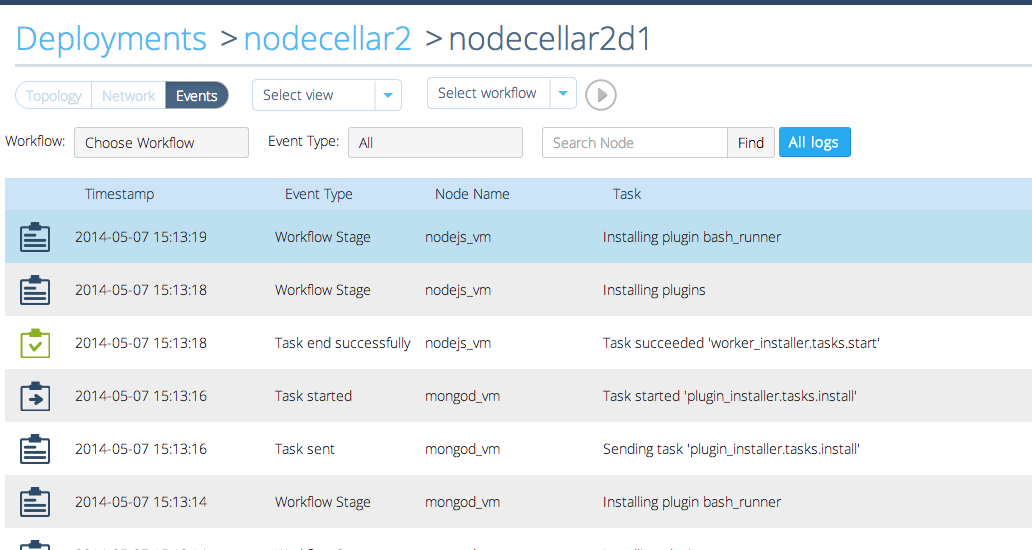
cfy deployments execute -d nodecellar1 installIn the logs see:
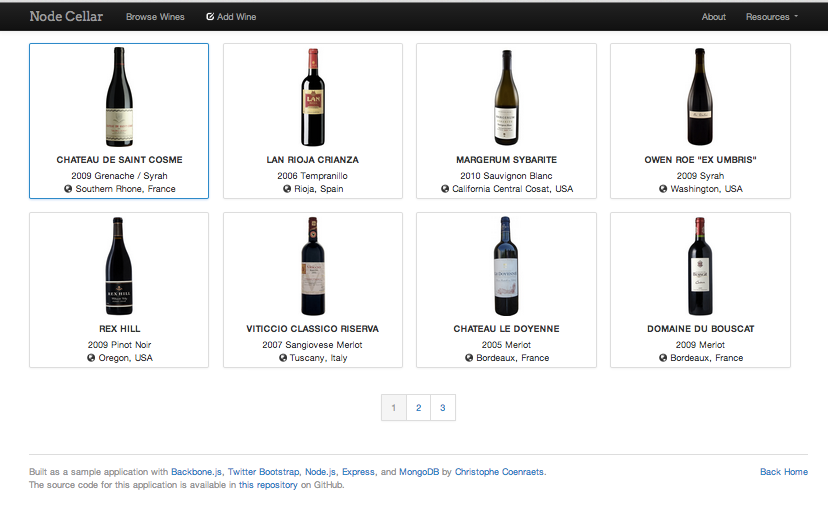
In the output there will be a url by which you can get access to the deployed application, the page will look like this:
Conclusion
In this article, preparatory procedures were performed, an image was created and Cloudify was installed in OpenStack, and a test application was deployed. An overview of the current version.
If someone has experience using this application, please unsubscribe in the comments about the cases in which it was used and my impressions. My knowledge with this product is only introductory.
Source: https://habr.com/ru/post/238325/
All Articles