Open source UTM on network perimeter protection
Hi, Habrovchane! 
Today I would like to share the experience of creating a device for protecting the network perimeter of a small organization based on open source solutions: NETFilter standard Linux firewall with Firewall Builder graphical interface, Suricata intrusion detection and prevention system with Snorby web interface and OpenVPN remote access gateway on one virtual machine.
I hope this article will help young administrators in solving possible problems that may arise when installing open source network security solutions.
')
I invite everyone who is interested.
We will collect the UTM solution (what is UTM, you can read here ), which will combine the firewall, IPS and VPN gateway.
The order of installation and configuration is as follows:
• Installing and configuring Snorby (web monitoring interface for Suricata), barnyard2 (utility for connecting Suricata and Snorby) and Suricata (actually, IPS itself);
• Installing Firewall Builder (NETFilter configuration GUI), setting firewall policy (ACL and NAT);
• Install and configure the server and client OpenVPN.
The security solutions themselves (NETFilter, Suricata, OpenVPN) were chosen for the reason that they are a kind of “classics” and are very common, so if necessary, you can find a bunch of information about setting up and working with them. We install graphical interfaces only for convenience of setting up and monitoring, no more, if you wish, you can do without them.
The platform for our UTM solution will be a virtual server running Ubuntu 14.04 onboard and the following configuration:
• 4 cores;
• 4 GB of RAM;
• 40 GB hard drive.
Those. To solve the problem of protecting the network perimeter of a small organization, the mediocre server will be suitable for its characteristics.
Before you start it is better to upgrade:
Install the necessary packages:
Install wkhtmltopdf:
Installing gems:
Install Snorby:
Edit the file /var/www/snorby/config/database.yml (if not, then you can edit * .example):
Edit the /var/www/snorby/config/snorby_config.yml file (if not, then you can edit * .example):
Run Snorby setup:
Configuring mysql:
Go back to editing the file /var/www/snorby/config/database.yml, where we enter the new user and password:
Installing Apache2 and required packages:
Passenger installation:
Create the file /etc/apache2/mods-available/passenger.load and write there:
Activation modules:
Create the file / etc / apache2 / sites-available / snorby and write there:
Activate the site:
Restart apache:
From / var / www / snorby we launch:
In the /etc/apache2/sites-available/000-default.conf file, we change the line:
We do a test run snorby. In the folder / var / www / snorby run:
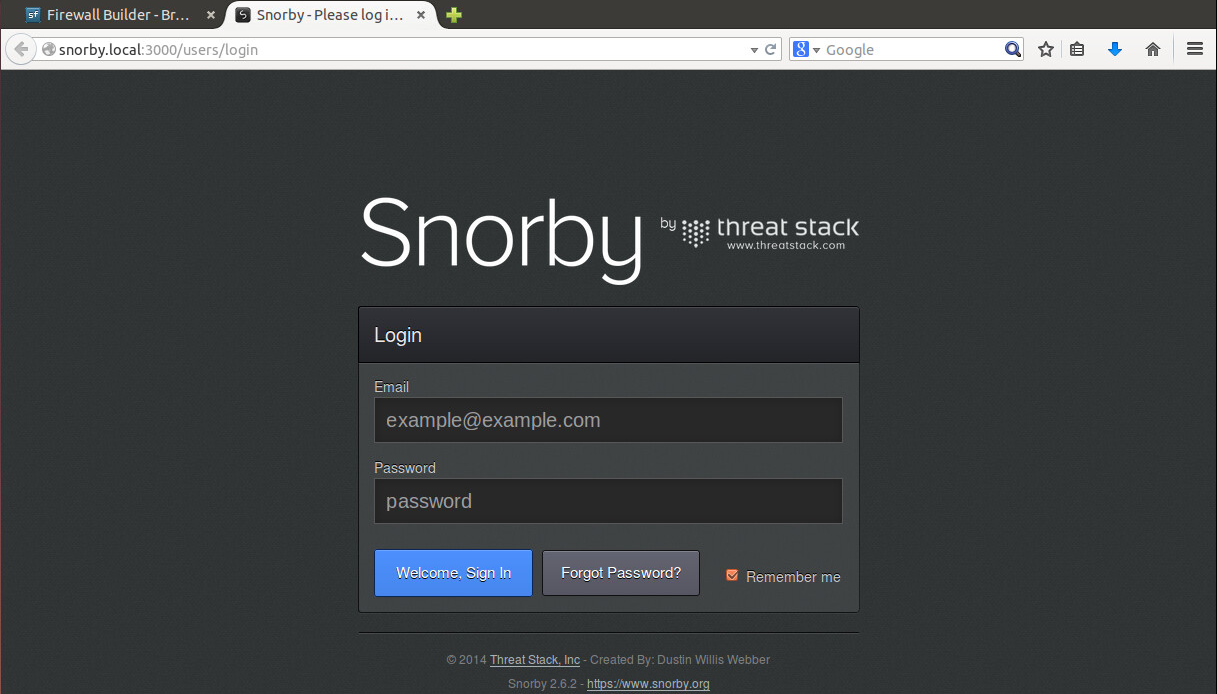
We go to http: // localhost: 3000 and if we see the login window, it means we are on the right path.
Next, we will put directly the very Suricata.
Install the necessary packages:
Yaml installation:
Install barnyard2:
Installation suricata:
In the /etc/suricata/suricata.yaml file, we change the lines:
Barnyard2 setup:
Change the lines in the /etc/suricata/barnyard2.conf file:
The final touch and everything should earn:
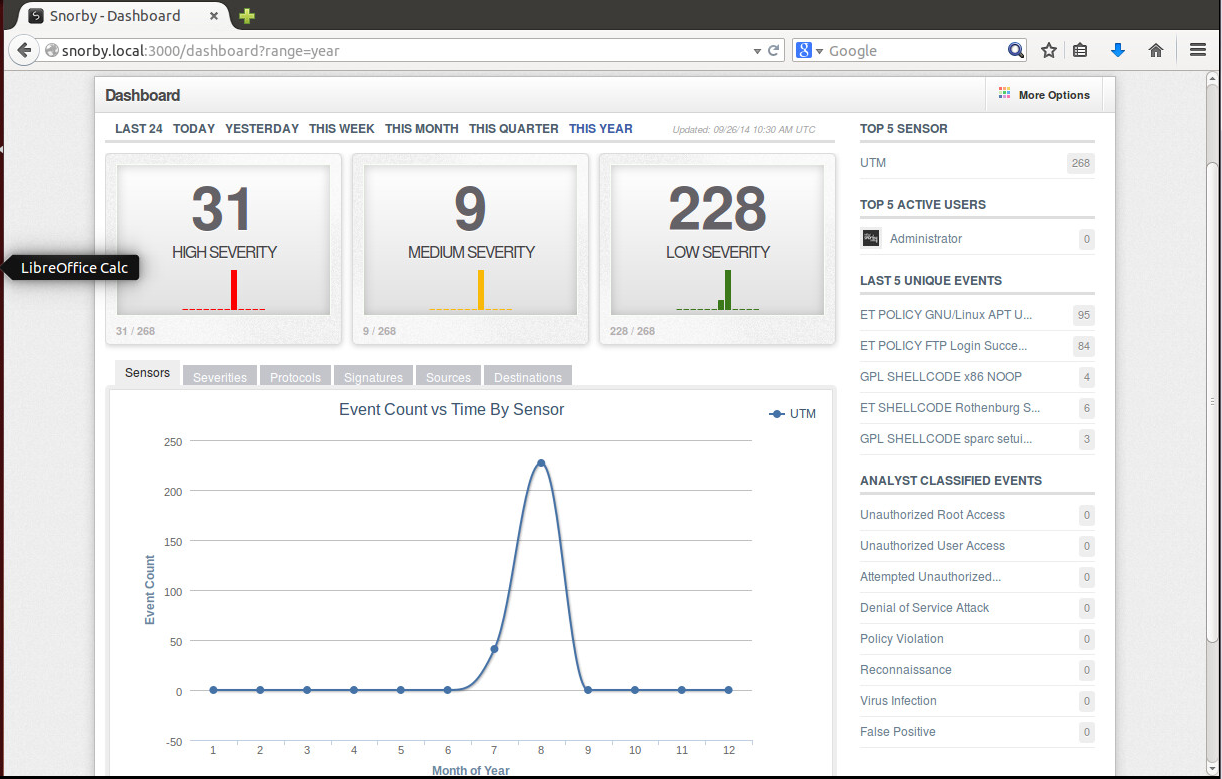
If you go back to http: // localhost: 3000 , you will see dashboards and information on some events.
This completes the IPS configuration.
Download the latest build on the link .
Install the necessary package:
Install FWBuilder:
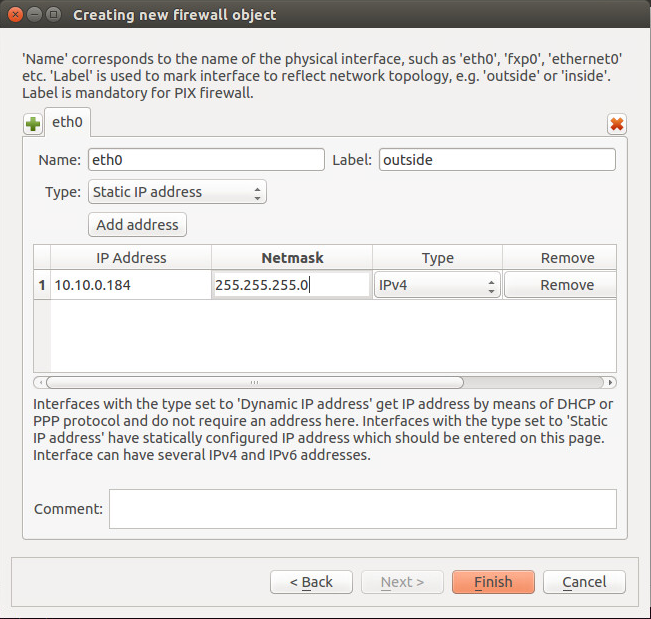
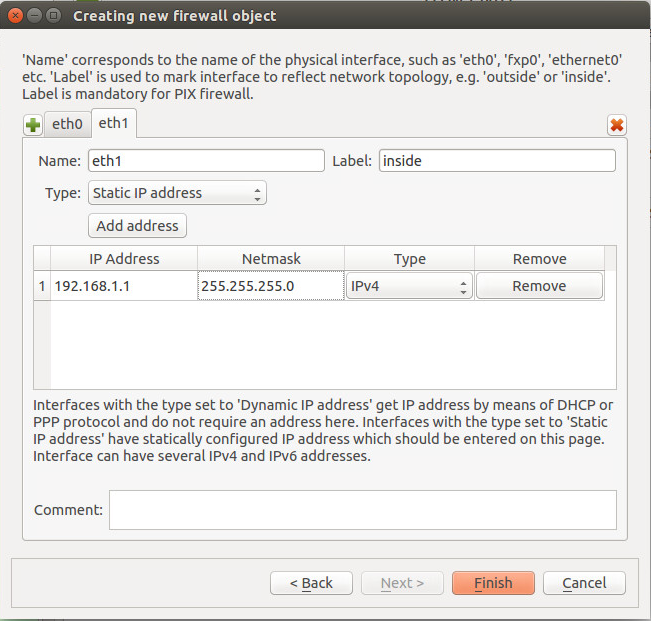
Run FWBuilder and create the Firewall element. To do this, click Create new firewall and fill in the fields:

Now we set up the interfaces:
Create the minimum required set of rules:

In principle, everything is pretty clear, so that you can continue to create rules to fit your needs.
When the rules are ready, click Install, enter the login / password and gateway address:
This completes the firewall setup.
Install OpenVPN and easy-rsa:
Create keys:
Change the line at the end of the file:
Create a server configuration file:
Create a client configuration file:
Enable routing on the gateway, if it is not enabled:
in the /etc/sysctl.conf file, let's comment on # net.ipv4.ip_forward = 1, then
Restart OpenVPN:
Creating client keys:
From the /etc/openvpn/easy-rsa/2.0/keys folder, we take the ca.crt, dh2048.pem, client.crt, client.key, ta.key files, they will be useful for the client.
Go to the client machine (I used Windows XP) and install the OpenVPN Client .
After installation, you need the files ca.crt, dh2048.pem, client.crt, client.key, ta.key, which we created on the server to copy to the / config folder in the directory where the OpenVPN Client is installed (I have C: \ Program Files \ OpenVPN \ config).
Now it remains to create a config for the client. In the folder / config create a file client.ovpn with the following content:
Now you can try to connect to the server.
This completes the UTM setup, we hope that the article will be useful to you.
Thank you all for your attention!
Glebov Maxim
Today I would like to share the experience of creating a device for protecting the network perimeter of a small organization based on open source solutions: NETFilter standard Linux firewall with Firewall Builder graphical interface, Suricata intrusion detection and prevention system with Snorby web interface and OpenVPN remote access gateway on one virtual machine.
I hope this article will help young administrators in solving possible problems that may arise when installing open source network security solutions.
')
I invite everyone who is interested.
What and where will we install
We will collect the UTM solution (what is UTM, you can read here ), which will combine the firewall, IPS and VPN gateway.
The order of installation and configuration is as follows:
• Installing and configuring Snorby (web monitoring interface for Suricata), barnyard2 (utility for connecting Suricata and Snorby) and Suricata (actually, IPS itself);
• Installing Firewall Builder (NETFilter configuration GUI), setting firewall policy (ACL and NAT);
• Install and configure the server and client OpenVPN.
The security solutions themselves (NETFilter, Suricata, OpenVPN) were chosen for the reason that they are a kind of “classics” and are very common, so if necessary, you can find a bunch of information about setting up and working with them. We install graphical interfaces only for convenience of setting up and monitoring, no more, if you wish, you can do without them.
The platform for our UTM solution will be a virtual server running Ubuntu 14.04 onboard and the following configuration:
• 4 cores;
• 4 GB of RAM;
• 40 GB hard drive.
Those. To solve the problem of protecting the network perimeter of a small organization, the mediocre server will be suitable for its characteristics.
Installation Suricata, Snorby, barnyard2
Before you start it is better to upgrade:
sudo apt-get update sudo apt-get upgrade sudo apt-get dist-upgrade Install the necessary packages:
sudo apt-get install gcc g++ build-essential libssl-dev libreadline6-dev zlib1g-dev linux-headers-generic libsqlite3-dev libxslt-dev libxml2-dev imagemagick git-core libmysqlclient-dev mysql-server libmagickwand-dev default-jre ruby1.9.3 Install wkhtmltopdf:
wget http://sourceforge.net/projects/wkhtmltopdf/files/0.12.1/wkhtmltox-0.12.1_linux-trusty-i386.deb sudo dpkg -i wkhtmltox-0.12.1_linux-trusty-i386.deb Installing gems:
sudo gem install thor i18n bundler tzinfo builder memcache-client rack rack-test erubis mail text-format rack-mount rails sqlite3 Install Snorby:
sudo git clone http://github.com/Snorby/snorby.git /var/www/snorby Edit the file /var/www/snorby/config/database.yml (if not, then you can edit * .example):
snorby: &snorby adapter: mysql username: root password: <enter the mysql root password here> host: localhost Edit the /var/www/snorby/config/snorby_config.yml file (if not, then you can edit * .example):
development: domain: localhost:3000 wkhtmltopdf: /usr/bin/wkhtmltopdf # - /usr/local/bin/wkhtmltopdf test: domain: localhost:3000 wkhtmltopdf: /usr/bin/wkhtmltopdf production: domain: localhost:3000 wkhtmltopdf: /usr/bin/wkhtmltopdf Run Snorby setup:
cd /var/www/snorby sudo bundle update activesupport railties rails sudo gem install arel ezprint && sudo bundle install sudo bundle exec rake snorby:setup Configuring mysql:
mysql -u root -p create user 'snorbyuser'@'localhost' IDENTIFIED BY '_'; grant all privileges on snorby.* to 'snorbyuser'@'localhost' with grant option; flush privileges; exit Go back to editing the file /var/www/snorby/config/database.yml, where we enter the new user and password:
snorby: &snorby adapter: mysql username: snorbyuser password: _ host: localhost Installing Apache2 and required packages:
sudo apt-get install apache2 apache2-prefork-dev libapr1-dev libaprutil1-dev sudo apt-get install libcurl4-openssl-dev sudo service apache2 start Passenger installation:
sudo gem install --no-ri --no-rdoc passenger sudo /usr/local/bin/passenger-install-apache2-module -a Create the file /etc/apache2/mods-available/passenger.load and write there:
LoadModule passenger_module /var/lib/gems/1.9.1/gems/passenger-4.0.48/buildout/apache2/mod_passenger.so <IfModule mod_passenger.c> PassengerRoot /var/lib/gems/1.9.1/gems/passenger-4.0.48 PassengerDefaultRuby /usr/bin/ruby1.9.1 </IfModule> Activation modules:
sudo a2enmod passenger sudo a2enmod rewrite sudo a2enmod ssl sudo chown www-data:www-data /var/www/snorby -R Create the file / etc / apache2 / sites-available / snorby and write there:
<VirtualHost *:80> ServerAdmin webmaster@localhost ServerName snorby.local DocumentRoot /var/www/snorby/public <Directory "/var/www/snorby/public"> AllowOverride all Order deny,allow Allow from all Options -MultiViews </Directory> </VirtualHost> Activate the site:
sudo ln -s /etc/apache2/sites-available/snorby /etc/apache2/sites-enabled/snorby Restart apache:
sudo service apache2 restart From / var / www / snorby we launch:
sudo bundle pack && sudo bundle install --path vender/cache In the /etc/apache2/sites-available/000-default.conf file, we change the line:
DocumentRoot /var/www/ We do a test run snorby. In the folder / var / www / snorby run:
sudo bundle exec rails server -e production We go to http: // localhost: 3000 and if we see the login window, it means we are on the right path.
Next, we will put directly the very Suricata.
Install the necessary packages:
sudo apt-get install libpcre3 libpcre3-dbg libpcre3-dev build-essential autoconf automake libtool libpcap-dev libcap-ng-dev libnet1-dev mysql-client wget http://security.ubuntu.com/ubuntu/pool/main/m/mysql-dfsg-5.1/libmysqlclient16_5.1.73-0ubuntu0.10.04.1_i386.deb sudo dpkg -i libmysqlclient16_5.1.73-0ubuntu0.10.04.1_i386.deb wget http://www.netfilter.org/projects/libnfnetlink/files/libnfnetlink-1.0.1.tar.bz2 sudo tar xvfz libnfnetlink-1.0.1.tar.bz2 sudo ./configure && sudo make && sudo make install Yaml installation:
wget http://pyyaml.org/download/libyaml/yaml-0.1.3.tar.gz sudo tar xvfz yaml-0.1.3.tar.gz cd yaml-0.1.3 sudo ./configure && sudo make && sudo make install Install barnyard2:
wget http://ftp.psu.ac.th/pub/snort/barnyard2-1.9.tar.gz sudo tar xvfz barnyard2-1.9.tar.gz cd barnyard2-1.9 sudo ./configure --with-mysql && sudo make && sudo make install Installation suricata:
sudo apt-get install suricata sudo cp /etc/suricata/suricata-debian.yaml /etc/suricata/suricata.yaml cd /etc/suricata sudo wget http://rules.emergingthreats.net/open/suricata/emerging.rules.tar.gz sudo tar xvfz emerging.rules.tar.gz In the /etc/suricata/suricata.yaml file, we change the lines:
default-rule-path: /etc/suricata/rules/ HOME_NET: "[ip_/]" # "[192.168.0.0/24]" Barnyard2 setup:
sudo cp downloads_folder/barnyard2-1.9/etc/barnyard2.conf /etc/suricata/ Change the lines in the /etc/suricata/barnyard2.conf file:
config reference_file: /etc/suricata/reference.config config classification_file: /etc/suricata/classification.config config gen_file: /etc/suricata/rules/gen-msg.map config sid_file: /etc/suricata/rules/sid-msg.map output database: log, mysql, user=snorbyuser password=_ dbname=snorby host=localhost sensor_name=sensor1 The final touch and everything should earn:
sudo mkdir /var/log/barnyard2 sudo iptables -I FORWARD -j NFQUEUE sudo suricata -c /etc/suricata/suricata.yaml -q 0 If you go back to http: // localhost: 3000 , you will see dashboards and information on some events.
This completes the IPS configuration.
Installing FWBuilder and configuring iptables
Download the latest build on the link .
Install the necessary package:
sudo apt-get install libqt4-gui Install FWBuilder:
sudo dpkg -i fwbuilder_5.1.0.3599-ubuntu-precise-1_i386.deb Run FWBuilder and create the Firewall element. To do this, click Create new firewall and fill in the fields:
Now we set up the interfaces:
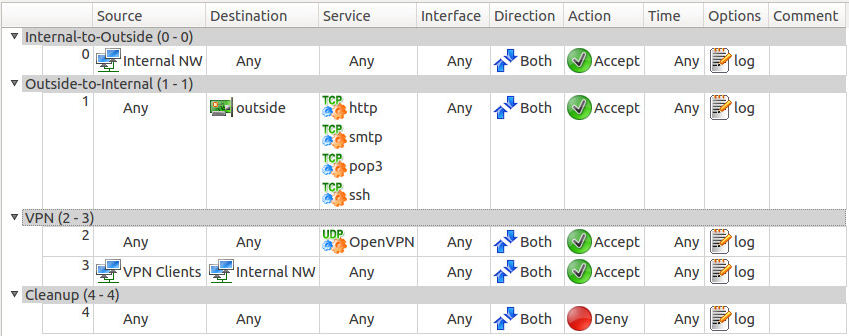
Create the minimum required set of rules:
In principle, everything is pretty clear, so that you can continue to create rules to fit your needs.
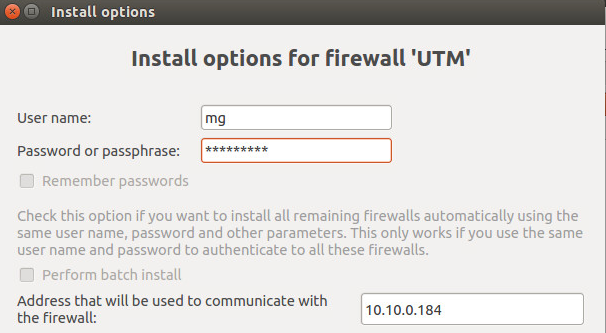
When the rules are ready, click Install, enter the login / password and gateway address:
This completes the firewall setup.
Installing and configuring OpenVPN
Install OpenVPN and easy-rsa:
sudo su apt-get install openvpn easy-rsa Create keys:
mkdir /etc/openvpn/easy-rsa cp -r /usr/share/easy-rsa /etc/openvpn/easy-rsa mv /etc/openvpn/easy-rsa/easy-rsa /etc/openvpn/easy-rsa/2.0 cd /etc/openvpn/easy-rsa/2.0 nano vars Change the line at the end of the file:
export KEY_COUNTRY="RU" export KEY_PROVINCE="Moscow" export KEY_CITY="Moscow" export KEY_ORG="IT" export KEY_EMAIL="test@lab.local" export KEY_OU="Security Department" export KEY_NAME="UTM" cp openssl-1.0.0.cnf openssl.cnf . ./vars ./clean-all ./build-ca ./build-key-server server ./build-dh openvpn --genkey --secret keys/ta.key cp -r /etc/openvpn/easy-rsa/2.0/keys/ /etc/openvpn/ Create a server configuration file:
cp /usr/share/doc/openvpn/examples/sample-config-files/server.conf.gz /etc/openvpn/ cd /etc/openvpn gunzip -d /etc/openvpn/server.conf.gz nano /etc/openvpn/server.conf port 1194 proto udp dev tun ca /etc/openvpn/keys/ca.crt cert /etc/openvpn/keys/server.crt key /etc/openvpn/keys/server.key # This file should be kept secret dh /etc/openvpn/keys/dh2048.pem server 10.8.0.0 255.255.255.0 ifconfig-pool-persist /etc/openvpn/ipp.txt push "route 192.168.1.0 255.255.255.0" keepalive 10 120 tls-server tls-auth /etc/openvpn/keys/ta.key 0 tls-timeout 120 auth SHA1 comp-lzo max-clients 1 persist-key persist-tun status /var/log/openvpn/openvpn-status.log verb 3 mute 20 mkdir /var/log/openvpn Create a client configuration file:
mkdir /etc/openvpn/ccd nano /etc/openvpn/ccd/client iroute 192.168.1.0 255.255.255.0 Enable routing on the gateway, if it is not enabled:
in the /etc/sysctl.conf file, let's comment on # net.ipv4.ip_forward = 1, then
sudo sysctl -p Restart OpenVPN:
openvpn restart Creating client keys:
cd /etc/openvpn/easy-rsa/2.0 . ./vars ./build-key client ./build-key-pass client From the /etc/openvpn/easy-rsa/2.0/keys folder, we take the ca.crt, dh2048.pem, client.crt, client.key, ta.key files, they will be useful for the client.
Go to the client machine (I used Windows XP) and install the OpenVPN Client .
After installation, you need the files ca.crt, dh2048.pem, client.crt, client.key, ta.key, which we created on the server to copy to the / config folder in the directory where the OpenVPN Client is installed (I have C: \ Program Files \ OpenVPN \ config).
Now it remains to create a config for the client. In the folder / config create a file client.ovpn with the following content:
client dev tun proto udp remote 10.10.0.184 1194 resolv-retry infinite ca "C:\\Program Files\\OpenVPN\\config\\ca.crt" cert "C:\\Program Files\\OpenVPN\\config\\client.crt" key "C:\\Program Files\\OpenVPN\\config\\client.key" tls-client tls-auth "C:\\Program Files\\OpenVPN\\config\\ta.key" 1 auth SHA1 # -. MD5 cipher BF-CBC remote-cert-tls server comp-lzo persist-key persist-tun status "C:\\Program Files\\OpenVPN\\log\\openvpn-status.log" log "C:\\Program Files\\OpenVPN\\log\\openvpn.log" verb 3 mute 20 Now you can try to connect to the server.
This completes the UTM setup, we hope that the article will be useful to you.
Thank you all for your attention!
Glebov Maxim
Source: https://habr.com/ru/post/238315/
All Articles