Router from DAP-1160
Good afternoon, Habr.
I want to share a little practical experience about creating a router from the old access point DAP-1160. The purpose of this task was simple - not to buy a new router to the country and save money. Well, and of course, interest.
Since I had never encountered alternative firmware before, I decided to fix this awkward moment for myself. So, here is the patient himself, a view from the inside, so to speak.
')

This unit has two LAN outputs and a standard 3 dbi wi-fi antenna, just what you need! We will make one port WAN, the second will remain for LAN. Next, I had the choice of an alternative firmware, since Native is not very stable. Therefore, the choice fell on DD-WRT or Open-WRT. But then there were difficulties. Either I was not looking enough, or I missed something, but a fact: under the DAP-1160 I did not find any of the firmware, or rather I did not find it under the Realtek RTL8186 chip. But on one of the forum threads I was sent to the site of alternative firmware Wive-NG. What was my happiness when I saw that one of the firmware supports the chip installed on my access point, and the point itself is listed in the list of supported devices.
So, the choice is made - we put Wive-NG.
Immediately I will make a reservation: due to the fact that the access point has very modest characteristics (FLASH - 4 MiB, RAM - 16 MiB), there is no web interface in the firmware and there is only a command line.
We reflash:
For good, you should flash through tftp, but in my case it did not help. Therefore, I will tell both options.
1. Through tftp.
We put any tftp server and download the archive and firmware. Unpack and find wive.bin, this is our firmware. We connect the LAN connector to the network card of the computer. Next, when the device is turned off, we reset the reset and turn it on. It should light up and after a few seconds the power LED goes out. Now we become with the device in one network, say, ip 192.168.1.88, mask 255.255.255.0. You can use any ip except 192.168.1.6.
Now fill the firmware:
For windows:
For Linux:
2. The above option did not work for me personally. Therefore, I made the usual firmware update via the native D-Link web interface, indicating the path to wive.bin. Oddly enough, everything went without a hitch.
And now the most interesting is setting:
By default, the device has a network 10.0.0.0/8 with the address on the router itself 10.200.200.249. We change the IP on the network card to be on the network with the now router. I set IP 10.200.200.248 with a mask of 255.255.255.0. Now we can safely connect via SSH to the router.

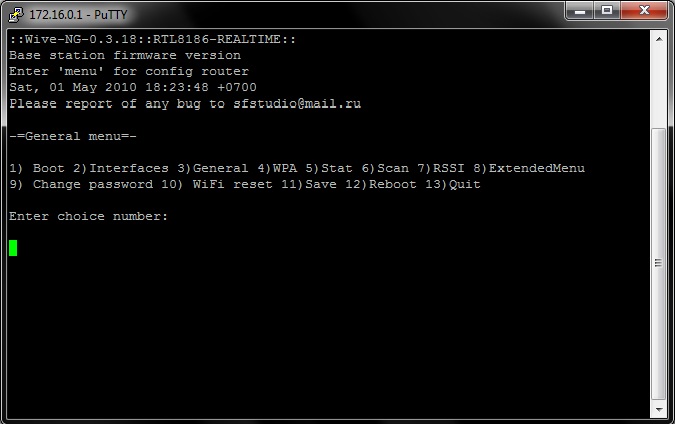
By default, the login in the router is root, the password is rtl8186. As you can see from the picture, the firmware version is 0.3.18, which is far from the newest, but what can you do, the piece of hardware is also not new. In fact, wive-ng is the usual Linux and nothing Linux is alien to it. But the developers greatly facilitated the lives of users by making a console menu, which is invoked by the "menu" command, where all the settings of the router are presented.
The first thing they advised to do is change the password to root.
You can do this as:
So, in front of us we see a lot of menu with numbers. Clicking on the number will open the corresponding configuration file in the vi editor. By editing these files, the router is configured.
Personally, I was embarrassed by the non-standard internal network on the router. Agree, it is somehow unusual to have the address of a router 10.200.200.249, therefore we change it. Go to menu -> 2) Interfaces and find the interface BR0, then change the string

Here below we find the ETH0 interface and derive it from BR0:
If you have one LAN output, then the next line in the ETH1 interface needs to be changed to

Save the changes and exit with the command
For now, we’ll finish configuring the interfaces. Let's configure DHCP.
Go to menu -> 8) Extended Menu -> 5) DHCPD .
Here we prescribe the settings of our DHCP server.
We will assign the distribution of ip to the interface br0, this will give the opportunity to distribute ip on all ports attached to this interface (eth1 and wlan0).
Next, we set the range of ip to be distributed, from which ip will begin distribution of addresses:
The following line can not touch:
We put the dns provider through a space or, in my case, Google’s:
We set the size of our network, it should match the size of the network that you specified in the line BR0_IPADDR = 172.16.0.1 / 24, i.e. 255.255.255.0.
We write the gateway, which will issue our DHCP server:
The following two lines can be commented out:
The ip reserve time per user can be reduced, or the default is 24 hours:
Save and exit
Go to the menu -> 1) Boot and check that our DHCP server is on, line

Save and exit the vi editor.
After the reboot, we will enter the router under the new ip and should get the address via DHCP. Just do not forget that LAN1 is no longer in BR0 and you need to switch to LAN2 or connect via wi-fi with the open SSID "SF-WL".
After reconnecting to the router with the new address, we finally move on to the settings for connecting to the Internet.
Go back to the menu -> 1) Boot and edit the following lines:
- turn on router mode
- enable NAT in router mode
- turn on the firewall
- let the router be the DNS server for the internal network -
The following option is not necessary, but on the forums it is recommended to disable it due to the fact that the memory on the device is so small and it is a pity to spend it on logs:
Save the changes and go to menu -> 2) Interfaces .
Now we need to choose the type of connection to our provider - PPTP, L2TP, PPOE. If your provider just gives you a static or dynamic ip, then you can skip this item.
I will look at the example of PPOE.
- enable this type of connection
- your login issued by the provider
Save and exit.
Go to menu -> 8) Extended Menu -> 2) Iptables . And here we add a line that includes the forwarding of packets to eth0
For good, you still need to close the ssh port:
Save and exit. Save to menu -> 11) Save and do 12) Reboot.
After the reboot, the router should raise the ppp0 interface, check it with the ifconfig command.
We try to ping the world - it should work.
5. All that is left for us is to configure wi-fi.
Go to the menu -> 3) General and find the WPA line and change to “yes”, thereby turning on the WPA / WPA2 mode
Save and exit.
Go now to the menu -> 4) WPA . And turn on the WPA2-mixed mode. Change the string
We also find a line and duplicate the name of our wi-fi network there.
And of course, the network key itself, change the value in quotes to your
Save and exit.
Tper menu -> 11) Save, menu -> 12) Reboot.
After the reboot, it remains for us to find our SSID and connect to it with the password we set up and use the Internet.
Bottom line: in fact, the firmware is much more stable than the native D-Link, for two days without crashing and freezing (it hung once a day or two with the native). But compared to the TL-WR1043N, it works much slower, the heavy sites open reluctantly, the torrent above 1 MB / s does not even go up the cable. But for the tariff plan of 4 Mb / s, for which this router was conceived, it will be fine.
Sources: wive-ng website, wive-ng forum .
I want to share a little practical experience about creating a router from the old access point DAP-1160. The purpose of this task was simple - not to buy a new router to the country and save money. Well, and of course, interest.
Since I had never encountered alternative firmware before, I decided to fix this awkward moment for myself. So, here is the patient himself, a view from the inside, so to speak.
')
This unit has two LAN outputs and a standard 3 dbi wi-fi antenna, just what you need! We will make one port WAN, the second will remain for LAN. Next, I had the choice of an alternative firmware, since Native is not very stable. Therefore, the choice fell on DD-WRT or Open-WRT. But then there were difficulties. Either I was not looking enough, or I missed something, but a fact: under the DAP-1160 I did not find any of the firmware, or rather I did not find it under the Realtek RTL8186 chip. But on one of the forum threads I was sent to the site of alternative firmware Wive-NG. What was my happiness when I saw that one of the firmware supports the chip installed on my access point, and the point itself is listed in the list of supported devices.
So, the choice is made - we put Wive-NG.
Immediately I will make a reservation: due to the fact that the access point has very modest characteristics (FLASH - 4 MiB, RAM - 16 MiB), there is no web interface in the firmware and there is only a command line.
We reflash:
For good, you should flash through tftp, but in my case it did not help. Therefore, I will tell both options.
1. Through tftp.
We put any tftp server and download the archive and firmware. Unpack and find wive.bin, this is our firmware. We connect the LAN connector to the network card of the computer. Next, when the device is turned off, we reset the reset and turn it on. It should light up and after a few seconds the power LED goes out. Now we become with the device in one network, say, ip 192.168.1.88, mask 255.255.255.0. You can use any ip except 192.168.1.6.
Now fill the firmware:
For windows:
tftp -i 192.168.1.6 put c:\wive.bin For Linux:
$ tftp tftp> connect 192.168.1.6 tftp> mode binary tftp> put wive.bin 2. The above option did not work for me personally. Therefore, I made the usual firmware update via the native D-Link web interface, indicating the path to wive.bin. Oddly enough, everything went without a hitch.
And now the most interesting is setting:
By default, the device has a network 10.0.0.0/8 with the address on the router itself 10.200.200.249. We change the IP on the network card to be on the network with the now router. I set IP 10.200.200.248 with a mask of 255.255.255.0. Now we can safely connect via SSH to the router.
By default, the login in the router is root, the password is rtl8186. As you can see from the picture, the firmware version is 0.3.18, which is far from the newest, but what can you do, the piece of hardware is also not new. In fact, wive-ng is the usual Linux and nothing Linux is alien to it. But the developers greatly facilitated the lives of users by making a console menu, which is invoked by the "menu" command, where all the settings of the router are presented.
The first thing they advised to do is change the password to root.
You can do this as:
passwd root so through the menu -> 9) Change PasswordSo, in front of us we see a lot of menu with numbers. Clicking on the number will open the corresponding configuration file in the vi editor. By editing these files, the router is configured.
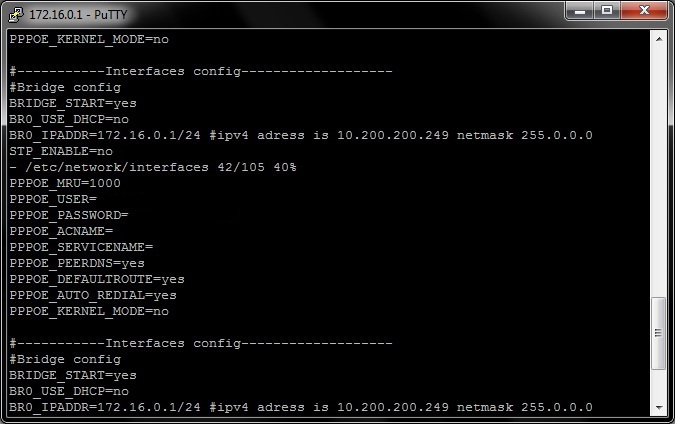
Personally, I was embarrassed by the non-standard internal network on the router. Agree, it is somehow unusual to have the address of a router 10.200.200.249, therefore we change it. Go to menu -> 2) Interfaces and find the interface BR0, then change the string
BR0_IPADDR=10.200.200.249/8 to your network address, I set BR0_IPADDR=172.16.0.1/24 We also check for the presence of “yes” in the line BRIDGE_START=yes Here below we find the ETH0 interface and derive it from BR0:
ETH0_IN_BR0=no The ETH0 interface will correspond to LAN1 on the device, which by output from BR0 will become the WAN interface. Then you should look into the settings of your provider, namely, how it gives you an IP address. If by DHCP, then write yes to this line ETH0_USE_DHCP=yes and leave this line empty and make it commented out: #ETH0_IPADDR= If you have a static IP, then we write “no” for DHCP in the line: ETH0_USE_DHCP=no And in the next line we register your IP, issued to you by the provider: ETH0_IPADDR= ip If you have one LAN output, then the next line in the ETH1 interface needs to be changed to
ETH1_ENABLED=no I have 2 LAN exits, so I leave it on.Save the changes and exit with the command
:wq For now, we’ll finish configuring the interfaces. Let's configure DHCP.
Go to menu -> 8) Extended Menu -> 5) DHCPD .
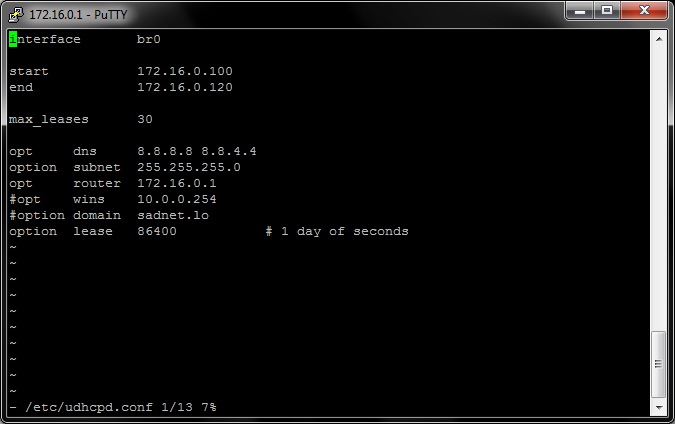
Here we prescribe the settings of our DHCP server.
We will assign the distribution of ip to the interface br0, this will give the opportunity to distribute ip on all ports attached to this interface (eth1 and wlan0).
Next, we set the range of ip to be distributed, from which ip will begin distribution of addresses:
start 172.16.0.100 and which will end end 172.16.0.120 The following line can not touch:
max_leases 30 We put the dns provider through a space or, in my case, Google’s:
opt dns We set the size of our network, it should match the size of the network that you specified in the line BR0_IPADDR = 172.16.0.1 / 24, i.e. 255.255.255.0.
option subnet 255.255.255.0 We write the gateway, which will issue our DHCP server:
opt router 172.16.0.1 The following two lines can be commented out:
#opt wins #option domain The ip reserve time per user can be reduced, or the default is 24 hours:
option lease 86400 Save and exit
:wq Go to the menu -> 1) Boot and check that our DHCP server is on, line
START_DHCPSERVER=yes Save and exit the vi editor.
:wq Now we save the menu -> 11) Save settings and reboot the menu -> 12 router ) Reboot .After the reboot, we will enter the router under the new ip and should get the address via DHCP. Just do not forget that LAN1 is no longer in BR0 and you need to switch to LAN2 or connect via wi-fi with the open SSID "SF-WL".
After reconnecting to the router with the new address, we finally move on to the settings for connecting to the Internet.
Go back to the menu -> 1) Boot and edit the following lines:
- turn on router mode
IPV4_FORWARD_ENABLE=yes - enable NAT in router mode
MASQUERADE=yes - turn on the firewall
START_IPTABLES=yes - let the router be the DNS server for the internal network -
START_DNSSERVER=yes The following option is not necessary, but on the forums it is recommended to disable it due to the fact that the memory on the device is so small and it is a pity to spend it on logs:
SYSLOG_ENABLE=no Save the changes and go to menu -> 2) Interfaces .
Now we need to choose the type of connection to our provider - PPTP, L2TP, PPOE. If your provider just gives you a static or dynamic ip, then you can skip this item.
I will look at the example of PPOE.
- enable this type of connection
PPPOE_CALL_START=yes - your login issued by the provider
PPPOE_USER= and accordingly the password PPPOE_PASSWORD= allow the router to automatically set the default route PPPOE_DEFAULTROUTE=yes and auto reconnect PPPOE_AUTO_REDIAL=yes Save and exit.
Go to menu -> 8) Extended Menu -> 2) Iptables . And here we add a line that includes the forwarding of packets to eth0
iptables -t nat -A POSTROUTING -o eth0 -j MASQUERADE For good, you still need to close the ssh port:
iptables -A INPUT -i eth0 -p tcp --destination-port 22 -j DROP iptables -A INPUT -i eth0 -p udp --destination-port 22 -j DROP Save and exit. Save to menu -> 11) Save and do 12) Reboot.
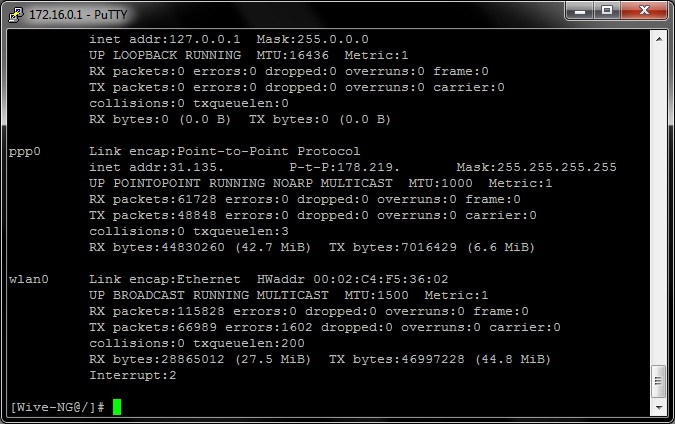
After the reboot, the router should raise the ppp0 interface, check it with the ifconfig command.
We try to ping the world - it should work.
5. All that is left for us is to configure wi-fi.
Go to the menu -> 3) General and find the WPA line and change to “yes”, thereby turning on the WPA / WPA2 mode
WPA=yes Find the line and change the name of the network to your ESSID= Save and exit.
Go now to the menu -> 4) WPA . And turn on the WPA2-mixed mode. Change the string
encryption = 4 on encryption = 6 We also find a line and duplicate the name of our wi-fi network there.
ssid = " " And of course, the network key itself, change the value in quotes to your
psk = "1234567890" Save and exit.
Tper menu -> 11) Save, menu -> 12) Reboot.
After the reboot, it remains for us to find our SSID and connect to it with the password we set up and use the Internet.
Bottom line: in fact, the firmware is much more stable than the native D-Link, for two days without crashing and freezing (it hung once a day or two with the native). But compared to the TL-WR1043N, it works much slower, the heavy sites open reluctantly, the torrent above 1 MB / s does not even go up the cable. But for the tariff plan of 4 Mb / s, for which this router was conceived, it will be fine.
Sources: wive-ng website, wive-ng forum .
Source: https://habr.com/ru/post/237955/
All Articles