What to do with a dusty GPU if you are a pentester. Part 1: Legacy ATI / AMD RADEON

Hi, Habr! The summer is over, the trees drop their leaves on the cold ground, the first snow is falling in Novosibirsk, and at this time I want to tell a little story about setting up a platform for sorting WPA / WPA2 passwords based on the outdated RADEON HD4890 video card today.
Introduction
Gone are the days when the video card was just a video card. GPGPU-based calculations ( https://ru.wikipedia.org/wiki/GPGPU ) are gaining popularity and are tens and sometimes hundreds of times more productive than CPU calculations. It's no secret that AMD RADEON video cards are doing much better in this respect than equivalent NVIDIA video adapters. To implement these calculations, there are the following implementations:
- NVIDIA CUDA - a technology that allows you to implement algorithms that run exclusively on GeForce, Quadro and Tesla GPUs;
- OpenCL - a framework for writing programs related to parallel computing on various graphics (GPU, including NVIDIA and AMD RADEON) and central processing units (CPU), as well as FPGA. Included in OpenGL and competing with CUDA;
- CAL ++ is a simple library for implementing the execution of algorithms on a video adapter with OpenCL-like syntax.
As you know, pyrit consists of two parts: the core and the module needed to support additional hardware. Moreover, this module can be compiled to support one of the three GPGPU computing technologies described above. CUDA disappears immediately, as it is implemented only for "green" video cards. Let's stop on CAL ++.
')
Prehistory
It all started with the desire to make something useful out of the old disassembled computer, just for fun. Literally "on my knees" everything was put together, the car was ready. The first brute-force passwords came to mind, naturally for peaceful purposes. So, what we have:
- CPU Intel Core 2 Duo with a frequency of 1.86GHz;
- 4Gb RAM in Dual-Channel mode;
- ATI RADEON HD4890, 1024Mb GDDR5 GPU, 975 MHz.
Ubuntu version 14.04 was chosen as the system, which was the source of the problems. For full hardware acceleration, a pre-installed driver is needed, downloaded from the AMD site, which refused to be installed. Googling an error message, several reasons were found: the kernel and x versions were too new for the Legacy version of the driver. I had to download ( from here ) an older version of Ubuntu 12.04 with version xorg 1.11.3 and kernel 3.2. Further tutorials were found here: http://www.blackmoreops.com/2013/11/22/install-pyrit-in-kali-linux/ .
Go!
What do we need?
- The propietary video card driver, which can be found on the official AMD website. In my case, this is legacy-amd-driver-catalyst-13.1, downloaded here: http://support.amd.com/ru-ru/download/desktop/legacy?product=Legacy2&os=Linux%20x86_64 .
- AMD APP SDK - tools for compiling the second pyrit module. Download here: http://developer.amd.com/tools-and-sdks/opencl-zone/amd-accelerated-parallel-processing-app-sdk/ .
- CAL ++ is another compilation library. http://sourceforge.net/projects/calpp/ .
- Patch for APP SDK - https://github.com/clockfort/amd-app-sdk-fixes .
- The pyrit sources, which are best taken from SVN.
The most convenient way is to download this wealth into a separate folder and work there from the console. Let's start with the driver:
$ unzip amd-driver-installer-catalyst-13.1-legacy-linux-x86.x86_64.zip $ chmod +x amd-driver-installer-catalyst-13.1-legacy-linux-x86.x86_64.run $ sudo ./amd-driver-installer-catalyst-13.1-legacy-linux-x86.x86_64.run This will launch the graphical version of the installer, which now should not be a problem. After installation, reboot and check if everything works:
$ sudo reboot # $ lsmod | grep fglrx fglrx 3273643 124 # , $ fglrxinfo display: :0.0 screen: 0 OpenGL vendor string: Advanced Micro Devices, Inc. OpenGL renderer string: ATI Radeon HD 4800 Series OpenGL version string: 3.3.11672 Compatibility Profile Context # :) $ fgl_glxgears Using GLX_SGIX_pbuffer 7919 frames in 5.0 seconds = 1583.800 FPS 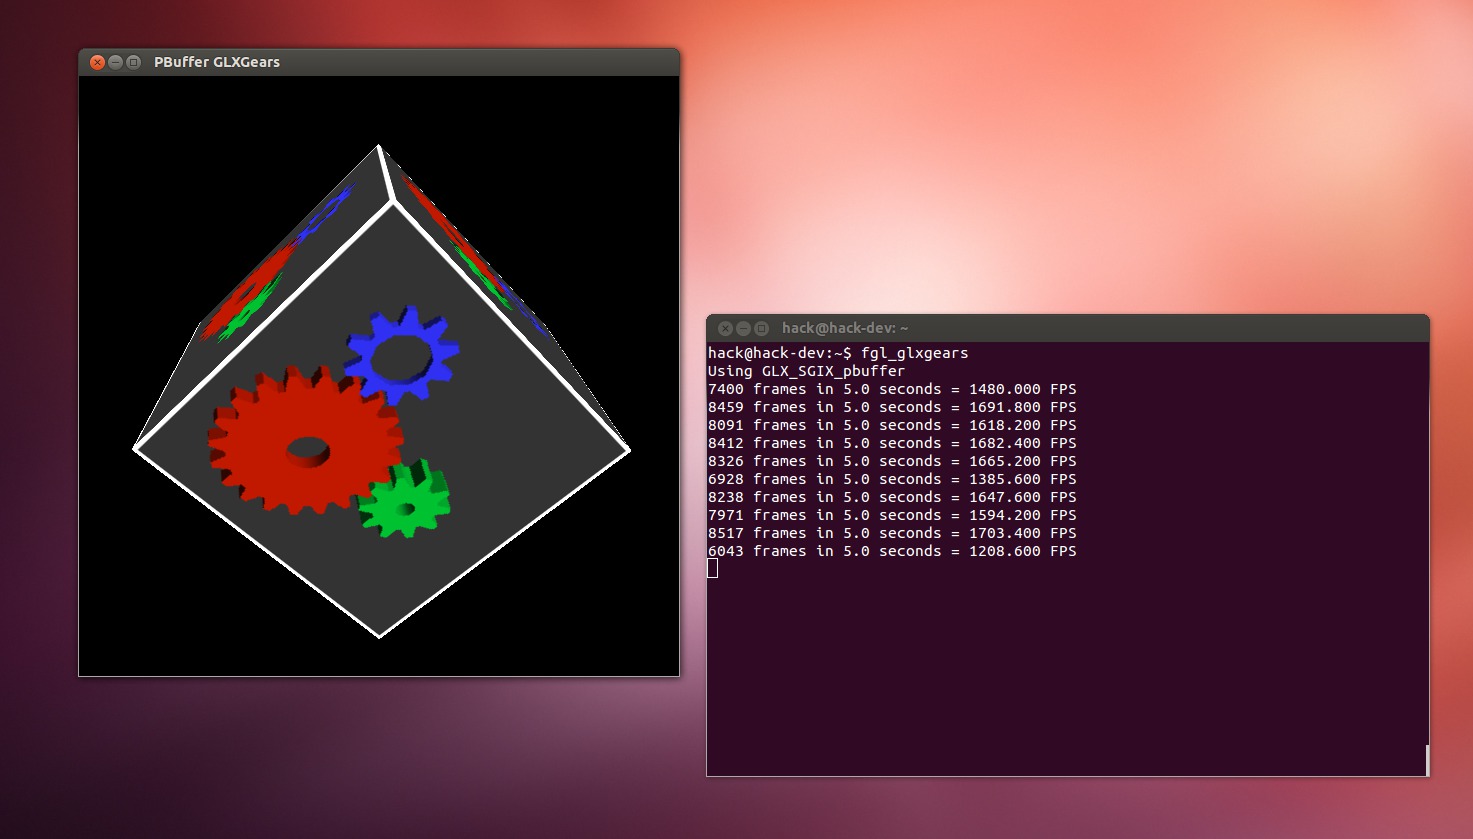
A rotating cube window will appear, FPS should not be low. If everything is OK, press CTRL-C - the driver installation is successful. Next, install the AMD APP SDK:
$ tar -xvf AMD-APP-SDK-linux-v2.9-1.599.381-GA-x64.tar.bz2 $ chmod +x AMD-APP-SDK-v2.9-1.599.381-GA-linux64.sh $ sudo ./AMD-APP-SDK-v2.9-1.599.381-GA-linux64.sh # , /opt $ sudo gedit /root/.bashrc At the end of the opened file, add the following:
# AMD APPSDK export AMDAPPSDKROOT=/opt/AMDAPPSDK-2.9-1 export AMDAPPSDKSAMPLESROOT=/opt/AMDAPPSDK-2.9-1 export LD_LIBRARY_PATH=${AMDAPPSDKROOT}/lib/x86_64:${LD_LIBRARY_PATH} export ATISTREAMSDKROOT=$AMDAPPSDKROOT And then apply the changes:
$ source /root/.bashrc These variables will help the compiler find the right folders. Now we need to add some missing components of the APP SDK:
$ sudo apt-get update $ sudo apt-get install subversion # , $ sudo passwd root $ su root # $ svn checkout https://github.com/clockfort/amd-app-sdk-fixes/trunk/include/CAL $AMDAPPSDKROOT/include/CAL Putting CAL ++:
$ apt-get install cmake libboost-all-dev $ tar -xvf calpp-0.90.tar.gz $ cd calpp-0.90/ $ gedit CMakeLists.txt In this file you need to change
# : FIND_PATH( LIB_ATICAL_INCLUDE NAMES cal.h calcl.h PATHS "$ENV{ATISTREAMSDKROOT}/include" ) # : FIND_PATH( LIB_ATICAL_INCLUDE NAMES cal.h calcl.h PATHS "$ENV{ATISTREAMSDKROOT}/include/CAL" ) And compile the library:
$ cmake . $ make $ make install If there are no errors, go ahead, otherwise you need to check all the paths to the files in CMakeLists.txt, especially those containing versions. Finally, the last step is to build pyrit:
$ cd .. # , pyrit $ sudo apt-get install libpcap-dev libssl-dev zlib1g-dev $ sudo svn checkout http://pyrit.googlecode.com/svn/trunk/ pyrit_svn # $ cd pyrit_svn/pyrit $ sudo ./setup.py build install # calpp cd ../cpyrit_calpp/ sudo gedit setup.py # : # VERSION = '0.4.0-dev' VERSION = '0.4.1-dev' # CALPP_INC_DIRS.append(os.path.join(CALPP_INC_DIR, 'include')) CALPP_INC_DIRS.append(os.path.join(CALPP_INC_DIR, 'include/CAL')) # $ sudo ./setup.py build install Hooray! Now we’ll check if our GPU sees pyrit:
$ pyrit list_cores Pyrit 0.4.1-dev (C) 2008-2011 Lukas Lueg http://pyrit.googlecode.com This code is distributed under the GNU General Public License v3+ The following cores seem available... #1: 'CAL++ Device #1 'ATI RV770'' #2: 'CPU-Core (SSE2)' $ pyrit selftest Pyrit 0.4.1-dev (C) 2008-2011 Lukas Lueg http://pyrit.googlecode.com This code is distributed under the GNU General Public License v3+ Cores incorporated in the test: #1: 'CAL++ Device #1 'ATI RV770'' #2: 'CPU-Core (SSE2)' All results verified. Your installation seems OK And benchmark:
$ pyrit benchmark Pyrit 0.4.1-dev (C) 2008-2011 Lukas Lueg http://pyrit.googlecode.com This code is distributed under the GNU General Public License v3+ Running benchmark (26285.9 PMKs/s)... / Computed 26285.86 PMKs/s total. #1: 'CAL++ Device #1 'ATI RV770'': 26369.6 PMKs/s (RTT 1.2) #2: 'CPU-Core (SSE2)': 525.0 PMKs/s (RTT 3.0) Well that's all. Now you can leave the car for the night, and go to sleep yourself, warming its warmth.
Conclusion
I hope someone will find the material of this article useful, and in another house the heart of an old forgotten video card will come to life. In the following parts I will try to tell you about merging several video adapters for collaboration, and also about merging several machines into a cluster. Successes to all!
PS Grateful to fellow Dimones for the equipment provided.
Source: https://habr.com/ru/post/237779/
All Articles