Web components in the implementation of Polymer from Google

Web components are a new era of web development and you can feel its power today with the help of Polymer from Google. You can create your own “elements” (tags) containing a template and encapsulated styles and logic (js), as well as take advantage of a rich collection of ready-made elements.
What is Polymer?
Polymer is a library (they call it, a set of polyfiles and syntactic sugar) to create and use a web component. And web components are a certain set of W3C standards, which in the future
If you think that html5 has changed the web, then wait and see what the Web components will do. © someone's.
Get the idea of a web component on webcomponents.org . You can dig into other components at component.kitchen .
Well, there is still a high probability that the Polymer's vision of the future will become a reality, and in the future you will simply disable the Polymer polyfiles (
platform.js ) and everything will continue to work natively (UPD: made a clarification. Thanks to nazarpc ) . We understand that companies like Google and Mozilla (they are developing a similar x-tag) can change the future of the web.Infrastructure
In order to back up theory with practice, we need infrastructure. The easiest way to create it is a yeoman and a Polymer generator for it (and of course Bower is needed). Below are the necessary commands (already installed with you - skip).
')
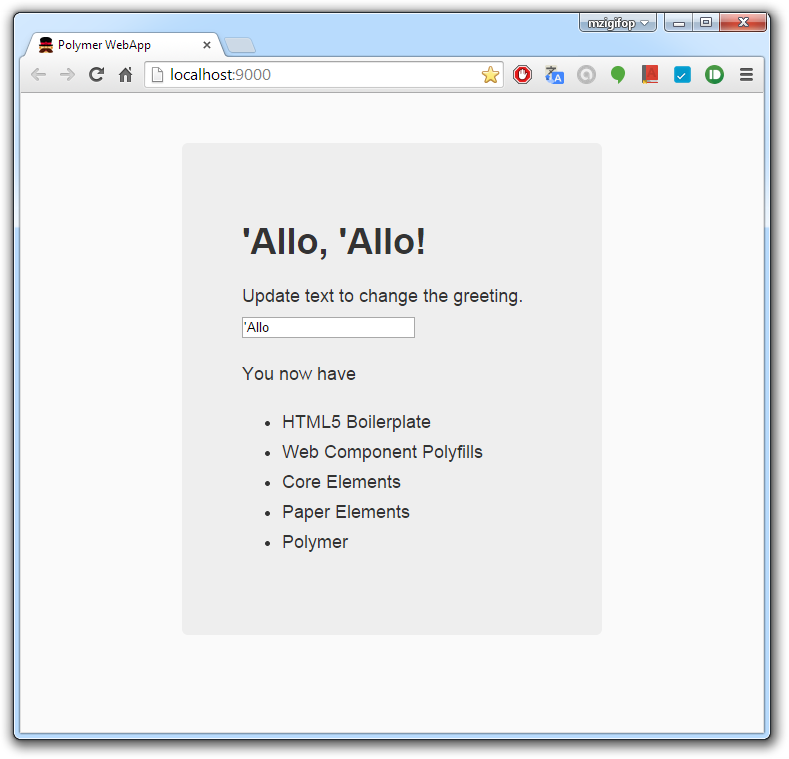
npm install -g bower npm install -g yo npm install -g generator-polymer mkdir my-project cd my-project yo polymer As a result, we get the initial skeleton of the application with a pair of its own elements, as well as a folder with the entire collection of ready-made elements. In order to see how it looks in the work, you need to start the server.
grunt serve After launch, the browser will open and you will see the following image:
So, when the infrastructure is established, let's proceed to the study:
Use of ready-made components and elements.
Polymer contains two main collections of items :
- Core-elements is a set of elements that includes visual elements (sockets, buttons, inputs, etc.) and non-visual elements (ajax, localstorage, etc.).
- Paper-elements is a collection of elements that implements a new material design , recently widely used by Google.
To use elements in
index.html must be connected (we already have everything connected) platform.js : <script src="bower_components/platform/platform.js"></script> You also need to import using the
<link> tag the elements we need before using them: <link rel="import" href="bower_components/[]/[].html"> Then just insert the necessary tags into your code and that's it:
<core-scaffold> <core-header-panel mode="seamed" navigation flex> <core-toolbar></core-toolbar> <core-menu valueattr="label"> <core-item icon="settings" label="Item1"></core-item> <core-item icon="settings" label="Item2"></core-item> </core-menu> </core-header-panel> <google-map></google-map> </core-scaffold> There are ready-made components for the Google APIs, for example
<google-map></google-map> . This makes it easy to embed Google services in our application. See the list of components on googlewebcomponents.imtqy.com .Quickly add ready-made components to the page, correct styles and js code, see how it all looks possible with the help of the Design tool . With it, you can then save the resulting code as a Github Gist.
Here is a short video about the work in this "editor".
Creating items
This is perhaps the most important feature of the web component and Polymer (at least for me). This is similar to the Angular directive, only with normal html with styles and logic. Moreover, all this is isolated and works in its own crowd, and no one from the outside will break anything.
It looks like this: (I'll create a
<habrauser-card> element. I'll start with an empty habrauser-card.html in the app/elements folder): <link rel="import" href="../bower_components/polymer/polymer.html"> <polymer-element name="habrauser-card" attributes="habrauser usercolor"> <template> <style> :host { display: block; padding: 10px; color: {{usercolor}}; } polyfill-next-selector { content: ':host h3'; } :host ::content h3 { margin: 0; text-decoration: underline; } </style> <content select="h3"></content> <li>I am habrauser <b>{{habrauser}}</b></li> <li><content></content></li> </template> <script> Polymer('habrauser-card', { habrauser: 'DefaultValue', usercolor: 'green' }); </script> </polymer-element> Let's look at:
First we connect
polymer.html or any other component, inside of which there is already a link on polymer.html .Then, in the
<polymer-element> , we define our element <habrauser-card> (Important! The name must necessarily be with a '-' sign) . In the attributes property we list the external (which will be used when calling) properties. I would call it a web component interface. They can still be set via js and the publish: property, but the method of setting via the argument is preferable.Next comes the html template (what’s enclosed in the
<template> tags).You can write styles right here in the
<style> , or you can load an external file (just like in the usual html). Moreover, Polymer will delay the "registration" of the element until the style sheet is fully loaded. :host is the selector of our <habrauser-card> element, i.e. root.In the
<content> substitute what is enclosed in our <habrauser-card> when called. The contents of the <habrauser-card> can even be disassembled by 'internal' tags, and output in the right places. This is done using the select argument of the <content> .Well, in the end, the
<script> , in which js is natural, can also be loaded as a file. Polymer([tag-name,] [prototype]) is a convenient wrapper for binding properties and methods to an element.And of course data-biding. Just insert the "double mustache"
{{param}} in the text, in the attributes, in the styles, everywhere and everything works. If the variable changes, it will change everywhere and immediately. Moreover, if this is an external variable (interface), then the changed value can be transferred "to the top".That's all the components described and now you can use it in
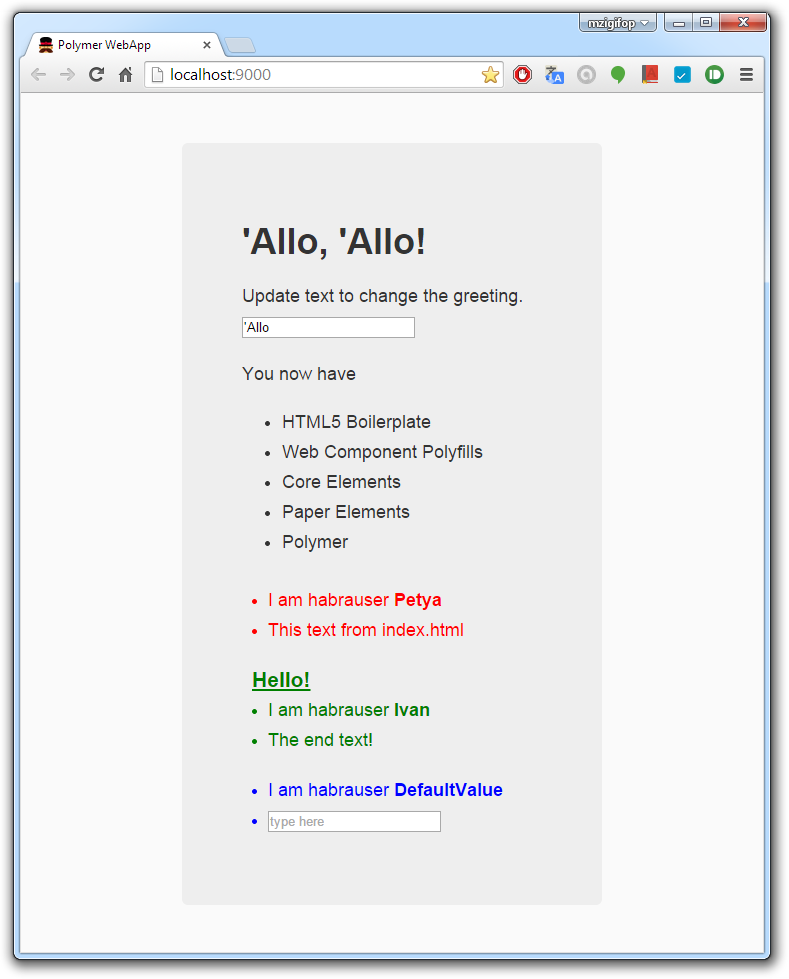
index.html : <!-- --> <link rel="import" href="elements/habrauser-card.html"> ... <div class="hero-unit"> ... <!-- --> <habrauser-card habrauser='Petya' usercolor='red'>This text from index.html</habrauser-card> <habrauser-card habrauser='Ivan'><h3>Hello!</h3> The end text!</habrauser-card> <habrauser-card usercolor='blue'><input placeholder="type here"></habrauser-card> </div> After saving in the browser, you will see this picture:
Let's try to expand the functionality of our component a bit: by clicking on our name, we will call the function:
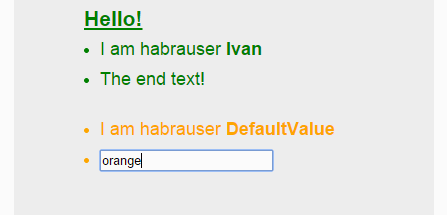
... <li>I am habrauser <b on-click="{{resetColor}}">{{habrauser}}</b></li> ... Polymer('habrauser-card', { habrauser: 'DefaultValue', usercolor: 'green', resetColor: function() { this.usercolor = 'green'; } ... and in
index.html will also slightly correct it by wrapping our calls in the <template> tag (for the work of date-binding in our index.html ). <template is="auto-binding"> <habrauser-card habrauser="Petya" usercolor="red">This text from index.html</habrauser-card> <habrauser-card habrauser="Ivan"><h3>Hello!</h3> The end text!</habrauser-card> <habrauser-card usercolor="{{newcolor}}"><input placeholder="type here" value="{{newcolor}}"></habrauser-card> </template> The result will be:
Well, the last example is an array and
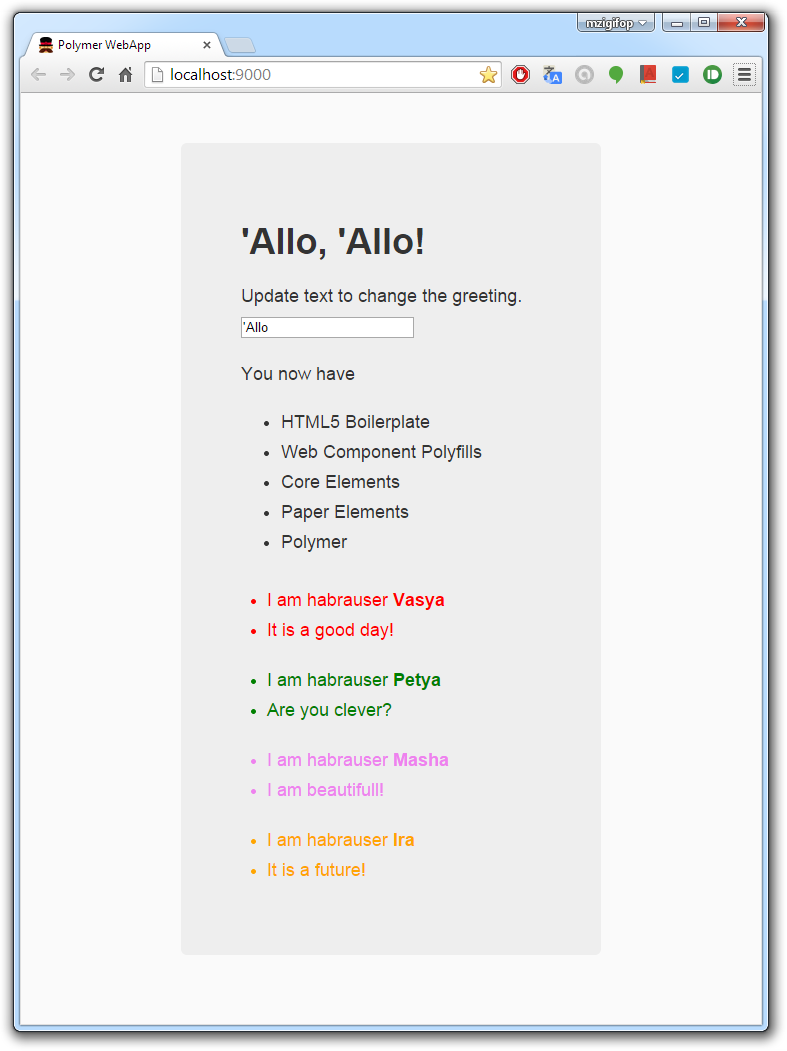
repeat it. Replace in index.html : <div class="hero-unit"> <yo-greeting></yo-greeting> <p>You now have</p> <yo-list></yo-list> <template id="my-tpl" is="auto-binding" repeat="{{habrausers}}"> <habrauser-card habrauser="{{name}}" usercolor="{{color}}">{{text}}</habrauser-card> </template> </div> <script> document.querySelector('#my-tpl').habrausers = [ {name: 'Vasya', color: 'red', text: 'It is a good day!'}, {name: 'Petya', color: 'green', text: 'Are you clever?'}, {name: 'Masha', color: 'violet', text: 'I am beautifull!'}, {name: 'Ira', color: 'orange', text: 'It is a future!'} ]; </script> The result will be
And finally, I highly recommend watching videos from Google I / O 2014 - One and Two
Well, the most important link of this post , which, if interested, will have to contact more than once.
Source: https://habr.com/ru/post/237421/
All Articles