Backing up user data
Not so long ago, as part of EMC product line testing, I happened to work with their EMC Avamar Virtual Edition solution. This experience I want to share with you in this publication.
After talking with colleagues from different companies, I concluded that many people neglect to back up the workstations of the company's employees, limited to only copying production applications.
On the one hand, this is understandable - even for “combat” services, there are still not many established practices that “went to the masses”. Therefore, ensuring good RTO and RPO performance for critical services is one of the major headaches for IT departments of both large and medium-sized companies. Taking the time to do such trifles as backing up user machines is an unaffordable luxury.
')
However, in practice this means that a workstation breakdown leads either to transfer of hard disks from an old device to a new one (with subsequent difficulties in inventory and accounting), or to complete loss of user data.
Of course, it has long been considered good practice to store important data on NAS servers and / or corporate file sharing sites. In this case, all important information is saved, however, temporary / non-critical data is lost. Plus, after replacing the iron, the user will have to re-personalize his workplace, which does not add to his good mood.
Perhaps, on a business scale, this is not something important, but in practice it leads to operational delays, increases downtime in the event of a breakdown, and trivially increases the tension between the IT department and internal customers. And the last - this is an important factor, to which many IT managers undeservedly do not pay attention.
This problem can be solved in several ways:
1. Leave everything as it is;
2. Virtualize the workplace of employees;
3. Implement services for backup jobs.
Of course, the 2nd scenario gives the maximum benefits that have already been painted and proven in various sources. However, it is quite an expensive solution to implement. And the transition from the “classical” organization of the workplace to the virtualized one is associated with a large number of difficulties, both technical and operational.
On the other hand, centralized backup tools are simpler to implement, do not require a radical restructuring of the infrastructure and are often more budgetary.
Recently, EMC has undergone significant structural changes, which resulted in, inter alia, the creation (read "union") of a new DPAD department - Data Protection and Availability Division. As the name implies, this department includes solutions for organizing data protection and availability. So far, we are interested in protection solutions.
So, at the moment EMC DPAD can offer us 3 data backup solutions: Data Domain, NetWorker, Avamar. In this article, I will focus on the description of the EMC Avamar solution. However, a few words for each product should be said.
Software for centralized backup and data recovery. It has a wide functionality for automation, centralized management and monitoring. And in general, optimized to work with large and complex infrastructures.
Hardware solution for storing backups, works on CIFS, NFS, Boost, VTL (Virtual Tape Library). Without its own backup tools, Data Domain requires separate backup software, such as NetWorker. Boost technology is now gaining popularity — an advanced interface for transporting deduplicated data and managing Data Domain systems.
Software and hardware solution designed to create and store backup copies of workstations and medium / low load services and applications.
Avamar works according to the classical server-client scheme. Client applications are installed on the protected machines, which collect, deduplicate (exclude duplicate data) and transfer data.
Therefore, copying is always incremental - i.e. first, the system makes a complete copy of the data, and then only the changing blocks. This can significantly reduce the load on the channel and the cost of storage capacity. In order not to get confused in incremental backups, Avamar maintains synthetic full backups.
And the key principle of Avamar’s work is precisely its deduplication algorithm.
If in a nutshell, this technology allows you to exclude unnecessary data transfer not only from a specific computer, but also from all sources, backup copies of which have already been made.
This algorithm has two sides of the coin:
1. This allows you to significantly save on the width of the data transmission channel and allows you to backup even from sources at a remote site (for example: branch office workstations).
2. But deduplication at the source takes about 5-10% of the processor performance and the amount of RAM. For a server, this can be quite a critical figure, but it will be unnoticeable for workstations.
When integrating with EMC Data Domain, the server stores only metadata on its local storage, and the data itself is already compressed after deduplication as it is placed on the Data Domain. Such a scheme works on the boost technology used in DD.
The recovery procedure is as follows:
In general, we need a new / repaired device with an installed OS and an Avamar client. Exceptions are devices with Windows OS: its file system with a boot partition can be included in the backup, which will allow you to deploy the backup to bare metal, using the baremetal utility.
Since Avamar is a combination of software and hardware products, each solution is formed from a set of different nodes - a node. A node is a host with an Avamar (management node) or disk storage (one hundred storage nodes) deployed on it.
There is an Avamar Grid, it happens in the form of a single node configuration (in this case, it is one Storage Node), and in a configuration like RAIN (redundant array of independent nodes)
In addition, EMC offers its customers a virtual execution model - AVE (Avamar Virtual Edition). To do this, you need to have a hypervisor on which the Virtual Machine with the Avamar server will be deployed. The datastore of the virtual cluster or external storage will be used as a backup storage location.
Virtual Avamar is available in several versions - at 0.5TB; 1TB; 2TB; 4TB usable volume. It is governed by a licensed company.
In addition, EMC guarantees seamless integration of AVE with VMware as the recommended hypervisor and EMC Data Domain as the recommended storage.
I happened to work with both the Avamar Grid and the Avamar Virtual Edition.
And since EMC has a trial demo version of Avamar Virtual Edition, I will tell you how to install it.
The concept of centralized management includes integration into hierarchical “domains” (not to be confused with Windows AD). In essence, this is just a tree-like folder structure that includes a list of clients, their copying policies, users, and delegated rights.
Thus, you can combine protected devices into different groups with your copying policies and restrict access to them by different users.
To manage the backup process, the backup administrator must install the administrator console.
Users can only view and restore only their data.
To do this, use the web-interface that is opened via the client installed on the device.
Avamar allows you to copy virtual machines running on the VMware vSphere ESXi hypervisor. For this, there is no need to install clients on each VM. It is enough to deploy a virtual machine in a cluster that will act as a client for the entire hypervisor. It is called Avamar proxy, and uses VADP technology (vStorage APIs for Data Protection) for backup. To integrate Avamar with ESXi, vCenter is required.
For those who want to copy only VMware virtual machines, you can purchase VDP-A - vSphere Data Protection Advanced. This product is also based on VADP technology. In fact, VDP-A is Avamar Virtual Edition, “trimmed” and honed under VMware. It costs less than EMC AVE, since it only has functionality for backing up virtual machines and some Microsoft applications.
When integrating Avamar with DD, DD is used only for storing the backup copies themselves, all the metadata and caches remain on the Avamar server. The data will be transmitted via the Boost protocol.
The main advantages of the EMC Avamar backup and recovery product are:
1. Universality - support for most commercial operating systems, databases and services.
2. Flexibility - various configurations, including a virtual version for VMware vSphere.
3. Easy to use - convenient client interface and integration with VMware vSphere.
4. Profitability - tangible savings in data channel bandwidth requirements due to the use of deduplication at the client.
Thus, having a staff of 50 people, we can simply implement the backup of their devices.
In most cases, with a virtualized infrastructure, there will be enough Avamar VE (virtual appliance) and storage space for copies.
This will allow for centralized automatic backup without any special technical difficulties and costs for qualified employees.
And the procedure for restoring lost user data will be reduced to replacing workstations of the same type and pressing a few buttons in the administrative console.
History of the problem
After talking with colleagues from different companies, I concluded that many people neglect to back up the workstations of the company's employees, limited to only copying production applications.
On the one hand, this is understandable - even for “combat” services, there are still not many established practices that “went to the masses”. Therefore, ensuring good RTO and RPO performance for critical services is one of the major headaches for IT departments of both large and medium-sized companies. Taking the time to do such trifles as backing up user machines is an unaffordable luxury.
')
However, in practice this means that a workstation breakdown leads either to transfer of hard disks from an old device to a new one (with subsequent difficulties in inventory and accounting), or to complete loss of user data.
Of course, it has long been considered good practice to store important data on NAS servers and / or corporate file sharing sites. In this case, all important information is saved, however, temporary / non-critical data is lost. Plus, after replacing the iron, the user will have to re-personalize his workplace, which does not add to his good mood.
Perhaps, on a business scale, this is not something important, but in practice it leads to operational delays, increases downtime in the event of a breakdown, and trivially increases the tension between the IT department and internal customers. And the last - this is an important factor, to which many IT managers undeservedly do not pay attention.
Solutions
This problem can be solved in several ways:
1. Leave everything as it is;
2. Virtualize the workplace of employees;
3. Implement services for backup jobs.
Of course, the 2nd scenario gives the maximum benefits that have already been painted and proven in various sources. However, it is quite an expensive solution to implement. And the transition from the “classical” organization of the workplace to the virtualized one is associated with a large number of difficulties, both technical and operational.
On the other hand, centralized backup tools are simpler to implement, do not require a radical restructuring of the infrastructure and are often more budgetary.
What can EMC offer us?
Recently, EMC has undergone significant structural changes, which resulted in, inter alia, the creation (read "union") of a new DPAD department - Data Protection and Availability Division. As the name implies, this department includes solutions for organizing data protection and availability. So far, we are interested in protection solutions.
So, at the moment EMC DPAD can offer us 3 data backup solutions: Data Domain, NetWorker, Avamar. In this article, I will focus on the description of the EMC Avamar solution. However, a few words for each product should be said.
Networker
Software for centralized backup and data recovery. It has a wide functionality for automation, centralized management and monitoring. And in general, optimized to work with large and complex infrastructures.
Data Domain
Hardware solution for storing backups, works on CIFS, NFS, Boost, VTL (Virtual Tape Library). Without its own backup tools, Data Domain requires separate backup software, such as NetWorker. Boost technology is now gaining popularity — an advanced interface for transporting deduplicated data and managing Data Domain systems.
Avamar
Software and hardware solution designed to create and store backup copies of workstations and medium / low load services and applications.
How it works?
Avamar works according to the classical server-client scheme. Client applications are installed on the protected machines, which collect, deduplicate (exclude duplicate data) and transfer data.
Therefore, copying is always incremental - i.e. first, the system makes a complete copy of the data, and then only the changing blocks. This can significantly reduce the load on the channel and the cost of storage capacity. In order not to get confused in incremental backups, Avamar maintains synthetic full backups.
And the key principle of Avamar’s work is precisely its deduplication algorithm.
If in a nutshell, this technology allows you to exclude unnecessary data transfer not only from a specific computer, but also from all sources, backup copies of which have already been made.
Below, the deduplication algorithm used by Avamar is described in more detail.
In Avamar, deduplication occurs on the client, so to speak “at the source” of the data.
For example, let's analyze the task of backing up a completely new file that has never been backed up by anyone:
1) The task came to backup;
2) Avamar'a client starts the process avtar.exe, which is engaged in the further deduplication process, and first all the processing will take place at the file level;
3) Using the SHA-1 algorithm, the 160-bit hash value of the file metadata is calculated;
4) Avtar searches for the resulting hash in its database of “file hashes” - F_cache.dat. It is located on the client, for example, in C: \ Program Files \ avs \ var, and during the backup F_cache.dat is completely unloaded into RAM;
5) Since our file is new, its hash will not be found in F_cache.dat on the client, and then the search will be performed on the Avamar server side in the same F_cache.dat, but the hashes base from all previous backups, all workstations;
6) But even there the hash value is not found. Then the avtar process goes to the block level and we are already talking about the backup of data blocks;
7) Data is divided into segments of various lengths from 1B to 64KB, on average, 25KB each;
8) After that, the segments are compressed by 30 - 50%, while if the segment is not compressed by more than 25%, its further processing takes place without compression;
9) Calculate 160-bit hashes for each compressed / incompressible segment;
10) hashes are combined into composites of 8 000 - 30 000 hashes;
11) further computed hashes of composites hashes;
12) hashes of composites hashes are again combined into composites;
13) and the big root hash is calculated - this is the hash of the composite hash of the hash composites
14) The resulting avtar root-hash value searches in its database for already “block hashes” - P_cache.dat.
15) If the root hash is not found on the client, the search will be on the server side of Avamar;
16) If the root-hash is not found and on the Avamar server, then the search already takes place on the hash of the hash composites, again first on the client, then on the server;
17) And so on until at least some sort of hash is found;
18) Only after all unique data blocks have been found, whose hashes have not been recorded anywhere, data transfer from the workstation to the avamara server will start;
19) On the server, the avamara just-zabekaplennaya bunch "data block - hash" recorded under its unique index;
20) A backup map is created - these are links to files and blocks;
21) And all this is done in a PostgreSQL database;
22) The number of the backup task is recorded, according to which it is further determined from which client the backup was made, the time for storing the backup, the index tree, the backup card, etc. etc.
This algorithm has two sides of the coin:
1. This allows you to significantly save on the width of the data transmission channel and allows you to backup even from sources at a remote site (for example: branch office workstations).
2. But deduplication at the source takes about 5-10% of the processor performance and the amount of RAM. For a server, this can be quite a critical figure, but it will be unnoticeable for workstations.
When integrating with EMC Data Domain, the server stores only metadata on its local storage, and the data itself is already compressed after deduplication as it is placed on the Data Domain. Such a scheme works on the boost technology used in DD.
The recovery procedure is as follows:
In general, we need a new / repaired device with an installed OS and an Avamar client. Exceptions are devices with Windows OS: its file system with a boot partition can be included in the backup, which will allow you to deploy the backup to bare metal, using the baremetal utility.
Architecture
Since Avamar is a combination of software and hardware products, each solution is formed from a set of different nodes - a node. A node is a host with an Avamar (management node) or disk storage (one hundred storage nodes) deployed on it.
There is an Avamar Grid, it happens in the form of a single node configuration (in this case, it is one Storage Node), and in a configuration like RAIN (redundant array of independent nodes)
In more detail about types of nodes
- Utility Node - Manages all necessary services
- Storage Node - Stores data, there are three types - M600, M1200, and M2400, differing in performance and capacity
- Spare Node - Backup node in case of failure of the stack node, is activated and entered into the work manually
- NDMP Node - Noda for Avamara operation via NDMP protocol
- Media Access node - Node for connecting tape devices
In addition, EMC offers its customers a virtual execution model - AVE (Avamar Virtual Edition). To do this, you need to have a hypervisor on which the Virtual Machine with the Avamar server will be deployed. The datastore of the virtual cluster or external storage will be used as a backup storage location.
Virtual Avamar is available in several versions - at 0.5TB; 1TB; 2TB; 4TB usable volume. It is governed by a licensed company.
In addition, EMC guarantees seamless integration of AVE with VMware as the recommended hypervisor and EMC Data Domain as the recommended storage.
I happened to work with both the Avamar Grid and the Avamar Virtual Edition.
And since EMC has a trial demo version of Avamar Virtual Edition, I will tell you how to install it.
Avamar Virtual Appliance Installation Process
Avamar Virtual Appliance Installation Process
With a raised VMware cluster, installation is fairly straightforward:
1. Deploy the image downloaded from the EMC .ovf partner resource and .vmdk virtual machine disk with installation packages inside.
2. Depending on the version of AVE, create the required number of virtual disks and connect them to the VM with AVE. In our case, this is 3 disks of 250 GB each.
3. After deploying and running the VM, we get a “bare” SUSE Linux Enterprise, but with all the necessary repositories inside. Connection to it is through the virtual console vSphere, and control through the console. Using the /usr/local/avamar/bin/ave-part.pl script, prepare the OS for installing Avamar on it.
4. Configure network interfaces. The easiest way to do this is with the dpnnetutil utility, it already exists as part of a virtual machine , but it can also be done using YaST2 . After you finish configuring the network interfaces, the VM needs to be rebooted.
5. Deploy the AVE installation wizard with the command ./usr/local/avamar/src/avinstaller-bootstrap-version.sles11_64.x86_64.run . Then run it. The installation wizard has a convenient web-interface: Avamar_Server_IP : 8543 / avi / avigui.html.

The installation and configuration of Avamar will take a long time and will require user input:
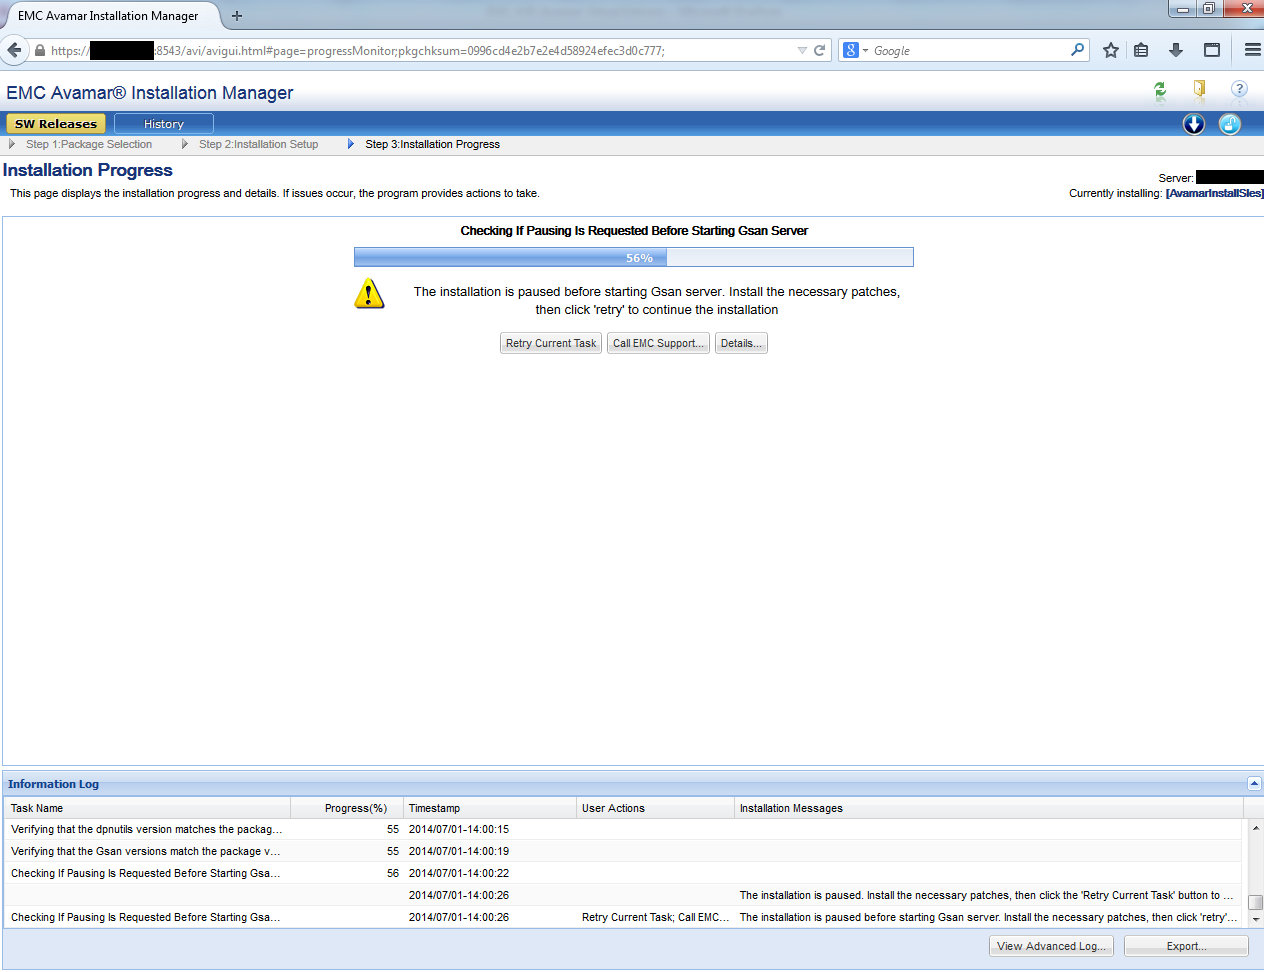
8. After the installation is completed in the web interface, we execute the final script in the console.
./usr/local/avamar/bin/ave-post.sh
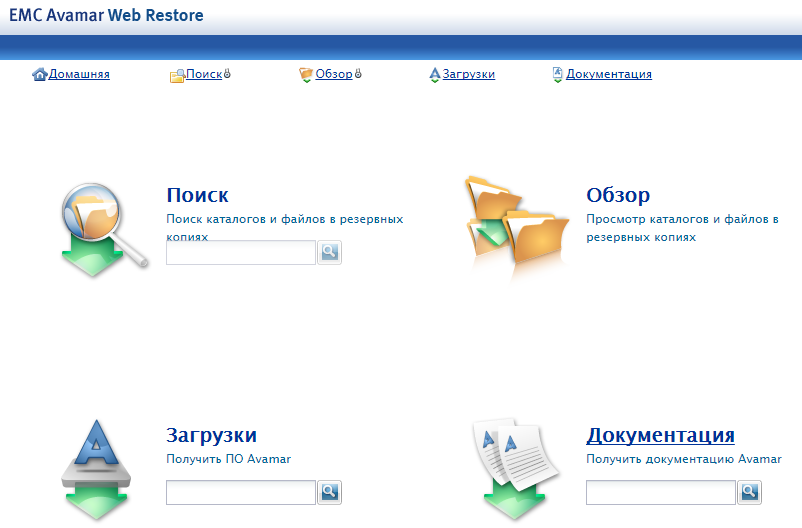
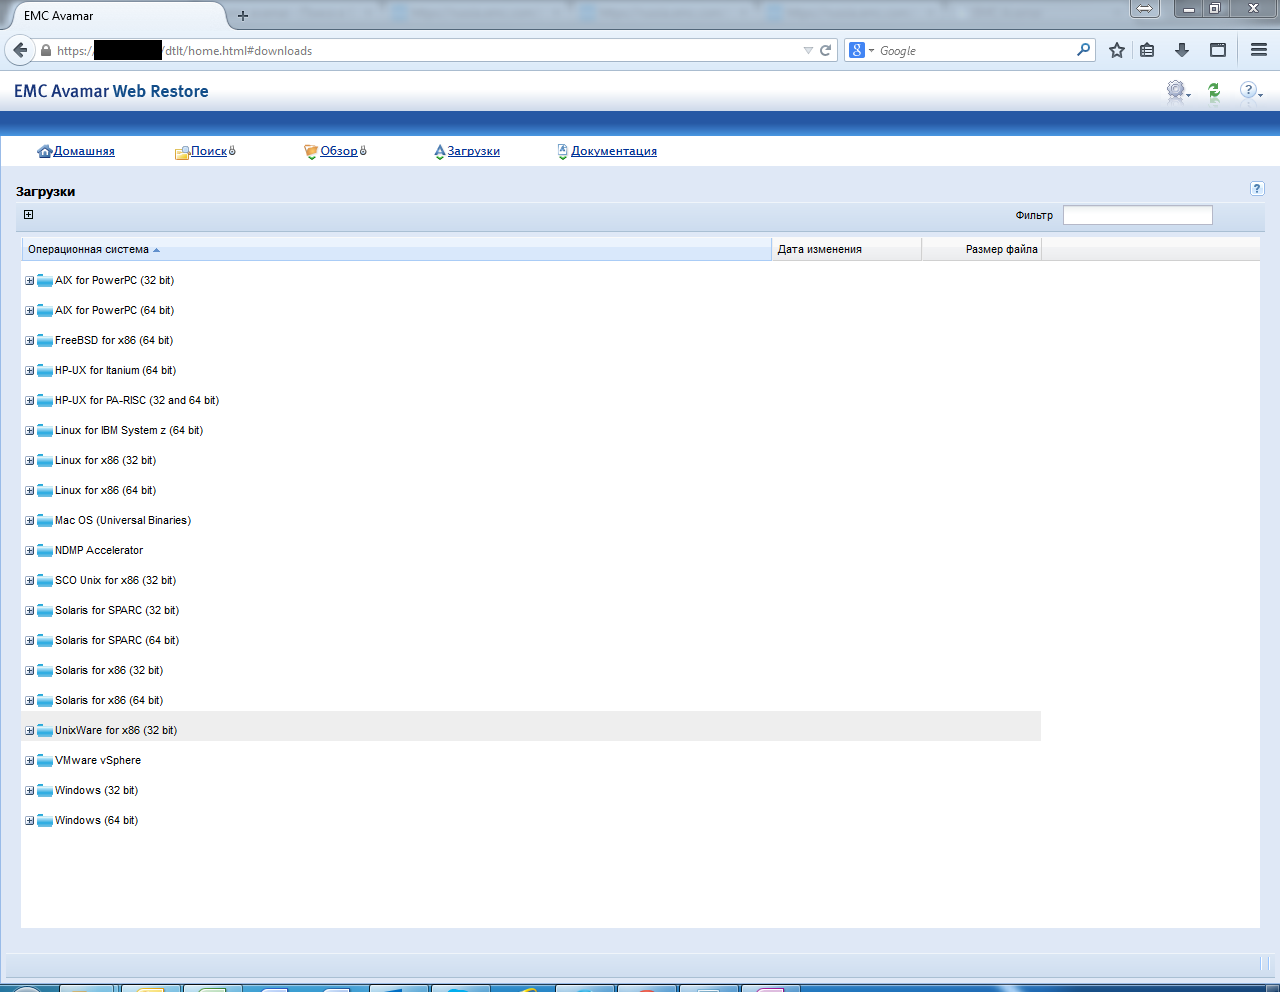
9. At the end of the server installation, we need to download and install the control console. To do this, simply open in the browser the IP address of the server (which you install in step 4). Using the web-based interface, you can download the client for various operating systems as well as baremetal utility for Windows OS. In the same place and all necessary documentation on everything that Avamar is able.
1. Deploy the image downloaded from the EMC .ovf partner resource and .vmdk virtual machine disk with installation packages inside.
2. Depending on the version of AVE, create the required number of virtual disks and connect them to the VM with AVE. In our case, this is 3 disks of 250 GB each.
3. After deploying and running the VM, we get a “bare” SUSE Linux Enterprise, but with all the necessary repositories inside. Connection to it is through the virtual console vSphere, and control through the console. Using the /usr/local/avamar/bin/ave-part.pl script, prepare the OS for installing Avamar on it.
4. Configure network interfaces. The easiest way to do this is with the dpnnetutil utility, it already exists as part of a virtual machine , but it can also be done using YaST2 . After you finish configuring the network interfaces, the VM needs to be rebooted.
5. Deploy the AVE installation wizard with the command ./usr/local/avamar/src/avinstaller-bootstrap-version.sles11_64.x86_64.run . Then run it. The installation wizard has a convenient web-interface: Avamar_Server_IP : 8543 / avi / avigui.html.
The installation and configuration of Avamar will take a long time and will require user input:
8. After the installation is completed in the web interface, we execute the final script in the console.
./usr/local/avamar/bin/ave-post.sh
9. At the end of the server installation, we need to download and install the control console. To do this, simply open in the browser the IP address of the server (which you install in step 4). Using the web-based interface, you can download the client for various operating systems as well as baremetal utility for Windows OS. In the same place and all necessary documentation on everything that Avamar is able.
Control
Control
This is what the admin console of the installed Avamar looks like:

The administrator is offered several scenarios for activating (adding) clients. In any of them, you initially need to install the client on the protected machine.
After this, the following scenarios are possible:
1. The user can himself through the client send an activation request:

2. The administrator can activate clients "by the piece", sending them the activation command by specifying its IP address.
3. An administrator can activate a client pool by specifying a pool of IP addresses.
In the first scenario, the client will be automatically added to the root domain, and the default policy will be applied to it. In the second and third scenarios, the administrator can define in advance the domain and policy for the clients being added.
Adding customers
The administrator is offered several scenarios for activating (adding) clients. In any of them, you initially need to install the client on the protected machine.
After this, the following scenarios are possible:
1. The user can himself through the client send an activation request:
2. The administrator can activate clients "by the piece", sending them the activation command by specifying its IP address.
3. An administrator can activate a client pool by specifying a pool of IP addresses.
In the first scenario, the client will be automatically added to the root domain, and the default policy will be applied to it. In the second and third scenarios, the administrator can define in advance the domain and policy for the clients being added.
Domains
The concept of centralized management includes integration into hierarchical “domains” (not to be confused with Windows AD). In essence, this is just a tree-like folder structure that includes a list of clients, their copying policies, users, and delegated rights.
Thus, you can combine protected devices into different groups with your copying policies and restrict access to them by different users.
Politicians
Copy policies define all backup properties:
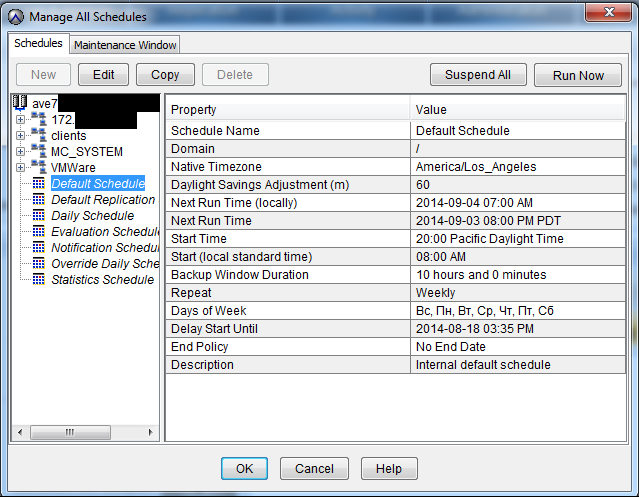

The maintenance window includes the creation of Checkpoints, Checkpoints, garbage collection.
A little about Checkpoints is server backup itself. If the host \ virtual machine crashes on these Checkpoints, then it will be possible to restore the managing server without losing the data, saved clients, users, domains and policies.
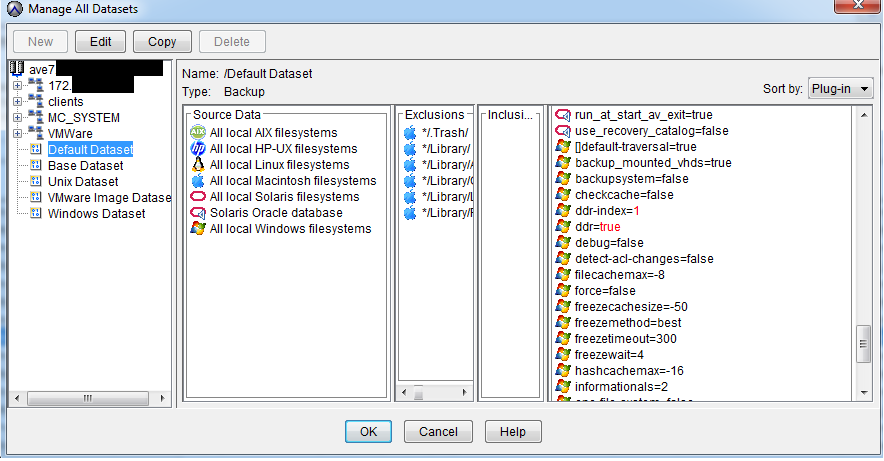

You can schedule systematic backups at any time of any day, select storage, etc. There is support for most operating systems, which allows you to select specific directories to copy. This allows you to protect only the necessary data, reducing the cost of storing unwanted copies.
In addition, when creating a policy, you can specify the expiration date of the copy. After this period, the copy will be considered "expired" and removed from storage.
schedule
Maintenance window
The maintenance window includes the creation of Checkpoints, Checkpoints, garbage collection.
A little about Checkpoints is server backup itself. If the host \ virtual machine crashes on these Checkpoints, then it will be possible to restore the managing server without losing the data, saved clients, users, domains and policies.
Copy objects
Copy retention time
You can schedule systematic backups at any time of any day, select storage, etc. There is support for most operating systems, which allows you to select specific directories to copy. This allows you to protect only the necessary data, reducing the cost of storing unwanted copies.
In addition, when creating a policy, you can specify the expiration date of the copy. After this period, the copy will be considered "expired" and removed from storage.
Example:
You have a root user with access to the root domain, i.e. to all customers.
Then you divide all users by department - sales, marketing, warehouse, logistics, etc.
For each domain (department), you can assign a user to control copy policies. And you can direct the copying of all departments personally.
At the same time, users have different levels of access: viewing status, only copying, only restoring, full access. Those. the head of the department may have the right to run an unplanned backup, and the rest of the staff only to restore from existing copies.
To manage the backup process, the backup administrator must install the administrator console.
Users can only view and restore only their data.
To do this, use the web-interface that is opened via the client installed on the device.
VMware Integration
Avamar allows you to copy virtual machines running on the VMware vSphere ESXi hypervisor. For this, there is no need to install clients on each VM. It is enough to deploy a virtual machine in a cluster that will act as a client for the entire hypervisor. It is called Avamar proxy, and uses VADP technology (vStorage APIs for Data Protection) for backup. To integrate Avamar with ESXi, vCenter is required.
Installation process
The Avamar proxy distribution is accessible via the web interface and is a .ova file.
After deploying .ova and booting the system, the script for setting up the virtual machine network interfaces immediately starts
Then you need on VM with Avamar server in the file /usr/local/avamar/var/mc/server_data/prefs/mcserver.xml write TRUE in the line: entry key = "allow_duplicate_client_names" value = "true"
For those who want to copy only VMware virtual machines, you can purchase VDP-A - vSphere Data Protection Advanced. This product is also based on VADP technology. In fact, VDP-A is Avamar Virtual Edition, “trimmed” and honed under VMware. It costs less than EMC AVE, since it only has functionality for backing up virtual machines and some Microsoft applications.
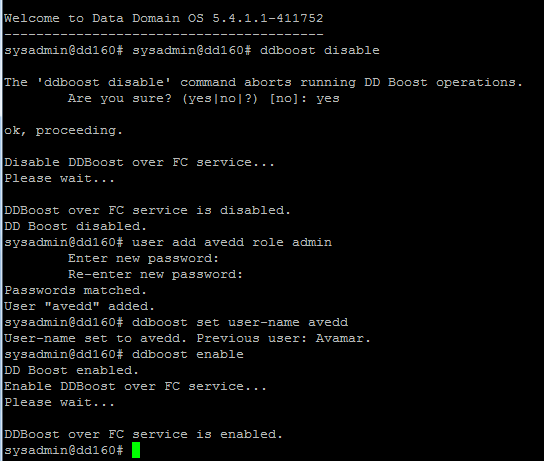
Integration with Data Domain on the example of Data Domain 160
When integrating Avamar with DD, DD is used only for storing the backup copies themselves, all the metadata and caches remain on the Avamar server. The data will be transmitted via the Boost protocol.
Integration
First you need to create a username for Avamar in the DD:
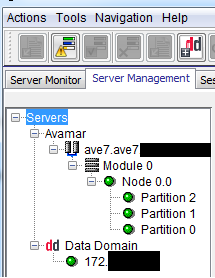
Next in the Avamar Administrator, in the Server tab, select Server Management and click on the button Actions> Add Data Domain System.
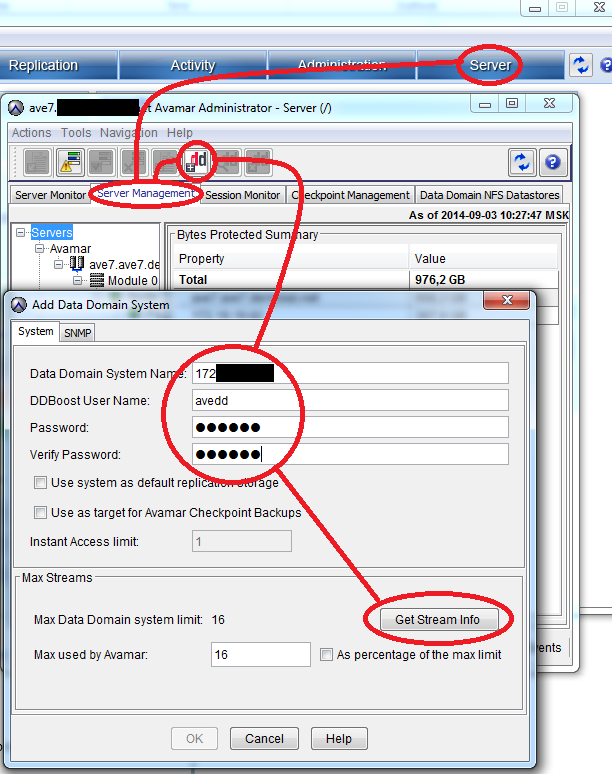
Fill in all the proposed fields, to check the number of supported streams, click Get Stream Info .
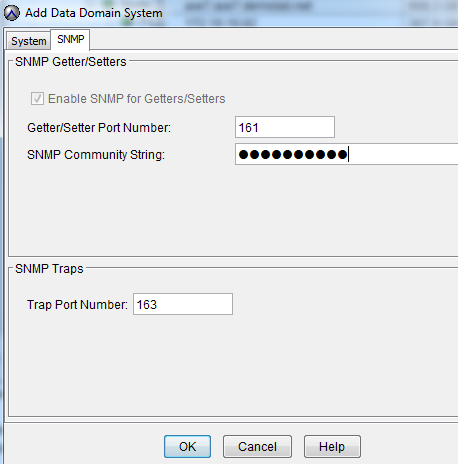
Go to the same window in the SNMP tab. Under this protocol, the Avamar server will receive DD status information.
As a result, we see an added system:
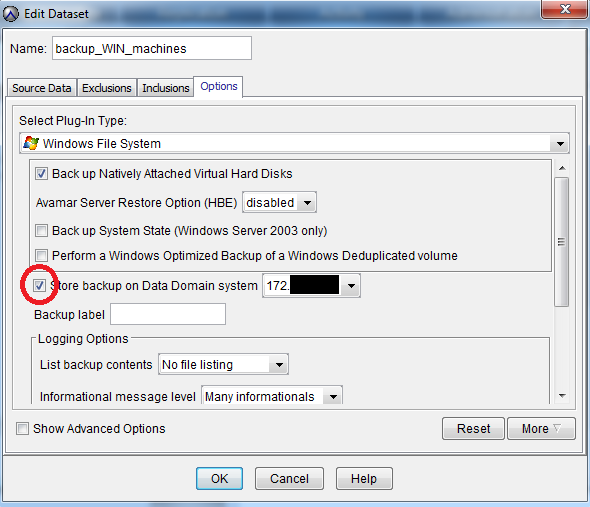
Next, you need not to forget in the settings DataSet put a tick "store backups on DD"
Next in the Avamar Administrator, in the Server tab, select Server Management and click on the button Actions> Add Data Domain System.
Fill in all the proposed fields, to check the number of supported streams, click Get Stream Info .
Go to the same window in the SNMP tab. Under this protocol, the Avamar server will receive DD status information.
As a result, we see an added system:
Next, you need not to forget in the settings DataSet put a tick "store backups on DD"
Summarizing
The main advantages of the EMC Avamar backup and recovery product are:
1. Universality - support for most commercial operating systems, databases and services.
2. Flexibility - various configurations, including a virtual version for VMware vSphere.
3. Easy to use - convenient client interface and integration with VMware vSphere.
4. Profitability - tangible savings in data channel bandwidth requirements due to the use of deduplication at the client.
Thus, having a staff of 50 people, we can simply implement the backup of their devices.
In most cases, with a virtualized infrastructure, there will be enough Avamar VE (virtual appliance) and storage space for copies.
This will allow for centralized automatic backup without any special technical difficulties and costs for qualified employees.
And the procedure for restoring lost user data will be reduced to replacing workstations of the same type and pressing a few buttons in the administrative console.
Source: https://habr.com/ru/post/237175/
All Articles