A simple and convenient way to add social networks in Android application on the example of Vkontakte and Odnoklassniki
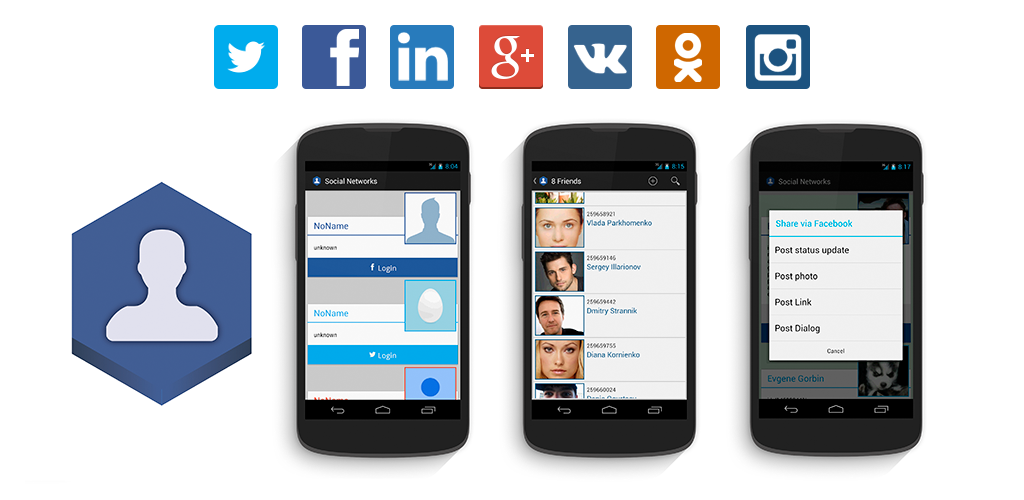
During the development of applications on Android, the question of the integration of social networks into an application often arises. Login through a social network, tell friends, view a list of friends - are found in almost every application.
To do this, you can use the modules of the library ASNE .
')
Using the library module, you connect the SDK or API of the selected social network and the interface for the most frequently used requests to it , thereby saving time and simplifying the addition of another social network. Thanks to the use of the SDK, the user can log in or share the record through an already installed social network application. And to add a social network as a module, if it is not in the developed ones, is not difficult - this is easy to do by analogy with any other module.
In this publication, I will show how you can easily add support for VK and Odnoklassniki in an Android application using the appropriate ASNE modules . The article describes a simplified example that includes adding a login, writing with a link to a user’s wall and displaying a list of friends.
To add a social network to the application, you will need a key to make requests. Therefore, the first step is to register the application - the links you will see a brief guide to creating an application for:
To continue, you will need the following keys that are used in the social networking SDK.
After creating a new project, save the keys in values / strings.xml :
strings.xml ( code )
Then we will add uses-permission to work with the Internet and the activity needed by Odnoklassniki to interact with the application in the manifest.
AndroidManifest.xml ( code )
Now we will add dependencies for ASNE modules , for example, in Android Studio for this you need:
Open Project Structure => select the application module and open Dependencies => Add new library dependency

Then at the request of asne, you will see all the modules available in the library and add to the asne-vk, asne-odnoklassniki dependency:
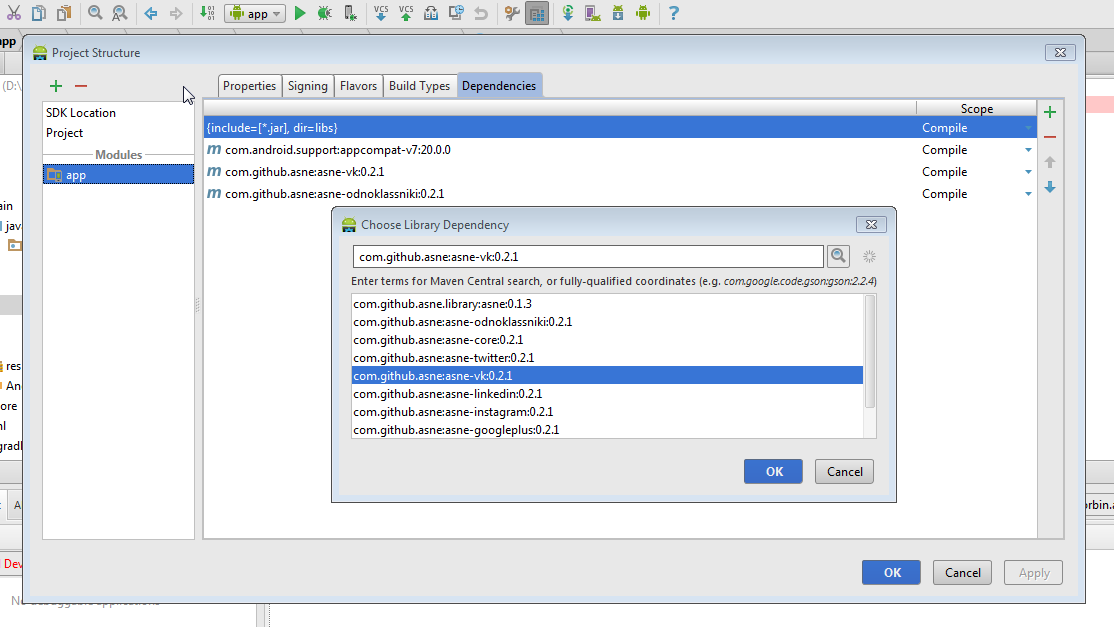
Or manually add dependencies to build.gradle .
build.gradle ( code )
A little decorate our application:
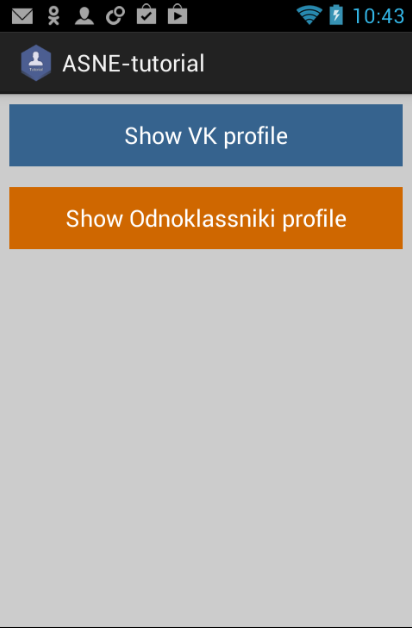
In the main fragment we place 2 buttons responsible for login to social networks.
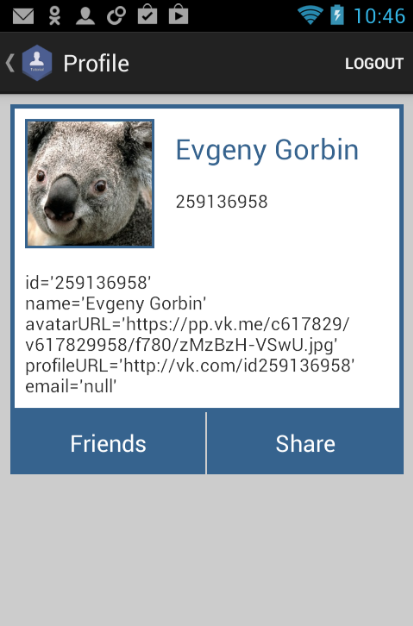
Let us set the appearance of the user profile in the form of a card with an image, a name, a social profile id and basic profile information.
And save the colors of social networks:
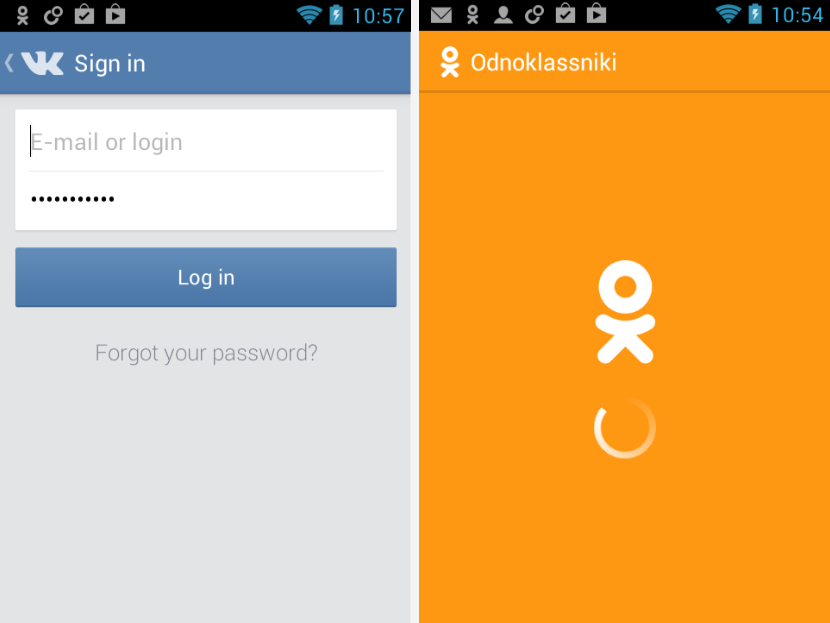
To process the response after the login request, override the onActivityResult method in MainActivity.java .
MainActivity.java ( code )
When processing a login request, the social network sends onActivityResult, we check it and send it to the SocialNetworkManager , which will transfer it to the appropriate SocialNetwork .
Now we integrate the social network into MainFragment.java - it's simple:
All source code onCreateView and onSocialNetworkManagerInitialized from MainFragment c initiating social networks.
To begin with, we will request a login in a social network, for this you only need an id
OnClickListener loginClick code with checking the status of the connection to the social network, and if the user has already logged in through the social network, open ProfileFragment.java
MainFragment.java ( code )
After the application is processed by the social network application, we get onLoginSuccess (int networkId) or onError (int networkId, String requestID, String errorMessage, Object data) - we will display the corresponding message.
MainFragment.java ( code )
Open ProfileFragment.java using the method:
MainFragment.java ( code )
In ProfileFragment.java, we get the social network identifier from MainFragment.java
ProfileFragment.java code )
Now, using the networkId, we will select the social network and query the current user profile data as follows:
do not forget to add OnRequestSocialPersonCompleteListener
After processing the request, we can use the received SocialPerson object to fill in the user profile in the application, or display an error on failure
ProfileFragment.java ( code )
To exit the social network, you must use the logout ()
And, frankly, that's all - added VK and Odnoklassniki to the app. As it turned out, this is quite simple and fast. Similarly, you can add other social networks such as Facebook, Twitter, Linkedin, Instagram or Google Plus just by adding the appropriate dependency and adding them to SocialNetworkManager.
Of course, you can use the methods described above to work with them.
But let's analyze some more requests - share the link and display a list of friends
Let's share a link via social network:
To begin, configure the button
To send a link to the user's wall, we need to send it to the Bundle.
And of course process the answers.
So in OnClickListener shareClick, we will show the user a simple dialog in which we ask if he wants to share the link, and if so, send it
ProfileFragment.java ()
And on the user's wall successfully appeared link with a preview and description
Now we will display a list of the user's friends:
Get SocialNetwork from social network ID and ask for friends list
We process the answer

You can learn more in FriendsFragment.java
Using the modules of the ASNE library, you can easily and quickly add any popular social network to the application. Of course, the library contains more methods that may be useful in your application. You can also use any SDK or API method using a token or an SDK object.
If this application seemed simple to you, you can see the implementation of all library methods in the library demo.
Project Code:
- GitHub repository ;
- Direct link to zip archive .
You can also study a similar article on connecting Facebook, Twitter and LinkedIn on codeproject.com .
At the moment, the library is stable and is in a state of adding social networks. I will be glad to your advice or assistance in the development.
Plans for the development of the library:
To do this, you can use the modules of the library ASNE .
')
Using the library module, you connect the SDK or API of the selected social network and the interface for the most frequently used requests to it , thereby saving time and simplifying the addition of another social network. Thanks to the use of the SDK, the user can log in or share the record through an already installed social network application. And to add a social network as a module, if it is not in the developed ones, is not difficult - this is easy to do by analogy with any other module.
In this publication, I will show how you can easily add support for VK and Odnoklassniki in an Android application using the appropriate ASNE modules . The article describes a simplified example that includes adding a login, writing with a link to a user’s wall and displaying a list of friends.
Registration of the application in a social network
To add a social network to the application, you will need a key to make requests. Therefore, the first step is to register the application - the links you will see a brief guide to creating an application for:
To continue, you will need the following keys that are used in the social networking SDK.
- VK App ID
- OK App ID
- OK Public Key
- OK Secret Key
Integration of Vkontakte and Odnoklassniki in the application
After creating a new project, save the keys in values / strings.xml :
strings.xml ( code )
<?xml version="1.0" encoding="utf-8"?> <resources> <string name="app_name">ASNE-tutorial</string> <string name="vk_app_id">4542602</string> <string name="ok_app_id">1096125440</string> <string name="ok_public_key">CBANIGFCEBABABABA</string> <string name="ok_secret_key">FF5161844C04525B64FA41A7</string> </resources> Then we will add uses-permission to work with the Internet and the activity needed by Odnoklassniki to interact with the application in the manifest.
AndroidManifest.xml ( code )
<?xml version="1.0" encoding="utf-8"?> <manifest xmlns:android="http://schemas.android.com/apk/res/android" package="com.github.gorbin.asnetutorial" > <uses-permission android:name="android.permission.INTERNET" /> <uses-permission android:name="android.permission.ACCESS_NETWORK_STATE"/> <application android:allowBackup="true" android:icon="@drawable/ic_launcher" android:label="@string/app_name" android:theme="@style/AppTheme" > <activity android:name=".MainActivity" android:label="@string/app_name" > <intent-filter> <action android:name="android.intent.action.MAIN" /> <category android:name="android.intent.category.LAUNCHER" /> </intent-filter> </activity> <activity android:name="ru.ok.android.sdk.OkAuthActivity" android:launchMode="singleTask" android:configChanges="orientation"> <intent-filter> <action android:name="android.intent.action.VIEW" /> <category android:name="android.intent.category.DEFAULT" /> <category android:name="android.intent.category.BROWSABLE" /> <data android:host="ok1096125440" android:scheme="okauth" /> </intent-filter> </activity> </application> </manifest> Now we will add dependencies for ASNE modules , for example, in Android Studio for this you need:
Open Project Structure => select the application module and open Dependencies => Add new library dependency
Then at the request of asne, you will see all the modules available in the library and add to the asne-vk, asne-odnoklassniki dependency:
Or manually add dependencies to build.gradle .
build.gradle ( code )
apply plugin: 'com.android.application' android { compileSdkVersion 19 buildToolsVersion '20.0.0' defaultConfig { applicationId "com.github.gorbin.asnetutorial" minSdkVersion 10 targetSdkVersion 19 versionCode 1 versionName "1.0" } buildTypes { release { runProguard false proguardFiles getDefaultProguardFile('proguard-android.txt'), 'proguard-rules.pro' } } } dependencies { compile fileTree(include: ['*.jar'], dir: 'libs') compile 'com.android.support:appcompat-v7:20.0.0' compile 'com.github.asne:asne-vk:0.3.1' compile 'com.github.asne:asne-odnoklassniki:0.3.1' } A little decorate our application:
In the main fragment we place 2 buttons responsible for login to social networks.
main_fragment.xml
main_fragment.xml ( code )
<?xml version="1.0" encoding="utf-8"?> <LinearLayout xmlns:android="http://schemas.android.com/apk/res/android" android:orientation="vertical" android:layout_width="match_parent" android:layout_height="match_parent" android:background="#FFCCCCCC"> <Button android:layout_width="fill_parent" android:layout_height="wrap_content" android:text="Login via VK" android:id="@+id/vk" android:layout_gravity="center_horizontal" android:background="@color/vk" android:layout_margin="8dp" android:textColor="#ffffffff" /> <Button android:layout_width="fill_parent" android:layout_height="wrap_content" android:text="Login via Odnoklassniki" android:id="@+id/ok" android:layout_gravity="center_horizontal" android:background="@color/ok" android:layout_margin="8dp" android:textColor="#ffffffff"/> </LinearLayout> Let us set the appearance of the user profile in the form of a card with an image, a name, a social profile id and basic profile information.
profile_fragment.xml
profile_fragment.xml ( code )
<?xml version="1.0" encoding="utf-8"?> <ScrollView xmlns:android="http://schemas.android.com/apk/res/android" android:layout_width="fill_parent" android:layout_height="fill_parent" android:background="@color/grey_light"> <RelativeLayout android:layout_width="wrap_content" android:layout_height="wrap_content" android:layout_alignParentTop="true" android:layout_alignParentLeft="true" android:layout_alignParentStart="true" android:layout_margin="8dp" android:id="@+id/frame" android:background="@color/dark"> <RelativeLayout android:layout_width="fill_parent" android:layout_height="wrap_content" android:layout_alignParentTop="true" android:layout_alignParentLeft="true" android:layout_alignParentStart="true" android:layout_margin="3dp" android:id="@+id/card" android:background="#FFFFFF"> <ImageView android:layout_width="100dp" android:layout_height="100dp" android:id="@+id/imageView" android:layout_margin="8dp" android:padding="2dp" android:background="@color/grey_light" android:layout_alignParentTop="true" android:layout_alignParentLeft="true" android:layout_alignParentStart="true" android:src="@drawable/user" android:adjustViewBounds="true" android:cropToPadding="true" android:scaleType="centerCrop"/> <TextView android:layout_width="wrap_content" android:layout_height="wrap_content" android:textAppearance="?android:attr/textAppearanceLarge" android:text="NoName" android:maxLines="3" android:singleLine="false" android:id="@+id/name" android:padding="8dp" android:layout_alignTop="@+id/imageView" android:layout_toRightOf="@+id/imageView" android:layout_toEndOf="@+id/imageView" android:layout_alignParentRight="true" android:layout_alignParentEnd="true" /> <TextView android:layout_width="wrap_content" android:layout_height="wrap_content" android:text="null" android:maxLines="3" android:singleLine="false" android:id="@+id/id" android:padding="8dp" android:layout_below="@+id/name" android:layout_alignLeft="@+id/name" android:layout_alignStart="@+id/name" /> <TextView android:layout_width="wrap_content" android:layout_height="wrap_content" android:text="" android:id="@+id/info" android:padding="8dp" android:layout_marginBottom="4dp" android:layout_below="@+id/imageView" android:layout_alignParentLeft="true" android:layout_alignParentStart="true" /> </RelativeLayout> <LinearLayout android:layout_width="match_parent" android:layout_height="wrap_content" android:id="@+id/buttonLayout" android:layout_below="@+id/card" android:layout_alignParentLeft="true" android:layout_alignParentRight="true" android:gravity="center" android:background="@color/grey_light"> <Button android:layout_width="match_parent" android:layout_height="match_parent" android:text="Friends" android:id="@+id/friends" android:padding="8dp" android:background="@color/dark" android:layout_marginRight="1dp" android:layout_weight="1" android:textColor="#ffffffff"/> <Button android:layout_width="match_parent" android:layout_height="match_parent" android:text="Share" android:id="@+id/share" android:padding="8dp" android:background="@color/dark" android:layout_weight="1" android:textColor="#ffffffff"/> </LinearLayout> </RelativeLayout> </ScrollView> And save the colors of social networks:
color.xml
color.xml ( code )
<?xml version="1.0" encoding="utf-8"?> <resources> <color name="grey_light">#FFCCCCCC</color> <color name="dark">#4b4b4b</color> <color name="vk">#36638e</color> <color name="ok">#cf6700</color> </resources> To process the response after the login request, override the onActivityResult method in MainActivity.java .
MainActivity.java ( code )
public static final String SOCIAL_NETWORK_TAG = "SocialIntegrationMain.SOCIAL_NETWORK_TAG"; @Override protected void onActivityResult(int requestCode, int resultCode, Intent data) { super.onActivityResult(requestCode, resultCode, data); Fragment fragment = getSupportFragmentManager().findFragmentByTag(SOCIAL_NETWORK_TAG); if (fragment != null) { fragment.onActivityResult(requestCode, resultCode, data); } } When processing a login request, the social network sends onActivityResult, we check it and send it to the SocialNetworkManager , which will transfer it to the appropriate SocialNetwork .
Now we integrate the social network into MainFragment.java - it's simple:
- Take the keys of social networks from values.xml
String VK_KEY = getActivity().getString(R.string.vk_app_id); String OK_APP_ID = getActivity().getString(R.string.ok_app_id); String OK_PUBLIC_KEY = getActivity().getString(R.string.ok_public_key); String OK_SECRET_KEY = getActivity().getString(R.string.ok_secret_key); - Get SocialNetworkManager
mSocialNetworkManager = (SocialNetworkManager) getFragmentManager().findFragmentByTag(MAinActivity.SOCIAL_NETWORK_TAG); - Create SocialNetworks with the appropriate permissions:
String[] vkScope = new String[] { VKScope.FRIENDS, VKScope.WALL, VKScope.PHOTOS, VKScope.NOHTTPS, VKScope.STATUS, }; VkSocialNetwork vkNetwork = new VkSocialNetwork(this, VK_KEY, vkScope); String[] okScope = new String[] { OkScope.VALUABLE_ACCESS }; OkSocialNetwork okNetwork = new OkSocialNetwork(this, OK_APP_ID, OK_PUBLIC_KEY, OK_SECRET_KEY, okScope); - Check if SocialNetworkManager exists
- If it doesn't exist, set it and add SocialNetworks to it
mSocialNetworkManager = new SocialNetworkManager(); mSocialNetworkManager.addSocialNetwork(vkNetwork); mSocialNetworkManager.addSocialNetwork(okNetwork); //Initiate every network from mSocialNetworkManager getFragmentManager().beginTransaction().add(mSocialNetworkManager, MAinActivity.SOCIAL_NETWORK_TAG).commit(); mSocialNetworkManager.setOnInitializationCompleteListener(this); - If SocialNetworkManager exists (set in an activity or another fragment) - select all initialized social networks and set it to OnLoginCompleteListener
if(!mSocialNetworkManager.getInitializedSocialNetworks().isEmpty()) { List<SocialNetwork> socialNetworks = mSocialNetworkManager.getInitializedSocialNetworks(); for (SocialNetwork socialNetwork : socialNetworks) { socialNetwork.setOnLoginCompleteListener(this); }
- If it doesn't exist, set it and add SocialNetworks to it
- Now you need to process the response after the initiation of SocialNetworks
@Override public void onSocialNetworkManagerInitialized() { for (SocialNetwork socialNetwork : mSocialNetworkManager.getInitializedSocialNetworks()) { socialNetwork.setOnLoginCompleteListener(this); initSocialNetwork(socialNetwork); } }
All source code onCreateView and onSocialNetworkManagerInitialized from MainFragment c initiating social networks.
MainFragment.java
MainFragment.java ( code )
MainFragment.java ( code )
public class MainFragment extends Fragment implements SocialNetworkManager.OnInitializationCompleteListener, OnLoginCompleteListener { /** * SocialNetwork Ids in ASNE: * 1 - Twitter * 2 - LinkedIn * 3 - Google Plus * 4 - Facebook * 5 - Vkontakte * 6 - Odnoklassniki * 7 - Instagram */ public static SocialNetworkManager mSocialNetworkManager; private Button vk; private Button ok; public MainFragment() { } @Override public View onCreateView(LayoutInflater inflater, ViewGroup container, Bundle savedInstanceState) { View rootView = inflater.inflate(R.layout.main_fragment, container, false); ((MainActivity)getActivity()).getSupportActionBar().setTitle(R.string.app_name); // init buttons and set Listener vk = (Button) rootView.findViewById(R.id.vk); vk.setOnClickListener(loginClick); ok = (Button) rootView.findViewById(R.id.ok); ok.setOnClickListener(loginClick); //Get Keys for initiate SocialNetworks String VK_KEY = getActivity().getString(R.string.vk_app_id); String OK_APP_ID = getActivity().getString(R.string.ok_app_id); String OK_PUBLIC_KEY = getActivity().getString(R.string.ok_public_key); String OK_SECRET_KEY = getActivity().getString(R.string.ok_secret_key); //Chose permissions String[] okScope = new String[] { OkScope.VALUABLE_ACCESS }; String[] vkScope = new String[] { VKScope.FRIENDS, VKScope.WALL, VKScope.PHOTOS, VKScope.NOHTTPS, VKScope.STATUS, }; //Use manager to manage SocialNetworks mSocialNetworkManager = (SocialNetworkManager) getFragmentManager().findFragmentByTag(MainActivity.SOCIAL_NETWORK_TAG); //Check if manager exist if (mSocialNetworkManager == null) { mSocialNetworkManager = new SocialNetworkManager(); //Init and add to manager VkSocialNetwork VkSocialNetwork vkNetwork = new VkSocialNetwork(this, VK_KEY, vkScope); mSocialNetworkManager.addSocialNetwork(vkNetwork); //Init and add to manager OkSocialNetwork OkSocialNetwork okNetwork = new OkSocialNetwork(this, OK_APP_ID, OK_PUBLIC_KEY, OK_SECRET_KEY, okScope); mSocialNetworkManager.addSocialNetwork(okNetwork); //Initiate every network from mSocialNetworkManager getFragmentManager().beginTransaction().add(mSocialNetworkManager, MainActivity.SOCIAL_NETWORK_TAG).commit(); mSocialNetworkManager.setOnInitializationCompleteListener(this); } else { //if manager exist - get and setup login only for initialized SocialNetworks if(!mSocialNetworkManager.getInitializedSocialNetworks().isEmpty()) { List<SocialNetwork> socialNetworks = mSocialNetworkManager.getInitializedSocialNetworks(); for (SocialNetwork socialNetwork : socialNetworks) { socialNetwork.setOnLoginCompleteListener(this); initSocialNetwork(socialNetwork); } } } return rootView; } private void initSocialNetwork(SocialNetwork socialNetwork){ if(socialNetwork.isConnected()){ switch (socialNetwork.getID()){ case VkSocialNetwork.ID: vk.setText("Show VK profile"); break; case OkSocialNetwork.ID: ok.setText("Show Odnoklassniki profile"); break; } } } @Override public void onSocialNetworkManagerInitialized() { //when init SocialNetworks - get and setup login only for initialized SocialNetworks for (SocialNetwork socialNetwork : mSocialNetworkManager.getInitializedSocialNetworks()) { socialNetwork.setOnLoginCompleteListener(this); initSocialNetwork(socialNetwork); } } Social Networking Requests
To begin with, we will request a login in a social network, for this you only need an id
SocialNetwork socialNetwork = mSocialNetworkManager.getSocialNetwork(networkId); socialNetwork.requestLogin(); OnClickListener loginClick code with checking the status of the connection to the social network, and if the user has already logged in through the social network, open ProfileFragment.java
MainFragment.java ( code )
private View.OnClickListener loginClick = new View.OnClickListener() { @Override public void onClick(View view) { int networkId = 0; switch (view.getId()){ case R.id.vk: networkId = VkSocialNetwork.ID; break; case R.id.ok: networkId = OkSocialNetwork.ID; break; } SocialNetwork socialNetwork = mSocialNetworkManager.getSocialNetwork(networkId); if(!socialNetwork.isConnected()) { if(networkId != 0) { socialNetwork.requestLogin(); MainActivity.showProgress("Loading social person"); } else { Toast.makeText(getActivity(), "Wrong networkId", Toast.LENGTH_LONG).show(); } } else { startProfile(socialNetwork.getID()); } } }; After the application is processed by the social network application, we get onLoginSuccess (int networkId) or onError (int networkId, String requestID, String errorMessage, Object data) - we will display the corresponding message.
MainFragment.java ( code )
@Override public void onLoginSuccess(int networkId) { MainActivity.hideProgress(); Toast.makeText(getActivity(), "Login Success", Toast.LENGTH_LONG).show(); } @Override public void onError(int networkId, String requestID, String errorMessage, Object data) { MainActivity.hideProgress(); Toast.makeText(getActivity(), "ERROR: " + errorMessage, Toast.LENGTH_LONG).show(); } Open ProfileFragment.java using the method:
MainFragment.java ( code )
private void startProfile(int networkId){ ProfileFragment profile = ProfileFragment.newInstannce(networkId); getActivity().getSupportFragmentManager().beginTransaction() .addToBackStack("profile") .replace(R.id.container, profile) .commit(); } In ProfileFragment.java, we get the social network identifier from MainFragment.java
ProfileFragment.java code )
public static ProfileFragment newInstannce(int id) { ProfileFragment fragment = new ProfileFragment(); Bundle args = new Bundle(); args.putInt(NETWORK_ID, id); fragment.setArguments(args); return fragment; } @Override public View onCreateView(LayoutInflater inflater, ViewGroup container, Bundle savedInstanceState) { networkId = getArguments().containsKey(NETWORK_ID) ? getArguments().getInt(NETWORK_ID) : 0; } Now, using the networkId, we will select the social network and query the current user profile data as follows:
socialNetwork = MainFragment.mSocialNetworkManager.getSocialNetwork(networkId); socialNetwork.setOnRequestCurrentPersonCompleteListener(this); socialNetwork.requestCurrentPerson(); do not forget to add OnRequestSocialPersonCompleteListener
After processing the request, we can use the received SocialPerson object to fill in the user profile in the application, or display an error on failure
ProfileFragment.java ( code )
@Override public void onRequestSocialPersonSuccess(int networkId, SocialPerson socialPerson) { name.setText(socialPerson.name); id.setText(socialPerson.id); String socialPersonString = socialPerson.toString(); String infoString = socialPersonString.substring(socialPersonString.indexOf("{")+1, socialPersonString.lastIndexOf("}")); info.setText(infoString.replace(", ", "\n")); Picasso.with(getActivity()) .load(socialPerson.avatarURL) .into(photo); } @Override public void onError(int networkId, String requestID, String errorMessage, Object data) { Toast.makeText(getActivity(), "ERROR: " + errorMessage, Toast.LENGTH_LONG).show(); } To exit the social network, you must use the logout ()
socialNetwork.logout(); getActivity().getSupportFragmentManager().popBackStack(); And, frankly, that's all - added VK and Odnoklassniki to the app. As it turned out, this is quite simple and fast. Similarly, you can add other social networks such as Facebook, Twitter, Linkedin, Instagram or Google Plus just by adding the appropriate dependency and adding them to SocialNetworkManager.
FacebookSocialNetwork fbNetwork = new FacebookSocialNetwork(this, fbScope); mSocialNetworkManager.addSocialNetwork(fbNetwork); TwitterSocialNetwork twNetwork = new TwitterSocialNetwork(this, TWITTER_CONSUMER_KEY, TWITTER_CONSUMER_SECRET); mSocialNetworkManager.addSocialNetwork(twNetwork); LinkedInSocialNetwork liNetwork = new LinkedInSocialNetwork(this, LINKEDIN_CONSUMER_KEY, LINKEDIN_CONSUMER_SECRET, linkedInScope); mSocialNetworkManager.addSocialNetwork(liNetwork); GooglePlusSocialNetwork gpNetwork = new GooglePlusSocialNetwork(this); mSocialNetworkManager.addSocialNetwork(gpNetwork); InstagramSocialNetwork instagramNetwork = new InstagramSocialNetwork(this, INSTAGRAM_CLIENT_KEY, INSTAGRAM_CLIENT_SECRET, instagramScope); mSocialNetworkManager.addSocialNetwork(instagramNetwork); Of course, you can use the methods described above to work with them.
But let's analyze some more requests - share the link and display a list of friends
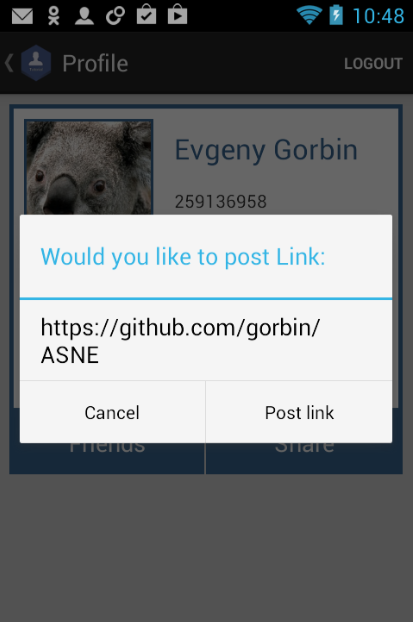
Let's share a link via social network:
To begin, configure the button
share = (Button) rootView.findViewById(R.id.share); share.setOnClickListener(shareClick); To send a link to the user's wall, we need to send it to the Bundle.
Bundle postParams = new Bundle(); postParams.putString(SocialNetwork.BUNDLE_LINK, link); socialNetwork.requestPostLink(postParams, message, postingComplete); And of course process the answers.
private OnPostingCompleteListener postingComplete = new OnPostingCompleteListener() { @Override public void onPostSuccessfully(int socialNetworkID) { Toast.makeText(getActivity(), "Sent", Toast.LENGTH_LONG).show(); } @Override public void onError(int socialNetworkID, String requestID, String errorMessage, Object data) { Toast.makeText(getActivity(), "Error while sending: " + errorMessage, Toast.LENGTH_LONG).show(); } }; So in OnClickListener shareClick, we will show the user a simple dialog in which we ask if he wants to share the link, and if so, send it
ProfileFragment.java ()
private View.OnClickListener shareClick = new View.OnClickListener() { @Override public void onClick(View view) { AlertDialog.Builder ad = alertDialogInit("Would you like to post Link:", link); ad.setPositiveButton("Post link", new DialogInterface.OnClickListener() { public void onClick(DialogInterface dialog, int id) { Bundle postParams = new Bundle(); postParams.putString(SocialNetwork.BUNDLE_LINK, link); socialNetwork.requestPostLink(postParams, message, postingComplete); } }); ad.setNegativeButton("Cancel", new DialogInterface.OnClickListener() { @Override public void onClick(DialogInterface dialog, int i) { dialog.cancel(); } }); ad.setOnCancelListener(new DialogInterface.OnCancelListener() { public void onCancel(DialogInterface dialog) { dialog.cancel(); } }); ad.create().show(); } }; And on the user's wall successfully appeared link with a preview and description
Now we will display a list of the user's friends:
Get SocialNetwork from social network ID and ask for friends list
SocialNetwork socialNetwork = MainFragment.mSocialNetworkManager.getSocialNetwork(networkId); socialNetwork.setOnRequestGetFriendsCompleteListener(this); socialNetwork.requestGetFriends(); We process the answer
@Override public void OnGetFriendsIdComplete(int id, String[] friendsID) { ((MainActivity)getActivity()).getSupportActionBar().setTitle(friendsID.length + " Friends"); } @Override public void OnGetFriendsComplete(int networkID, ArrayList<SocialPerson> socialPersons) { MainActivity.hideProgress(); FriendsListAdapter adapter = new FriendsListAdapter(getActivity(), socialPersons, networkID); listView.setAdapter(adapter); } @Override public void onError(int networkId, String requestID, String errorMessage, Object data) { MainActivity.hideProgress(); Toast.makeText(getActivity(), "ERROR: " + errorMessage, Toast.LENGTH_LONG).show(); } You can learn more in FriendsFragment.java
Total
Using the modules of the ASNE library, you can easily and quickly add any popular social network to the application. Of course, the library contains more methods that may be useful in your application. You can also use any SDK or API method using a token or an SDK object.
If this application seemed simple to you, you can see the implementation of all library methods in the library demo.
Project Code:
- GitHub repository ;
- Direct link to zip archive .
You can also study a similar article on connecting Facebook, Twitter and LinkedIn on codeproject.com .
At the moment, the library is stable and is in a state of adding social networks. I will be glad to your advice or assistance in the development.
Plans for the development of the library:
- Description of the addition of its module - in the wiki repository (in fact, everything is very simple);
- Adding Chinese social networks;
- Writing javdoca and tests.
Source: https://habr.com/ru/post/237095/
All Articles