Museum adventures with a telephone
Greetings dear readers. My name is Andrey, recently I work in the Central Museum of the Great Patriotic War. In addition to the creation of ordinary museum engaged in the development of more and virtual exhibitions. Therefore, in my review of the Nokia Lumia 1520, I will show how this phone can be used to create a small virtual tour using the 20-megapixel camera and the Three.JS JavaScript library.
But first, let's look at what fell into my hands for a few short days of testing. This is how the device looks from a pretty little blue box.

The two main features of the Lumia 1520 are the 20-megapixel camera and the Windows Phone 8 operating system. In addition, I would like to mention the battery, which I managed to discharge in just a few days of use by only 20-30%. From the strange - it was not possible to specify your Microsoft account, it was not even possible to create a new one, for some vague reason, like the lack of connection or server errors. Without this, the interest in WP8 quickly died out, because it was impossible to install any applications and check what this system was worth. However, the purpose of testing is somewhat different - to show how this phone can be used to create a virtual exhibition in real, sorry for the pun, setting. And in order to make it even more interesting, I will add the ability to use the helmet Oculus Rift.
')
I chose a combat equipment site on the territory adjacent to the museum that was suitable for this action:

Photo taken on Nokia Lumia 1520 and slightly cropped in GIMPʻe
So what do you want to do?
1. Take a set of photos for each viewpoint.
2. Get a panoramic photo from each kit.
3. With the help of ThreeJS to show what we did in the previous stages.
The result can be placed on the site, and if the desire arises you can turn it into an independent program using the HTML5 Application template from the well-known Qt5 or some Awesomium.
Having walked around the site with the technique, I captured interesting (from my point of view) places on the Lumia 1520 camera, which is called PureView, and quite corresponds to its name.
The method of shooting is very simple - having twisted in one place you need to take a series of photos with an overlap of the previous 30-50% in order for the resulting panoramic photos of each viewpoint to be glued together correctly and without any particular flaws.
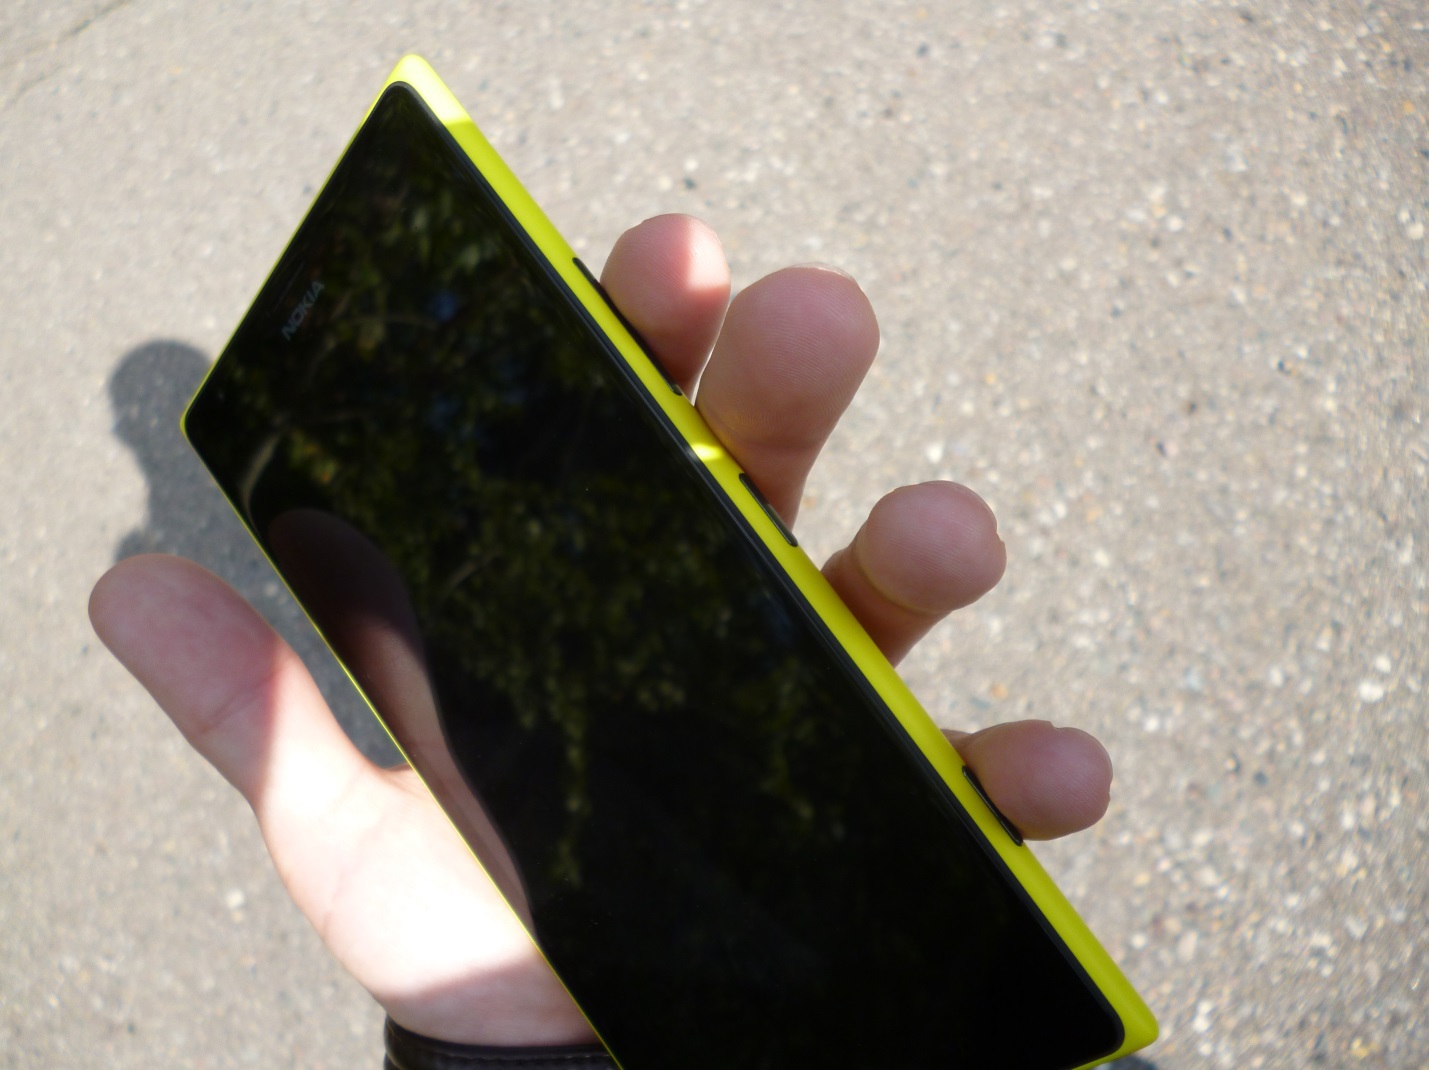
During the transition from one viewpoint to another, it was possible to assess how the phone is in the hand. The control keys for sound, phone lock and camera were right under the fingers of my left hand:

What do the photos that need to get in the first stage look like? Here are some examples of photos taken by the camera of this phone. Please pay attention to changing the angle of rotation around the vertical axis:
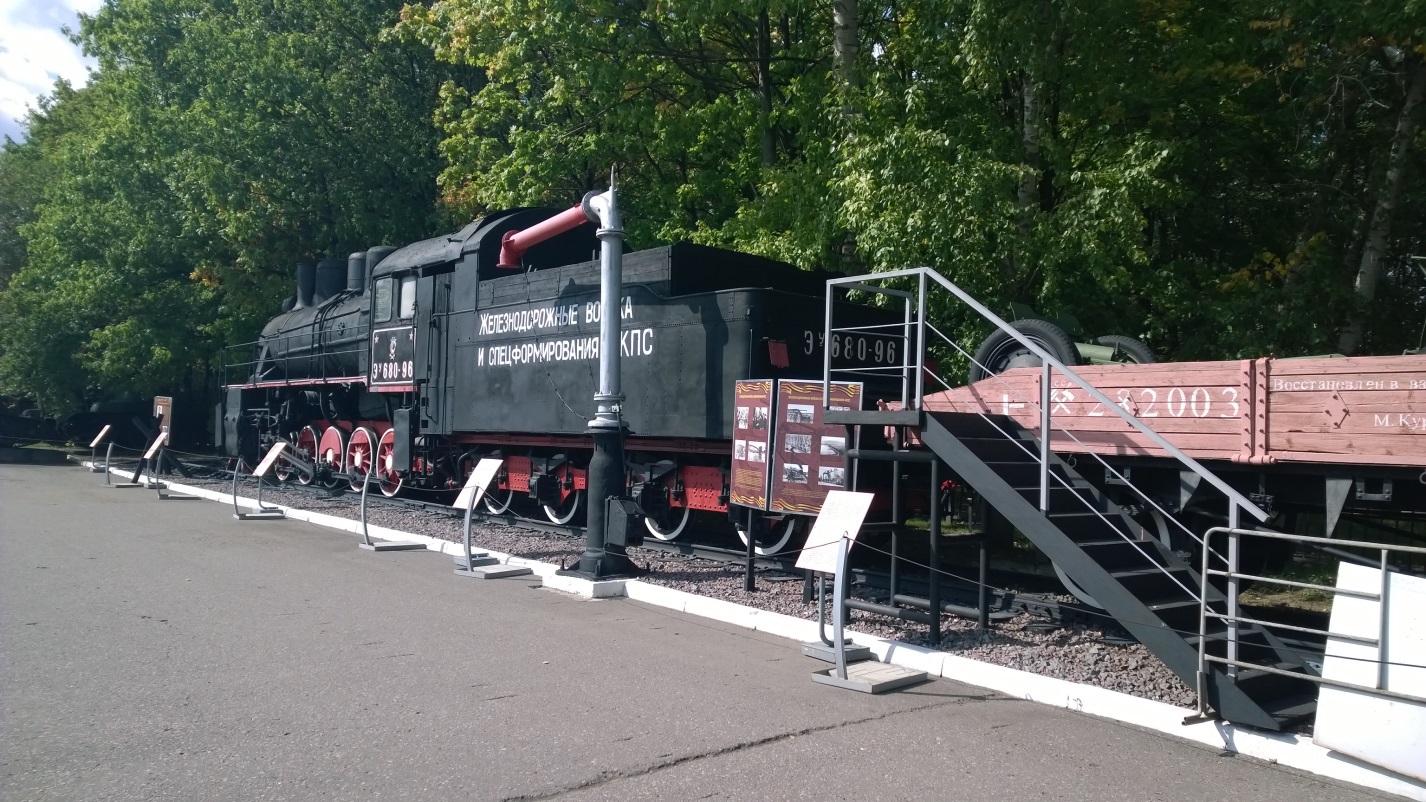
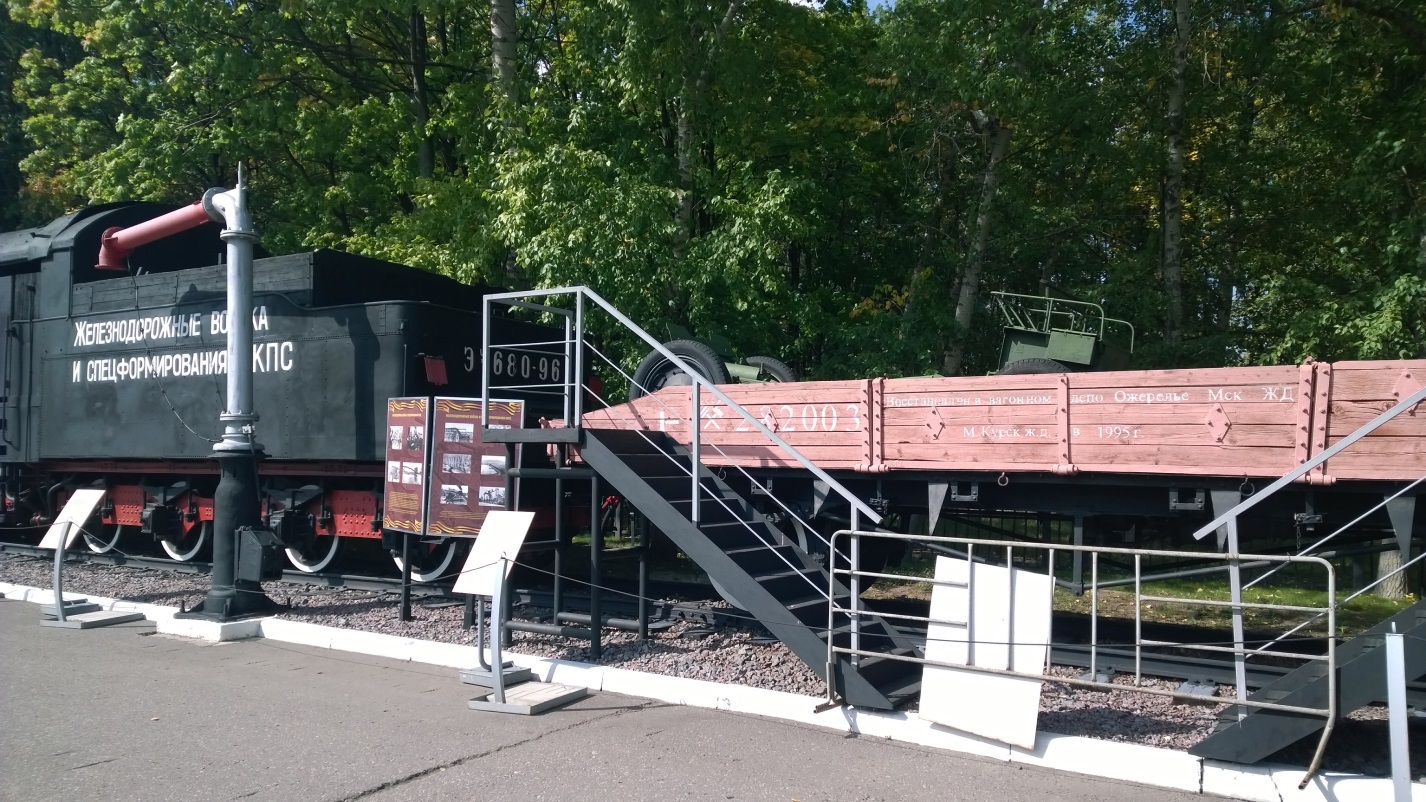
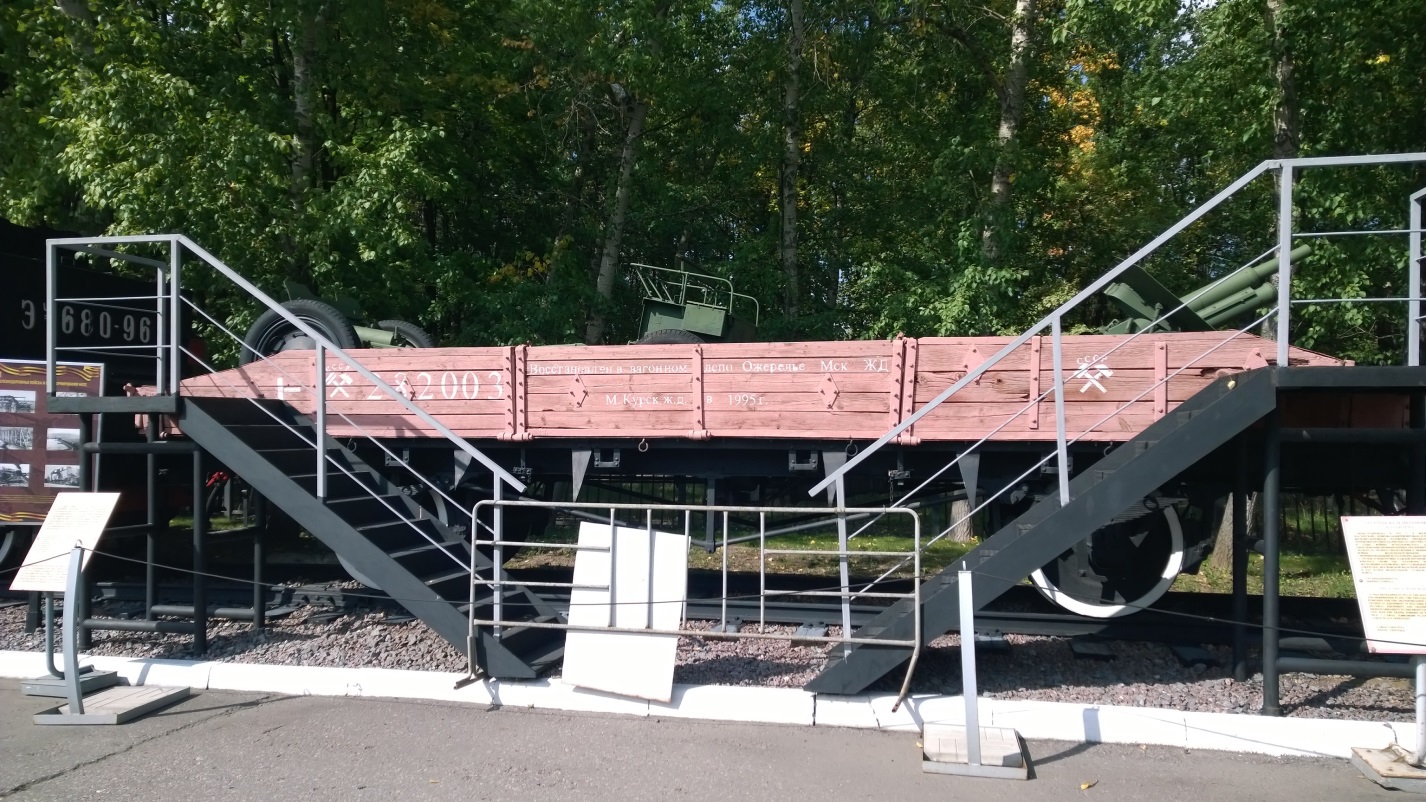
Thus, a series of snapshots of 5 points of view of the combat equipment site located on Poklonnaya Hill were obtained.
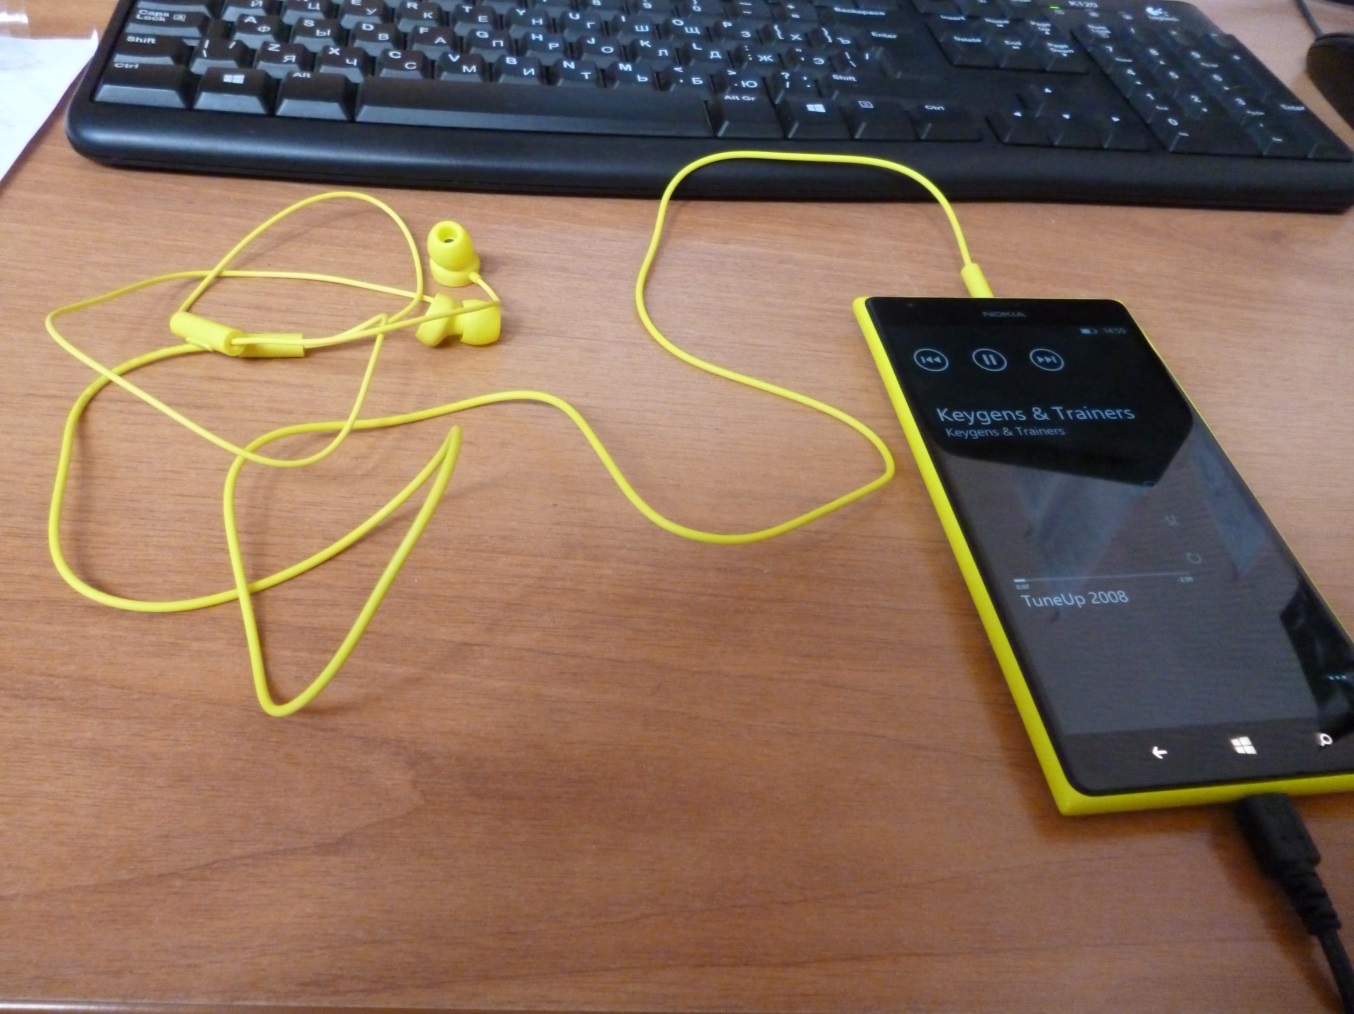
It's time to start processing the photographs, that is, go to the second paragraph of my small plan. In order to transfer the saved photos from the extensive memory of the phone to the computer, I used the USB cable from the blue box of the standard package. While the photos were being transmitted, I listened to music a little from my memory card, which is supported by this device. In addition to the cable, there are headphones with a pleasant to the touch wire and good sound:
Opening the folder with photos, I found an unusual way to save them. For each photo there are two graphic files that differ in resolution: the first one is smaller - 3072 by 1728, the second - 5376 by 3024. I suggest using files with a higher resolution.
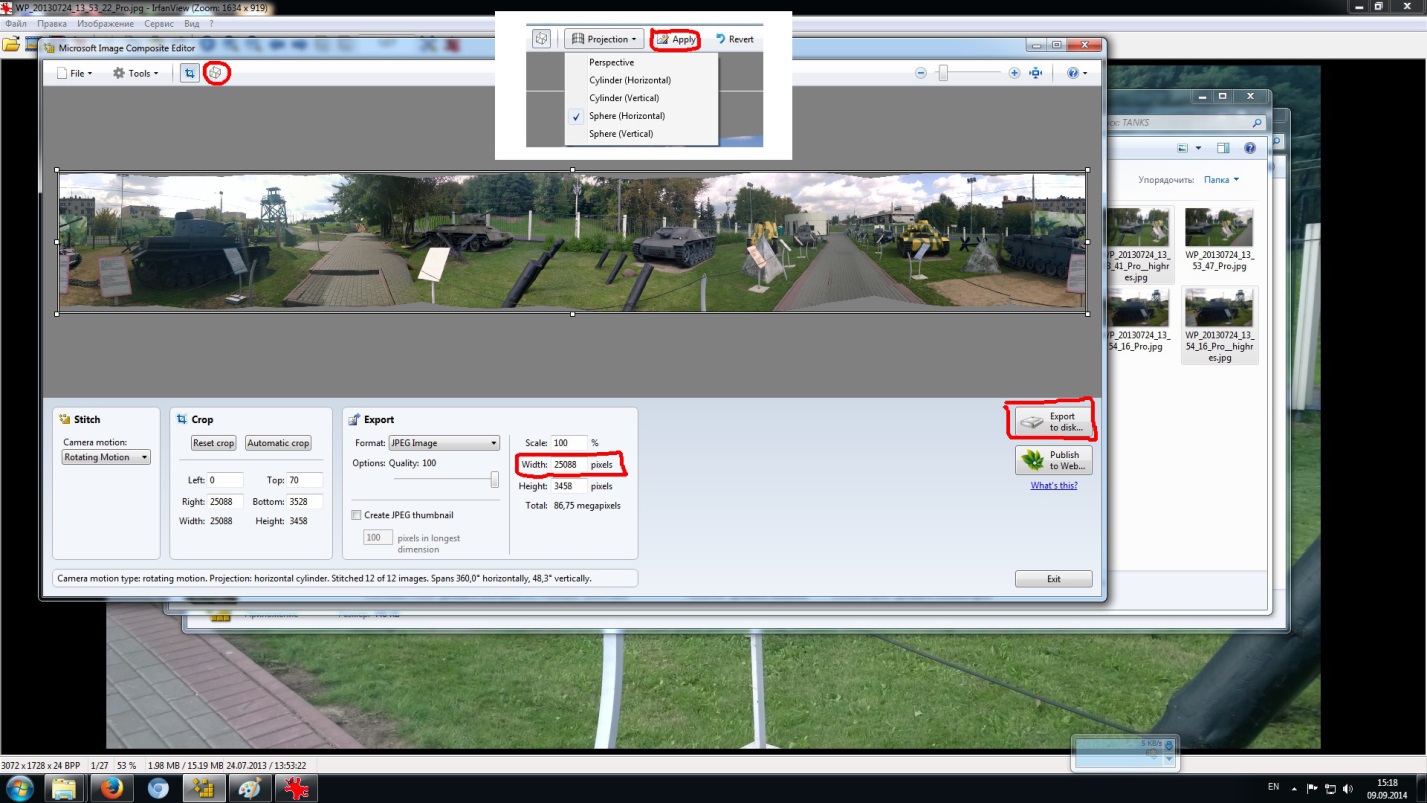
Next you need to glue a series of photos in a panoramic view. There are several programs that allow you to do this, among them there are good free ones. There are two free programs for preparing panoramic photos: Hugin and Microsoft ICE .
The first one to master is a bit more complicated than the second one, so for quick results we will use the Microsoft Image Composite Editor. Highlighted high-resolution photos, dragged to the ICE workspace, indicated the necessary settings for the resulting file - that's it! In the export settings, we specify the width of 4096, and clicking on the cube (circled in red) - we indicate that we need a spherical projection, click the Apply button, and then the Export to disk button ...
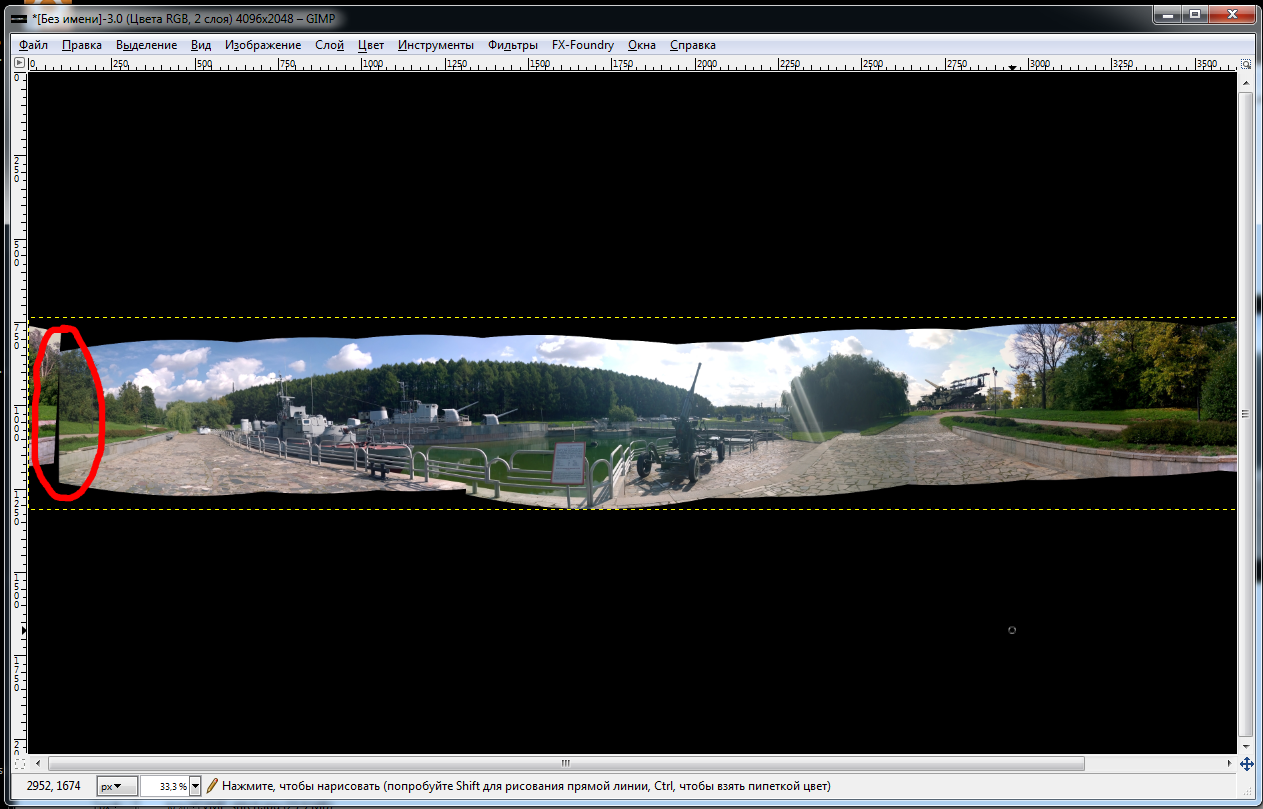
The resulting panoramic photo is almost possible to use, you only need to bring it to the size of 4096x2048, which can easily be done in any graphic editor such as GIMP or Paint.NET. To do this, simply create a new file of size 4096x2048 with a black background and overlay the glued panoramic photo of the viewpoint in the center. By the way, pay attention, if you forget where the shooting started from and not return to it, the panoramic photo will not “close” as a result, as in the screenshot:
Then with the help of Three.js, we use the taken panoramic photos as a texture for a sphere within which the camera can be rotated. Please note, since I took only one row of photos for each viewpoint, the camera can only be rotated around the vertical axis. However, if you wish, by changing the angle of shooting, you can take panoramic photos with a large viewing angle, that is, you can look up and down. However, this is not a matter of principle and the process of creating a panorama will not change drastically.
Take a look at the code for the index.html file:
The head section lists the styles of buttons that are taken from http://alexwolfe.imtqy.com/Buttons/ .
Rotation around the horizontal axis is blocked, so as not to show the missing pieces of the panorama. If you prepare panoramic photos with a large viewing angle vertically, then in the update function you need to uncomment one line.
Initially, the code is taken from the example of three.js - panorama demo and supplemented.
To display the virtual tour through the helmet Oculus Rift, I used the library from troffmo5 ( http://github.com/troffmo5 ).
Download the entire code from Google Drive at this link .
View the result can be on this link .
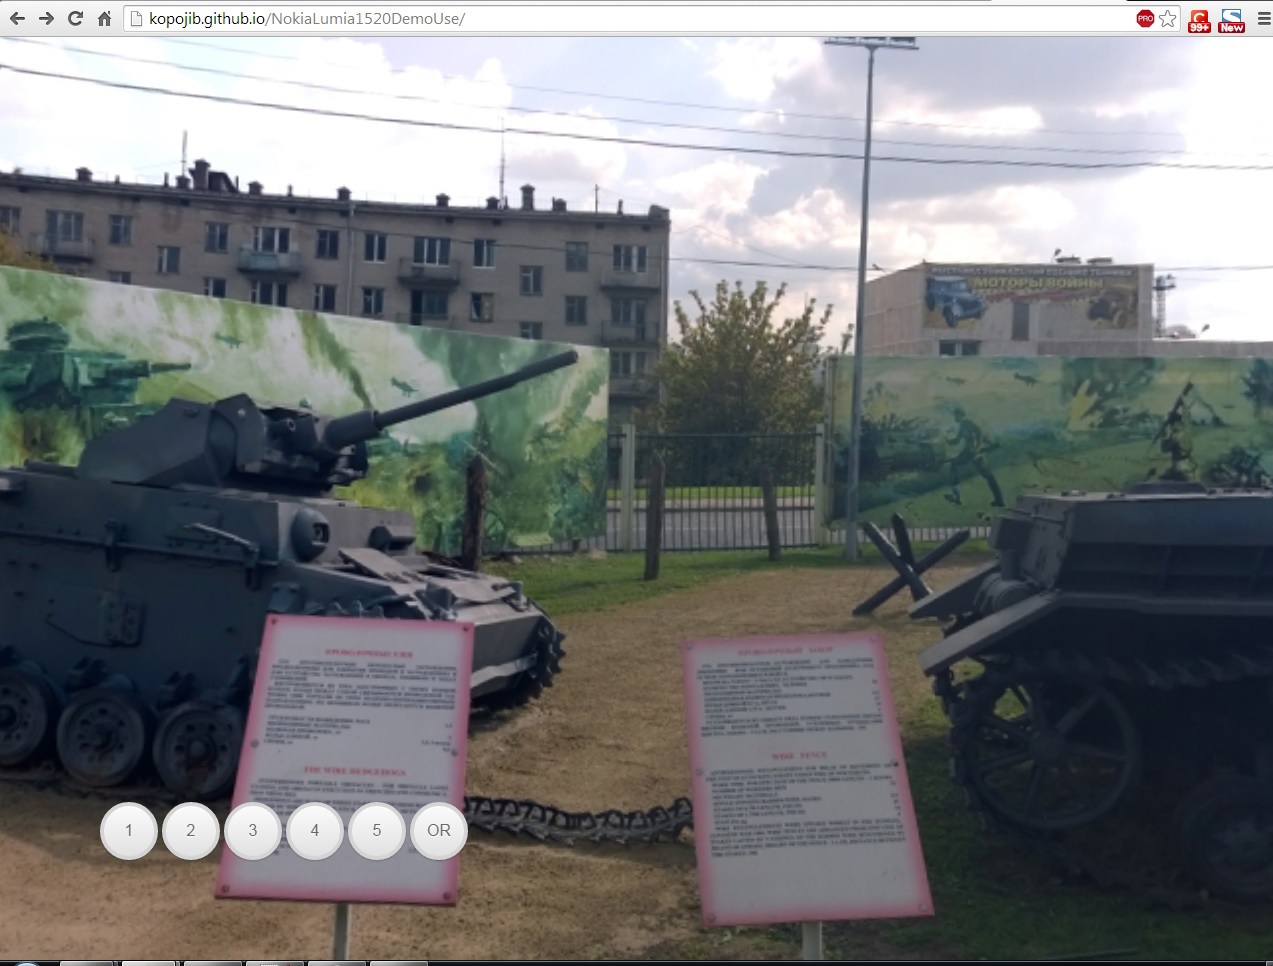
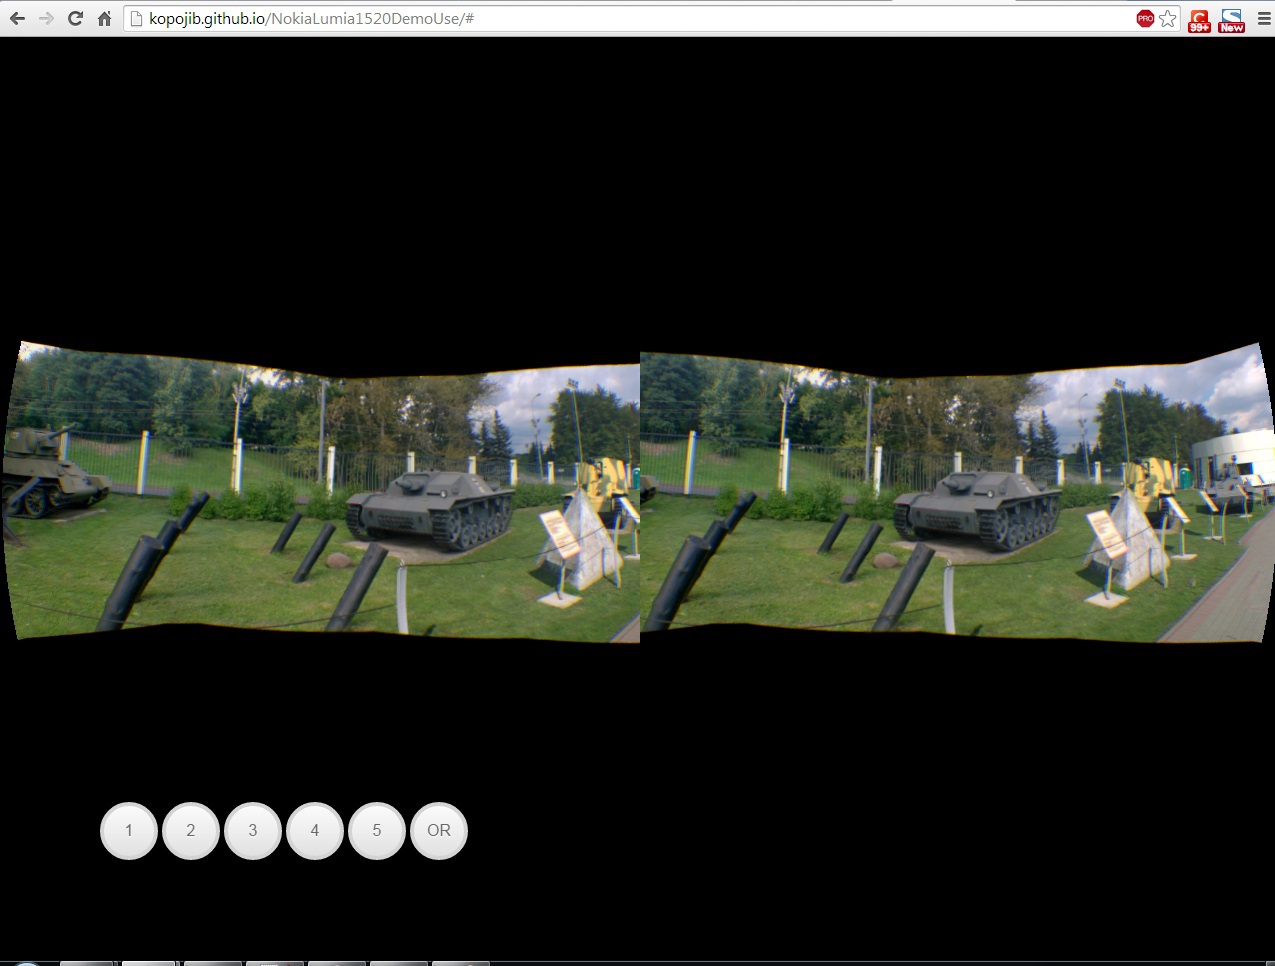
The button with the mysterious letters OR allows you to turn on the display for the Oculus Rift helmet, and the buttons with the numbers to switch from one viewpoint to another.
In the future, you can improve this mini-tour by adding a description to each viewpoint and to each exhibit presented, or, for example, add some convenient way to control the viewing.
I hope this example will be able to help someone in their daily activities.
But first, let's look at what fell into my hands for a few short days of testing. This is how the device looks from a pretty little blue box.
The two main features of the Lumia 1520 are the 20-megapixel camera and the Windows Phone 8 operating system. In addition, I would like to mention the battery, which I managed to discharge in just a few days of use by only 20-30%. From the strange - it was not possible to specify your Microsoft account, it was not even possible to create a new one, for some vague reason, like the lack of connection or server errors. Without this, the interest in WP8 quickly died out, because it was impossible to install any applications and check what this system was worth. However, the purpose of testing is somewhat different - to show how this phone can be used to create a virtual exhibition in real, sorry for the pun, setting. And in order to make it even more interesting, I will add the ability to use the helmet Oculus Rift.
')
I chose a combat equipment site on the territory adjacent to the museum that was suitable for this action:
Photo taken on Nokia Lumia 1520 and slightly cropped in GIMPʻe
So what do you want to do?
1. Take a set of photos for each viewpoint.
2. Get a panoramic photo from each kit.
3. With the help of ThreeJS to show what we did in the previous stages.
The result can be placed on the site, and if the desire arises you can turn it into an independent program using the HTML5 Application template from the well-known Qt5 or some Awesomium.
Having walked around the site with the technique, I captured interesting (from my point of view) places on the Lumia 1520 camera, which is called PureView, and quite corresponds to its name.
The method of shooting is very simple - having twisted in one place you need to take a series of photos with an overlap of the previous 30-50% in order for the resulting panoramic photos of each viewpoint to be glued together correctly and without any particular flaws.
During the transition from one viewpoint to another, it was possible to assess how the phone is in the hand. The control keys for sound, phone lock and camera were right under the fingers of my left hand:
What do the photos that need to get in the first stage look like? Here are some examples of photos taken by the camera of this phone. Please pay attention to changing the angle of rotation around the vertical axis:
Thus, a series of snapshots of 5 points of view of the combat equipment site located on Poklonnaya Hill were obtained.
It's time to start processing the photographs, that is, go to the second paragraph of my small plan. In order to transfer the saved photos from the extensive memory of the phone to the computer, I used the USB cable from the blue box of the standard package. While the photos were being transmitted, I listened to music a little from my memory card, which is supported by this device. In addition to the cable, there are headphones with a pleasant to the touch wire and good sound:
Opening the folder with photos, I found an unusual way to save them. For each photo there are two graphic files that differ in resolution: the first one is smaller - 3072 by 1728, the second - 5376 by 3024. I suggest using files with a higher resolution.
Next you need to glue a series of photos in a panoramic view. There are several programs that allow you to do this, among them there are good free ones. There are two free programs for preparing panoramic photos: Hugin and Microsoft ICE .
The first one to master is a bit more complicated than the second one, so for quick results we will use the Microsoft Image Composite Editor. Highlighted high-resolution photos, dragged to the ICE workspace, indicated the necessary settings for the resulting file - that's it! In the export settings, we specify the width of 4096, and clicking on the cube (circled in red) - we indicate that we need a spherical projection, click the Apply button, and then the Export to disk button ...
The resulting panoramic photo is almost possible to use, you only need to bring it to the size of 4096x2048, which can easily be done in any graphic editor such as GIMP or Paint.NET. To do this, simply create a new file of size 4096x2048 with a black background and overlay the glued panoramic photo of the viewpoint in the center. By the way, pay attention, if you forget where the shooting started from and not return to it, the panoramic photo will not “close” as a result, as in the screenshot:
Then with the help of Three.js, we use the taken panoramic photos as a texture for a sphere within which the camera can be rotated. Please note, since I took only one row of photos for each viewpoint, the camera can only be rotated around the vertical axis. However, if you wish, by changing the angle of shooting, you can take panoramic photos with a large viewing angle, that is, you can look up and down. However, this is not a matter of principle and the process of creating a panorama will not change drastically.
Take a look at the code for the index.html file:
index.html
<!DOCTYPE html> <html lang="en"> <head> <title> , , Nokia Lumia 1520</title> <meta charset="utf-8"> <meta name="viewport" content="width=device-width, user-scalable=no, minimum-scale=1.0, maximum-scale=1.0"> <style> body { background-color: #000000; margin: 0px; overflow: hidden; } a { color: #ffffff; } #footer { position: absolute; bottom: 100px; left:100px; } #text { text-shadow: -10px 10px 0px #00e6e6, -20px 20px 0px #01cccc, -30px 30px 0px #00bdbd; position: absolute; top: 100px; right:100px; } .button { -moz-box-shadow: inset 0px 1px 0px rgba(255, 255, 255, 0.5), 0px 1px 2px rgba(0, 0, 0, 0.15); -webkit-box-shadow: inset 0px 1px 0px rgba(255, 255, 255, 0.5), 0px 1px 2px rgba(0, 0, 0, 0.15); box-shadow: inset 0px 1px 0px rgba(255, 255, 255, 0.5), 0px 1px 2px rgba(0, 0, 0, 0.15); background-color: #EEE; background: url('data:image/svg+xml;base64,PD94bWwgdmVyc2lvbj0iMS4wIiBlbmNvZGluZz0idXRmLTgiPz4gPHN2ZyB2ZXJzaW9uPSIxLjEiIHhtbG5zPSJodHRwOi8vd3d3LnczLm9yZy8yMDAwL3N2ZyI+PGRlZnM+PGxpbmVhckdyYWRpZW50IGlkPSJncmFkIiBncmFkaWVudFVuaXRzPSJvYmplY3RCb3VuZGluZ0JveCIgeDE9IjAuNSIgeTE9IjAuMCIgeDI9IjAuNSIgeTI9IjEuMCI+PHN0b3Agb2Zmc2V0PSIwJSIgc3RvcC1jb2xvcj0iI2ZiZmJmYiIvPjxzdG9wIG9mZnNldD0iMTAwJSIgc3RvcC1jb2xvcj0iI2UxZTFlMSIvPjwvbGluZWFyR3JhZGllbnQ+PC9kZWZzPjxyZWN0IHg9IjAiIHk9IjAiIHdpZHRoPSIxMDAlIiBoZWlnaHQ9IjEwMCUiIGZpbGw9InVybCgjZ3JhZCkiIC8+PC9zdmc+IA=='); background: -webkit-gradient(linear, 50% 0%, 50% 100%, color-stop(0%, #fbfbfb), color-stop(100%, #e1e1e1)); background: -moz-linear-gradient(top, #fbfbfb, #e1e1e1); background: -webkit-linear-gradient(top, #fbfbfb, #e1e1e1); background: linear-gradient(to bottom, #fbfbfb, #e1e1e1); display: inline-block; vertical-align: middle; *vertical-align: auto; *zoom: 1; *display: inline; border: 1px solid #d4d4d4; height: 32px; line-height: 30px; padding: 0px 25.6px; font-weight: 300; font-size: 14px; font-family: "Helvetica Neue Light", "Helvetica Neue", "Helvetica", "Arial", "Lucida Grande", sans-serif; color: #666; text-shadow: 0 1px 1px white; margin: 0; text-decoration: none; text-align: center; } /* line 44, ../scss/partials/_buttons.scss */ .button:hover, .button:focus { background-color: #EEE; background: url('data:image/svg+xml;base64,PD94bWwgdmVyc2lvbj0iMS4wIiBlbmNvZGluZz0idXRmLTgiPz4gPHN2ZyB2ZXJzaW9uPSIxLjEiIHhtbG5zPSJodHRwOi8vd3d3LnczLm9yZy8yMDAwL3N2ZyI+PGRlZnM+PGxpbmVhckdyYWRpZW50IGlkPSJncmFkIiBncmFkaWVudFVuaXRzPSJvYmplY3RCb3VuZGluZ0JveCIgeDE9IjAuNSIgeTE9IjAuMCIgeDI9IjAuNSIgeTI9IjEuMCI+PHN0b3Agb2Zmc2V0PSIwJSIgc3RvcC1jb2xvcj0iI2ZmZmZmZiIvPjxzdG9wIG9mZnNldD0iMTAwJSIgc3RvcC1jb2xvcj0iI2RjZGNkYyIvPjwvbGluZWFyR3JhZGllbnQ+PC9kZWZzPjxyZWN0IHg9IjAiIHk9IjAiIHdpZHRoPSIxMDAlIiBoZWlnaHQ9IjEwMCUiIGZpbGw9InVybCgjZ3JhZCkiIC8+PC9zdmc+IA=='); background: -webkit-gradient(linear, 50% 0%, 50% 100%, color-stop(0%, #ffffff), color-stop(100%, #dcdcdc)); background: -moz-linear-gradient(top, #ffffff, #dcdcdc); background: -webkit-linear-gradient(top, #ffffff, #dcdcdc); background: linear-gradient(to bottom, #ffffff, #dcdcdc); } /* line 48, ../scss/partials/_buttons.scss */ .button:active { -moz-box-shadow: inset 0px 1px 3px rgba(0, 0, 0, 0.3), 0px 1px 0px white; -webkit-box-shadow: inset 0px 1px 3px rgba(0, 0, 0, 0.3), 0px 1px 0px white; box-shadow: inset 0px 1px 3px rgba(0, 0, 0, 0.3), 0px 1px 0px white; text-shadow: 0px 1px 0px rgba(255, 255, 255, 0.4); background: #eeeeee; color: #bbbbbb; } /* line 54, ../scss/partials/_buttons.scss */ .button:focus { outline: none; } /* line 60, ../scss/partials/_buttons.scss */ input.button, button.button { height: 34px; cursor: pointer; -webkit-appearance: none; } /* line 67, ../scss/partials/_buttons.scss */ .button-block { display: block; } /* line 72, ../scss/partials/_buttons.scss */ .button.disabled, .button.disabled:hover, .button.disabled:focus, .button.disabled:active, input.button:disabled, button.button:disabled { -moz-box-shadow: 0px 1px 2px rgba(0, 0, 0, 0.1); -webkit-box-shadow: 0px 1px 2px rgba(0, 0, 0, 0.1); box-shadow: 0px 1px 2px rgba(0, 0, 0, 0.1); filter: progid:DXImageTransform.Microsoft.Alpha(Opacity=80); opacity: 0.8; background: #EEE; border: 1px solid #DDD; text-shadow: 0 1px 1px white; color: #CCC; cursor: default; -webkit-appearance: none; } /* line 89, ../scss/partials/_buttons.scss */ .button-wrap { background: url('data:image/svg+xml;base64,PD94bWwgdmVyc2lvbj0iMS4wIiBlbmNvZGluZz0idXRmLTgiPz4gPHN2ZyB2ZXJzaW9uPSIxLjEiIHhtbG5zPSJodHRwOi8vd3d3LnczLm9yZy8yMDAwL3N2ZyI+PGRlZnM+PGxpbmVhckdyYWRpZW50IGlkPSJncmFkIiBncmFkaWVudFVuaXRzPSJvYmplY3RCb3VuZGluZ0JveCIgeDE9IjAuNSIgeTE9IjAuMCIgeDI9IjAuNSIgeTI9IjEuMCI+PHN0b3Agb2Zmc2V0PSIwJSIgc3RvcC1jb2xvcj0iI2UzZTNlMyIvPjxzdG9wIG9mZnNldD0iMTAwJSIgc3RvcC1jb2xvcj0iI2YyZjJmMiIvPjwvbGluZWFyR3JhZGllbnQ+PC9kZWZzPjxyZWN0IHg9IjAiIHk9IjAiIHdpZHRoPSIxMDAlIiBoZWlnaHQ9IjEwMCUiIGZpbGw9InVybCgjZ3JhZCkiIC8+PC9zdmc+IA=='); background: -webkit-gradient(linear, 50% 0%, 50% 100%, color-stop(0%, #e3e3e3), color-stop(100%, #f2f2f2)); background: -moz-linear-gradient(top, #e3e3e3, #f2f2f2); background: -webkit-linear-gradient(top, #e3e3e3, #f2f2f2); background: linear-gradient(to bottom, #e3e3e3, #f2f2f2); -moz-border-radius: 200px; -webkit-border-radius: 200px; border-radius: 200px; -moz-box-shadow: inset 0px 1px 3px rgba(0, 0, 0, 0.04); -webkit-box-shadow: inset 0px 1px 3px rgba(0, 0, 0, 0.04); box-shadow: inset 0px 1px 3px rgba(0, 0, 0, 0.04); padding: 10px; display: inline-block; } /* line 195, ../scss/partials/_buttons.scss */ .button-circle { -moz-border-radius: 240px; -webkit-border-radius: 240px; border-radius: 240px; -moz-box-shadow: inset 0px 1px 1px rgba(255, 255, 255, 0.5), 0px 1px 2px rgba(0, 0, 0, 0.2); -webkit-box-shadow: inset 0px 1px 1px rgba(255, 255, 255, 0.5), 0px 1px 2px rgba(0, 0, 0, 0.2); box-shadow: inset 0px 1px 1px rgba(255, 255, 255, 0.5), 0px 1px 2px rgba(0, 0, 0, 0.2); width: 50px; line-height: 50px; height: 50px; padding: 0px; border-width: 4px; font-size: 16px; } </style> </head> <body> <script> function loadPoint(file){ texture = THREE.ImageUtils.loadTexture( 'textures/' + file + '.jpg', {}, function() { mesh.material.map = texture; } ); } // : . function switchView () { oculus_enabled =! oculus_enabled; renderer.setSize( window.innerWidth, window.innerHeight ); effect.setSize( window.innerWidth, window.innerHeight ); } </script> <div id="container"> <div id="footer"> <!-- --> <a href="#" class="button button-circle" onclick="loadPoint(1)">1</a> <a href="#" class="button button-circle" onclick="loadPoint(2)">2</a> <a href="#" class="button button-circle" onclick="loadPoint(3)">3</a> <a href="#" class="button button-circle" onclick="loadPoint(4)">4</a> <a href="#" class="button button-circle" onclick="loadPoint(5)">5</a> <a href="#" class="button button-circle" onclick="switchView()">OR</a> </div> </div> <script src="js/three.min.js"></script> <script src="js/OculusRiftEffect.js"></script> <script> var camera, scene, renderer, mesh, oculus_enabled = false; var isUserInteracting = false, onMouseDownMouseX = 0, onMouseDownMouseY = 0, lon = 0, onMouseDownLon = 0, lat = 0, onMouseDownLat = 0, phi = 0, theta = 0; init(); animate(); function init() { var container; container = document.getElementById( 'container' ); camera = new THREE.PerspectiveCamera( 40, window.innerWidth / window.innerHeight, 1, 1100 ); camera.target = new THREE.Vector3( 0, 0, 0 ); scene = new THREE.Scene(); var geometry = new THREE.SphereGeometry( 500, 60, 40 ); geometry.applyMatrix( new THREE.Matrix4().makeScale( -1, 1, 1 ) ); var material = new THREE.MeshBasicMaterial( { map: THREE.ImageUtils.loadTexture( 'textures/1.jpg' ) // , , , . } ); mesh = new THREE.Mesh( geometry, material ); scene.add( mesh ); renderer = new THREE.WebGLRenderer(); renderer.setSize( window.innerWidth, window.innerHeight ); container.appendChild( renderer.domElement ); effect = new THREE.OculusRiftEffect( renderer, {worldScale: 100} ); effect.setSize( window.innerWidth, window.innerHeight ); document.addEventListener( 'mousedown', onDocumentMouseDown, false ); document.addEventListener( 'mousemove', onDocumentMouseMove, false ); document.addEventListener( 'mouseup', onDocumentMouseUp, false ); window.addEventListener( 'resize', onWindowResize, false ); } function onWindowResize() { camera.aspect = window.innerWidth / window.innerHeight; camera.updateProjectionMatrix(); renderer.setSize( window.innerWidth, window.innerHeight ); effect.setSize( window.innerWidth, window.innerHeight ); } function onDocumentMouseDown( event ) { event.preventDefault(); isUserInteracting = true; onPointerDownPointerX = event.clientX; onPointerDownPointerY = event.clientY; onPointerDownLon = lon; onPointerDownLat = lat; } function onDocumentMouseMove( event ) { if ( isUserInteracting === true ) { lon = ( onPointerDownPointerX - event.clientX ) * 0.1 + onPointerDownLon; lat = ( event.clientY - onPointerDownPointerY ) * 0.1 + onPointerDownLat; } } function onDocumentMouseUp( event ) { isUserInteracting = false; } function animate() { requestAnimationFrame( animate ); update(); } function update() { if ( isUserInteracting === false ) { lon += 0.1; } lat = Math.max( - 85, Math.min( 85, lat ) ); phi = THREE.Math.degToRad( 90 - lat ); theta = THREE.Math.degToRad( lon ); camera.target.x = 500 * Math.sin( phi ) * Math.cos( theta ); //camera.target.y = 500 * Math.cos( phi ); // , "" . camera.target.z = 500 * Math.sin( phi ) * Math.sin( theta ); camera.lookAt( camera.target ); if (oculus_enabled) { effect.render( scene, camera ); } else { renderer.render( scene, camera ); } } //, , andreyazbarov@gmail.com </script> </body> </html> The head section lists the styles of buttons that are taken from http://alexwolfe.imtqy.com/Buttons/ .
Rotation around the horizontal axis is blocked, so as not to show the missing pieces of the panorama. If you prepare panoramic photos with a large viewing angle vertically, then in the update function you need to uncomment one line.
Initially, the code is taken from the example of three.js - panorama demo and supplemented.
To display the virtual tour through the helmet Oculus Rift, I used the library from troffmo5 ( http://github.com/troffmo5 ).
Download the entire code from Google Drive at this link .
View the result can be on this link .
The button with the mysterious letters OR allows you to turn on the display for the Oculus Rift helmet, and the buttons with the numbers to switch from one viewpoint to another.
In the future, you can improve this mini-tour by adding a description to each viewpoint and to each exhibit presented, or, for example, add some convenient way to control the viewing.
I hope this example will be able to help someone in their daily activities.
Source: https://habr.com/ru/post/236973/
All Articles