Create skeleton animations in the Spriter
We continue to talk about the development of the first game for our educational platform Learzing - this will be a quest that helps in learning English idioms.
Today we will work in the skeleton animation editor Spriter . On the finished example, we consider the merits of this type of animation, the differences from the classic sprite, and tell you about the prospects for its use in HTML5 games.
As an example, we take the finished character named Foxy, this will be the main character of our game. To create a project in the Spriter editor, you need to divide the character image into elements and save them in separate directories. The elements are the parts of the Foxy body that we will attach to the “skeleton”.
')

Open the Spriter, create a new project and select the root directory with sprites. In the Palette panel, we see our directories, drag and drop into the workspace and restore the Foxy image from individual elements. In the Z-order panel we arrange the desired position of the sprites in the z-coordinate.
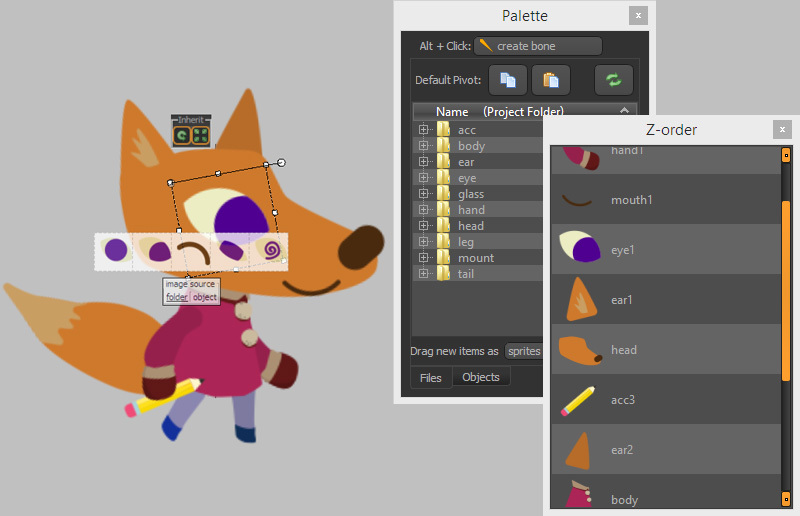
Now, if we select the sprite with the right mouse button, the editor will show us what other sprites are in the directory, so you can quickly change the sprites while working with the animation. Now we will build a “skeleton” to our character.
In the Palette panel, select Create bone, with the Alt button pressed down, mark the bones - build the skeleton. A couple of rules for its construction. If a bone is created with the selected bone, the selected bone becomes the parent created. If there are no selected bones in the working field and you have created a bone, in this case it will be independent of the skeleton. The skeleton hierarchy can be viewed in the Hierarchy panel.
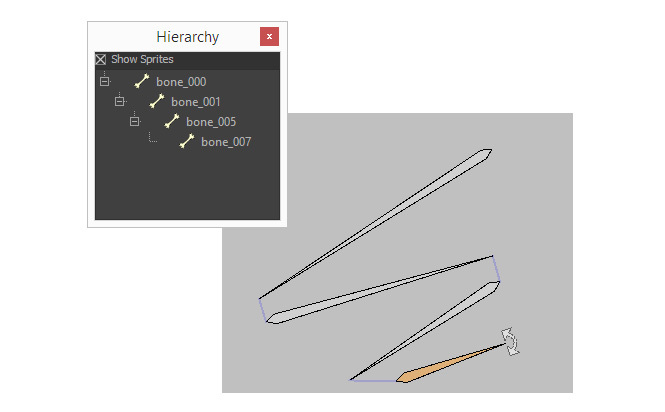
In the Hierarchy panel, instead of the bone names generated by bone_xxx, it is advisable to rename them and choose more understandable names — for example, head-bone or leg-left-bone. This will help to easily find the element of interest in the generated XML / JSON source code.

After the skeleton has been formed according to the shape of the character, it is necessary to connect each bone with the sprite under it. To do this, select the bone, press and hold "B" + click on the sprite. We have such a skeleton here, the sequence of attached sprites is clearly shown in the hierarchy panel.
We went to the animation. Those who did the animation in Adobe Flash, will be familiar to the usual Timeline. And for those who see the editor for animation for the first time, do not worry, this is a standard tool and the work in it is simple. Carry the timeline slider and change the position of the bones. The spriter keeps the character’s position in key frames and calculates the movement between them.
At this stage, an obvious plus is seen - the process of creating animation takes several times less time than frame-by-frame rendering. In the Animations panel we create additional animations for our game. The second plus of skeletal animation is that as the amount of animation increases, only the number of rows in XML / JSON increases, not the number of frames in sprite animation.

In Spriter there is another very useful option for igrodelov - Character Maps. This option allows you to create images based on the finished skeleton and a set of animation. In terms of the shape and size of your character, you can draw a plethora of accessories and new clothes, or completely replace your character with an identical skeleton. And all this within one project!

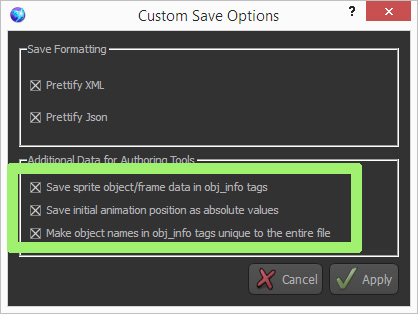
It's time to check out our work in battle. Let's prepare our project for export to Construct 2 (we wrote about this tool for creating HTML5 games in previous articles). To do this, change the settings for saving the project. We include in it all sub-items of Additional Data for Authoring Tools. We have two files scml and scon, they are absolutely similar to the syntax of XML and JSON.
The next step is to install the plug-in on Construct 2 to support skeletal animation. On the Construct 2 forum you can always download the latest version.
The unpacked plugin is a set of three js scripts, move them to the installation directory
Drag the scml files onto the working field in Construct 2 and set events in the Event Sheet. Read about the features of writing logic and events in Construct 2 in our previous articles.
We offer to see a demo project from Spriter developers. We also recommend viewing the YouTube channel , where you will find a lot of interesting and educational material on Spriter.

For comparison, we have prepared a demo scene with two types of animation.

Poll
Traditionally, at the end of the article, we invite all the developers to help us create a game to learn English idioms - spend a few minutes and complete a short survey that will affect our development.First of all, we would like to start from the wishes and needs of users (that is, you), and only then from our own ideas. All survey participants will receive early access to our quest.
All articles of the series
- Startup step by step: the future of online education
- Startup step by step: team and mentors
- Startup step by step: first business model
- How we made the educational platform: first design, landing page and logo
- How we made the educational platform: the first application
- Making an HTML5 Quest: Using the MVC Pattern in Construct 2
- Making an HTML5 quest: creating a character and basic animation
Source: https://habr.com/ru/post/236791/
All Articles